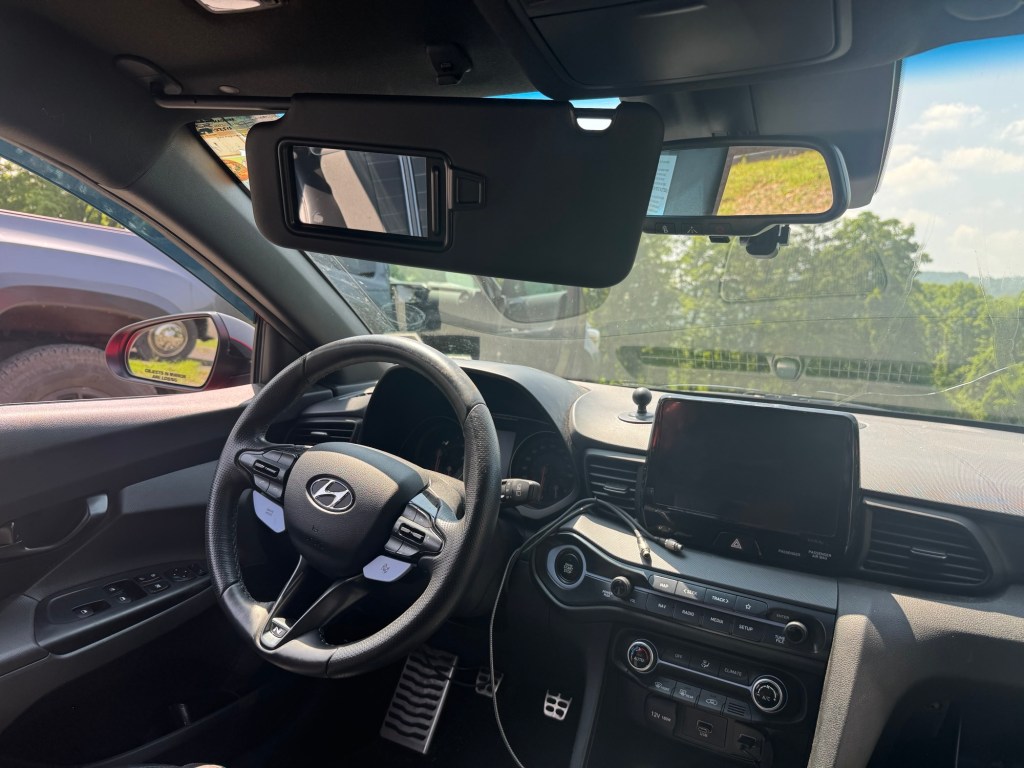
I was data coaching at Watkins Glen today. I went back into town to get a few things and on the way back to the track, I heard a siren behind me. I pulled to the side of the road and stopped, as one does to let them pass.
The emergency vehicle’s driver was distracted or didn’t see me, and plowed into the back of my car at full speed. My car is totaled.
Hit from behind and then pushed into a fence.
It was a fire and rescue truck, perhaps a Chevy Suburban. I saw it coming the whole time. In disbelief I watched the distance close. And then the impact. It was loud. Jarring. Painful. The airbag didn’t go off, and I got a face full of my spectacles on the steering wheel.
Some would say, “an improvement.”
This comes at such an inconvenient time; I’m coaching with Ross Bentley and Peter Krause next week, doing a new program we’ve developed. Luckily my brother Ian and co-coach Josh Herbert are helping with last minute stuff. But, man, super unhappy about this turn of events, and the timing!
The front got munched on a metal fence post.
I’ve put so much work into this car. It’s truly gutting to see this mess. And to know it’s not coming back.
That’s a huge impact. Hyundai makes a solid accordion car!
There’s a 90% chance I get another Veloster N and just hit the reset button with everything I’ve learned. I probably won’t be able to get another 10-year track warranty, though.
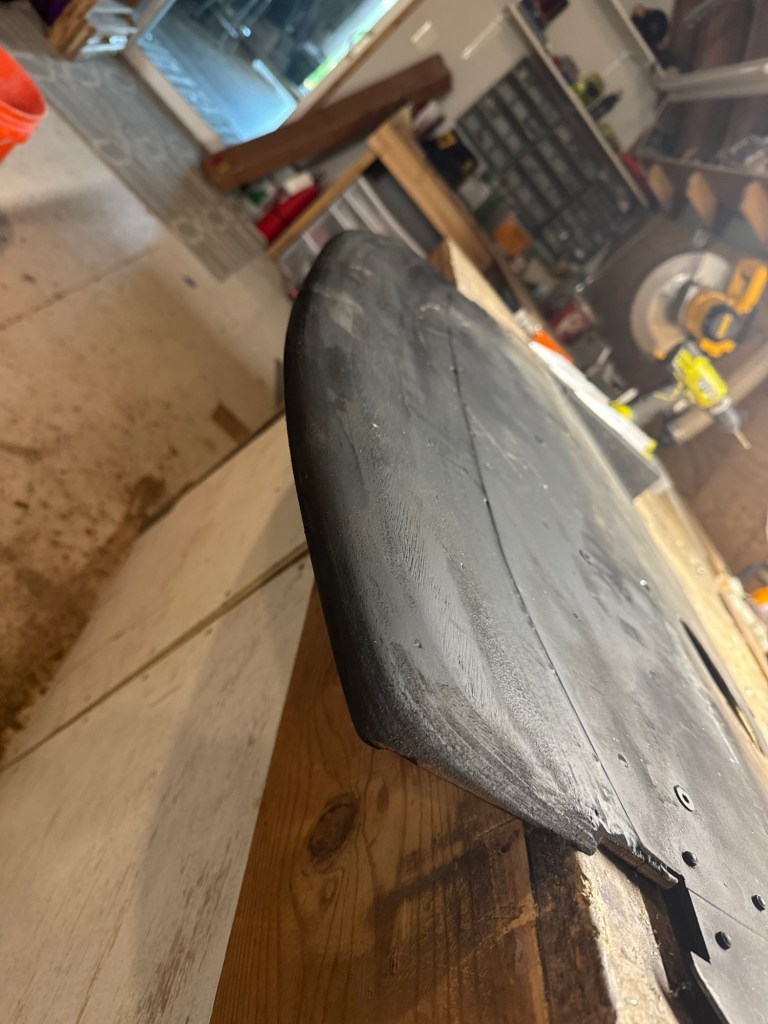
World’s smallest splitter has become one big splinter.
I used to track a ’93 Miata, and it occurs to me that if I was in that car, you might be reading my obituary. The height of the bumpers on the truck that hit me are considerably higher than standard bumper height, and I probably would have been steamrolled. Now that I’ve crash tested the Veloster, I’m more convinced this is the right car for me.
I feel like an airbag should have gone off.
I’ve been to the ER twice, and passed the CAT scans and X-rays tests. There’s no glass in my face, even though it feels like it. My back and neck are pretty sore, and my left shoulder is lower than my right. This is going to some time to come back from, both mentally and physically. But I’m also thankful; it could have been a lot worse.
Tell your loved ones you love them. Appreciate the time you have. We are lucky to be here.
Update 7/17: I think I found my replacement car in Florida. Same color, 6-speed manual, Hyundai certified (100k powertrain warranty). It’s a 2021 not a ’22, and it has almost double the miles, but I don’t want a DCT, and there just aren’t many to choose from.
In this post I show you a small splitter I made for my Veloster N. It’s about the size of your typical aftermarket front lip, but it’s much better performing, because it leverages all of the wind tunnel work I’ve done.
If you’ve read my wind tunnel reports, you know that 9 Lives Racing splitter diffusers on a Miata made only made about 8 lbs of downforce at 100 mph. This is pretty underwhelming, but they also don’t have a lot of area. Meanwhile, curving the entire trailing edge of the splitter upwards (essentially making a splitter diffuser across the full width of the car) made 150% more downforce (added 60+ lbs) on my Veloster. And so those are the numbers behind why I have a 36” wide central diffuser in my undertray, and not skinny little ramps in the wheel wells.
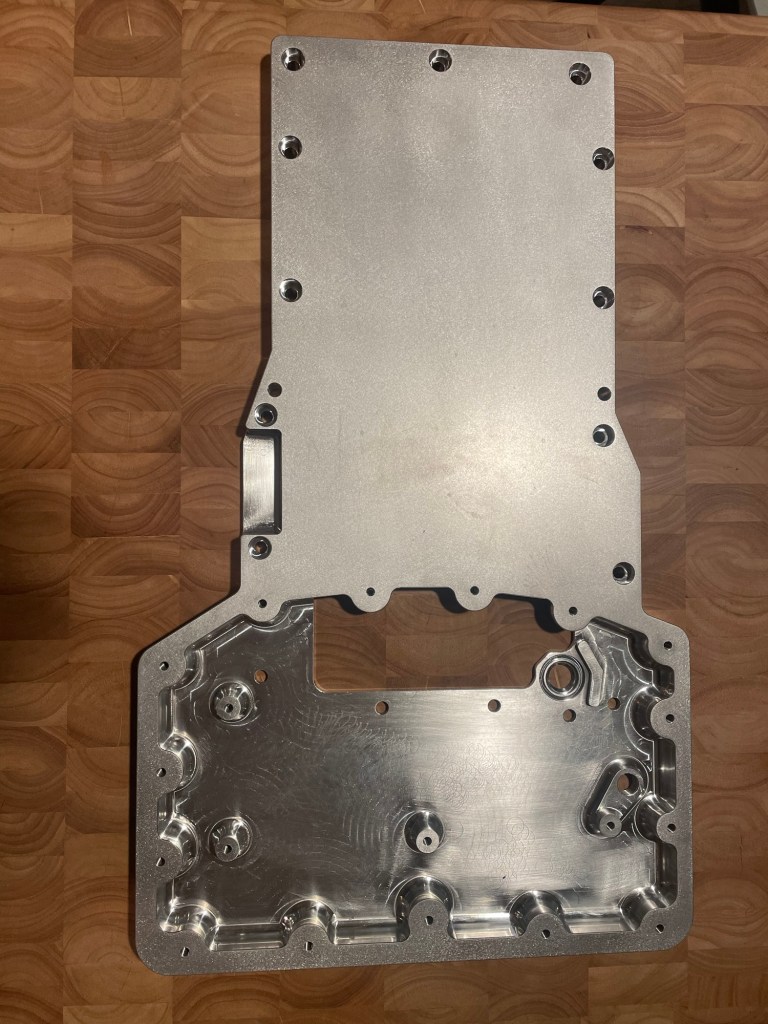
My aluminum undertray compared to OE plastic. I tape over the oil filter hole, of course.
I chose to make the splitter quite small, it measures just 36” wide, so that it fits between the two big black chunks of plastic on either side. The splitter is also very short, only 2” lip maximum, and the sides taper back to follow the lines of the body. Area-wise, this is definitely the world’s smallest splitter.
36” x 2” is the smallest splitter I’ve made, by a long shot.
You might wonder why I chose such a small splitter lip. My recent experiments with rear aero have shown that my car goes faster and faster with more rear downforce. So if I were to use a big splitter, I might need a 70” wing to balance that out. Maybe a double wing.
I don’t want to do that because this is a dual duty car, primarily for coaching and DEs. I don’t use the car for any kind of competitions, and so it’s more important that I don’t ground out the lip on driveways, or hit logs at my mom’s house! I also want the car to look cool, and I don’t like huge wings on a street car, but that’s just an aesthetic thing.
The splitter is bolted to the undertray and fits between the undertray and front fascia. From this angle, you can see how much diffusion the undertray has. This allows air to expand and lowers the pressure in front of it.
The splitter fits in between the undertray and the middle fascia. There’s quite a gap here, and so I tripled the thickness of the leading edge to 3/4”.
Thickening the lip to 3/4” allows a very large roundover, which helps keep air attached.
It’s easy to add extra thickness to a splitter and round it over, and with that you get better flow attachment. I don’t know why I don’t see more people doing this. Also worth noting, the big roundover made the splitter about a pound lighter!
Front lip rounded over and strakes riveted on. It’s ready to mount on the car.
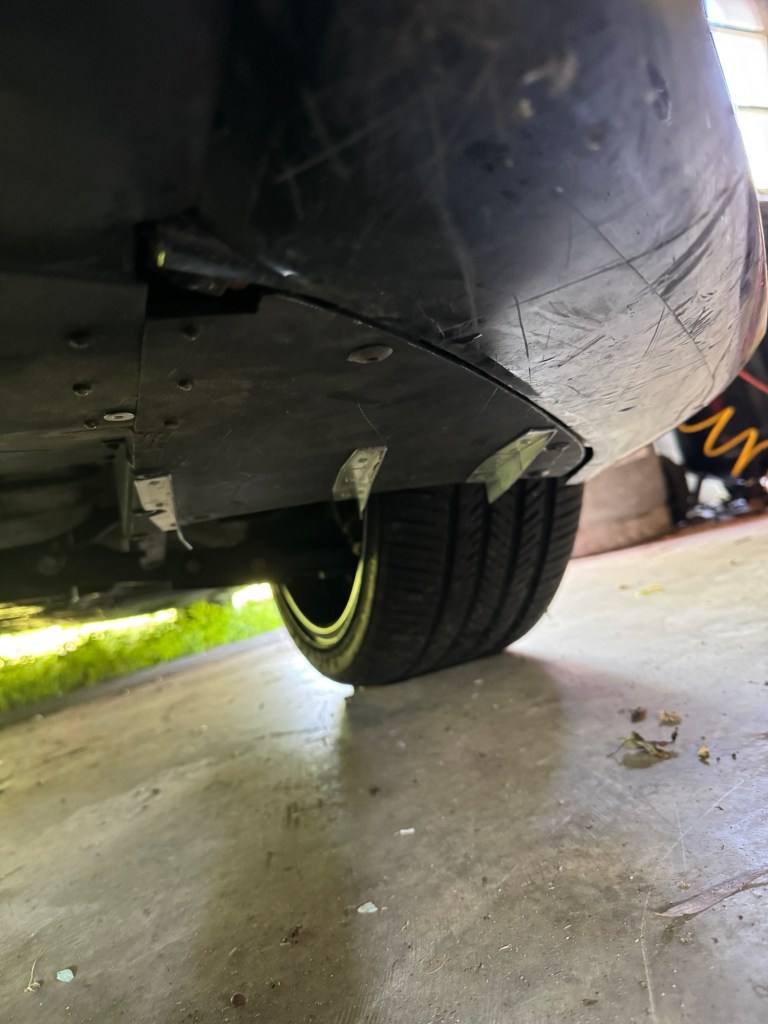
I also decided to add some vortex strakes to send air sideways. Typically these go directly in front of the tire, which reduces tire squirt. But because my undertray is narrower than a full-width splitter, only the outermost strake lines up with a tire. The other two strakes should direct more air to the brakes.
Strakes direct some air to the brakes.
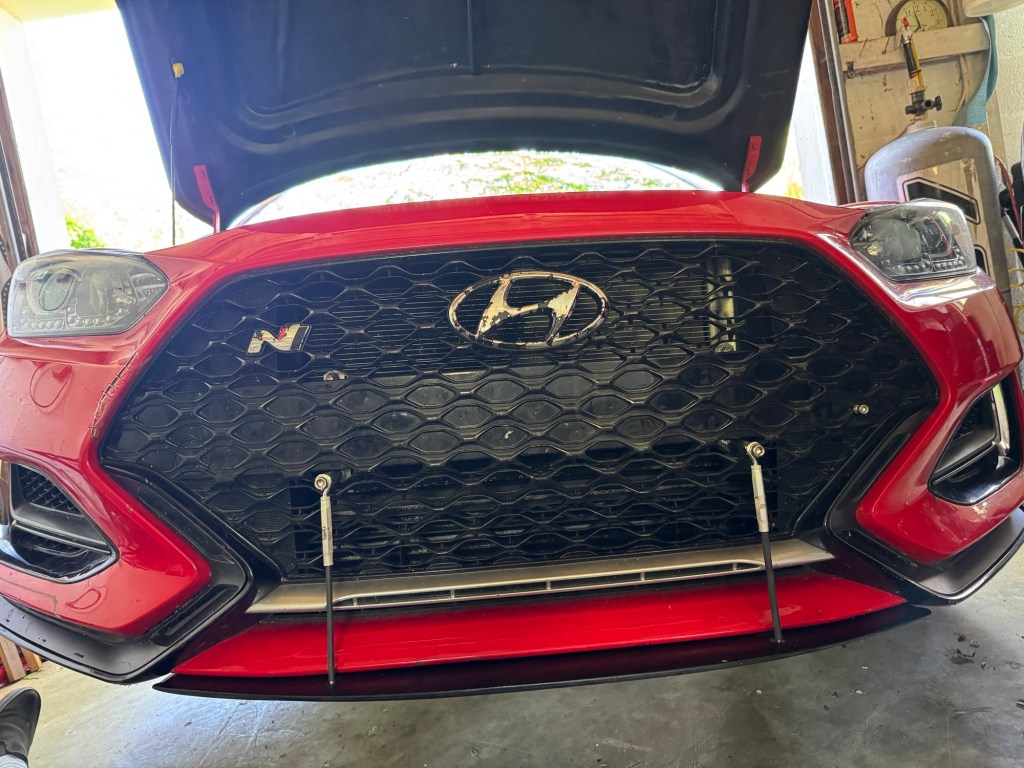
To mount the splitter and undertray I use speed clips through various parts of the fascia, long bolts to the radiator bottom (where the OE undertray mounts to), and splitter rods in front. The splitter rods mount to the bumper beam using U-bolts and other hardware from the Lowe’s racing department. All of the metal parts to mount the splitter are less than $50.
Splitter rods are all-thread, mated to a turnbuckle at the top and a T-bolt underneath. Speed clips replace all of the pop fastners around the outside.
The splitter is meant to be set for maximum ground clearance, so that it’s flush with the underbody. But the turnbuckles allow me to add some rake, and I could angle it down a few degrees if I want to. But like I said, this is mostly a street car and ground clearance is important, so I’ll keep it flush most of the time.
All said and done it weighs 11 lbs, and is built way stronger than necessary. But it makes the whole front end more rigid, and ties everything together nicely. The front fascia used to flex quite a bit if I pushed in on it with my foot, and now it’s much more solid.
Bottom view shows T-bolt, strakes, and flush mounted height.
Which brings me to the final step, which has nothing to do with fixing my mishap, but something I’ve been meaning to do for a while: add canards. I’ve tested canards in the wind tunnel on a couple occasions, and while I liked the results, the front fascia felt a little too flexible for my tastes (the bottom canard would flex downward at speed) and so I never used them on track.
I have two sets of canards, some commercial productsfrom Verus and DIY ones I made. In the wind tunnel, the CFD-designed Verus canards made only 15 lbs of front downforce at 100 mph, compared to the 85 lbs my canards made. However, my canards were pretty draggy and the Verus ones had zero effect on drag or rear downforce. So I figured I’ll mount the Verus ones permanently, and make mine removable, and use them only when I’m at the track.
Note that the reason my canards made more downforce (and drag) is simply the location. In all of the wind tunnel data I’ve accrued, the bottom canard does the work, and the upper canard helps reduce the drag in the entire system. It’s important to get the bottom canard as low down as possible; mine go on the ridge of red plastic, at the bottom of the bumper fascia. (See more in my blog post on canards for more details.)
How much downforce will these changes make? I’ve optimized the splitter in several ways, but it’s too high for there to be much ground effect, and the splitter lip itself is rather short. Let’s call it 50-60 lbs of downforce at 100 mph, plus maybe 110-120 lbs for the canards and hood vent. Both of those items help with splitter extraction, so they go hand-in-hand.
Around 170 lbs of downforce at 100 mph is about the same as my 12-degree full-curve splitter made alone (without canard or hood vent), which I felt was pretty decent. However, the bottom canards are doing half the work, and they are draggy sumbitches. At a slow track like Pineview, I’ll surely use the lower canards, but I’ll have to A/B test them at Watkins Glen before knowing if they are beneficial at a fast track.
This was a good stopping place for the day, and I think I earned myself a cold one (Best Day Brewing N/A West Coast IPA.)
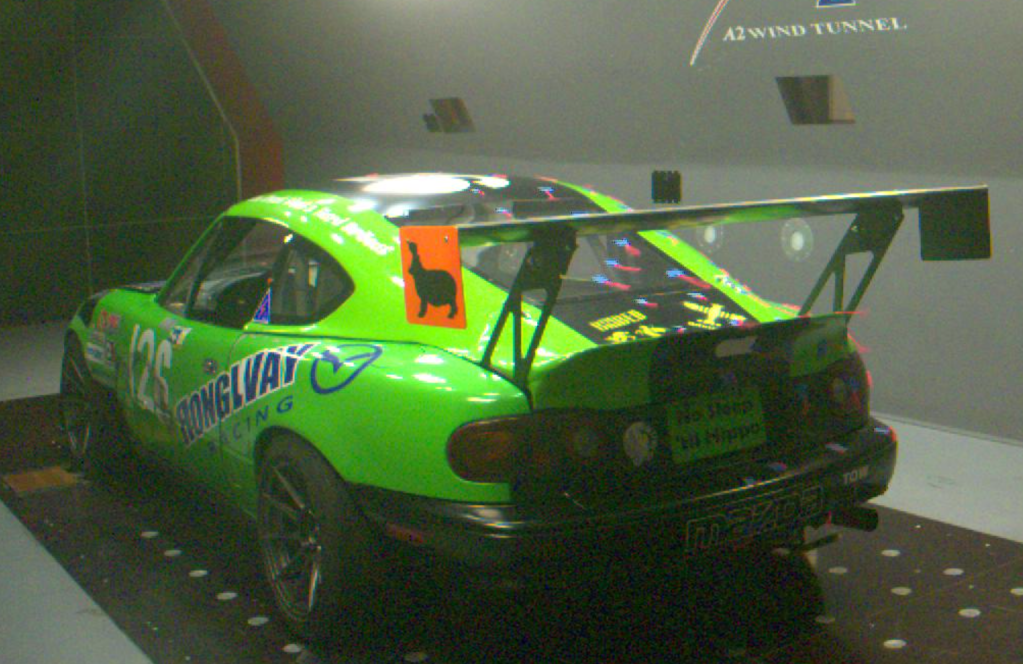
Last year I borrowed Phil Sproger’s NA Miata so that I could test various parts in the A2 wind tunnel. Phil’s car has the full catalog of parts from 9 Lives Racing, and so we were able to set up the car in real life exactly as it’s been tested in CFD. But we didn’t stop there, we also tried various combinations of parts, including the following:
Splitter diffusers, spill boards, and tire spats.
Canards in various locations and combinations.
Closed windows versus open, plus modifications to reduce drag and turbulence from the open windows, including wickers, mirrors, and venting the rear window in two different locations.
Singular hood vents fender vents.
Brake ducts, NACA ducts.
OEM hardtop with and without a rear window spoiler, versus a CCP fastback.
Blackbird Fabworx spoiler at different angles/heights.
Wings from 9 Lives Racing, Wing Logic, and a couple prototypes.
The report is over 50 pages long and includes all of the wind tunnel data, plus explanations on how each part contributes to drag and lift. I then assemble the parts into logical builds, so you can see the lift-drag ratio and aerodynamic balance of the entire car. And I give you the details on how to do that, so you can build your own custom Miata and know its values. The report concludes with racing simulations using Miatas of different power levels on different race tracks, so you know the most important thing: how different aero parts affect lap time.
The Miata wind tunnel report costs $35. After paying, you’ll get a download link.
I talk about the wind tunnel test and go over some of the results in an episode on The Blind Apex podcast. If you listen to that, you might wonder “where’s Johnny?” Well, we invited Mister 9 Lives Racing, but he was a no-show! Which was surprising because he was a guest of mine at the wind tunnel, and could have provided some color commentary. I also had some follow up questions on how we can use my data as a feedback loop for better CFD, and move the science of Miata aerodynamics forward.
I share some of the data from the wind tunnel in the podcast, but please don’t take that as a sign that you should do the same. It was expensive and a lot of work testing parts and putting the data together in a whitepaper. Thanks for caring and not sharing, and supporting this website and future wind tunnel tests.
It’s been a while since my last article and you might be wondering what’s going on over here. Mostly I’ve been doing non-aero experiments based on driver mod, rather than car mod. I’ll report back on that when I have some reliable data, but the spring weather (rain) has made data gathering difficult.
As part of this driver mod theme, the last couple weeks I’ve volunteered as a mentor to do instructor training with NASA and Hooked on Driving. The programs are a little different, but the mentoring part is quite similar, and quite a lot of fun.
National Auto Sport Association Northeast
Last week Ed Cangialosi of NASA Northeast sent out a plea for additional mentors to help with their instructor training event at NJMP Lightning. My wife was out of town, so I heeded the call. This wasn’t entirely out of generosity, as I always learn some nugget from my student or other coaches.
The trip down to Millville is 275 miles, and I averaged 32 mpg in my Veloster N. It occurred to me that I burn more gas in two 20-minute track sessions at Watkins Glen than I do driving all the way to NJMP. Wild.
The NJMP instructor training is designed to get new instructors into the game. I don’t believe any of the students have instructed before, and so this is to simply gain provisional instructor status. And NASA needs a lot of instructors, partly because of Toyota’s GR program. If you buy a new GR86, GR Corolla, or GR Supra, you get a free NASA track day. This puts a lot of pressure on the already oversold novice group, and so many more instructors are needed.
I applaud Toyota for having a program like this, but “Oh What a Feeling!” it would be if they could build some track-ready cars! The Subaru engines in the GR86s are well known for their oil pan problems, and Toyota is well known for not warrantying them. So why do they give away a track day for a car that can un-warranty itself on track? The GR Corolla has a more reliable engine, but it’s also known to overheat its rear diff, thereby becoming a front-wheel drive car after a few hot laps. I guess the GR Supra is the car to have then, but the one GR Supra student I instructed had already done a 550 hp Stage 2 tune before his first track day, and while I’m not going to paint all the Supra owners with the same brush, I have seen more than a few novices with modified Supras.
But to get back to the point of this post, to become a NASA instructor, there’s some pre-work you must do, and then take the in-person class. During the class the chief instructor hits the high points in a lecture format, but most of the education is hands-on with mentors.
As a mentor, my role is to drive the car as a student would, play-acting three types of student. The instructor candidate (my student, as it were) sits in the right seat and coaches me through some typical personality types.
Novice, timid – The first type of novice is what we refer to as a never-never, as they’ve never been on track before. They don’t know the limits of their car, they don’t know the jargon, and may not even know how to buckle their helmet.
Novice, aggressive – The next type of novice has more confidence than skill. They have strong inputs that engage the car’s stability and traction control systems, and they don’t listen to you. This is a deadly combination the instructor needs to control.
Novice, skilled – This driver has been to a couple track days and has the skills and jargon down. They need more refined instruction, and might be ready to advance to the solo group if they have awareness and play well with others.
Hooked on Driving MSF Level 2
The Motorsport Safety Foundation is a national organization that seeks to formalize the requirements for different levels of instructors, by establishing a path of continuing education, and providing a formal record of achievement for HPDE instructors.
Unlike the NASA training, MSF Level 2 assumes the student has done some instructing before, and passing this course means you earn more than a provisional status; MSF2 means you can instruct with any group that recognizes these credentials. And that is a lot of HPDE groups nationwide, and so earning your MSF2 is a pretty big deal.
For that reason, the training is more intense. There’s a full day of classroom, with slides, discussion, and poignant stories from the trenches. Added to that, you also have six sessions on track with a mentor, who now plays six different roles, not just the three with NASA.
Hooked on Driving did their training at Pocono North, which if I’m being brutally honest, isn’t a great track. The transitions from the banking to the infield are abrupt, and lowered track cars with splitters will absolutely hit bottom here. The banking is fast, the infield is slow, and there’s not enough variation to get anything more than a low grade from this sourpuss.
Anyway, I wasn’t there to drive the track, I was there to instruct two students. I started the day with one student, and then half way through the day, switched students with another mentor. This is something HoD does, and I love it. Not only does the instructor candidate get two different coaches, but there’s less chance of favoritism when it comes time to pass or fail the student.
Not every student passes, and it’s difficult to be the mentor that fails their student. In fact I didn’t pass mine, I asked that he work with HoD a few more times and get more mentoring before he gets his MSF2 badge. I know he’s going to be a good coach, but that level of certification has to mean something, and my guy was close, but not quite over the bar.
Play acting
I come from a family of actors. My dad was an amateur actor his whole life, and my sister Mia Korf (IMDB) was on soap operas and other stuff. So maybe it comes naturally to me to act out the characters, and so I do some pretty funny shit in the car. I’m still laughing about it now.
When the instructor says “open the wheel” I take both hands off the wheel.
At times I won’t listen to anything the instructor says. I’ll shut down and say nothing when they ask me questions.
I’ll shift to 2nd and 3rd and back to 2nd in the middle of a corner.
I leave my hand on the shifter the whole time.
I steer with one hand on the wheel. Or I’ll shuffle steer, and then justify it by saying that’s what Randy Pobst does.
I hide my phone under my left leg and time my laps.
I leave things in the car that rattle around, usually under the passenger seat.
I intentionally drive off the track and into the grass at least once. Sometimes twice.
There are other things I do, but they don’t come out of left field. I make sure I’m in character during the pre-drive interview, and even while waiting on the grid. “Oh, that’s Mikey ahead of us, he says he’s going to do a 1:20, so we’re going to do a 1:19.” If you hear that shit, we’re going flat out.
Advice
Get your MSF Level 1 or sign up with NASA and become a provisional instructor. I started my journey with Chin Track Days, but there are many organizations that will let you instruct with them, and then mentor you along the way.
As an instructor, you’ll start seeing patterns and learn to anticipate your student. The most common safety issue I see in novice drivers is that they don’t brake hard enough. Many are afraid to engage the ABS, and so they carry 30% brake pressure all the way into the corner, and beyond. If you’re a new instructor, get the students to engage the ABS as early in the day as you can. Once the student realizes they can’t break the car by braking, they’ll achieve a necessary level of confidence that both of you will benefit from.
Another thing I do with most students is to stop them from shifting altogether. If it’s possible, run the entire track in one gear, as tall as possible. This one change can keep a hot-head under control, and can later be used with intermediate drivers to make them corner faster.
The one thing I disagree with in HPDE curriculums is to “drive the racing line.” But because I’m there to instruct under their umbrella, I abide by their rules. Mostly. The one subtle rebellion I have is that I don’t make students steer to the track-out cone. I just don’t see the purpose of adding distance for no reason. Instead, I get them to gradually add more and more throttle, and eventually we find the corner exit as a natural course of action. Now the racing line becomes a result of inputs, not a goal in and of itself.
The most common problem I see with new instructors is they provide too much information. For example a recent instructor candidate told me to “get on the brakes early to load up the front tires so that you gain more traction for turning in.” I mean, yes that’s true, but that’s a conversation for the parking lot. Instead, tell the driver to make an input based on a reference. My version of his directions was “Brake at the bridge.”
Becoming an instructor has many benefits, not the least of which is free track time. But you’ll also find the rare student that suddenly “gets it,” and the pride is felt equally in both seats when that happens. Believe me, this is as rewarding as setting a personal best lap. Through this journey you’ll also become a better driver yourself. Because, as the saying goes, “You never really know something until you teach it.”
I plan on doing a few tests at Watkins Glen International this year, and this is the first of (I hope) several reports. WGI is 25 miles from my house, and I have a lot of opportunities for free track time with groups I instruct for (Chin, HoD, MT, NASA, PCA, SCDA). The Glen is convenient for testing, and the corner speeds are high, making it a good place to test aerodynamic downforce. But the straights are also quite long, and so drag matters a lot here.
However, as a testing venue, WGI is only so-so because it’s a popular track, and so there might be 40+ cars in your run group. It’s not just the traffic that’s the problem, but highly variable weather, and virtually no runoff. So it’s not uncommon to lose a session due to rain, fog, or because someone hits a wall. For this reason, I may need to use sector times and predicted laps in order to get good data.
But on April 13th we had decent weather and lots of space on track with Mass Tuning, and so I was able to test different things and get clean laps. But because I made aero changes each session, and was also playing taxi (guest rides), I wasn’t able to string together many hot laps, and so there are only three decent laps from each aero configuration.
Another reason for the lack of hot laps is it takes a full three laps to get my tires up to temperature. I start them at 27 front and 30 rear, and at the end of the session they are properly at 37 F and 36 R. But I lose a lot of time early in the session, braking and accelerating hard to get the temps up, while keeping corner speeds low. If I’m impatient and corner hard at less than 32 psi, the tires roll over and I cord the outer edge. I learned this the hard way last year, getting only about 1/3 of the life out of my tires.
In the future, I may start the tires at 30 psi, which should put the tires out of the danger zone after one lap. This would result in the front tires being 40-42 psi for most of the session, and while this won’t return the best lap times, I should be able to normalize the data better.
The long warm-up times are probably the result of not enough negative camber. In fact I never hear the tires working hard, they just make a low-frequency moaning sound, not the screeching howl I get out of my Miata on the same tires. The Veloster sits on lowering springs and has one set of camber bolts, and this maxes out the camber at -1.8 degrees. With offset bushings (or slotting) it’s possible to get -2.5 degrees, but any more than that and I risk blowing the OE struts. This is still a street car, and I’m not going to ruin it by turning it into a track car with coilovers, stiff sway bars, and solid bushings. Well, not yet anyway.
OE N wing 2:17.4
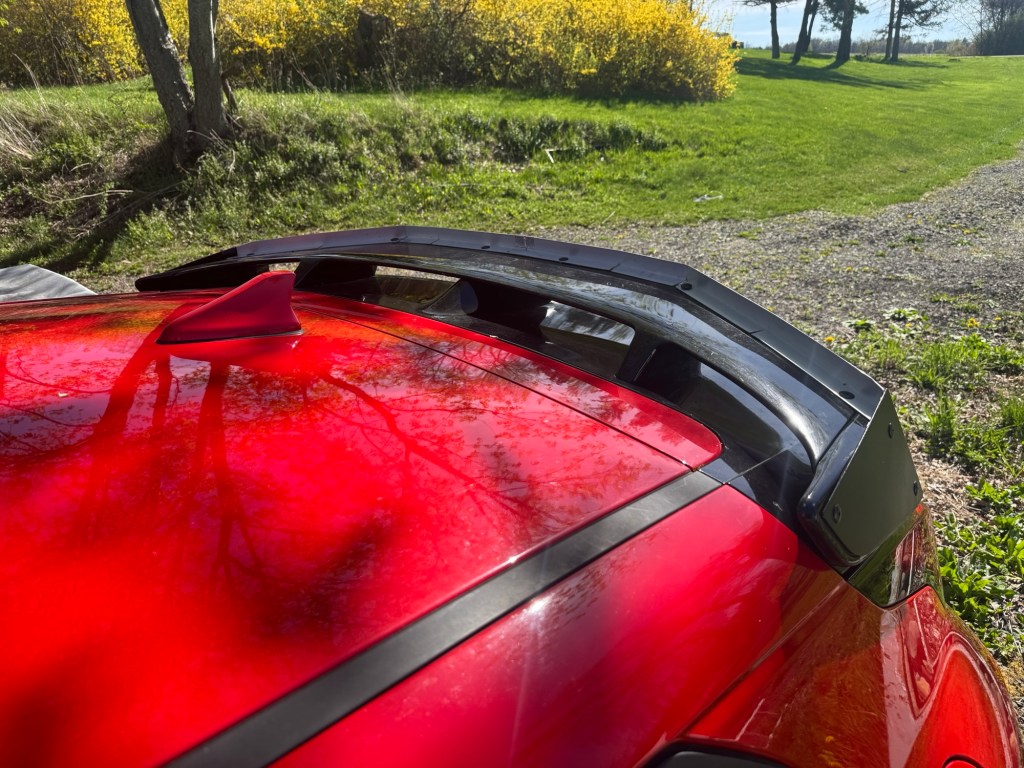
In the wind tunnel, the OE wing (or it could equally be called a spoiler) made 30.8 lbs of downforce at 100 mph. This cancelled out the rear lift on the base model hatchback, giving the car a slightly negative coefficient of lift. This is very rare in a street car. In my article Thinking in Aerodynamic Coefficients, I show that most cars have positive lift of around Cl 0.1-0.2. Cars that have zero lift or even some downforce are rare, and usually an exotic sportscar. But the Veloster N is one of those unicorns that has downforce straight from the factory.
The OE wing does a good job of stabilizing the rear of the car, and I felt none of the rear instability issues I felt when testing the car with the base model roof extension (meaning no wing). That was a test I ran at NYST, and the rear lift made the car twitchy under braking going into T1 and T5. But at WGI where I was 30 mph faster, the N wing felt stable under braking, and so the OE wing is definitely an improvement on the base model’s featureless roof extension.
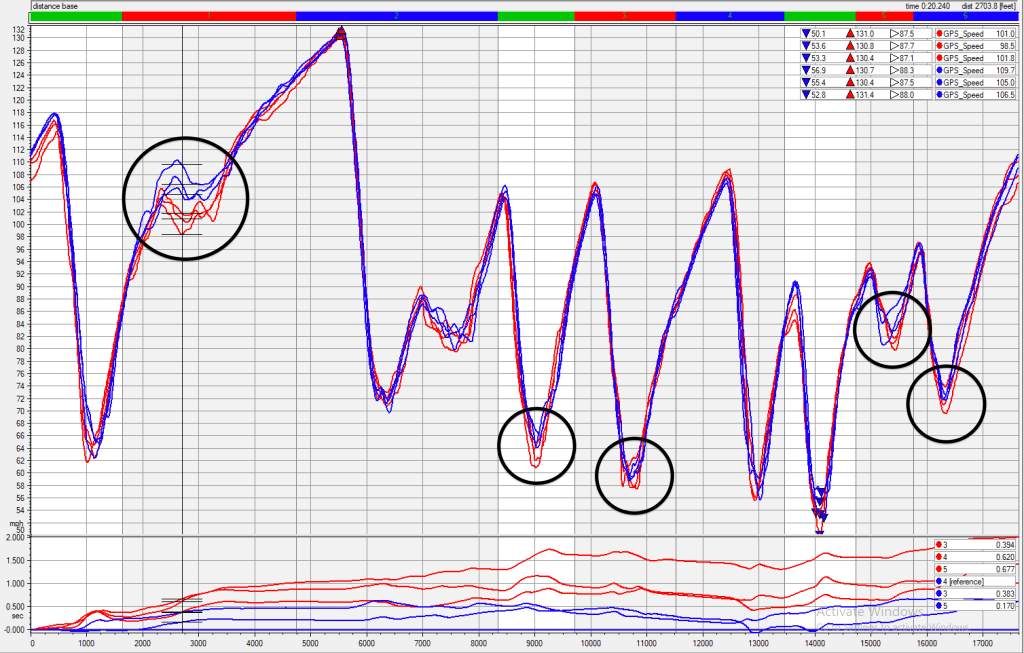
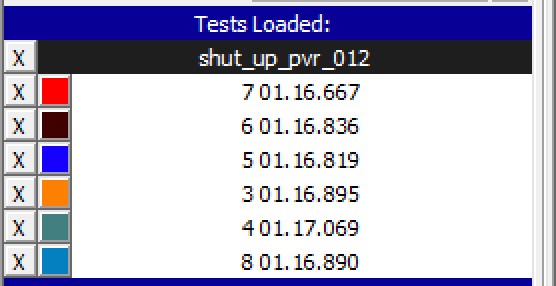
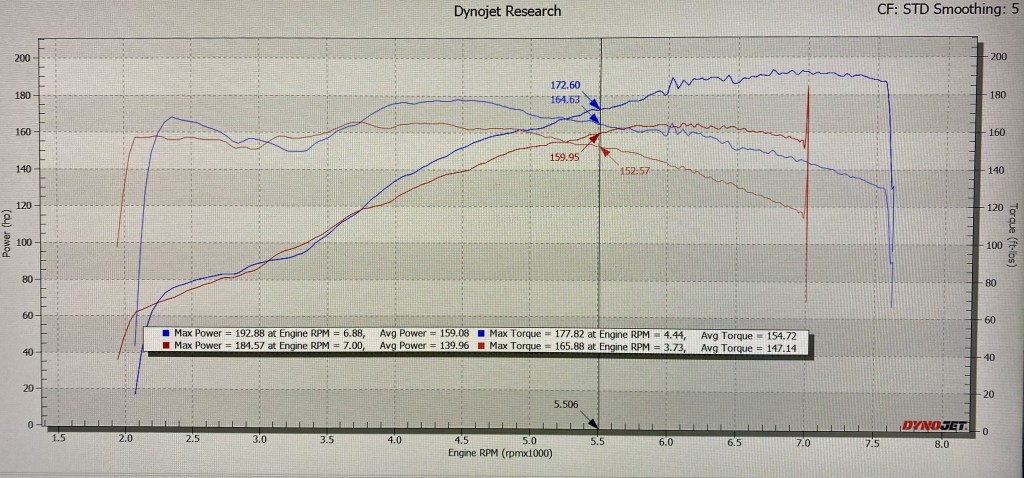
The N wing also had the least drag, and posted the fastest top speed of 132 mph on the back straight. But the OEM wing also had the least downforce, and you can see this on the speed trace below, where I compare the OEM wing (red) to the same wing with a Gurney flap (blue). Note the difference in speed through the esses, it’s huge. But also note the vMins in each corner that I’ve circled. Not only are the vMins higher, they are shifted to the left, indicating that I’m backing up the corner better when the car has more rear downforce.
Red is OEM wing; Blue is the same wing with a Gurney flap.
Wicker kicker 2:16.4
I put a 1” tall Gurney flap (wicker) on the trailing edge of the N wing, and in the wind tunnel this made 114.7 lbs of rear downforce and 8.9 lbs of front downforce. The fact that this made front downforce means the wing is behaving more like a spoiler than a wing, and the combined 123.6 lbs of downforce is a lot more than I would have thought from adding a simple Gurney flap. When I add a Gurney flap to a wing I usually get 150-170% more downforce, not over 400% more! With an increase in downforce, there’s more drag, and 8.3 hp is lost at 100 mph.
Wicker-kicker Gurney flap thingy.
But the extra grip through the esses is worth it, and by the time I get on the brakes for the bus stop, the max speeds are identical with or without the wicker. Around the rest of the lap, the modified OE wing has more grip, and the lap times are 1.1 seconds faster, lap after lap.
I uploaded a video of three consecutive laps, and I apologize in advance for the shitty audio. I use an original SmartyCam with an internal mic, and I can’t figure out how to make it less terrible. Anyway, I do a brace of identical 2:17.031 laps (down to the thousandth of a second!), on either side of a 2:16.415.
Three laps, turn the audio off.
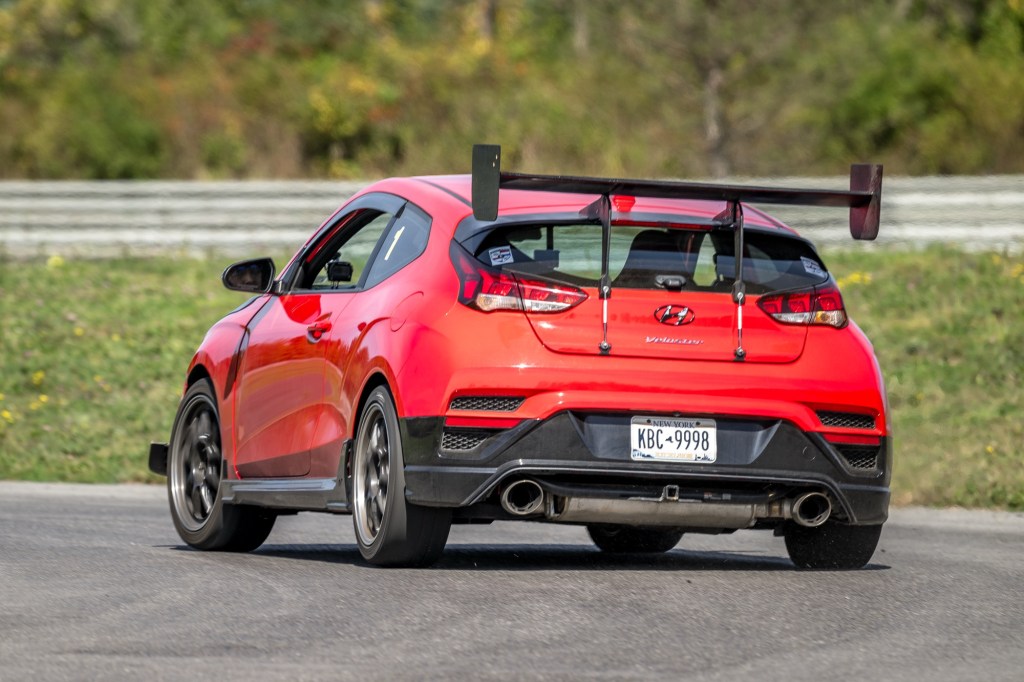
S1223 54×11 wing 2:16.8
In the wind tunnel, my DIY Selig S1223 wing made 179.5 lbs of rear downforce at 100 mph, and 31.6 lbs of front lift. Wings are located higher and further rearward than spoilers, and so it’s normal for wings to lift the front end through leverage. As a practical matter, this is why people typically use a splitter and a wing together, but a spoiler can often be combined with a simple airdam, or just used on its own.
The wing’s total downforce of 147.9 lbs, divided by 45.3 lbs of drag force, returns a 3.27:1 L/D ratio, which is about the same as the OE wing, but not as good as with the Gurney flap. The drag amounts to 12 hp at 100 mph, and on the back straight of Watkins Glen, the wing is 2 mph slower than the other options.
One of the reasons the wing isn’t very efficient is because it has a span of only 54”. This is problematic for two reasons: first, wing-tip vortices have a detrimental effect on the wing’s overall performance, and so the greater the aspect ratio, the better the wing performs; second, most of the wing is in the silhouette of the hatchback roofline, and so very little of the wing is in clean air.
The reason the wing is 54” is because I wanted a cheap way to test a dual element wing, and bought a $35 extruded wing as the upper wing. The dual wing worked well at Pineview Run and NYST, setting the fastest laps (.8 seconds and 1.0 seconds faster than the single wing, respectively). But after seeing the initial results from the single wing at Watkins Glen, I didn’t even bother attaching the upper wing, as I’m sure the dual wing would have been the slowest.
Single wing has rather tall end plates, as they are used to hold a second wing element. I didn’t try the dual wing option at WGI.
Under most racing rules, wings are allowed to be body width, which in the case of the Veloster N would be 71.7”. I tested a 70” Wing Logic wing in the wind tunnel, and it made the same amount of total downforce as my 54” DIY wing, but with 44% of the drag. The resulting 7.4:1 L/D ratio shows how important it is to get the wing tips as far apart from each other as possible, into clean air, and away from the hatchback roofline. I may test this on track in the future.
Conclusions
Based on testing the single wing at Pineview Run (.7 seconds faster) and NYST (1.5 seconds), I felt for sure the S1223 single element wing was going to be worth 3 seconds at WGI. The fact that it was only worth about 1 second has me tail spinning into the D-K pit of despair. Let me think about why that may be….
One reason for the lack of performance may be the aero balance. As mentioned, the wing adds rear downforce with a lot of leverage, and so it was the only one that lifted the front. The result is the car may have too much rear aero bias, and not enough grip for turning in. Perhaps when I put a splitter on the car, I’ll see better results.
But note also that the aero balance was even worse at NYST and Pineview. The fastest rear aero on those tracks was the double wing, which I didn’t measure in the wind tunnel, but certainly has the most downforce and drag.
Another reason the wing underperformed could be the driver underperformed. I don’t believe I was cornering hard enough, and just barely edging into the performance envelope where aero is adding to what the tires alone can give. With more laps and coaching, we may see the driver perform better, and with that, the results may change.
Of course drag is a factor at Watkins Glen, and the 54” wing had the most drag. If I swapped to a 70” Wing Logic wing, I’d gain the equivalent of 6.7 hp (at 100 mph).
But as it sits now for both car and driver, the easiest and cheapest way to go faster in a Veloster N is to put a 1” Gurney flap on the OE wing. The performance of this modification was one of the biggest surprises in the wind tunnel, and it’s nice to see that reflected in real life, as well.
Three hot laps from each configuration went like this:
Config
Best lap
Average
Predicted
OEM wing
2:17.434
2:17.91
2:16.841
OE + wicker
2:16.415
2:16.83
2:15.783
54″ wing
2:16.795
2:17.02
2:16.284
While I have some work to do to get faster, I’m a consistent driver. Watkins Glen is a long 3.38 miles, but my lap times are usually within a couple-three tenths of the previous lap. That’s around a 0.3% difference, and probably similar to the noise you’d see in other variables that change throughout the day, such as air and track temperature, wind speed and direction, etc.
<brag>On a track that I have more laps on, like Pineview Run, I’m a metronome. Here’s six laps in a row with 0.372 seconds between all of them. If you throw out the fastest and slowest, I do four laps separated by 0.076 seconds.</brag>
Consistent laps matter for testing.
I mention this not just so that I can thump my chest, but to throw some validity on track testing aero components. There are a lot of variables that change throughout the day, or even within a single track session. As those tolerances stack up, lap times can vary a lot. However, my driving is probably less of a factor than you might think, and I just want to point that out so I can deflect some of the “you’re driving like shit” comments. (Which are true, but at least I’m consistently driving like shit.)
Future tests
For Watkins Glen to be useful as an aero testing venue, I’ll need to fix my attitude, and turn my frown upside down. I’ve never gotten along well with this track, and I have to get to the point where I enjoy driving here. With some help from Gregg Vandivert (Omega 13 Coaching) and many more visits to the track, perhaps I can flip this script.
[sigh emoji] I hesitate to list the tests I want to do in the future, because the best laid plans of mice and men usually amount to the same dung heap of disappointment. But if things go as planned, I’ll test the following:
Driver mod – I’m curious to see how much time I can lose from professional coaching alone. In order to A/B test myself, I’ll need to use the same baseline setup and pray for days with similar weather.
Splitter – I didn’t use a splitter in any of these tests because I was matching the same setup I already tested at Pineview and NYST. But now that I’ve done those tests, I can put a splitter back on my car and see how this compares to the wind tunnel, and how getting more front aero load helps the overall balance. Naturally I’ll need to test the splitter at various heights and angles of attack, and so this could be a whole day of testing on its own.
Canards – I tested canards in the wind tunnel on two different occasions, and now it’s time to take the best results and see how they do in the real world.
OE wingmodifications – The 1” wicker worked great on the OE wing, but I’ve only tried the one size. Next I should try 1/2” and 1.5” tall, and see what happens. Also, I believe that getting the OE wing a little higher may increase performance, and with that, I could also add some angle of attack. This should be as simple as installing a few shims beneath the wing.
Ducktail spoiler – I tested a DIY spoiler at Pineview and the results were similar to the single wing. But WGI has already proven to be quite different than other tracks, and so I should test this one.
Bigger wings – The wind tunnel already showed me how important wing span is, and so a 71.7” wing will be a lot more efficient. I’m building a big wing now, and shall test this for sure.
Active aero – I wrote an article on active aero, in which I did racing simulations at Watkins Glen. Now it’s time to put my money where my mouth is and do the same experiments in real life. The easiest active aero to fabricate would be a DRS spoiler, so I may start with that rather than jumping straight to a dual wing.
Diffuser – I tested a diffuser in the wind tunnel and it was pretty lousy, losing about as much front downforce as it made in the rear. But the A2 wind tunnel doesn’t have rollers for the wheels and so the effect of the underbody can’t be 100% trusted. So I should probably test the diffuser IRL and shoot myself up with another dose of disappointment.
vMins and driver performance
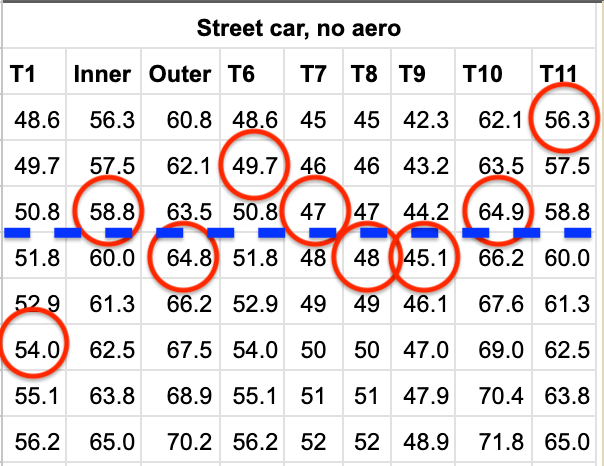
If you saw my previous post on vMins, you may wonder how well I performed on the vMin table. I put the OE wing on the Street table, and the modified wings on the Track side.
The red circles indicate my vMins with the OE wing, and you can see that I’m OK, but not great. My T7 may be a bit high, or more likely, all of my vMins can come closer to that level. However, when I add rear aero, I park it in the bus stop! I’m probably using the same braking marker, and then just over-slowing the car with the extra downforce and drag. I expected my vMins to be a lot worse than this, so I’m pleasantly surprised that I’m not driving like shit. And at least I know what to work on next time.
Gran Turismo nerds
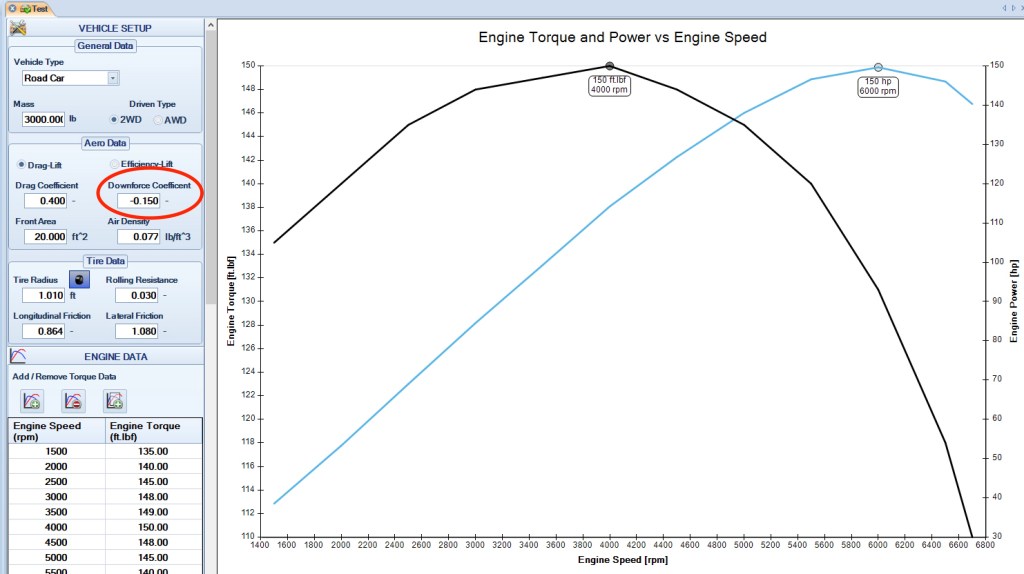
I prepared for my Watkins Glen weekend by doing some laps in Gran Turismo 7. GT7 doesn’t have a Hyundai Veloster N in the game, so I’ve been using a Scirocco R. Now that I have data to refer to, I can modify the car to be as close as possible to the real world.
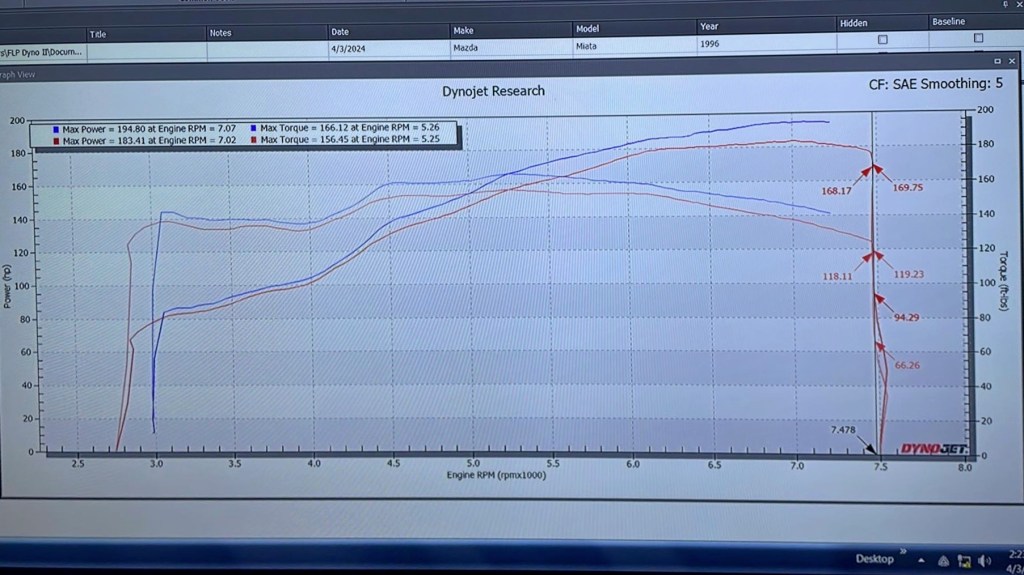
In the game I set the car weight to 3000 lbs and the horsepower to 244 (buy the lightweight modifier and add ballast weight and a power restrictor). This approximates the dry weight of my car (I have lighter wheels and the rear seats removed) and what my car puts out on the dyno (my engine is bone stock, not even a cold air intake). More importantly, this also gives me a realistic speed of 132 mph on the back straight. (I’m sure you could use a heavier car with more power, but this is just what I landed on.)
I also fitted the non-adjustable Sport suspension because I have lowering springs, and added the Sport brake pads (which do nothing in the game, but I’m trying to match the car IRL). I added a rear wing so that I can adjust the rear downforce from low (OE N spoiler) to high (single wing). GT7 doesn’t simulate aero accurately anyway, but I added no other downforce because I’m not using any. I use Comfort Soft tires, which puts the corner speeds in the right window for Hankook RS4s with painfully not enough negative camber.
If you have GT7, make a Scirocco R like this and play along. The PP value should be 492 with the wing maxed out. You can drop a comment here or contact me if you want to compare notes.
With the Scirocco R set up like this, I can click off low 2:14 laps regularly, and get the occasional 2:13 at WGI. That’s 3 seconds faster than I’m doing in the real world, which seems about right seeing as I can drive much harder in the game than IRL. As I get better in the real world, I expect the lap times to get closer to GT7. We shall see.
If you made it this far, thanks! If you’d like to support more content like this, hit the Buy Me a Coffee link. If you’d like the Veloster Wind Tunnel Report, it’s just $25 and goes through a ton of stuff you can do to make your car faster.
TL;DR: A long story on how I got started with data, became frustrated with data coaching, and developed a simple tool for self coaching. You can skip this epic tale and print the PDF of the Watkins Glen vMin table.
I’ve been a data coach for a few years, and everyone I’ve coached has made massive improvements. Most of the time data coaching takes just one or two sessions, and on average, I’d say people go about a second faster per mile.
On a short track like Pineview, that’s only one second, but at Watkins Glen, that’s three seconds. Three seconds is like going from a track tire to a slick. Or adding aero. Or buying a lot of horsepower. Any of those things could cost $2000 or more, and so getting three seconds for free is phenomenal. Yes, free.
For a couple years I was the lead data coach for the Niagara Region Porsche Club of America (NRPCA), and we offered free data coaching. While PCA clientelle can certainly afford paying for it, we were trying to lower the bar and get more students interested. Nevertheless, I’d have only one or two students per day.
This became a discouraging waste of time, and so last year I took a hiatus from data coaching. I’ll get back to that again, but in the meantime, I want to share something I invented, which is a vMin table for self-coaching. It looks very simple, but there’s a lot of research and effort that went into it.
It’s a long sorry, hence the TL;DR at the top. I won’t blame anybody for simply clicking the link and moving onto using the tool. But for those that want the backstory, it begins like this:
I never wanted to use data
14-odd years ago I did one or two HPDEs with Hooked on Driving in California, and after seeing a shit-heap of a car on its way to race at Chuckwalla, I convinced my brother and a couple friends to buy a first-gen MR2, cage it, and race it in the 24 Hours of Lemons. For several years, everything I knew about performance driving I learned with the bit between my teeth, going wheel to wheel in an underpowered car, trying to catch faster cars in the corners.
I was good, always setting the fastest times on my team. When we acquired Ben Dawson (Dominating with Dawson, on Garage Heroes in Training), I was able to match his times, but not better them. Then my identical twin brother became a real student of the game, reading Speed Secrets, getting into data, sim racing, instructing… and he left me in the dust.
After being the fastest on the team for a couple years, I was now a few seconds slower per lap. Ian encouraged me to follow in his footsteps, but I countered that I wanted my skills to represent the everyman driver. It could maybe turn into a twin study, where one brother used data, the other didn’t, and look where they ended up years later.
That’s how much I didn’t want to use data; I was willing to let my identical twin trounce me on track, handicap our team’s position in the final standings, pretend to do a bogus twin study, and skill-shame myself with a milquetoast modifier like everyman.
(When reading this article to my wife, she said if people only knew how competitive I am, the fact that I would let my twin brother beat me is incomprehensible. This is the exclamation point on how much I didn’t want to get into data.)
The transition to using data happened sometime after leaving California and starting a new team in New York. Ian flew out a couple times to race my new Miata, and he’d annoyingly show up to some unseen track, and destroy the team’s best times in his first few sighting laps.
It took a while, but the everyman got tired of his everyday beatings, learned how to use data, and then began to coach others through the same process. The track to hell is paved with good intentions.
Data coaching barriers
Data coaching hasn’t taken off for me like I had imagined it would. The reason for that isn’t a hardware problem, since I bring six Aim Solos and assorted brackets with me to all events. Neither was it a financial hardship, because I offered it for free. And nobody ever lost a driving session, since I’d schedule their coaching sessions around that. There were literally no barriers to data coaching, and so the reluctance was puzzling.
Part of the reason data coaching didn’t catch on was due to PCA itself being different from other clubs: we weren’t supposed to talk about lap times, none of the senior instructors were using data or pushing it into the curriculum, much of the clientele were older and skeptical of things new, and in any national organization, change moves at a snail’s pace.
There’s also the “I’m just here to have fun” contingent that comprises most of the people that sign up for a HPDE, and I totally get this group. If I went to a pickup basketball game and some “coach” was on the sidelines saying he could run me through drills between games, I’d walk the other way. The fact is, most of us sign up for track days to have fun with friends, and while the E in HPDE stands for Education, we are really there for the E in Enjoyment.
However, what I’ve found through years of trying to get people to dip their toe into data, the largest barrier to data coaching is this: nobody wants to know they are slow. And they don’t want anyone else to know that either. Pride is the wall that stands between having fun and and going faster.
The real barrier to data coaching.
The thing is, I haven’t met any slow drivers. Everyone has at least one corner where they are fast, and we all have one or two corners where we are slow. You use the former to build on the latter. And that’s what data coaching does – it finds your strengths and creates an individualized strategy to address your weakness. People call it driver mod and it’s a good term, because it’s something you take to every car you drive.
But because pride is more delicate than money is valuable, people will spend thousands on car mods and won’t accept a free driver mod. This was doubly frustrating because NRPCA HPDEs are mostly on weekdays, and so I was burning vacation time to help one or two students per day. So I pondered the incredible value of data coaching, against the struggle of getting people to try it, and I realized this: people will only try data coaching if they can do it in private.
Technological barriers
I wasn’t the only one who figured this out, Garmin did, too. Their Catalyst product combines AI coaching with data privacy in a compact package that doesn’t require a laptop or a professional to review the data.
I read the Garmin Catalyst review by Mark Petronis at AMT Motorsport, and that should have deterred me from buying one, because I’m already an advanced data user. But a virulent case of FOMO swayed me into buying one and experimenting with it for a couple months. I found the following shortcomings.
The Catalyst doesn’t actually know where you should brake, turn in, accelerate, or track out. It only knows what you’ve already done. so you’ll never know the fastest way around the track, just the least-worst that you’ve done so far.
If you drive consistently, the Catalyst won’t help; without variation, it returns nothing. You need to make errors in your driving that end up being beneficial mistakes.
The Catalyst uses only your recent driving. There’s no way to save and then upload best laps from yourself or other drivers to compare with. And so if you live for comparative data (driver mod, tire testing, aero testing, etc), you can’t A/B test jack shit versus shit jack.
You also can’t download your Catalyst data and then compare it with other people using different devices. This is infuriating, because the Catalyst is gathering GPS data. All I need is a CSV file so I can dump that into Race Studio, but Garmin refuses to play well with others.
The coaching “opportunities” were mostly good, but occasionally had advice I disagreed with, or missed some obvious wins. For examples of that, see Gregg Vandivert’s article When Garmin Catalyst leaves time on the table.
The audio hints are fun and come at a good cadence, but the advice has nothing to do with skill, just to drive with more gusto. As useless as the advice was, some of it remains memorable; I can still hear her say “keep pushing,” but it’s mostly her accent, and no longer in the context of driving.
The Catalyst isn’t plugged into the OBD2 port, so it doesn’t know the most basic information, like whether you had pulled your foot off the gas, braked lightly, or balked a shift. It doesn’t know what gear you’re in, so it can’t whisper “hey there big guy, don’t downshift before the next left, hold 4th gear.”
There are numerous other quirks or strategic decisions that are baked into the firmware or blocked from export, and I simply don’t agree with a closed system that reeks of rotten Apple products.
In the end, I discovered what the Catalyst is: an excellent delta timer and video camera. [sigh] Perhaps there have been updates that address these issues, and maybe I wasn’t using mine in a way that got the best use out of it. In any case, I sold mine and haven’t looked back. But if Garmin could export the optimal lap video as 10hz GPS data, I’d buy it back at twice the cost.
My requirements must not represent the majority, as I see a lot of Catalysts at the track. However, it appears that most of them are being used as a lap timer and video camera. I rarely see people removing the devices from their cars in between sessions, and so I doubt they are using the coaching opportunities during the day. I guess this is like buying a gym membership and then only using the sauna, but least they are in the right area for self betterment. I understand many people really like their Catalyst, but those people probably never had real data coaching, and accept the shortcomings as a tradeoff for a great UX and data privacy.
On the technological flip side you have Aim products, which sets the gold standard for motorsports data loggers. Unlike the Catalyst, you can plug an Aim SoloDL into your car’s OBD2 port and/or jump into the CAN bus and get brake pressure, throttle position, steering angle, and anything else the car reports on. The amount of data is staggering, and Aim’s decision to display everything by default (including useless data like the device’s internal battery voltage), is complicated and off-putting.
But the true barrier to using Aim products is the software. I’ve worked in software development for 25 years, for companies like Oracle, Salesforce, and Google. I know what good usability looks like, and the amount of effort it takes to take a very powerful tool and make it easy to use.
The Race Studio 3 user interface is a cornucopia of poor decisions, many of which could have been fixed using setup wizards to create custom profiles. Or hire a technical writer like myself to explain how to use three lefts to make a right. But there’s nothing intuitive, streamlined, or adequately documented in Race Studio 3, and so I use Race Studio 2 most of the time, which also isn’t great, but sucks less.
It’s also worth mentioning that unless you put a password on your Solo2, your data isn’t private. When I turn on my laptop in the Watkins Glen garage, I can walk around and pick up everyone’s Solo2 on the wireless network. Because the Solo2 is so damn confusing, most people are using it only as a lap timer, and so they haven’t set a password, and everyone within earshot can access that data.
At this point of the story we come to the realization that technology sucks, and that the best tool for introducing people to data doesn’t exist. If I wanted to get people to dip their toe into the waters of data coaching, I’d need to invent something with the following qualifications: free, private, and devoid of all technology.
[vMin table entered the chat.]
vMin data coaching
The intro to data coaching tool I came up with is simply a table for minimum corner speed, or as data coaches call it, vMin. Every track has thousands of laps of historical data, and my approach takes advantage of that knowledge, using the best drivers. The primary use of this table is for identifying which corners you need to work on. I’ll show you how to use the table in a minute, but first I want to explain why vMin.
vMin is only a single piece of data, so is it really that important? Well, after seven-and-a-half years of weekly email tips and tricks, Ross Bentley thought so. The final Speed Secrets Weekly #400 could have ended on any subject, but there’s a reason he chose vMin; it’s the thing that separates average drivers from great drivers.
Unlike lap times, which can be bought, setting an ideal vMin is 100% skill. It’s the one variable you can look at that separates the wheat from the chaff. It’s like a unique identifier for expertise, or a genetic marker for driving greatness. Here’s why:
Average drivers throw away entry speed without a thought, and that’s because their thoughts are on two things they learned in the novice group: late braking and early acceleration. When you’re adept at those skills, and combine that with a modern car’s nannies and horsepower, you can pass everyone in your DE group. Advancing to the fastest run group and passing the instructors is simply a matter of more power and better tires.
On the other hand, advanced drivers hoard entry speed like a dragon with its gold; they save it and defend it. Having already mastered late braking and early acceleration, they can instead concentrate 90% of their attention on the last 10% of corner entry. In that very small and compressed zone just before the apex, they make micro adjustments in a delicate dance that maximizes traction, minimizes steering angle, and positions the car for the optimal exit. And they do all of that while retaining the highest minimum corner speed. Herein lies the real art of driving, and if you want just one metric that separates the artistes from the poseurs, you can see it in a single number: vMin.
Another great thing about vMin analysis is that you can still get data in a DE session that’s full of traffic. Unlike looking at lap times, which can be spoiled by a single slow driver, you only need to hit each corner once perfectly, and you’ll have representative vMin data. Of course the more laps you do the more accurate your data is, but the point is, you don’t need to be enraged by backmarkers spoiling a lap, you can still get good data on a crowded day.
Data coaches may add the fact that while vMin is an important metric, where the car is at the point of vMin, and what direction it’s pointing, are actually more important. Yes, I agree wholeheartedly. But if you are able to get that kind of information, then you’re already using data, and this vMin table was not invented nor intended for you! But I will also say that that the where and what direction are already subtly baked into those numbers.
But let’s get back to vMin simply as a number, and not as a position or angle. By raising your vMin speed, you have an advantage until the next corner. For example, at Watkins Glen, let’s say you typically go through Turn 1 at 64 mph. If you can roll another 1 mph through the corner using a different line or technique, that might be worth a full second by the time you reach the bus stop.
Is a higher vMin always better? No. If going through the corner at 66 mph means you’re later to full throttle, then you might be a full second slower by the time you get to the bus stop. So the point isn’t to get the highest vMin in each corner, but the appropriate vMin. If your vMin is at the appropriate speed, and if you’re also at the correct location and angle, and you do this through every corner, this shows up as horizontal line in the vMin table.
Before I explain how to use the vMin table, you should know it’s a coarse measurement, and it’s not perfect. Necessarily so. Later in this article I go into how I created this table, and some decisions I made for ease of use over accuracy. The purpose of the vMin table is to give the everyman a free, private tool they can use to data coach themselves with nothing more than pencil and paper.
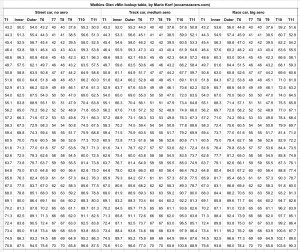
Using the vMin table
The vMin table (download PDF) shows the ideal minimum corner speeds at Watkins Glen International. It is divided into three columns, based on how much aero your car has. Circle your vMins in each corner, and they should (ideally) form a horizontal line across one or two rows. Speeds that are above that line (slower) are corners where you can increase your vMin. Speeds that are below (faster), indicate that you are either late to full throttle, or can bring several vMins higher.
In the previous image, there’s a horizontal-ish line formed by the inner and outer loop, and turns 7, 8, 9, and 10. But T6 and especially T11 are slower, and are areas for improvement. T1 is faster than other corners, meaning the driver is either late to full throttle, or all corners could be faster.
And that’s basically it. Draw circles around your vMins, look at the ones above and below the line, and try different strategies so that you end up with a horizontal line.
You probably noticed that there are no vMins for Turns 2-3 (the esses). That’s because low-powered cars can’t reach a high enough speed before these corners. If you’re flat footed before, during, and after the corner, it’s really just a straight, isn’t it? For the same reason, if you’re in a slow car, your vMin data for T10 could be off, because you may not reach the T10 vMin on the straight between T9 and T10.
Those caveats aside, one of the great things about vMin analysis is that it doesn’t matter if it’s raining out. All your vMins will come down by the same amount. For that matter, tires don’t matter. If you’re on all-season tires or racing slicks, your vMins should still form a horizontal line.
The vMin table can also be used as a comparative metric with other cars or drivers. If you and a buddy have similar aero (more on this later), you can compare vMins. You may find one of you has a corner you need to work on, and the other has the answer. No data coaches needed, just share driving notes with friends.
Improving your vMins
You’ve circled your vMins on the table, and it’s time to address the outliers. Most of the time you’ll be working on raising your vMins, and so I’ve included various strategies for that below. I can’t take credit for these, it’s things I’ve learned standing on the shoulders of giants. Certainly much comes from Ross Bentley, and his excellent Masterclass online webinars and Speed Secrets books, emails, and other content. I also compare notes with other coaches, and so if you have a method for raising or refining vMin, please contact me and I’ll update the list.
What I’ve found is the best way to raise vMin is deprogramming. We need to challenge our beliefs, break old habits, and even unlearn things we were taught as novices. These are things that we rely on for speed and safety, and they are deeply ingrained. But they are also holding us back. Deprogramming requires a change of focus and a deliberate (sometimes diametrical) change in our actions. By completely changing what you were concentrating on and performing through habit, and intentionally moving that focus and doing something else, you’ll begin to deprogram yourself.
Try to change your focus and actions in the following areas, and see how it changes your vMin.
Existing focus
Focus on this to raise vMin
Beginning of braking point
End of braking point
Late braking
Brake earlier/lighter/longer
Threshold braking
Release longer, softer
Downshifting before the corner
Hold a taller gear
Driving a late apex line
Take a late apex as early as you can
Always on one pedal
Coast/pause mid-corner
Early acceleration
Maintain momentum
Setting a fast lap
Learning
Driving
Drilling
Note that different corners will require different strategies, and not all of them will work out. People are different, too. You may find that one strategy works for you, while someone else may have a very difficult time with it. For example, I find that the best way to improve my vMins is doing the no-brakes drill, and that may not be practical for most people who are sharing a crowded track with others.
I’ll explain each of the focus areas, so you understand why they can increase your vMin.
BoB vs EoB – Most of us have a solid reference for the beginning of braking point (BoB). At Watkins Glen, it’s usually something very obvious, like the 400 board in T1. I’m not suggesting you stop using that, but add a second reference point for the end of braking (EoB) point. It’s deeper than you think, near the apex. By shifting your focus to EoB, you’ll spend less attention on late braking and more on that crucial zone, where the wild things are.
Brake lighter – For someone who is really good at late braking, it may seem that breaking earlier, lighter, and longer will result in a slower lap time. However, some combination of earlier, lighter, longer will set you up for a higher vMin, and with that, your lap time will come down. You may eventually get back to later, stronger, shorter, but only after you understand the true vMin in that corner, and position your car appropriately.
Release softer – It’s easy and fun to pass people on the brakes. Drop anchor a fraction of a second later, brake hard in a straight line, and turn in at the last possible moment and you’ve made a great pass. But once the pass is complete, it requires a lot of effort to turn the car sharply at a low speed. If you release the brakes softer (earlier and longer), you can add a little bit of steering into the final part of the braking zone, making the car a wee bit less stable. This will allow you to pivot the car using yaw instead of steering angle, which results in earlier and acceleration and less tire scrub.
Hold a taller gear -Because the engine has better acceleration at higher revs, most people downshift before the corner. Instead, try holding a taller gear. By not downshifting, you can use all of you concentration on corner entry. By using a taller gear, you can apply full throttle earlier; it’s like a passive traction control system. If there’s just one exercise you try, I hope it’s this one, you may be surprised by the results. If this doesn’t work, then your car may have large gaps in the gearing, and so try downshifting after the corner. This will still free up your concentration on corner entry, while providing more oomph at corner exit. My twin brother has been trying go under 1:02 sim racing a Miata at Brands Hatch Indy, and was stuck there for years. He changed his shifting to after the corner, and can now consistently click off high 1:01 laps.
Apex earlier – You were taught a late apex line for good reasons, it allows a larger corner radius, earlier acceleration, and it’s safe. Do what you’re doing now, just do it earlier. We call this backing up the corner, and it’s one of the things I look for immediately when data coaching. Whenever I compare two or more drivers, whoever has their vMin further to the left will be the fastest, because they broke earlier, turned the car earlier, and got on the gas earlier. Another reason you should apex earlier is because not all corners require a late apex. But most of us learned the late apex line early in our driving careers, and because it’s so effective, we’ve programmed ourselves to use that strategy in all corners. This is the most common mistake I see as a data coach, but unlearning the school line requires a deliberate change of focus.
Coast – Whether or not they’ve heard “always be on one pedal,” many people are. They transition immediately from hard on the brakes to hard on the gas. The term is pedal mashing; the definition is slow. You’ve probably seen a friction circle, and understand that if you use 50% of the tire’s traction for braking or acceleration, you only have 50% left for cornering. The result of immediately jumping from the brakes to the gas means the car never experiences 100% of the tire’s grip for cornering. However, if you allow the car to settle in the middle of the corner, then it can use all of the the available traction for lateral grip. We aren’t talking a lot of time spent coasting, it could be just a couple heartbeats between the pedals, but it can pay huge dividends in vMin. If you’re a pedal masher, it may take some effort to delay your transition from brakes to throttle, but try coasting for a full second mid corner, watch your vMins go up, and your lap times come down.
Conserve momentum – Drive a Miata. No, seriously! Every car is a momentum car, and if you can’t go fast with 90 hp, 900 hp isn’t going to help you. The only way to go fast in a slow car is to conserve momentum, and the best way to learn that is in a Miata. If you can’t borrow or rent one, drive your car two gears taller than normal. It’s probably still faster than a Miata, but you’ll get the point of the exercise.
Focus on learning – Lap times are an important measurement of self worth, and at some point during a weekend most of us are focused on setting a PB lap. But you only need one, and it’s usually set around 10-11am. So for the afternoon sessions, change your focus to learning, and experiment with things that can raise vMin. You will go slower than normal, but your next morning session will thank you. Also, if you drive a modern car with traction- and stability-control systems, turn off all the nannies, even if it’s raining. Heck, especially if it’s raining. Those things may help you set a fast lap right now, but they are seriously holding you back in the future. In my car, the difference between letting the car’s computer think for me and me thinking for myself is about 1.5 seconds per lap, and that’s on a short 1-mile course.
Drills – It’s difficult to learn how to play a musical instrument without doing scales or other repetitive exercises. And when you want to learn how to play a song, you need to break it down into multiple pieces and do each piece separately for a while. That’s drilling and it’s an essential part of mastering anything. How much drilling do we do at the track? None. Part of that is because drilling isn’t fun, but it’s also both unsafe and rude to do drills when sharing the track with people who are mostly trying to set PBs. The answer is to use your warm up and cool down laps for drills. But if you want real mastery, you should spend more time drilling than driving, and that requires a mostly vacant track. For this I suggest either becoming a member at a private club like Pineview Run or Circuit Florida, or hitting a less popular track mid-week. I won’t go heavy into which drills you should do, but the no-brakes drill, followed by no shifting, is a good one-two punch that will raise your vMin and drop seconds per lap.
Now that I’ve addressed your low vMins, what about those corners that have a vMin that’s faster than others? These are both rarer and easier to solve. Like in golf, most of us are trying to correct a slice (low vMin), but the odd duck has a hook (high vMin).
If you have one vMin that’s too high, you might be a novice that’s under-driving the whole track. That’s OK, this gives us something to work with! The confidence and skill you’re experiencing in that one faster corner can be applied to every other corner, and all your vMins can come up. Ask you instructor to help you with this, you’re about to drop 5 seconds per lap!
If you’re an intermediate or better driver with one vMin that’s too high, then you’re getting on the gas too late. Review your data in this corner and you’ll see you are either late to full throttle, or rolling off after an initial throttle application, and then reapplying throttle at corner exit. On some corners, this is an appropriate strategy, but Watkins Glen doesn’t have a turn like that.
The reason for your high vMin is likely one of two things. Either you started tracking in a low powered car, in which case your natural default is to conserve momentum, or you simply charged in too fast. Good for you, because too much is easier to fix than not enough! Change your focus to braking and turning earlier (backing up the corner), and get to full throttle before the apex. You may eventually move your acceleration point a bit later, and dial in some maintenance throttle, but to break old habits you need to do something extreme, and changing your inputs such that you can apply full throttle before the apex should do it.
Using the vMin table as a shortcut in data coaching
You’ll recall that the purpose of the vMin table was to allow people to keep their data private and coach themselves. What I didn’t expect was that I’d also use this table with every single student I coached at Watkins Glen.
Before I had the vMin table, my normal process was to send a student out for two sessions with the Aim Solo. The first session was mostly to make sure the unit was working and to warm up the driver, but sometimes there are good corners or sectors that are worth saving. The second session is usually the fastest of the day, and I bring them in after that and download the Aim data into Race Studio.
I’d load up their best three or four laps, and look at the the shape of the speed trace. From that I can get just about every input they are doing, and so I don’t need things like steering angle, brake pressure, throttle position, etc. I’ll also look at the time slip on the bottom to look for any large gains due to beneficial mistakes. Next I’ll do a sector time analysis to calculate a realistic theoretical best lap, and expand the histograms to show them how consistent they are. I may then open the friction circle to show the student how they are blending inputs (there’s often a discrepancy in left and right turns), although I could already suss that out myself from looking at the speed trace.
Now that is a pretty long and complicated process, but it’s also very accurate and illuminating. But what I found was that it wasn’t necessary with the average student. Most people have the same things to work on, and it’s easy to grab the low hanging fruit. The largest, lowest, and juiciest fruit is vMin.
These days my process has changed, and after downloading their data into Race Studio, I load up all the laps (not just the fast ones), take a note of the vMins in each corner, and circle them on the vMin table. This allows me to immediately assess the general skill level of the student, and which corners they need to work on.
For example, if I see that T7 and T8 are off by say 2-3 mph, I know the student has some work to do in general. But if those corners are the same, then I can assume a higher level of skill. There are other shortcuts you may discover for yourself, so if you’re a data coach at Watkins Glen, try my vMin table and see if it speeds up your data coaching process as well.
How I created the vMin table
You might be wondering where the data comes from, and how accurate the vMins are. I started by analyzing hundreds of laps at WGI, from rookie drivers to pro racers. I found a lot of 10hz GPS data online, and so it was easy to import a .drk file or convert a CSV from some other system, and then analyze the data in Race Studio.
But when I didn’t find enough pro-level data, I found another way, which was to watch in-car videos on YouTube, and simply jot down the vMins in each corner. It’s definitely a longer and less accurate process, as I needed to watch multiple laps and get the highest vMins in each corner. Data was useless at less than 10 hz, but I found some quality videos online, and it’s worth mentioning the Catalyst videos were excellent. (However, most of the Catalyst users aren’t at a level where their data was super useful.) By combining GPS data with videos I was able to get an expert-level dataset large enough to work with.
After acquiring that mountain of data, I noticed that most advanced drivers go through turns 7 and 8 at the same speed. Drivers of less skill might go through T7 a couple mph faster, or it could be T8, but the best drivers were just about the same speed through both corners.
That got me to thinking of these two corners as a base corner speed, and that every other corner was simply some multiple of the average of T7 and T8. But after some pondering, I realized it wasn’t the average of the corners that mattered, it was the higher of the two. Because the best drivers went through both corners at the same speed, everyone else should be able to as well.
I then looked at my consistent drivers, meaning those who drove T7 and T8 the same-ish speed, and jotted down what their vMin was in every other corner. Then I made that into a percentage of the base corner speed. For example, I found that an expert driver usually goes through T1 at 108% of the base corner speed (the higher of T7 and T8).
Now that I had multipliers on the base speed for every corner on the track, I could make a table for every 1 mph interval of the base corner speed. If you look at the table, you’ll notice turns 7 and 8 are always whole numbers, while every other turn is a decimal value. Now you know why.
At this point I had a workable vMin table, except for one thing: aero. Cars without aerodynamic downforce lift at speed, which means they lose grip the faster they go. Conversely, cars with aero downforce gain grip the faster they go (well, in relation to cars without downforce). Because WGI has so many fast corners and sees everything from IMSA racers to Spec Miatas, my data was not actually correct, since some cars were lifting off the pavement, and others were pushing into it. For an in depth look at the interplay between tires and aero, see my article on How Downforce Affects Tires, which shows the cornering speed of cars with varying levels of downforce, and their speed through Watkins Glen T10.
To get accurate vMin information, I’d need to know the frontal area and the coefficient of drag and lift from every car in my dataset. This is impossible, especially at the pro level where these secrets are guarded. In addition, pro teams may optimize their mechanical grip for just a couple corners, and make the driver earn their pay in the rest of them. So even if I could get specific aero data on the car, I’m not sure I could use those values for every corner equally.
OK, so instead of 100% accurate data, I figured I could estimate the amount of downforce on every car and log it next to the vMin speeds. After doing that for every car in my dataset, I would then be able to create each car in OptimumLap, run a simulation to see what the difference was in speed and lateral grip, and factor that into the final vMin value for each corner.
That’s a lot of work, but it’s the kind of thing I’m good at. I’ve done a lot of aero research, and combined with my wind tunnel testing, I can make an educated guess on a car’s drag and lift values, and land within a few percent.
After assigning values to every car and running test simulations, I now had an aero factor for each corner. To get accurate vMins, I just had to classify the car’s aero on a scale from 0 (none) to 1 (lots), factor that into my formula, and then I’d know the approximate vMin.
And here I ran into my first usability problem. My initial goal was to create a mathematical formula to say, “if the car has this coefficient of lift, it should go this much faster through the corner.” But this would require the user to know the coefficient of lift on their car, and then apply a mathematical formula to find each vMin value in the table. Nobody is going to do that.
So what I ended up with are three columns to represent aero: none, medium and big. It’s still up to the user to determine which column to use, and for that I’ll provide some quick guidance here, but also you should look at my article on Thinking in Aerodynamic Coefficients.
No aero – This represents most cars without aero, but also a lot of cars with factory wings, front lips, side skirts, and body kits. None of that OE stuff does much for downforce. Coefficient of lift ranges from +0.25 to -0.1.
Medium aero – This represents most track cars with wings and splitters or pro-level cars with just airdams and spoilers. Coefficient of lift is all negative (downforce), in the range of -0.3 to -0.8 or so.
Big aero – This represents professional aero done correctly, and some amateur-level time attack aero. It’s rare to see this level of aero at the track. Anyway, coefficient of lift is -1.0 and better.
As I’m writing this, it occurs to me that you could average the vMins between two adjacent tables, and in that way get five values for aero. That level of accuracy shouldn’t be necessary for most tracks (corner speeds are lower), but that’s kinda neat.
One more thing to note about aero (and it relates to the dataset in general) is that if you compare the three aero columns, the speeds are the same in Turn 1. This isn’t a typo or error on my part. T1 is certainly fast enough for aero to make a difference, but for whatever reason, aero cars and non-aero cars (driven by pro and expert drivers) go through T1 at virtually the same speed, respective to the base cornering speed.
This is why it’s not possible to assemble an accurate vMin table by measuring corner radius, camber, lateral grip, and coefficient of lift, and then running that through a number crunching algorithm. The drivers are the real computers here, and so it’s necessary to see what they are doing in each corner, not what is theoretically (mathematically) possible.
To find out who the best drivers are, it was necessary to quantify driver skill. This required estimating tire grip for each car and factoring that in. Essentially I was asking this: given this tire and aero, how fast should this car be able to go through each turn? This wasn’t terribly difficult because I have a lot of tire data, and I know how to tweak the values in OptimumLap to return realistic values. This got me close, and in some cases I had to slightly correct the values based on what the best drivers were doing.
With all of this information on tires and aero, I could assign every driver a cornering score. What you see in the vMin table is the best of the best. Some of these are pro drivers, but there are quite a few drivers that have pro-level vMins, with only a single corner and/or some consistency they need to work on.
vMins at other tracks?
You might be wondering if I’ve created vMin tables for other tracks, and of course I have. The ADHD part of me loves the dope rush of starting a new project, but then the realization of actually having to finish it sets in. This ends up with me starting another vMin analysis at some new track and not finishing that one either.
But I do intend on releasing more vMin tables in the future. The next tracks are likely Lime Rock, NYST, PittRace, Thompson, and Mosport, all of which I started and then backburnered.
It’s a time consuming process to find all the data, cull that into an expert driver dataset, log all the data in a spreadsheet, calculate a base corner speed, and then figure out the multipliers for each corner. But the endgame where I have to factor in the aero is particularly lengthy and difficult to get right. Now you know why I move on to the next before finishing.
There’s also the fact that not every race track has corners that are useful for vMin analysis. I mentioned previously that T2 and T3 at Watkins Glen don’t have vMins, and the climbing esses at ViR would be similarly problematic in a slower car. Also very long corners, like the Octopus at NJMP Thunderbolt, or the T8-9 complex at Brainerd, just don’t lend themselves well to vMin analysis, since vMin is then very location dependent.
If you have a track that you’d like me to create a vMin table for, contact me and perhaps I can be compelled to start a new one. (I mean, I can always be compelled to start a new one; I really need some motivation to finish one.) But know this: the accuracy of a vMin table depends on having pro- and expert-level driving data from that track to create a dataset. Without that, it’s a non-starter.
Find a data coach
I hope you get something out of the vMin table and try some of the exercises on the reverse side. Most of you will see a significant drop in lap time, but you’ll eventually hit another plateau, because where your car is at vMin, and where the car is pointing, and how long it’s at vMin (thanks Ross) are more important than the actual vMin number. To work on those, you’ll need a data coach.
I suggest hiring a data coach at the track. While there are coaches and services that will analyze your data remotely, having a data coach at the track with you is much more effective. You’ll shorten the feedback loop and get results that day.
If you’re well connected and monied, absolutely go straight to Ross Bentley or Peter Krause. For people coming to Watkins Glen, I suggest the following.
My data coaching partner Chris White is still with Niagara PCA, and also data coaches for the WGI-based Trackmasters group. So if you make it to Watkins Glen for those events, book time with him, I believe this service is still free. Also, Chris tells me that the vMin table is now being used in the PCA classroom, and so perhaps the worm has turned?
Gregg Vandivert runs Omega 13 Coaching and is available at several tracks in the northeast. He uses both Aim and Garmin devices at the same time, and combines that with right-seat coaching. I don’t believe you’ll find a better full-service coaching experience. Gregg told me a great story where he got someone six seconds at WGI, and it wasn’t even his student!
Patroon BMW visits WGI at least once per year and has a great crew of data coaches. They are headquartered in the Albany area, and so you’re more likely to see them at New England tracks like Lime Rock, but look them up if you’re in their area.
I’m available for private data coaching at Watkins Glen and other tracks in the Northeast, but I prefer to do this at Pineview Run. I have a lot of comparative data there, the track is usually pretty empty, and the lodge is air-conditioned with big tables where we can sit and review data. Pineview is a highly technical track, and so it can be even more useful if you’ve never been there before, as you can test your assumptions on driving strategy versus a mountain of data from other drivers. I have a sliding scaled based on dates (was I planning on being there already) and whether or not you own a Porsche.
If you’d like to get drill-based instruction and data coaching from me and Ross Bentley at Pineview, sign up for the Ross Bentley Driver Development Program. The 2-day class doesn’t include data, but the 3-day class does, and is offered only on July 25-27. The cost is $4000, but the driver mod will be worth it, many times over.
There is a new time trial series in Florida called FARA Super Lap Series, and one of my regular readers asked if I could help him optimize a car for that. I took a look at the rule book, and I must say, the philosophy and ground rules are excellent. But the classing system is probably one of the worst I’ve ever seen.
Now before I go sniping at them, I also want to acknowledge the hard work that goes into creating a racing series. This includes securing track dates, building a website, wrangling sponsors, writing a rule book, etc. It appears that FARA has done an outstanding job with 95% of it. It’s only the classing rules that are out of step with an otherwise excellent effort. Bravo.
So let me apologize ahead of time for any feelings I hurt, that is not my intent. That said, let’s talk about the classing system and how I’d build a car to the limit of the rules.
Classing
The classing structure is based on points:
SL5 – Up to 7 points. Unless you’re racing in Grid Life Sundae Cup, I’d stay out of this class, it’s just too limiting.
SL4 – Up to 14 points. Shitty Miatas.
SL3 – Up to 21 points. Could be fun.
SL2 – Up to 28 points. My Veloster would go here.
SL1 – Up to 34 points. Could be fun.
SLU – 35+ points. If you’re building for the unlimited class, you don’t need to keep track of points. Fun build, but not relevant to this article.
To find out what class you go into, you add up the points for the car’s power to weight ratio, tire choice, tire width, aero, suspension, brakes, drivetrain, and gearing. I’ll look at these in turn.
Power to weight ratio
To figure out your power to weight ratio, the rule book gives you the following formula:
If I use this formula to calculate the power to weight ratio for a Miata, I get 31 lbs/hp. Oops, the 2 is on the wrong side of the parentheses. Certainly the intent was to add peak hp and peak torque together, and then divide by two, not add half of the torque to the horsepower. Anyway, good for them to include torque in the calculation, I get what they meant, even if the formula is wrong.
Once you have the (correct) power-to-weight ratio for your car, you can see how many points that is using the following table:
Right away I see a huge mistake, which is that the point system goes in the opposite direction than it does in reality. In the real world, adding power has diminishing returns: the more you add, the less you gain. But you can see in the formula there’s a straight rate of 1 point per interval until 12 lbs/hp, and then you take two points per interval. This is so backwards I have a hard time wrapping my head around it.
What that math results in, is that if you take a stock Corvette or similar car with a power-to-weight better than 10, it’s going to be in the Unlimited class, even if it’s on all-season tires. I’ll run some simulations later, but I can see right away that this wrong.
Anyway, I have the first principle for any FARA build, which is to build to a 12:1 power-to-weight ratio, or worse. (Unless building for the Unlimited class, which I will hereafter ignore.)
Tire points
The fact that the power-to-weight points goes in the opposite direction of reality prepared me for how FARA treats tire points: Fantasy land. FARA bases tire points on treadwear (UTQG) value!
300 TW or more, 0 points
200-280 TW, 3 points
100-180 TW, 6 points
Less than 100 TW, 9 points
If you follow recent trends in tire performance you know that tire grip has nothing to do with the treadwear value! Any race series that bases performance on treadwear values needs to look at the work Andy Hollis has been doing for Grassroots Motorsports. He’s tested lots of tires and then gives them letter grades (from D to AAA) in different categories. Most importantly, he ranks the tire on time trial pace, and this requires evaluating every single tire, not looking at what the manufacturer writes on the sidewall.
Image courtesy of Grassroots Motorsports. Please subscribe to them to support this kind of testing.
So let me break down these FARA tire categories, and which tires I’d opt for:
Any tire with 300 TW or more is zero points, and so while some performance cars come on a 540TW tire (I’m looking at you Corvette C8), you’re basically talking Michelin Pilot Sport 4S vs Continental ExtremeContact 02. Andy Hollis rates the ECS02 as B- grade and the PS4S as a C grade, but everyone else puts them as equals. Lots of high-end sports cars come with the PS4S as original equipment, and so I applaud FARA for having a 300TW category.
In fantasy land, 200 TW tires all have the same performance. In reality, some 200 TW tires (Valino GP08R, Accelera 651, Armstrong Blu Track Race, Kenda KR20A, etc.) are slower than a 300 TW tire, while many of the super 200s (A052, CRS, RE71RS, etc.) are faster than 100 TW tires. And you also have the Hoosier Track Attack Pro and Vitour P1 Tempesta, which somehow get a 200 TW rating, and are faster than 60-80 TW tires.
100 TW tires are a loser’s choice in FARA. With the exception of the Goodyear Eagle Supercar 3R, there isn’t a single 100 TW tire that is faster than a mid-tier 200 TW. Just use the best 200 and stay away from this category.
Any sub-100 TW tire is 9 points, but there’s a chasm of performance between a Toyo RR and a Hoosier A7.
So if you understand that treadwear has nothing to do with grip, and that there are outliers within every segment, then there are only three tires to choose from: Conti ECS02 (300 TW, 0 pts), Hoosier Track Attack Pro (200 TW, 3 points), and Hoosier A7 (under 100 TW, 9 points). Note that the Hoosier TAP is new and there aren’t a lot of sizes available yet, so if you can’t find them in your size, get the Vitour P1 Tempesta. (Which is a A+ tire rather than a AA tire, so how much are we splitting hairs here, Andy?).
At this point it’s appropriate to mention coilovers. If you’re using a 300 TW tire you can get away with stock suspension, but any performance tire pretty much requires coilovers for the negative camber alone. FARA penalizes 1 point for 1-way adjustable coilovers and 2 points for 2+ damping adjustments. Good lord that’s a cheap price to pay for making your car lower, better sprung, corner balanced, and with camber. Ergo, going forward in this article, I’ll add one point to the 200 TW and A7 tires for coilovers, as it’s a no-brainer.
Tire width
Tire width is another area FARA kinda misses the boat, as they assign points using a straight scale (sigh). It goes like this:
225 and less – 0 points
245 – 1 point
265 – 2 points
285 – 3 points
305 – 4 points
315 and over – 5 points
The first problem here is that heavier cars use wider tires, but don’t get a huge advantage out of the extra width. If you’re going to evaluate tire width, you need to take into account the weight of the car. The real imbalance is when you have a lighter car that is using a wider tire for its weight.
Most cars weigh about 13-14 times the tire width. Ish. So a car with 245 tires is going to weigh in the neighborhood of 3200-3400 lbs. And that’s a fine width for an OEM tire, but track cars typically have much wider rubber. For example, my 2000-pound Miata also uses 245 tires, and it get’s proportionately more grip out of the same width.
If the FARA people had looked around, they’d have noticed that every other racing series that uses tire width as a variable either sets a limit on max width, or sets tire width based on the weight of the car. So FARA could have said SL5 max width 205, SL4 max width 225, and so on, and it would make more sense. Or set the tire width based on weight.
But here’s something that’s also true: wider tires don’t make you go any faster! Unless you have a wider wheel to support the extra width, wider tires are often slower. A 245 tire on a 7″ rim is not as fast as a 225 tire on a 9″ rim. Tire Rack did the testing for this, and it’s not even close. So if you want to accurately assign tire width as a factor, you also need to take into account the wheel width, and honestly, it would be more accurate to track the wheel width alone and ignore tire width altogether. Or use NASAs time trial rules and force all competitors to measure their mounted tires with a caliper.
The other reason tire width is a problem is because tire manufacturers lie about tire width the same way they do with treadwear. They can write whatever they want on the sidewall, and so most of the Super 200s run a full size wider. If you measure a 225 A052 or RE71RS, you’ll find it’s about as wide as most 235s. And the most egregious offender is Hoosier; their 225 A7 is wider than many 245 tires!
So, given how FARA treats tire width, what would I do? I’d run the widest wheels that would fit my car, and then select a tire with a tread width (not section width) that matches my wheel choice. On my Miata, that could be a 225 on a 9” wheel or a 245 tire on a 9.5-10” wheel. On a heavier car, I might lean into a 265 tire on a 10.5-11” wheel, but I’d have to see how the points shake out. Tire compound is way more important than tire width anyway, so that’s going to be the thing to simulate.
Aero
Most aero items appear to be free, and so if your car has hood and fender vents, canards, a diffuser, or other unlisted aero items, you’re only bound by the “can’t be overly large” clause. The only thing FARA penalizes are splitters and rear aero. And honesty, I agree with that.
2″ splitter – 1 point
4″ splitter – 2 points
>4″ splitter – 3 points
150 square inch spoiler or wing – 0 points
249 square inch spoiler or wing – 1 point
499 square inch spoiler or wing – 2 points
699 square inch spoiler or wing – 3 points
700+ square inch spoiler or wing – 4 points
I’ll have to run simulations to determine which aero items to choose, but the 2″ splitter and 249 square-inch spoiler (not wing) would be a good low-DF combination for 2 points. A 4″ splitter and 699-ish wing is a proven combination on tracks around the world, but for only 2 more points I might rather use a larger splitter and a dual wing. Running simulations will be important here.
Misc points
I already went over coilovers, and so the remaining things FARA assigns points for are the following:
Aftermarket brakes (1 point) – You only need to set one fast lap in time trials, so I wouldn’t opt for aftermarket brakes.
DCT-type transmissions (1 point) – I guess this is an advantage, but I would personally never. OptimumLap does instantaneous shifts, so I have no good way to simulate this, so I’ll ignore this for now.
Changing the gearing (3 points) – I have run thousands of simulations in OptimumLap, and I can tell you with certainty that gearing is the least important factor. I’m not sure why FARA charges 3 points for this, and no build I’d spec would change the gearing. And how were they going to police this anyway?
Guidelines
After reading the rulebook, I’ve got the following parameters:
12 lbs/hp or worse.
200 TW or A7 on the widest wheel possible; tire width TBD.
No aero vs small splitter with 249 square-inch spoiler vs unlimited splitter and max wing.
OptimumLap Simulations
To calculate lap times, I’ll build the various cars and test them at Sebring. I don’t have Homestead in my list of tracks, but if someone gives me 10hz GPS data I could run some simulations on that as well.
The first thing I’ll do is load up a test vehicle to represent an average car. It weighs 3000 lbs and has an even power spread with 150 hp and torque. Don’t worry about that 20:1 lbs/hp ratio, because I’ll be using the Power Factor modifier to make adjustments up and down the scale. I’ll also specify some round numbers for frontal area, drag, etc. But take note that the coefficient of downforce is -0.15, which is a negative number and represents lift.
Screenshot
OptimumLap uses a coefficient of downforce, not lift, and so if you are used to using negative numbers to represent downforce, invert them. Most passenger cars have around .15 positive lift, and so you’d enter -.15 in OptimumLap.
Note that the lap times are not supposed to be 100% accurate, but the deltas are. In order to get accurate lap times, I need to factor in things like surface grip, camber, and other variables, which are time consuming. I’m really only interested in, is this faster than that, which I can get from OptimumLap without doing the corrections.
Next I’ll do a Batch Run simulation and sweep the Power Factor in 20 increments. This will allow me to see how the various lbs/hp ratios and lap times play out. I’ll run the batch simulations three times: once for the 300 TW, once for 200 TW, and once for Hoosier A7. It went like this:
Batch simulation runs for the three tire choices.
SL4 (yellow) – Given 14 points to work with, the fastest lap is with 200 TW tires. It’s 3.4 seconds faster than the 300 TW, and 1.1 seconds faster than the Hoosiers.
SL3 (green) – With 21 points to spend, the results are pretty much the same, and I’d want the 200 TW tire.
SL2 (cyan) – Same deal with 28 points, but the Ho-hos are catching up.
SL1 (orange) – With more points for power, I’d be smoking purple crack. The Hoosiers go 1.3 seconds faster than 200 TW.
I haven’t factored in aero yet, but the trend is pretty obvious for SL4 and SL3: use 200 TW tires unless you have 34 points to work with. Next I’ll build a couple aero cars, but I don’t need to sweep all the values, just simulate builds that correspond to 14, 21, 28, and 34 points. Like so:
Which results in the following summary of classes and lap times.
Lap times by class and build.
Given all of these simulations, here are the builds:
SL4 – 19 lbs/hp with a 2″ splitter, 6″ spoiler, and a 225-width 200 TW tire on a 9″ wheel. This is probably a NA/NB Miata with a few bolt ons.
SL3 – 15.5 lbs/hp with no aero, 225-width 200 TW tire on a 9″ wheel. There are a lot cars around this power-to-weight ratio, from ND1 Miatas to Mini Coopers to BMW E46s, etc.
SL2 – 12 lbs/hp with a 2″ splitter and a 6″ spoiler. At this power level, you’re probably looking at a 245-width 200 TW tire on a 10″ wheel, and that would cost another point for tire width, so the car would be at 12.6 lbs/hp. No big deal. My Veloster N would go into this class, as would many faster cars.
SL1 – Same car as above, but now on Hoosier A7s.
SLU – A Corvette C8 (stock, as delivered) would go into the Unlimited class based on power-to-weight ratio and tire width. It would do about the same lap time as the SL3 car. This shows you just how imbalanced GT the FARA system is, and how building a car to the limit of the rules is a huge advantage.
Before I go, I guess you might be wondering why I specced a spoiler and 2″ splitter. Well, a single wing (499 sq-in MSHD) and a 4″ splitter would cost an additional 2 points. And while this would confer more aero benefit, I feel the results would be quite similar. I guess if you really want me to know the values, buy me a coffee and I’ll run those, or get OptimumLap (it’s free) and do them yourself.
Conclusion
The primary purpose of an amateur time trial series like FARA is to get like-minded enthusiasts together and have some fun. If the existing rules do that, then I’d call it a success. But if rules result in bad feelings and unfairness, then that’s not a success. However it shakes out, I really like FARA’s philosophy and general intent, and wish them and their competitors good luck.
If I was going to fix the rules, I’d do this:
Reverse the weighting of points in the power-to-weight rubric so that it matches the real world of diminishing returns.
Create a tire point system based on GRM letter grades. The best way to do that would be to runs hundreds of simulations; an easier way would be a straight scale: D = 0, C = 2, B = 4, A = 6, AA = 8, AAA = 10.
Penalize points for tire width where vehicle weight is < 11 times tire width (wide tires) and give back points where vehicle weight is > 13 times tire width (skinny tires). Or, just ignore tire and wheel width altogether.
Double the points for coilovers (2 points for 1-way, 4 points for 2+ way).
Throw out the points modifiers for aftermarket brakes and gearing changes.
My all-time favorite tire is the Hankook Ventus R-S4. They grip well, break away predictably, howl audibly, and stay consistent for hours on end. The symmetrical tread pattern allows you to flip the tire on the rim, and so if you have a camber-challenged car, you don’t have to throw out the tire after wearing out the outside shoulder. On a performance per dollar basis, there is no tire that can equal its combination of grip, durability, and value.
I have heard people complain that they are slow, or suck in the rain, but those people must be comparing them to a Super 200, like a RE71RS or A052. In the Enduro 200 segment, the RS4 is equal to or faster than any other tire.
Several years ago my brother and I tested four 200 TW tires at Thunderhill West in his Yaris. The RE71R was the fastest, but only barely faster than the RS4, and I was most consistent on the kooks. You can read about the subjective testing in Part 1 and data analysis in Part 2. The big takeaway wasn’t just the lap times, but how the tires felt, and the RS4 was my favorite.
If you don’t trust my driving skills, Tire Rack also tested the RS4 versus various other tires. The RS4 was a second faster than the slowest tire in the test, the RT615K+, but lagged 1.5 seconds behind the fastest, the RE71RS. But compared to other Enduro 200s, the RS4’s lap times were right in the middle of the range, equal to the Continental ExtremeContact Force, Michelin Cup2 Connect, and Yokohama AD09.
Tire Rack’s testing of various 200TW tires puts the RS4 right in the middle.
Of course Andy Hollis has also tested the RS4 for Grassrooots Motorsports, and you can read those comparison tests here and here. But another tire test you may not have seen is one of the best tire evaluations I’ve seen anywhere, and it’s from Rugged Badger Racing. What Roy has done in this video is look at tire tests performed by Grassroots Motorsports and others, and normalize the data using tread width and tire width. After much exhaustive research, and a fabulous spreadsheet (which he links to in the comments), he’s determined the speed of each tire, and the cost to run them.
Roy’s data analysis comes from a lot of personal tire testing, as well as research across multiple online tire tests.
As impressive as Roy’s spreadsheet is, there’s a lot of extra data in it, and so I made a copy, hid several columns, and offer you the following distilled version that applies to Miatas only:
Estimated lap time and costs in 15” Miata sizes.
Note that I deleted the Nexen Sport R tire, as they seem impossible to get. I also made the lap time basis an even 100 seconds, so the faster tires can be seen as a percentage faster than the RS4. Otherwise all of the data and analysis is his, and I want to say a big thanks to Roy for nerding so hard on this.
Now if you’re looking at this data and wondering why the A052 is the same speed as a RS4, it’s because the A052 only comes in a 205 width. You really need to watch all of Roy’s video to get the explanations, but as you can see, the 245 RS4 is still the best Miata tire for endurance racing, being only a second or so behind the fastest in class, while costing much less. The Continental ExtremeContact Force is 0.1% faster, but it’s about double the running costs.
Another reason Miata people love the RS4 is because it comes in all the Miata sizes.
195/50-15 – Don’t think of this tire as a 195, it’s actually wider than most 205 tires. This is the perfect size for for 6.5-7.5″ wide wheels.
225/45-15 – This tire on a 9” wheel is one of the best combinations for track driving. The sidewall stretch makes for a very precise turn-in, and a playful and predictable feel.
245/40R15 – The widest 15″ size gives more grip and longer wear, but you should run this on a 9.5″ wide wheel for the best results. If you have a boosted or swapped Miata, these are your dancing shoes.
But not for the Veloster…
As much as I love the RS4, I’ve never had them on my Veloster N. The reason for that is twofold: 19” tires are stupid expensive, and the Veloster can’t easily fit a 245/40R18.
To the first point, I can get a 235-width RS4 in a 19” diameter at a heady $326 apiece. But I wouldn’t put track tires on my OE wheels, nor would I buy aftermarket 19” wheels. This is because, like most track enthusiasts, I swapped the heavy OE 19×8 +55 wheels for aftermarket 18×8.5 +45 wheels. This drops about 10 lbs per wheel, plus the tires are typically 20% cheaper.
Hankook makes a 245/40R18, but it runs wide, and it won’t fit a Veloster N easily. One of the major problems with the VN is the inability to use wide wheels and tires. A Civic Type R comes with 10″ wheels and 265 tires, while the Veloster struggles to fit a 8.5″ wheel and 245s.
This combination just barely clears the fenders with some of the narrower 245 tires, but you might need to roll and pull on the metal to avoid cutting the rubber. If you have coilovers you can get more negative camber, but with just camber bolts and stock suspension, you’re typically stuck with a 235 tire. And this sucks because many of the 200 TW enduro tires don’t come in a 235 width. Continental ExtremeContact Force, Maxxis VR1 or VR2, and my favorite, the Hankook RS4, come only in a 245/40R18.
Coming soon, 235/40R18
I just looked at Tire Rack and saw that they have the RS4 in 235/40-18. Now this was a surprise, because I have absolutely checked Tire Rack’s website many times for this phantom size, and it has never existed before. Thinking this was an error, I went to the Hankook website, and sure enough, the manufacturer doesn’t list this size at all! (Update, now it does, but not on the Shop page.)
I called Tire Rack to investigate, and they assured me that they had this size tire in stock, but there was only one tire. They were as perplexed as I was about why they had just one tire of a new size, but perhaps they were sent an early sample to measure it up?
Looking at the specs of the tire, right away I think I see a mistake. The tread depth is listed as 7/32″, while every other RS4 is listed at 8.9/32″. I think I know what’s going on here, which is that 7mm is equal to 8.9/32″, and so someone entered the tread depth information incorrectly. However, this being a new size, perhaps they changed something? When you create a new tire mold, I imagine there’s an opportunity to sneak in some updated technology, and reducing tread depth would certainly make the tires faster off the shelf.
Speaking of specs, the tread width measures 8.6″. The rule of thumb is to match wheel width with the tire’s tread width (not section width). Many people believe you should fit the widest tires you can, but it turns out that’s not true. Tire Rack did a very good investigation into wheel and tire widths, and found that properly sizing the tires to the wheel width makes the fastest combination, and narrower tires were often faster in the dry, and always faster in the wet. (As a side note, when Tire Rack put out this report and accompanying video, my brother and I vowed to buy all of our tires from Tire Rack in the future. This is the kind of reporting that buys our allegiance.)
So that you can choose the appropriate tire for your wheel width, I made the following table listing various track tires by tread width:
Common wisdom is to match tread width (not section width) to wheel width.
Notice the average tread width of a 235-18 track tire is about 8.3”. Continental and Michelin tires run a bit narrower, while the Super 200 cheater tires (A052, RT660, etc) run wider. But RS4s are also on the wider side, and at 8.6”, the 235 RS4 should be ideal for my 8.5″ Konig Countergrams. Given Tire Rack’s testing, I’d bet even money that the 235 is faster than 245 on 8.5″ wheels.
Up until a day ago I didn’t know which tires I was going to use this year. I almost resigned myself to buying off-brand all-season tires in an effort to find the best of the worst. As fun as it sounds to gather that data, it’ll be great to be back on the kooks again.
Despite only having a single tire in stock, Tire Rack assured me that they would be regularly stocking this size in the future, and that the first shipment is due on April 1st. Trusting this isn’t an April Fools joke, I gave them my credit card number so I can be at the front of the line when they unload the first shipment.
Thank you Hankook for making the RS4 in Miata sizes, and now a Veloster size. Thank you Tire Rack and Roy for exhaustive testing and reporting. Let’s get this track season started already!
Update: Buy your wheels and tires from Tire Rack
Since posting this article I’ve added wheels to my order, and this is significant news for one thing that I just learned: you can order any wheel you want from Tire Rack.
If you use Tire Rack’s website and search for wheels, you must enter your car info. They won’t sell wheels without knowing what car they are for, and they won’t sell you anything with an aggressive fitment.
The only 8.5” wide wheel they’ll sell me for my Veloster N is an Enkei with +50 offset. It’s a fine wheel but at 20 lbs, it’s 2-3 lbs heavier than a Konig wheel of the same size. And while I like the 9-spoke pattern on the TS9, I’d prefer a 10-spoke.
What galls me is that I know for certain that a +43 offset fits just fine, and I also know Konig has a bunch of wheels in the +43-45 range. I also know Tire Rack sells them, but there’s no way to actually order them for my car using their website. However, there’s a simple workaround.
It feels so 1999, but call 888-456-1732 and press 1 for Sales. I talked to Luke, who absolutely knows his shit, and he set me up with bronze Konig Dekagrams in 18×8.5 +43. The price was the same you’d see anywhere else, but also cheaper because Tire Rack will fit the TPMS sensors, plus mount and balance the tires for free. If required, they also send centering rings, lug nuts, and a drive tool for free.
Tire Rack hooks you up with the freebies.
I was already pleased as punch, but then the very next day I got an email to say my order has been shipped! Well either they were sitting on more than a single tire, or that April 1st shipment arrived early. Either way, track season has begun.
This winter I went to Florida to visit my in-laws for a couple weeks. My original plan was to drive my Veloster down and do some track days. I’d take a break from pickleball and cribbage, and do some driving at a couple tracks I’ve been to before, The FIRM and Sebring. And then maybe pick up a new track sticker after hitting Homestead.
But The FIRM didn’t have any open track days for the two weeks I’d be down south. Same deal with Homestead. There was only one open event at Sebring, but it was a Track Night in America, and I swore I’d never do one of those again. The one TNIA I did at Palmer felt like UDWFCNIA (Unskilled Drivers in the Wrong Fucking Class Night in America).
So with no public track days on the calendar, the only chance I’d have to drive on track would be a private race track. As luck would have it, Circuit Florida is near my in-laws.
If you haven’t heard of Circuit Florida, it’s because it’s a members-only track, similar in concept to Monticello, M1 Concourse, Apex Motor Club, Atlanta Motorsports Park, etc. These are exclusive country clubs with initiation fees that range from $15k to $115k, and you pay annual dues on top of that. Many of these tracks have onsite garages and/or condos, and some require that you buy property to get into the club.
It’s so perfect it looks like a rendering. And the inside of the condos are stunning.
As expensive as they are, this business model seems to be gaining in popularity, and more private tracks are popping up. From a historical standpoint, it’s not surprising. Horses were once used for transportation, but are now mostly a pastime for the wealthy. In the future, that’s the way it may go with cars; most of us will be transported by electric self-driving shitboxes, while rich people will keep a stable of cars, and use them for recreational track driving.
Whatever happens in the distant future, the immediate future required a call to Circuit Florida to make an appointment. The track manager, Adam Ricardel said I could take some laps in my Veloster. But in the end I decided not to put 2400 miles on my car for a few parade laps. Instead we took my wife’s Mini Cooper to Florida, which is on excellent snow tires, and that would turn out to be important an important decision for the return trip.
Circuit Florida is awesome
Circuit Florida is the brainchild of Paul Scarpello, a successful businessman who had the means to buy the land and build the track by his lonesome. As such, the entire operation isn’t a fantasy-land held up in committee, but a real-world commitment driven by a single vision. That vision includes hiring Bob Barnard to design the layout, acquiring the most expensive motorsports-grade asphalt available, doing a tits job of paving it, building upscale condos and garages, and executing all of it with pace and precision.
Paul’s track manager is Adam Ricardel, who has a long list of credentials (Chief Instructor this, blah blah blah that), but I’ll tell you the one thing you need to know about the quality of his character: he races an E30 in Champcar (I’m pretty sure I’ve raced against him at Sebring and possibly WGI). He’s a savage wheelman who can can talk at eye level with both millionaires and average Joes, and is exactly the guy you’d want to be in charge of the track.
Circuit Florida has a paperclip layout, optimized for the available space, with 1.7 miles fit into fast straights and technical corners. Adam drove me around in one of the track’s fleet, a Mustang something or other, and while the car was forgettable, the track was not. It’s goddamn fantastic.
There’s 30 feet of elevation, which is well placed.
Being situated in Florida, you’d be right for thinking it’s flat. But then you’d be wrong. There is a surpising amount of elevation on this track, and it’s used strategically to create a more technical layout. With long straights and slower corners, both supercars and Miatas would be at home on this track, but the latter would be more fun. In fact the club is buying a fleet of MX-5 Cup cars just for members to race around in.
Of course there will be a swank clubhouse, and they are building a gym and restaurant, and maybe a business center, I forget. That kind of thing doesn’t blow my skirt up, but the track has my utilikilt up around my shoulders. And here’s the kicker, Circuit Florida recently received zoning and site plan approval for an extension of its racetrack to 2.4 miles, a skid pad, off-road driving course, a 6-acre industrial pad site, and 75 additional trackside condos. Hallelujah.
There’s a bit of elevation here at pit entry.
So what’s all this going to cost? About $20k for a one-year trial membership. If you’re all-in from the get-go, the initiation fee and monthly dues also works out to around $20k per year for 10 years of membership. This is a rich person’s playground, and my Veloster would look a little out of place next to the member cars I saw lapping on track. There was a brand new 911, a Lamborghini LP610, a brace of McLaren 720S (one with an extra 150 hp), and a AMG GT with all the options. I’d have passed every one of them, but there’s always an inverse relationship to money spent and skill, especially with these kinds of clubs.
Typical member car. Just point me by, please.
Frankly, these are not my people, and it feels weird rubbing shoulders with people that don’t have dandruff on them. But if I lived in Florida, I’d join this club for the same reason I pay for YouTube Premium: I hate commercials. But in this case it’s not so much commercials, it’s the morning drivers’ meetings.
8 am drivers’ meetings are a vampire draining 30 minutes of life from 100 people at a time. It’s the same shit every time: thanking the registrar and other clerks for doing their jobs, going over the flags we’ve seen before, how to do a point-by, basic safety rules, dumb jokes, and all the other shit we’ve heard over and over again. The unfortunate part is, if there’s truly anything important to be said, it’s lost in the chaff of sameness. There ought to be a TSA-Pre version of drivers’ meetings where we get a 3×5 index card with any important safety issues. And nothing else.
Rant off. The other reason I’d join Circuit Florida is the convenience. I like to be able to show up whenever I want, run some laps, and go home after a couple-three sessions. I also do a lot of aero and tire testing, and I need a fairly open track and the ability to pit and change things every few laps. I get that now at Pineview, and I require more of the same.
I’ve been a member at Pineview Run since 2019, and the experience has spoiled me rotten. Even if Pineview Run is rather small, being able to drive at a moment’s notice outweighs the combination of cost and butting heads with management. So, yeah, I’d pay a ridiculous amount to belong to a private track club in Florida.
And it’s honestly not that ridiculous. If you consider the average track day is $400, I’d break even after 50 events. I mean, if I was living in Florida, what else am I going to do with my time? I would 100% join Circuit Florida.
Florida Man
Florida Man is an Internet meme first popularized in 2013,[1] referring to an alleged prevalence of people performing irrational or maniacal actions in the U.S. state of Florida. Internet users typically submit links to news stories and articles about unusual or strange crimes and other events occurring in Florida, with stories’ headlines often beginning with “Florida Man …” followed by the main event of the story. – Wikipedia
I’ve laughed at my share of Florida Man memes, and it makes me wonder how many are actually true. Well here’s one that’s real:
“Florida Man discovers that a small corner of a race track is within the restricted flight path of a neighboring airport and closes the track, incurring the wrath of local car racers, and nullifying years of track data.”
This amount of turf is apparently very important to someone in the air. Only in Florida.
As the story goes, some Florida Man made an airport surveying error back in 1999, and when The FIRM took over the lease in 2013, they had no idea said map was off by a few feet. But Florida Man 2025 decided that this is an important piece of real estate for a flight path, and shut that part of the track down.
I have to think that if it was me that noticed this tiny discrepancy, I would have let it go; it obviously hasn’t been an issue in a quarter century of takeoffs and landings. But Florida Man got a bug up his fuselage about it, involved the FAA, and now The FIRM is embroiled in a legal battle with a Government agency. I can’t imagine how much fun that’s going to be. Thank you Florida Man, I’ve got a dick punch and a hertz donut for you.
The FIRM
I only have one day of driving at The FIRM, in my buddy Brad Alderman’s ND2 Miata. The track is short and mostly flat, but it’s a fun combination of technical corners, one high speed pucker, and the biggest wall of Armco you’ve ever seen. Compared to places like Watkins Glen or Lime Rock, The FIRM is insignificant. Except for one thing: the Grassroots Motorsports leaderboard.
If you want to research car performance, a lot of people’s first stop would be the lap times from the Nurburgring. On this side of the pond we have don’t have the same kind of proving ground, but some journalists get together every year for Car and Driver’s Lightning Lap, which is a measure of something (if not an entirely accurate one). And then you have smaller and more accurate leaderboards, like the one GRM keeps at the FIRM.
If you check out Grassroots Motorsports ultimate guide to track car lap times, you’ll see a very good example of how to keep an accurate leaderboard. They list the tires, weather, and try to use the same driver as much as possible. If you click on the car, you’ll see an in-depth article, or even a video with data analysis. Unfortunately, whatever The FIRM does next, GRM is going to lose the ability to test new cars and compare that directly with the historical data that they’ve done such a great job acquiring.
Maybe there’s an upside to all of this, though. When The FIRM redesigns the track, perhaps they’ll be able to make some improvements. The big Armco wall is a tad intimidating, and the esses are so mild people just drive a straight line through them. So let’s be optimistic about the change, and maybe someone can figure out a correction factor to equate the old times with new.
In the meantime, did you know that the lap times from Toronto Motorsports Park are pretty close the The FIRM? Yeah, check out Speed Academy’s leaderboard and it’s nearly the same times. Let’s just cross our fingers that they don’t have a Canada Man.
Miatas are underpowered from the factory, but because they have rear-wheel drive, perfect weight balance, and skinny tires, they are fun to drive. Combine those traits with sporty suspension, precise steering, and a slick 5-speed manual, and you have the ideal recipe for a backroads sports car.
But take that same car to a race track and it’s a fucking embarrassment. Worse, it’s a rolling roadblock. If you look at historical data from Car and Driver’s Lightning Lap, there are only two cars slower than a 2006 Miata: a Honda Fit and a Kia Carnival (a minivan FFS). Miatas have gotten faster through the years, but even the fastest one, a 2019 RF Club, was humiliated by two generations of Honda Civic. No, I’m not talking about the Civic Type R, but the pedestrian Si model.
Historically, the problem with older Miatas is the engine, and so the aftermarket is rife with options, from bolt-ons, to forced injection, to motor swaps. One day I’ll write an article sorting these out, but for now I just want to talk about what I feel is the right amount of power, and what I feel is the best way to get there.
The right amount of power
I’ve driven Miatas from 90 to 250 hp, and I can tell you that from my point of view, the sweet spot is below 200, and probably somewhere around 175 hp. To be clear, I’m talking about track driving, not about drag racing, highway pulls, or other straight-line bullshit that ignores the Miatas purpose.
A track-prepped Miata at 2350 lbs (with driver) and 175 hp at the wheels has about 13.5 lbs/hp. For comparison, that’s about the same as a track-prepped E36 M3, and that’s good company to be in. Of course more power is faster, but there are diminishing returns, and after a certain point, the engine begins to dominate the experience. That’s fine if you like muscle cars, but Miatas have always been about balance, and being more than the sum of its parts. As such, I don’t believe 200 hp is what this platform wants or needs; there are better cars for that.
13.5 lbs/hp is plenty fast, and with a little ballast, it would be possible to race in NASA ST5/TT5. At one point I was also considering GLTC, and after taking points for aero, the car can be no better than 13 lbs/hp. Now I’ve seen the lap times TT5 and GLTC racers put down, and I don’t need a Miata to go any faster than that.
I’ve also driven three very different Miatas back to back to back on a race track, and to my surprise, my 145 hp 1.6 Miata was faster than a 200 hp K-swapped Miata. The KMiata was on better suspension and tires, and yet both drivers went faster in the less powerful car. And so I know for certain that 200 hp isn’t the answer, and that less is sometimes more.
But the star that day was Dylan’s VVT swap, which remains one the best Miatas I’ve driven. It struck an ideal balance of power and drivability, retaining all that is good about a Miata, with a motor to match. Dylan later added a turbo, but after finding out his car was better without it, reverted to a normally aspirated build. See? More evidence.
For all of those reasons, I believe 175-ish whp is ideal for a NA/NB Miata. So, what are the options to achieve that?
VVT 10/10 – Getting a BP engine to 150 hp at the wheels isn’t terribly difficult, but 175 hp sure is: full bolt-ons, head work, cams, a custom exhaust, a standalone ECU, possibly ITBs, and of course, lots of dyno tuning. They say the last 10% of performance is 90% of the cost, and that’s where you’ll be. This isn’t the best use of money, but if you want this option, contact Stefan Napp.
Turbo – Even the smallest turbo will easily make 175 hp on an otherwise stock engine. It’s cheap and easy, but in exchange you have turbo problems. Many people accept that trade, but I’ve seen too many broken turbo Miatas to take the plunge. Also, it seems like most turbos end up above 200 hp, and thus beyond my needs.
Supercharger – An M45 supercharger with an intercooler and smaller diameter crank pulley can get close to 175 hp, but the problem is heat soak after multiple laps. So this is a better option for a street car than a track car, but I heartily approve of the quantity and quality of power, and of course the sound.
K24 – As stated earlier, I drove one on track and it was slower than my cammed 1.6. I know a lot of people are happy with their K swaps, but for me it’s too much engine, too expensive, and too Honda.
Hayabusa – A gen-2 Hayabusa swap from Spec13 probably won’t make 175 hp, but since the engine is lighter, the end result should be in the ideal lbs/hp range. What’s not ideal is the lack of reverse gear, and less than 100 ft-lbs of torque. I’m currently part way through my own Busa swap, and so I obviously think this is a good option for a hardcore race car, but this swap isn’t for everyone.
Ecotec – To get a BP Miata engine to put out 165-170 hp is a lot of money and work, which is where an Ecotec fuggin starts. The path to 175 hp is cheap and easy, and there’s buckets of torque that a BP engine can only dream about.
An Ecotec swap makes a lot of sense. Sensible person that I am, I contacted EcotecMiata a couple years ago and asked them to do a turnkey swap. I’d simply drop off my car at their headquarters, and pick it up a few weeks later ready to drive. But they were terrible with communication, and so despite several attempts, it just never happened.
Fast forward a couple years and EcotecMiata is now under new ownership. The new owner, Cameron Recknagel, is solving some of the age-old problems with the swap kit, adding new performance options, and most importantly, communicating with customers.
I’ve known Cameron for several years, his Star Wars themed Miata was the first car I featured on this blog. Back in 2019 he had a tuned BP and raced Lemons, but in the quest for better race results, and junk yard available engines, he swapped in an Ecotec. His wealth of knowledge on the platform is another strong reason to choose this swap.
Ecotec problems… solved
Every motor swap is in some way or another a disaster, and as an early adopter, Cameron experienced several of these teething problems. The biggest hardware problem was a leaking oil pan; it wasn’t always straight, had bad welds, and the baffles inside would break.
1” thick aluminum adapter plate.
Cameron’s solution to this is simple; use an existing oil pan from another car and make up a custom adapter plate. He let the OEMs do the hard work and adapted an off the shelf stamping to an inch of billet aluminum. Don’t worry, the oil pan sits flush or slightly above the subframe, and so it’s not going to deck out; the lowest part on the car is actually the exhaust crossover tube.
This was always a problem with the swap, because the exhaust is on the other side of the car. The exhaust needs to cross over from passenger side to driver side, but the PPF is in the way. And so is the clutch fork.
Cameron’s solution to the clutch fork problem was the same as the oil pan: use existing parts. He took an existing hydraulic throwout bearing kit and moved the clutch slave inside of the transmission. This makes routing the exhaust much easier, and his internal clutch slave kit even works with other swaps so long as they are using Miata clutch kits and transmissions.
So let’s talk numbers, most importantly cost, hours, horsepower, and torque.
Ecotec by the numbers
I’d guess most people choose an Ecotec swap because you can find junkyard motors for $200. This is dirt cheap by any measure, especially with Miata motors going for over $1200, and K24s going for a couple thousand. On a dollar for dollar performance calculation, the Ecotec wins.
The other part of cost that you need to factor in, is how long it takes to do the swap. Most other engine swaps require modification of the stock subframe, which isn’t necessary with the Ecotec Miata swap. And unlike using forced-induction on a BP, the stock radiator is ample for the 2.4L Ecotec. It’s not a terribly difficult operation to swap in the motor, and three people can do the full swap in a weekend.
Three people? Well, extra hands help. An Ecotec is about 40 lbs heavier than a BP motor. The head is a lot bigger, and inside the block you have a heavier crank and balance shafts.
Bigger, but still plenty of room. Notice the intake is now on the cold side of the engine.
Power-wise, a bone stock port-inject Ecotec swap with a drop-in tune will make between 165-170 hp. I don’t think a Miata needs any more power than that, but if you have a heavier car and/or simply want more power, common bolt-ons include replacing the cast-iron exhaust manifold with a Polaris header, and something Miata people are familiar with, swapping OE cams.
On Miatas, you can modify the exhaust cam and swap it onto the intake side, which provides a little more duration. The exhintake cam swap can make up to 8 hp when properly timed and tuned. The Ecotec cam swap is the opposite; you put the intake cam on the exhaust side. This gives more lift and duration, and results in 15-20 hp. Because you can pull a cam at the junkyard for $20, there probably isn’t a more cost effective gain to be had anywhere.
The cheapest power you can get.
For additional power, some people may want to remove the balance shafts and/or water pump, but Cameron advises against this. The small amount of power gained simply isn’t worth the loss in reliability, or the headaches that ensue. With the balance shafts in, you end up with a Singer sewing machine up front for your daily commute that’s hiding +175 hp for the track. Keep this engine under 7500 and you can beat on it like it still owes you that $209.99+tax. Just make sure to put good oil in and a Hengst oil filter (seriously, use no other filter, they like to collapse).
If you need more power, race camshafts, a plug-n-play standalone ECM from BMEP Solutions, and turbo kits are a call away. While the internet isn’t ripe with aftermarket parts like a K-motor, parts are still readily available, and Cameron assures me Ecotec Miata is there to help.
But like I started with, I don’t want anything north of 200 hp, and so a basic kit would get me there. Here’s a dyno chart showing a bone stock engine that makes 160 hp. This is a little on the low side compared to some junkyard engines, but with a Polaris Slingshot header ($200) a shorty ram intake, and a little tuning, you can easily make over 172 hp.
Red: stock. Blue: short ram intake and BMPE tuned.
Cameron’s personal endurance racing engine sports regrind cams, and smartly retains the water pump and balance shaft for all-day running. Even with worn out piston rings this put out nearly 200 hp. See for yourself.
The swap kit is competitively priced at $4500, which is similar to a Busa swap, but cheaper than most others. The real savings is the $200 motor, and how cheaply you can get another 20 hp. With a weekend of wrenching you can upgrade that moving chicane to something that will keep putting a smile on your face, and give German sports cars something to worry about.