How much downforce does your car wing make? Mathematically, you can calculate downforce using this formula: downforce = 1/2p * A * Cl * V^2. If that means anything to you, then you don’t need this website. If that calculation scares the shit out of you, I provide a cheat code below makes it a lot easier.
However, if you’re not interested in math, and more interested in exactly how much downforce different wings make on different cars, I’ve tested several wings and spoilers in a wind tunnel.
The wings tests span two different wind tunnel reports, because the cars are quite different, and that ends up mattering a lot more than the wing itself. Click the button, fill out the form, and you’ll get a link where you can download the reports.
1/2p – I’ll simplify this as a constant value of .00119. That’s all you need to know about 1/2p. (It’s air density, which changes due to elevation, temperature, and humidity. Accept this static value and move ahead.)
A – This is the area of the wing in square feet. If you have a 64″ 9 Lives Racing wing, then your area is about 4 square feet (64″ x 9.25”/ 144”).
Cl – This is Coefficient of Lift. It’s a tricky value because it changes with different shapes of wings, how fast you’re going, the wing angle, and turbulence. For the time being, you can use a value of 1. Multiplying by 1 is easy, and I’ll explain later why this is also a reasonable value.
V^2 – Velocity in feet per second, squared. For this you need to know that 1 mph = 1.467 feet per second.
OK, so let’s figure out about how much downforce a 4 square-foot single-element wing produces at different speeds. Three things will remain constant, the 1/2p value, the wing area A, and the coefficient of lift, Cl. Multiply all those factors together and you get a value of .00528836. Now all we need is to multiply .00528836 by the velocity in feet per second, squared.
Velocity
FPS ^2
Downforce
40 mph
3441.8
16.5 lbs
60 mph
7744.0
37.2 lbs
80 mph
13767.2
66.2 lbs
100 mph
21512.1
103.5 lbs
120 mph
30976.0
149.1 lbs
Downforce at various speeds, 9LR 64″ wing, Cl 1.0
How Much Added Grip?
If we assume that tire grip is linear with weight we can calculate the amount of grip you gain at different speeds. (For an in-depth look at how tire grip and aero are related, see Tire Grip and Aero.) Downforce helps light cars more than heavy cars, because the percentage gain is greater. I’ll use the same wing and speeds to illustrate this.
Speed
2400 lb car
3000 lb car
40
.76%
.60%
60
1.70%
1.36%
80
3.03%
2.43%
100
4.74%
3.79%
120
6.82%
5.46%
Grip increase at different speeds using the same wing.
You can see that at low speed, downforce isn’t very effective, and you might question its use for autocross (40 mph avg). To be fair, drag isn’t very consequential at low speed either, so as long as your aero parts aren’t heavy, or at the polar ends of the car (which they usually are), then low speed aero is somewhat useful.
At medium speeds, downforce is a noticeable advantage. If you’re looking at this table and thinking 3% grip isn’t that big of a deal, it is. At a high speed track like Watkins Glen, it can be the difference of 5 seconds per lap, or more. I go into that in depth in How Much is Aero Worth in Lap Time? .
Coefficient of Lift
In the above calculations, I chose a Cl value of 1.0. However, some airfoils can achieve over twice that much downforce, and you can read about that in Airfoil Comparisons, where I review the best airfoils for car wings.
But don’t get too excited about the high Cl numbers. There is always something creating turbulence at the front of the car, which creates downstream losses on the wing. This could be hood and fender vents, canards, sharp angles at your roofline, the wake of other cars in front of you, crosswinds, or all of these. Anything that creates turbulence destroys lift.
I saw this firsthand when I changed only the roofline shape on my car and back-to-back tested them: removing the top resulted in only 40% of the downforce as an OEM hard top; A fastback increased rear downforce by 130%. That’s a dramatic example, but you can see that it’s possible to lose or gain over three times the downforce by changing only the shape of the roof.
So this is a very long-winded way of saying that a coefficient of lift of 1.0 is fine for rough calculations, on a single element wing. For a properly designed dual element wing, you can use an equally rough value of Cl 1.5. My original dual element wing measured more like 1.3, but I’ve made more modifications since, and it’s probably closer to 1.5 now.
Since coefficient of lift is affected by roofline shape, use the following modifiers when you calculate downforce for a Miata (or other convertible).
If you have an open top convertible, divide the wing’s downforce by 2.5.
With a choptop (or a hardtop with the window removed), cut downforce in half.
With an OEM hard top (also probably applies to a convertible with the roof up), use the figures in the table as is.
With a fastback, multiply by 1.25.
If you want to nerd out on it, you can experiment with wing shapes, angles, turbulence, and lift using the NACA wing calculator or BigFoil. If you want real values, you don’t do rough calculations, you hire someone like Kyle Forster to do CFD on your car. Or if you want real-world data, hire Man and Machine Consulting, who did the testing on my car.
If you’re looking for more reading on car aerodynamics, check out my resources page. If you found this or other posts useful, consider buying me a coffee so that I’ll be fueled up to write more informative posts. Thanks!
Someone on Facebook said this title was click bait. That’s fucking hilarious since I don’t sell anything, there are no ads on this site, and I have absolutely no reason to mislead you, or anyone.
If you’re tracking a car in HPDE or racing in a series where weight doesn’t matter, obviously make the car as light as possible. As Colin Chapman said, “Simplify, then add lightness.” But some racing series are based on power to weight ratio, and in this case, lighter is not always better.
The NASA Super Touring series, Gridlife, Pineview Challenge Cup, and many others use the weight of the car divided by horsepower as the primary balancing factor. And why not? Mathematically, that seems like a good way to create parity between different cars. Well, if they were all racing in a vacuum.
In the real world, air has resistance, and overcoming resistance requires power. Drag increases at the square of the speed, so there’s about twice as much drag at 100 mph as there is at 70 mph.
Let’s take a look at two cars with identical shapes. They both have a frontal area of 20 square feet and a coefficient of drag of .48 (typical race car with windows open). The cars differ in weight, one is 1800 lbs the other is 3000 lbs.
If I input those numbers into the RSR calculator, I find out that it takes about 81 hp for the lightweight car to reach 100 mph, and about 85 hp for the heavyweight car. So weight is not a large factor here. For both cars, 60 hp is lost to drag.
Now I’ll increase the speed to 120 mph to simulate the back straight on the closest track to me, Watkins Glen. The lightweight car needs 137 hp to reach that speed, while the heavy car needs 143 hp. For both cars, over 110 horsepower is lost to drag. If these cars were in the same class based on 12.5 lbs/hp (GLTC or NASA ST4), the light car would have 7 hp remaining at 120 mph. The heavy car would have 97! Because these cars have the same power to weight ratio, they both accelerate at the same rate. But once they reach 120 mph, one car can barely maintain that speed, while other has power to spare.
In other words, at a faster track, you want power at the expense of weight. To illustrate that, let’s see what happens in OptimumLap when we add power, but keep the power-to-weight ratio the same. In the following table, all cars are at 20 lbs/hp. I’ll run simulations on three very different tracks, Watkins Glen, New York Safety Track, and Pineview Run. (Conveniently all within 100 miles of me.)
Lbs
Hp
WGI
NYST
PV
1800
90
150.10
104.96
78.55
2000
100
149.14
104.62
78.47
2200
110
148.36
104.35
78.41
2400
120
147.53
104.02
78.32
2600
130
147.00
103.84
78.28
2800
140
146.54
103.68
78.25
3000
150
146.00
103.47
78.19
All cars at 20 lbs/hp, Cl -0.3, Cd .45, Cg 1.1
As you can see, the heaviest car is the fastest at every track. It’s a small difference at Pineview, and a significant 1.5 seconds at Safety Track, but a whopping 4 seconds at Watkins Glen. The simulator shows the difference in top speed is 12 mph at WGI. Wow. A difference of 4 seconds and 12 mph with cars that are supposed to be equal!
But don’t lighter cars corner faster? Not really. Friction (grip) depends on weight, and the more weight, the more friction. Don’t lighter cars stop faster? Not really. A lighter car still has less grip because of less weight. The simulator factors all this in so we don’t need to.
But it’s worth noting that OptimumLap is a single-point-mass calculator. It can’t factor in elevation changes, track camber, or the fact that your car has four tires. When cornering, the outside tires are loaded more, and on a heavier car, even more. At some point you get diminishing grip from the outside tires, and so lighter cars do grip and change direction better than heavier cars. I just can’t simulate that in OL.
Aerodynamic lift affects lighter cars differently than heavy cars, as well. If your car makes downforce, then the lighter car has an advantage. If your car generates lift (most street cars have a Cl of around .3 or .4, meaning they lift at speed), then the heavier car has an advantage.
Another way lightweight cars are handicapped is by having to run skinnier tires. In many series, a lightweight car might be limited to a 205-width tire, while heavier cars could use 225, 245, or whatever. And what’s the logic behind that? I’m not sure. As you can see, the lightweight cars are already at a power disadvantage (anywhere outside of a vacuum), and limiting their tire width only makes it worse.
Here’s the current rules for GLTC, and you can see that lighter cars are penalized with narrower tires.
Weight
Slick
100 TW
200 TW
2250lbs or less
205
245
265
2251 lbs – 2600 lbs
225
255
285
2601 lbs – 2950 lbs
245
275
295
2951 lbs – 3300 lbs
275
295
315
3301 lbs or more
295
315
335
GLTC tire widths.
In addition, if you win a GLTC race, they add 150 lbs to your car. On a lighter car, this is a greater penalty than a heavier car. For example, on a 2200 lb car, it would go from 13 lbs/hp to 13.9, and on a 3000 lb car, from 13 to 13.65.
In the NASA system, not only are lighter cars penalized with narrower tires, but as cars get lighter, they take additional penalties to HP. So if your car weighs 2450 lbs, it takes a .4 lbs/hp penalty. If it weighs 2250 lbs, that’s a .5 penalty. And so on. This is completely the opposite of how it works in the simulation, because lighter cars need more power to be competitive.
For example, if you race in NASA TT6, you can have a Miata at 2140 lbs and 110 hp, with 205 tires. Or you could have the same car at 2450 lbs, 128 hp, and 225 tires. Do the math and the heavier car has both a better power to weight ratio, and wider tires, and would win in a simulation and the real world.
Corrective Factor?
Ideally, there should be a reverse corrective factor that balances the lbs/hp ratio for cars of any weight, so that lighter cars get a bit more power, and heavier cars less. Let’s take a look at what that factor could be. Ideally, you’d like to see the 1800-lb car, the 2400-lb car, and the 3000-lb car in the same second at all tracks, not 4 seconds apart.
If I do a corrective factor to figure lbs/hp like this: Lbs/(HP+((2400-Lbs)*0.016)) Then I get simulated lap times like this:
Lbs
Hp
Adj HP
Lbs/Hp
WGI
NYST
PV
1800
90
99.6
17.65
148.32
104.02
78.21
2000
100
106.4
18.52
148.00
104.01
78.25
2200
110
113.2
19.30
147.74
104.01
78.29
2400
120
120.0
20.00
147.53
104.02
78.32
2600
130
126.8
20.63
147.52
104.14
78.39
2800
140
133.6
21.21
147.45
104.19
78.45
3000
150
140.4
21.74
147.38
104.25
78.50
The heaviest car still wins at Watkins Glen, but it’s only a 1 second difference, not 4 seconds. At Pineview, the lightest car wins, but only by 3/10ths. And at New York Safety Track, it’s mostly a draw until the cars get heavier than 2400 lbs, but then the greatest difference is only 2/10ths instead of 1.5 seconds.
Naturally the formula could be adjusted slightly, by using a different median weight (2600 lbs instead of 2400 lbs, for example), or changing the hp factor from .016 to a lower or higher number. In any case, for a series that used lbs/hp series for classing, they can make it more fair by using such an adjustment. Of course they won’t, but data supports that they should. I mean, ideally, they’d have a different adjustment for every track….
I wrote the rules for the Pineview Challenge Cup series, and those rules also use lbs/hp as the basis. Pineview is a slower track (72 mph top speed in this simulation), so there’s much less in the deltas. One of the benefits of this series is the thin rule book, so I’m not tempted to complicate things. But if we ran our series at any other track, I might make an adjustment like this.
Full disclosure, I’m a weight weeny. My street Miata with a full interior, rollbar, splitter, and wing weighs in at 2070 lbs dry. It’s just about as light as I can get it while still keeping it streetable. So I’m not the guy who says that heavy cars are better, I’m the guy who drills out his keys to save weight!
However, the reality of it is, if you race in a series that uses power-to-weight ratio as a balancing factor, you’re probably better off with a heavier car and more power. This often gets you into a wider tire size, as well. Adding lightness is adding slowness.
I was lucky to be able to drive a lot of other people’s cars this year.
I have Aim Solo data for most of these, as well. For each car I’ll give my quick thoughts on what I liked and didn’t like, and then go into a longer description. At the end I’ll put up a chart with lap times and other stats for comparison.
BMW Z3
What I liked: Great torque, soft rev limiter What I didn’t like: Unsupportive seats, shift knob falls off
Pineview owns a 1998 Z3 with a hard top, which is used for rentals and instruction. It has all-season tires, which are slow but a lot of fun. The seats suck. The shift knob fell off twice, once at my feet (I found and put it back while at speed), and a lap later it went to the small of my back, where I left it as a lumbar support. The seats suck.
The Aim data shows this car has the same acceleration as my 1.6 Miata, and both cars have similar lap times on all-seasons. But the Z3 is softer everywhere, and has a lot of body roll. It’s a pity Pineview doesn’t have a spare set of wheels with good tires, because on RS4s, this car should be able to do a 1:16.
BMW 128i
What I liked: Snug cockpit, holds 4 tires, lots of power What I didn’t like: Light switch power delivery
Napp Motorsports has a youtube channel where they test cars and build things, and in one of their episodes they got to track test Andrew Johnson’s modified BMW 128i at Pineview Run. I was there that day, and they were nice enough to let me try it.
Andrew’s modification list is long and includes swapped parts from other BMWs and the end result is a lot more power. As in 250 wheel horsepower . Andrew also added some kind of fancy diff. I don’t think it’s a Torsen or a clutch pack, but maybe some weird combination of the two. I’ve never driven a car that hooked up so immediately. I didn’t like it.
I don’t know if it was the diff or the power delivery, but this was the most difficult car I drove this year, it plowed into corners with understeer, and as soon as I got on the throttle it transitioned to massive oversteer. I like to play with throttle modulation, but this car’s power delivery is a light switch; on or off. I only did a few laps, and I had to completely change my driving style in order to get in a good lap. Stephan is a good driver, and also struggled to put in a good lap, so it wasn’t just me.
There’s a lot of potential in this car, and with a softer hit on the bottom, and maybe tuning the diff (or fuck it, an open diff), it would have been a lot faster. Maybe at other tracks it’s perfect, but at Pineview it was a handful. Weirdly, this is on the short list of cars I’d buy tomorrow. The cockpit is super nice, the seats fold down to hold four track tires, and 128s are a used car bargain.
Ford Focus RS
What I liked:4WD and lots of power What I didn’t like: Felt like FWD
Steve Wilson’s Focus RS is a good looking car with rally roots. I like virtually everything about it, except it behaves a bit too much like a FWD car. There are different modes, such as Sport, Track, and Drift, and I drove it in the Track mode.
I only did three hot laps because when I drove by Start/Finish, I noticed Steve had both of his hands up to his head, like he was freaking out that I was going to crash it. But I think he was actually taking video on his phone, and I misinterpreted the gesture. Alas, three laps is enough to get to know most cars, and I set a decent lap.
For sure the car needs more camber, and the RE71Rs were just about spent, and had already been flipped once, so that didn’t help. I’d like to spend more time in the car to figure out how to rotate it. I got it to pivot on the nose once and it felt brilliant. If Steve lets me try it again I’ll throw it in Drift mode and see if I can drive it like a rally car. Either that or put some harder tires on the rear.
Steve and I looked at the Aim data, and if we combine the parts of the track where he’s fast with where I’m fast, this car is capable of doing 15s for sure.
Honda S2000 AP2
What I liked: Honda-ness, cockpit What I didn’t like: Lack of torque
Melody and a couple friends came to Pineview to do an autocross experiment, and while we won’t be doing autocross at Pineview, we had a great time messing around in cars. I got to try Melody’s AP2, and loved it. Mostly.
I’m a Honda guy. My first motorcycle was a Honda, most of my cars have been Hondas, and I will probably have more Honda motorcycles and cars in the future. So it’s pretty hard to disappoint me in a Honda.
And yet while the car is Honda-perfect, the engine is a little disappointing. Even this longer stroke version that’s supposed to have more torque, well, doesn’t. The VTEC has a wonderful hit, but it happens so late in the game. In hindsight, I should have used 1st gear at least in the S-trap. At some other track I would be singing its praises, but not at Pineview. This car would be a predator at Watkins Glen. At Pineview, it’s prey.
Hyundai Veloster N
What I liked: Everything What I didn’t like: 19″ wheels
I drove two Veloster Ns this year, Chris Gailey’s and Philip Milligan’s. I have Aim data for both, and they are similar, but not the same. This might because of the different driving modes you can program. I don’t recall what I used in Chris’ car but in Philip’s I told him “turn everything off.”
In hindsight, I should have left rev matching on. Not that you get out of shape by downshifting a FWD car, but it’s such a cool feature and it pleasantly surprises me every time the engine blips automatically right before I throw it in the gate.
The motor is a mass of torque, and it tempts you to short shift and ride the rising boost, rather than spin it to redline. In fact I created a Veloster in OptimumLap, and it also short shifts in the computer world. So don’t rev it, ride the wave.
I’ve driven 4WD cars that felt more like a FWD car than the Veloster. I’ve driven RWD cars that felt more like a FWD car than the Veloster! Mash the throttle in the corner and of course it understeers, but if you trail brake on corner entry and transition to throttle, it’s very neutral. The power, the balance, the shifting, this is as complete of a package as I’ve driven in a FWD car.
If I was going to buy a new car tomorrow I’d buy a Veloster N. This is coming from a Miata guy who was teetering on quitting racing and buying a ND2. Yeah, the Veloster is that good. I would roll the fenders flat and fit the widest 18″ wheels and tires that would fit, add a splitter and a wing, and fucking dominate.
NA Miata
What I liked: Miata everything What I didn’t like: Miata power
I have two NA Miatas, my cammed NA6 and my NA8 race car. They put out about the same power and both are solid little cars. When I jump in another NA Miata, I pretty much know what to expect. Sahir’s NA Miata has Vmaxx coilovers and 225 RS4s, and I had a good idea how it would handle. Which is why I found his NA8 a bit puzzling.
It was loose. Not just in the sense that it oversteered, but it also felt disconnected, and had more roll than it should have. On the first lap I spun the rear wheels in the Toe, T9 (the uphill 180 left) and in the S-trap. On the plus side, there wasn’t a lot of power, so the oversteer was easy to manage. In fact I probably made it through the S-trap faster in his car than mine.
But my overall sense was that this was a car that wasn’t quite the sum of its parts. Maybe it needs new suspension bushings, a stiffer front bar, an alignment, or shock adjustments, I don’t know. I managed a decent lap time driving around the problems (faster than I did in the K-Miata, ahem), but when this car is sorted, it’s a PV Cup class C4 killer. Oh wait, it already won that class. Class C3 beckons.
NB1 Miatas
What I liked: NB > NA What I didn’t like: NB > NA
I was lucky to drive three different NB1 Miatas this year, from Davey, Clayton, and Alyssa. NBs are better cars than NAs, and if I was building a dedicated track Miata, I’d start with a NB. I have two NAs, and it’s taken me a while (and some tears) to come around to admitting this.
Davey’s Miata has stock suspension because he also uses it for ice racing, and ice is super bumpy. Therefore, his car lacks a bit of speed and grip compared to other track-modified Miatas. But it’s really fun to drive and reminds me that a stock Miata is a wonderful thing. I forgot what lap times I ran in his car, maybe low 21s? But by the end of the season Davey was doing low 20s on well worn VR1s.
Clayton’s NB1 is a bit more modified, with some bolt on performance, Tokiko shocks, and FM dual-duty spring rates and sways. When I drove it the alignment wasn’t fully sorted out, but it felt exactly like a NB should.
Alyssa Merrill’s NB1 is the quintessential budget Miata track car. It has Delrin bushings, Blisteins, 800/500 springs, 15×9 wheels, 245 RS4 tires, a chin airdam, splitter, and 9LR wing. The motor has the usual bolt ons, but still a stock ECU.
The interior is gutted and it has a race seat bolted down, and this was my only problem with it, I couldn’t adjust the seat or heel-toe shift. This isn’t entirely why I was 1 second slower than Alyssa, but I will hang onto every excuse I’ve got. I recall I did a low 16 that day, to her low 15. Later that year she’d do a 1:14.580 and move the goal posts to the near impossible.
Alyssa’s car is also a rolling laboratory, with sensors for wheel speed, throttle, and brake, with all that going through a 5 hz GPS device tracking the usual variables. There isn’t a better track-sorted Miata that’s been to Pineview, and she hasn’t really gotten around to the motor yet. Fawk.
K-Miata
What I liked: It’s a Miata What I didn’t like: I wanted more from the engine and tires
Stephan Napp’s K-Miata was disappointing. It dynoed at almost 200 hp on Rick Gifford’s Land and Sea dyno (which reads like a Mustang) and on a Dynjoet this would be about 220 hp. That’s a lot of power for a Miata, and so it better have good tires. And it did: 225 Rival 1.5 S. I forgot what it’s got for suspension, maybe Xidas? It’s not lacking in any specification.
If you’d asked me before I tried this car, I would say the car should be doing 1:15s. I created a model of this car in OptimumLap and the computer says it should do a 1:15.32. And yet I could only get within 2.5 seconds of this time. What gives?
For one, I didn’t like the tires. I looked at data, and the peak Gs are great, they generated more grip than RS4s, which are my benchmark tires. But the Rival 1.5 S just doesn’t work with my driving style I guess. Alyssa or Josh might get a lot more out of the these tires, but I lacked confidence and couldn’t adjust.
I also didn’t love the engine: VTEC on top, nothing down low. Just when I got into the power I had to jump on the brakes. Like Melody’s S2000, this car might be awesome on a big track, but at Pineview, it’s a scalp for the taking. To put a point on this, both Stephan and I drove my 1.6 Miata about a second faster than we each drove his K-Miata. So this wasn’t a case of car familiarity, or lack thereof.
Stephan is boosting his K-Miata over the winter, and that’ll help the torque curve a lot. I’d like to get this back to Pineview, preferably on a different tire (I have lots, borrow mine!), and put this car into the 14s.
VVT Swapped NA Miata
What I liked: Best Miata motor ever What I didn’t like: (this space intentionally left blank)
This car started as a 1.6, got a NA8 swap, and then later a VVT swap. The head is decked, ports cleaned up, standalone ECU, custom exhaust etc. It made 135 hp on Rick’s dyno (150 Dynojet), with lots of torque down low.
This is hands-down the best Miata motor I’ve ever driven. Instant throttle response, very tractable power, and perfectly suited to the Miata chassis. I don’t think a Miata needs (or wants) more power than this. When I look at the Aim data, the VVT has the same acceleration off the corners as the K-Miata, and if these two cars were on equal tires, my money is on the VVT, despite being down 70 hp.
Unfortunately they weren’t on equal tires, Dylan was running on S.Drives. I drove that tire all last year for giggles, and it makes nice noises, slides well, but doesn’t set very good lap times. We later fit some 8-year old Z214s to Dylan’s car and he went .5 seconds faster than he did when driving Stephan’s K-Miata. Not apples to apples, but there you have it, the VVT was faster than the K-Miata with the same driver.
Stephan obviously knows the recipe for a great VVT motor, and can make another one just like it. Anyone looking for an ideal Miata motor should get in touch with Napp Motorsports and specify the same build. I hear that Dylan is boosting his car this winter, and it won’t surprise me if it goes slower around Pineview afterwards. But he’s a street guy, and I’m a track guy, and so we have different priorities.
Mini R50
What I liked: Flickable, planted, sorted What I didn’t like: Acceleration
When I met my wife she had a Mini Cooper S with sport suspension. It was love at first sight. So when Adam Gerken brought his Mini R50 to Pineview, I begged for a drive in it.
Adam did a lot of sensible upgrades, like later model aluminum control arms, brakes, some weight loss, and RE71Rs. I believe the motor was untouched, or at least if felt it. Yeah, slow. On the street it might feel peppy, but on the track it could hardly get out of its own way.
And that’s why it’s surprising to me how much I enjoyed it. In fact, I almost bought it! The steering is quick and precise, with a darty lively feel that people always say is like a go-kart, but I find it more like a Miata. Through the Knuckle I could lean on the power all I wanted and it was planted, without a hint of understeer. The brakes were strong, it shifted great, and the whole experience put a huge smile on my face.
For fun factor, this car was the biggest surprise for me, and I’ve been looking at R53s since (no sunroof, LSD, 20004 +).
Porsche Boxster 3.0
What I liked: Solid torque, solid chassis What I didn’t like: Care and feeding
Dieter was there for the autocross testing day and let me drive his baby. Compared to Melody’s S2000 it felt torquey, more planted, and faster everywhere except the end of the straights. I didn’t have my Aim Solo in the car, and we were running an abbreviated track with cones, so it wouldn’t have mattered anyway. But in back-to-back testing, the Boxster was faster than the S2000. I really liked the Boxster, thanks Dieter!
Used Boxsters are cheap now, but I’m not in the market. Mostly I’m worried about maintenance and consumables. Oil changes, brake parts, and the other consumables are Porsche-money, and for a guy used to buying $20 rotors and $40 brake pads, uh-uh, no way.
Scion FRS, Supercharged
What I liked: Motor, chassis What I didn’t like: Diff, shifter (v1)
Ronald Xheng has been really cool about me driving his car. I didn’t even drive other people’s cars much before this, but Ronald kept insisting I drive his, and this has led to me driving all the cars on this page. Thanks for getting the ball rolling Ron!
The first version of his car was a well tuned N/A making 190-ish hp, lots of weight reduction, good suspension bits, etc. I drove it on RS4s and it was pretty magical. People trackside could see my stupidly wide grin as I passed Start/Finish. Ron’s Aim Solo was in the car instead of mine, so I don’t have the data, but I believe I did mid 15s. There was a 14 in it, but I missed half the downshifts into 2nd.
If you pull the shifter all the way left, it gets caught in no-man’s land and won’t go in the gate for 2nd gear. Ron fixed that in V2 of his car, with an IRP shifter, which is short and buttery. He also got a clutch-style diff and a supercharger. I could take or leave the diff, and honestly the supercharger is a bit more power than I’m comfortable with, and I needed more laps, but then I broke an axle. Not my fault, this is the 3rd axle this car has broken.
Part of my lack of comfort was the Champiro SX2 tires, which I have no familiarity with. They are somewhere between a RS4 and ECS in grip, and start howling when you’re still thinking about corner entry. Lots of fun, and I could grow to like them, but I need more time, especially with the supercharger. Which is awesome. And I want one.
Toyota Yaris
What I liked: Familiarity of an old shoe What I didn’t like: Speed of an old shoe
This was the first year in many years I didn’t race my brother’s Yaris. His is B-Spec prepared, handles well (if soft), but needs more power and a LSD.
I needed some FWD car data for the Pineview Cup, and so when I saw that Nick Dixon had just bought a Yaris, I asked him if we could test it at Pineview. Nick obliged, and the car came wisely shod on Conti ECS tires. I had a bunch of tires stored at Pineview, but the fenders weren’t rolled so only my 205 Toyo RRs on 15x7s fit it. For the most part the car felt like a Yaris (both good and bad), and handled better with the RRs, but it had issues.
The main problem was it kept cutting power out. I’d go through T2, ease off the brake and onto throttle, and then… nothing. It just fell flat on its face. If someone was close behind you, this is an accident waiting to happen. Nick later found out the problem was stability control, and when it engaged, you sat there for a full second while the ECU mulled things over. I’m not sure if it can be turned off or not, maybe there’s a fuse you can pull, but the car is miserable and unsafe on track with this feature on.
Volvo Wagon
What I liked: Turbo, 4WD, brakes What I didn’t like: Sticky throttle, heavy, understeer
4000 pounds and a long wheelbase aren’t the recipe for going around Pineview quickly. But this Volvo wagon has the T5 turbo and 4WD, and puts the power down. It understeers a bit, and if it were my car I’d move the bias rearward with tire pressure, but The Family Truckster is fun as is.
The most disconcerting part was when I’d lift off the gas, the engine kept going! It’s only for half a second, but it makes transitioning from throttle to brakes a little weird. In a way, it’s like driving a Tesla for the first time, but you soon get used to it. By my second lap I had forgotten about this altogether and put in the necessary pause from throttle to brake.
The Firestone tires are every bit as good as people say they are, on par with Conti ECS in my book. They didn’t overheat despite the weight, and were predictable the whole session. The big Volvo also stopped really well, and overall handled better and was more fun than I thought it would be.
Summary Data
Here’s a summary of the cars I drove this year, with tires and lap times. I’ve included my 1.6 Miata on different tires, as a benchmark for performance.
If I didn’t have Miatas, I’d probably have a FRS/BRZ/GT86; similar philosophy, but in a coupe with better aero. My brother is thinking about a new car, and a 86 is on his list, so I thought I’d take this post out of the can and finish it. One of the reasons for owning this car would be to run it in the 86 Cup time trials, which seems like a cool series with a great rule set.
The 86 Cup rules has a Stock class, which allows you to take any modifications from an approved list. This is probably how I’d race one, but it doesn’t allow you to do much with aero. Since this is a website based on aero, let’s take a look at the aero options for the non-stock classes.
The rules allow you to modify the car, taking different amounts of points for each modification. The point total puts you into one of four different classes, which can result in different cars, with very individual builds. In the Street class, you’re allowed up to 4 points, in the Modified you get 7 points, and the Unlimited class is, well, unlimited.
Points
What
Notes
.25
Level 1 Front
Aftermarket bumper, no splitter
.75
Level 2 Front
Splitter, spats, canards, everything
.125
Canards
Quack
.125
Front spats
Not unless you increase track
.25
Vented hood
Would help with splitter
.125
Fenders
Aftermarket or vented
.125
Cut rear bumper
Poor man’s diffuser
.25
Level 1 Diffuser
Starts behind rear axle
.5
Level 2 Diffuser
Starts in front of rear axle (but how far?)
0
Underbody panels
Any year OEM underbody panels
.125
Vortex generators
Please no
0
OEM spoiler
Any year OK
.25
Spoiler
Any non-OEM spoiler
1
Level 1 wing
Up to 55″ wide, 8″ stands
1.5
Level 2 wing
Up to 57.5″ wide, 10″ stands
1.75
Level 3 wing
Anything goes, I guess
Aero options in 86 Cup
That’s a lot of options to choose from. How do I think they stack up?
Front end
The aftermarket has turned out some interesting BRZ/FRS bumpers, but without an undertray and splitter (and hood vents if you’re doing those), I’m not sure any of them are better than stock. I guess if you have .25 points lying around, then why not.
A better choice is a splitter, it costs .75 points, but then you can use any bumper you want, wheel spats, and canards as well! Data from my testing showed that a splitter is very worthwhile, and so I’d take this option with side spats and maybe canards.
Underbody
If you study the YouTube videos from Kyle.Engineers, you’ll see that a diffuser doesn’t do that much unless you’re optimizing the underbody. That means first add a splitter, then side skirts, and then a flat bottom (or Venturi), and after all that, add a diffuser. Indeed, a flat bottom alone is superior to a diffuser, so I wouldn’t bother with a diffuser unless I’d done everything forward of that first, and still had points. Cutting the bumper also helps, but it’s such a negligible gain that I’d only do that if I had points to spare.
Spoilers and wings
The spoiler and wing options are interesting.
A spoiler costs zero points for OEM and .25 points for anything else. I’ve got a pretty wild imagination when it comes to spoilers, and I’d probably make my own adjustable spoiler if I was in the Street class. With more points to spend, or unlimited, I’d jump right up to Level 3 wing
There are two Level 1 wings that are whitelisted (SARD LSR and BRZ tS), and I’ve never seen the data on them. These might be a bargain, or a waste of points. From what I’ve seen, they need bigger end plates for sure.
The level 2 wing can be 2.5” wider and mounted 2″ higher than Level 1. I don’t know how much that would change the performance, but .5 points seems like a lot to spend on a couple inches.
If you need more rear downforce, Level 3 is obviously the way to go. It’s only .25 points more than a Level 2 wing, with no restrictions on width, height, or set-back distance. Go big.
Conclusions
A full aero package (level 2 front, hood and fender vents, level 2 diffuser, level 3 wing) is 3.5 points. That same number of points would also get you a Super 200 tire (A052, for example) on a 8.5″ wide wheel, or a built engine with forced induction.
It’s hard to say what would be the best build. On some tracks, power, on others, mechanical grip or aero. I wrote about that once before, and while some tracks favor one or the other, it would be difficult to modify your car between races. But it does appear that the 86 Cup rules strike a good balance, and it would take me a few hundred simulations to figure out which options I’d run. But at first blush the splitter and spoiler only cost 1 point, and seem like a good combo for a Street-class build.
Verus Engineering Aero Packages
Verus Engineering makes a lot of GT86 aero parts and if you dig around on their website you can find information packets, which gives you in-depth information on their aero parts. These informative packets also group some aero parts together in different “Ventus packages” that are supposed to work well together.
In a way I want to congratulate Verus on providing the customer such valuable data, but honestly… it borders on smoke and mirrors. The only thing I need is the drag and lift values, and after you wade through 29 pages of text, images, and tables, guess what they don’t give you? Drag and lift values.
It took a couple emails back and forth with their engineering department, but I finally got what I wanted. They claimed that drag and lift was confusing to most customers, so they no longer provide that. Well it’s not confusing to this customer, it’s the only two values I give a shit about.
Anyway, rant off, here’s how those Ventus Packages stack up.
Ventus 1 – This package has canards (dive planes), underbody panels over the transmission and rear suspension, and a diffuser. It’s interesting that they chose to use canards, which are very inefficient, together with underbody aero, which is totally unrelated. This would be .625 points in the 86 Cup, and have Cd = 0.372, Cl = 0.013.
Ventus 2 – This package adds a splitter and ducktail spoiler to the first package. People often think splitters and spoilers add drag, but here’s another case where you get more downforce and less drag. This would cost 1.25 points in the 86 Cup, with Cd = 0.355, Cl = -0.195.
Ventus 3 – This package adds endplates on the splitter, side splitters (side skirts), and a high-efficiency rear wing. It’s interesting that they chose to use both a spoiler and a wing on this package, I guess you’d have to take both for points. It looks like a Level 2 wing, and so this package would cost 2.25 points, plus whatever side skirts cost (not listed in the 86 Cup rules). Cd = 0.441, Cl = -0.499
Ventus 4 – This package exchanges the spoiler and high-efficiency wing for a bigger wing. Same 2.25 points as the Ventus 3 package, with Cd = 0.465, Cl = -0.633
Personally, I would not have done the packages in this way, because you’d get more benefit by going front to back. Meaning, do the splitter first, and the diffuser only after you’ve sealed up the sides and cleaned up the underbody. But Verus is trying to sell things to street-driving customers, and the splitter is not curb-friendly, and diffusers look cooler, so starting at the back makes financial sense. Likewise, canards are the last thing I’d do, but maybe the first thing a typical customer buys? Lame, but I guess it’s not what you can build, it’s what you can sell.
Verus Simulations
So you might be wondering which of those packages is fastest? Let’s run them through OptimumLap and find out. I usually factor in more drag and lift to simulate open windows, but this time I’ll use the Verus data as is. I’ve made the tire grip 1.2g across all configurations. I’ll simulate laps at Watkins Glen, NYST, and the 2010 Solo Nationals autocross track, to see what happens at different speeds.
Note that I’m a bit skeptical of Verus’s CFD values. The downforce (negative lift) is less than I’d expect. A GT86 with a splitter and a wing should be similar to my Miata with the same, which was measured at .41 drag and -1.2 coefficient of lift (with windows open, mind you). I don’t run a diffuser, flat bottom, canards, etc., and got way better values than Verus did. I don’t know why there’s this discrepancy, but anyway, I’ve added my car’s aero as the final entry in the table.
Package
Cd
Cl
Points
WGI
NYST
AX
Stock
.3
.3
0
2:21.52
1:42.09
62.74
Ventus 1
.372
.013
.625
2:21.59
1:42.04
62.52
Ventus 2
.355
-.195
1.25
2:20.63
1:41.45
62.32
Ventus 3
.441
-.499
2.25
2:21.28
1:41.10
62.07
Ventus 4
.465
-.633
2.25
2:21.34
1:40.90
61.96
Occam’s
.410
-1.20
2.0
2:18.31
1:39.30
61.40
Simulated lap times based on different builds
Based on OptimumLap simulations, the Ventus packages keep going faster as you add more of their doo-dads. This holds true at autocross and medium-speed tracks like NY Safety Track. However, at Watkins Glen, notice that the bone stock configuration actually went faster than Ventus 1, and the Ventus 2 package with a spoiler instead of a wing was the overall fastest. Watkins Glen is a fast track, and if you don’t have a lot of power, drag reduction is super important. Finally, the true potential of the aero packages might be closer to my car, which flat out stomps the CFD-generated numbers. YMMV.
My builds
After reading the rules and running some simulations, this is how I’d make a car for the 86 Cup.
Street class (4 points) – Splitter (.75), vented hood (.25), spoiler (.25), 9” wheels (1.25), GT Radial SX2 245/40-17 (-1). That’s 2 points, giving me 2 points for suspension or mild engine mods.
Modified class (7 points) – Splitter (.75), vented hood (.25), level 3 wing (1.75), 9” wheels (1.25), NT01 (1.0). Thats 5 points so far, and gives me 2 points for suspension or engine stuff.
Unlimited class (any) – All the aero, supercharger, wide tires and slicks, fully adjustable suspension, etc. I mean, duh, all of it.
Stock – (0 points) – But I’d probably race in the stock class, which allows front camber plates and camber bolts, rear lower control arms, oil cooler, cat-back exhaust, base trim spoiler, and updating/backdating to any OEM parts. I’d ride on 17×8 RPF1s with 225 SX2 and call it race ready. Sell my Miatas and get into this? Tempting.
I’m pretty green when it comes to car setup, and my understanding on things like front roll couple is notsomuch. But my teammate Alyssa sent me a link to the FatCat Suspension Calculator, and after playing with the tutorial for a while, I learned a thing or two.
Terms
Bounce frequency – Lower values are comfortable, higher values less so. A 1990 Miata has a bounce frequency of 1.15 front, 1.01 rear. Fat Cat suggests that higher than 1.7 hz is not suitable for the street. That’s about 360 lbs front and 275 rear.
Roll stiffness – Determines how much body roll the car has in a corner. You can change roll stiffness with sway bars, and it won’t affect bounce frequency.
Front roll couple (FRC) – A low FRC makes a car easier to steer, but stable at speed, and susceptible to oversteer. A high FRC makes the car more stable at speed, but harder to steer, and tends to understeer. Mazda engineers felt that about 59% FRC was a good balance. Fat Cat says Miatas are biased a bit towards oversteer, and they use a higher FRC.
Front Roll Couple
Notes
Less than 58%
Oversteer
59%
1990 Mazda Miata
63%
Track and high speed setup
65-68%
Autocross
Front Roll Couple values
My Street Car
My street car has a Racing Beat hollow front sway bar, stock rear bar, and Tein Street Advance shocks with 7k/6 springs, which are the same shocks the calculator uses as an example. Luckily I did these all at the same time, but if I had done the shocks or sway bars individually, it would have ruined the handing.
Configuration
Bounce
Stiffness
FRC
Result
Stock sways and shocks
1.14, 1.01
872
58.9%
Stock
RB front sway only
Stock
1295
72.5%
Understeer
Tein Street Advance only
1.77, 1.88
1910
50.5%
Oversteer
RB front, stock rear, Tein shocks
1.77, 1.88
2334
59.6%
Stock-ish
It’s easy to change FRC for better, and for worse.
Adding just the front sway bar would have made the car boring and push everywhere. Adding just the shocks, the car would have been loose mess, wanting to swap ends. But put all the parts on at the same time, and the car’s balance is very much like a stock Miata.
My Race Car
My 1994 race car is on Spec Miata suspension. When I bought it, the previous owner had disconnected the rear sway bar. That’s a front roll couple of 71.2%, which is a lot, but I didn’t know any better and anyway the car seemed to handle well like that.
But then I added a wing, which resulted in way too much understeer. This was how the car was set up during aero testing at WGI, and if you read about that, you know I also had some unfavorable negative chassis rake. All things combined, the car was an understeering pig.
Before racing at Mid Ohio last year, I reconnected the rear sway bar. This has brought the FRC back to 63.1%, which makes the car steer easier at low speed. And the wing adds progressively more rear bias, so the car transitions to understeer at high speed. The end result is a car that handles really well at all speeds. And that’s one of the cool things about aero, you tune a car so that it’s loose at low speed, and tight at high speed, just like you want it (or at least how I want it).
Getting Back 20 Points in Champcar
Champcar charges 20 points per aftermarket sway bar. I’m using a Spec Miata front sway bar. Is it worth getting 20 points back and using the stock sway bars?
Reverting the car to stock sway bars front and rear would reduce the roll stiffness by about 13%, but the FRC would be only 1.5% more. I don’t know if those changes are things I’d feel or not. However, there’s another option on stock sway bars: changing the spring rate to 850 lb front and 400 lb rear would bring the roll stiffness and FRC very close to where they are now. The only drawback is that bounce frequency would go up in this configuration, from 2.36/1.85 hz to 2.60/2.05 hz. Finally, I could leave the front spring as is, increase the rear spring to 400 lb and remove the rear sway bar, which would have the same FRC as a Spec Miata, but 9% less roll stiffness. In any case, there are a lot of options, and I can get 20 points back if I want to.
Configuration
Stiffness
FRC
Spec Miata 750/325, 24mm/15mm sways
2952
63.1%
As above, no rear sway bar
2750
71.2%
Spec Miata, stock sway bars
2581
64.6%
Stock sway bars, 850/400# springs
2963
62.9%
No rear sway, 400# rear spring
2645
63.1%
Sway bar options on the race car
NB Miata Rear Suspension
I was reading one of Keith Tanner’s books on Miatas, and he states that NB Miatas have slightly different suspension geometry than an NA, and consequently different motion ratios. On equal springs, an NB has softer rear suspension than an NA. So if you have an NB, multiply your rear spring rate by .87 to get the equivalent to an NA spring on the FatCat calculator.
With that knowledge I ran some numbers on my team mechanic Clayton’s 1999 NB. It has 318 lb front, 233 lb rear springs, and Flyin Miata sway bars 1″ front and 5/8″ rear. The previous owner had disconnected the rear sway bar for some reason, giving a FRC of 71.4%. That’s a lot of front bias. Connecting the rear sway bar brings FRC to 58.8%, which is almost identical to a 1990 Miata. With this suspension setup, bounce frequency is just below the 1.7 hz comfort threshold, and roll stiffness is 2.4x more than a 1990 Miata. Sweet.
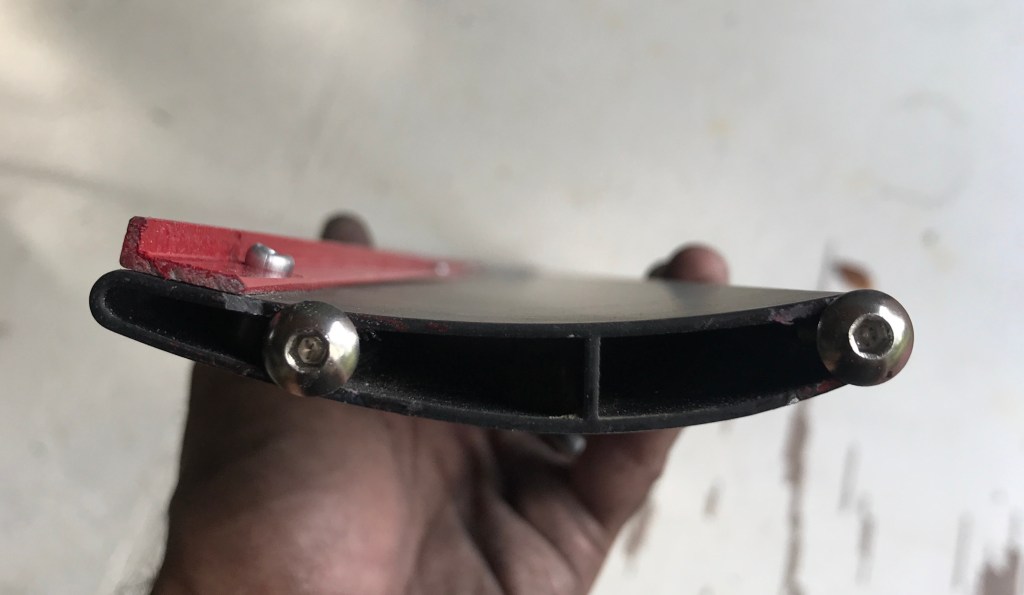
You can buy a cheap wing on eBay, Amazon or whatever for as little as $50, or a double decker for $75. I’ve previously written about the testing I did on this wing. Let me be clear about this: it was a piece of junk right out of the box. At a minimum you must make new endplates (see previous blog post) and get the wing higher.
The mighty Mophon wing.
I made those and other modifications and it performed better than I expected. The 53″ wing created almost as much downforce as the 60″ 9LR wing! But also a lot more drag, which negatively affected front downforce. You have to think of aero as a system, and as a system, the 9LR wing with OEM hard top had a Cl of -1.01 and a Cd of .48 for an aero efficiency of 2.11. Whereas the eBay wing in the same configuration had a Cl of -0.56 and a Cd of .55, for an aero efficiency of 0.90.
While the eBay wing system was worse than the 9LR, the drag and lift values showed that my car would go faster with the wing than without it. Even my very slippery fastback without a wing was slower in a race simulation than the eBay wing with a hard top. Even cheap wings can be good!
Just the same, the eBay wing has been sitting unused. I got tired of looking at it and decided it was time for some new development efforts. Before I get to that, I’ll recap all of what I did previously, and then get onto version 2.0.
Wing stands
The janky mounts that came with the wing might work on a hatchback, but are far too low to be efficient on a Miata. You need to get the wing higher, where the air is less turbulent. I made my wing stands out of a square piece of 1/4″ aluminum plate, 12″x 12″, which I simply cut at an angle to make two matching sides.
I bolted the stands through the trunk gutter with three bolts per side. Note that the trunk gutter isn’t parallel or plumb, meaning that once the stands are bolted in, I had to pull on them and bend them to be near vertical. This bends the trunk gutter into shape.
Pro tip: If your wing stands are slightly sprung (meaning there is tension between them, and you have to force them into a vertical position), it makes the wing stands stiffer. So don’t fret about getting them vertical, just pull them into position about 40″ apart at the top when you mount the wing.
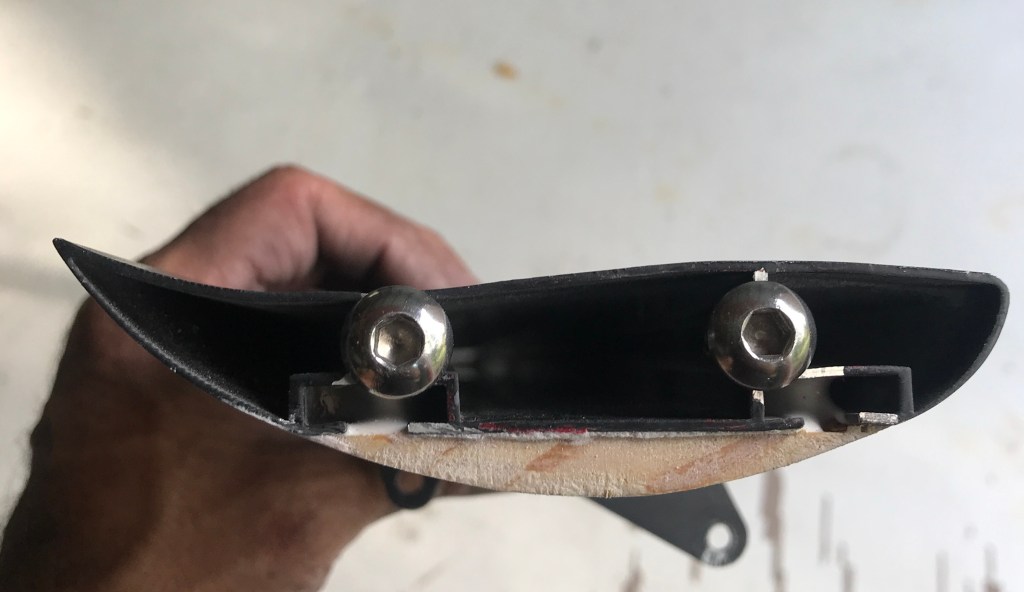
End plates
The end plates were the next things to go, not only because they were too small, but because they didn’t allow me to set the convergent gap and secondary wing angle correctly.
Slots for upper wing adjustment didn’t allow for correct gap and angle. End plates way too small.
Convergent what? Basically, the gap between the two wings must accelerate air as it passes through. In order to do that, the gap at the front edge has to be larger than the gap at the back. The factory end plates have two arcs cut into the end plates, and pivoting the upper wing through this arc is supposed to allow you to set the angle and gap distance. But if you do that correctly, then there’s no overlap.
The top wing should overlap the lower wing at about 4% of the chord, which is about 0.3″ in this case. I measured that distance and drilled a single front hole to use as a pivot, and then three holes further back to provide a range of adjustment. This gives me the proper overlap and gap, and I can set the upper wing angle easily.
Upper wing modifications
The upper wing is flexible, and if you set the proper overlap and gap to the lower wing, the upper wing will vibrate and hit the lower wing. So I added a stop in the middle of the lower wing, which will support the upper wing as it bends. The stop is just a piece of aluminum with a couple rivets to hold it in place. You could duct tape a piece of rubber tubing and it would work (did that for the first race).
I also riveted a Gurney flap to the upper wing. This stiffened up the upper wing a little, but based on the test results, I think it was too large, and part of why the wing had some much drag.
So this is where the 2.0 developments being. The first thing I did was cut the Gurney flap down to half the height, as shown below.
Small Gurney flap. Is it necessary on the upper wing?
However, I’m not 100% sure the upper wing needs a Gurney flap. The gap between the wings is supposed to accelerate air, and that should be enough to keep air from separating at the trailing edge. Also, the trailing edge of the upper wing is round and thick, and just looking at the camber across the chord makes me think the wicker isn’t helping. At some point after taking this picture, I removed the wicker altogether.
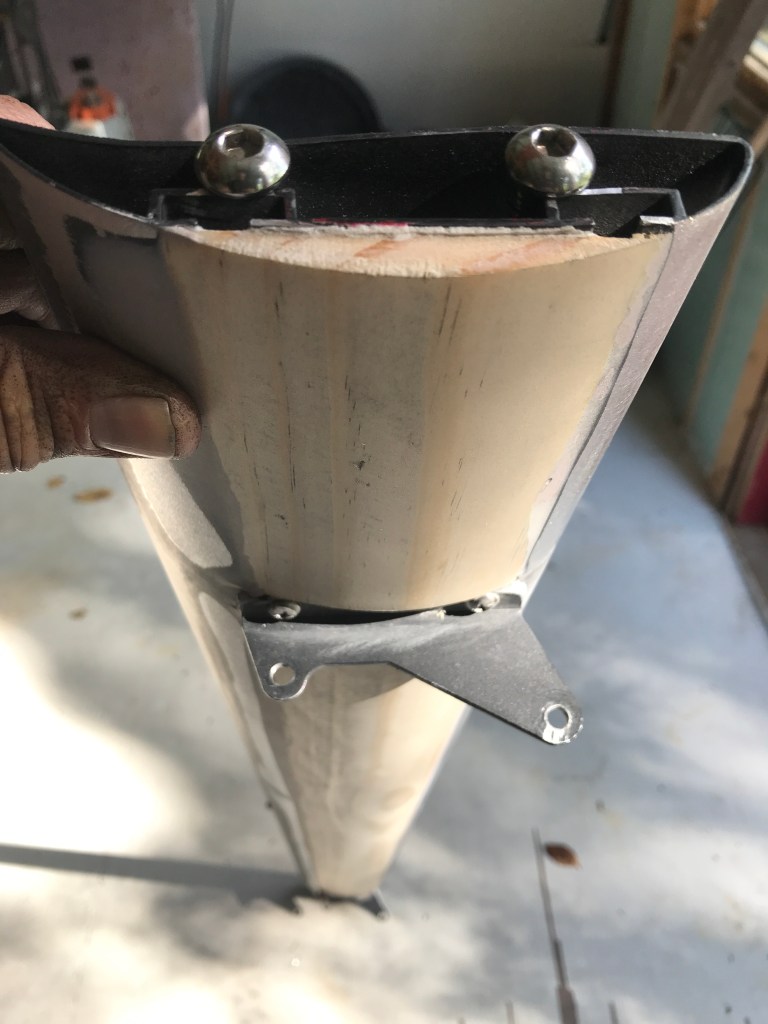
Curving the underside of the main wing
The underside of the main wing is flat and has two mounting grooves that span the length of the wing. This conveniently allows you to mount the wing at any width, and makes the main wing a good deal stiffer. The compromise is less than optimal flow under the wing, not only because of the flat shape, but the grooves.
The profile of the wing is much better without the large flat spot along the bottom. .
I could have simply filled the grooves, but if you’ve been following my blog then you understand I like to go a bit overboard. So I bought a piece of pine baseboard at Home Depot, glued this to the bottom of the wing with epoxy, and sanded it to a rounded shape. If you decide to do the same thing, you need to know exactly how far apart your wing stands are before you do this, as there’s no adjusting the width afterwards.
Pine baseboard, glued and sanded.
Note for Grid Life Touring Cup (GLTC): I was looking at the rules for Grid Life Touring Cup, and noticed they don’t count points for wings that measure 250 square inches or less. The lower wing measures 244 square inches, so you could use this wing without the 3% penalty! You can buy the lower wing alone for about $50.
Finishing touches
All that was left was to sand and paint it, and I think it looks pretty cool. You can still see some of the wood grain beneath, which is either a shitty paint job, or a DIY detail to appreciate, depending on your point of view.
Before shaping the underside, the wing and end plates weighed 7.6 lbs. After shaping the underside, the ensemble weighed 8 lbs. Pine boards are light. I’m not 100% happy with the end plates, they need to be larger, but I can continue to mess with that.
Test results
To see how the wing performed I took it up to my usual testing grounds, Pineview Run. Now this is not the ideal place to test aero, because at lower speed, aero is not as pronounced. I don’t have Man and Machine Consulting’s telemetry equipment, so lap times is the best I can do.
Those excuses aside, my teammate Alyssa tried the 60” 9LR wing back to back with my new modified wing and somehow the double wing went faster. We did nothing to control variables such as wind speed and temperature, so let’s not call this a conclusive test, but for sure it’s an improvement on the 1.0 version of this wing. Will I race with it? I might use this wing at a Lemons race, or on a short track like Pineview, but for any real racing, I’ll be using the 9LR wing for sure.
This website is full of data that supports why cars (Miatas) should have aero. Nevertheless, I meet people all the time that say they don’t want to use aero. Fine, don’t. But don’t justify that with bullshit excuses or claims you can’t back up with data. That just gets you a dick punch for being a moron.
What are the most common excuses I hear for not using aero?
Alyssa’s car has evolving aero, built to a budget.
“My car doesn’t make enough power to use aero”
This is the dumbest one. I wrote about this previously, and it’s just plain wrong. Miatas have terrible aero, and the normal aero things one does to a Miata reduce drag (freeing up power) and add downforce (increasing grip). There’s simply no downside to using aero on a Miata.
Drag reduction – Airdam, splitter, flat bottom, low spoiler: all of these reduce drag. Explain to me how the fuck it takes more power to use aero?
Wing drag – A single-element wing has about as much drag as your side mirrors. Move the mirrors inboard and shut up. Or just ignore the mirror drag and stand agape as you gain 2-3 seconds per lap.
“I’m not a good enough driver to use aero”
This is my second favorite saying. As if the self-admitted “not-good enough driver” has aerodynamic knowledge, but not driving skill? The fact is, adding grip and stability is not going to make you a worse driver, it’s going to make you a safer and better driver.
Understeer is safe – A wing will generate more and more downforce at speed, shifting the balance of the car to the rear, causing the car to understeer the faster you go. This is especially good for people who claim they aren’t good drivers.
Easy to tune – Not everyone is schooled in setting up suspension. Conversely, changing the angle of your wing is child’s play.
Braking – If you look at data, you’ll see that aero helps braking more than it does for cornering. Drivers who identify as “not good” will benefit greatly from better braking.
Stability is good – A stable car is easier to drive at high speed. Cars without aero suffer from aerodynamic lift, which makes the car unstable at high speed. Downforce makes a car easier to drive, and better for noobs. Lack of aero, and instability, require a better driver. Not the other way around.
Obviously a pro driver will get more out of a car that has a lot of downforce, but a rookie driver will also benefit greatly from aero. Saying that there’s some skill level requirement to a car that has less drag and lift is fucking asinine.
“I don’t like the way aero looks”
If you’re choosing your performance based on looks then you’re not serious about performance and shouldn’t be reading my website. For a street car, you have a leg to stand on, but for a race car, notsomuch.
My brother is one of these “I don’t like the way aero looks” people. It’s infuriating because he races a Yaris. Somehow he thinks a splitter and wing are going to ruin its wonderful lines?!? Dude, this is not a Giugiaro masterpiece! Aero all the things, brother.
I finally got Ian to throw a $50 wing on the Yaris and he was able to flat-foot Thunderhill Turn 1 for the first time ever. So at least he’s been partially converted. I’d like to see it with a splitter, flat bottom, barge boards, and diffuser, but I’ll take this small victory for now.
“Aero costs too much”
OK, I don’t really hear people say this one so much as see it. People will dump money into every aspect of performance except aero. They’ll run A052s and change them every 5 hours. Or they’ll do an engine swap or turbo. All the grip and power things cost money, and then keep costing money. On the other hand, once you do aero, you’re done. Aero is way cheaper for the same performance.
Tires – Teams that run Super 200s for endurance racing are spending 3x more on tires. Sure, they are getting a second or two a lap, but also paying for tires (and mounting) 3-4 times more often.
Power – Everyone wants more power, but for Miatas without fuel cells, you’re limited by the fuel you can carry. Some motor swaps, like Ecotecs, are pretty frugal on fuel, but more power means more gas. Gas costs money, pit stops cost time, do the math.
Aero – Do it once, forget about it. I’ve done a lot of OptimumLap simulations on different tracks, and while some tracks favor one or the other, grip, power, and aero often balance each other out. Over time, aero is simply the cheapest way to get the same lap times.
What’s your excuse for not using aero?
If your racing series doesn’t allow aero, obviously you can’t. But if you’re not using aero for some other reason, tell me why. But be careful… and cover your junk.
Some race tracks are power tracks, and some are grip tracks. At the extreme ends of the spectrum, compare a salt flat to a skid pad. On the salt flat, there’s no cornering, it’s all about power. Likewise, on a skid pad, it doesn’t matter how much power you have, it’s all about grip.
Some tracks are all about grip.
However, you also have to consider the aerodynamic factors of drag and lift. On a salt flat, drag could be a huge factor. On a large diameter skid pad, aerodynamic lift (downforce), could also weigh heavily (pun intended).
Most race tracks are neither salt flats nor skid pads, but somewhere in between. Some favor grip, some power, and some aero. I thought it would be interesting to run a bunch of simulations in OptimumLap to find out which tracks favor power, grip, or aero.
For the simulator car I used a Miata (surprise!) with 100 hp, 2400 lbs, tires at 1.0g grip, andvCd 0.5, Cl 0.5. These are very low, round numbers, meant only to illustrate the differences. Moreover, the low power and grip values create larger gaps in the data, which makes it more obvious which tracks favor which attributes.
I ran this base car on 12 different race tracks that range from an autocross course to the fastest closed-course race tracks in the USA. There’s a good mix of tracks in OptimumLap, but I also added the map my brother made of New York Safety Track, because it’s local and awesome.
New York Safety Track (NYST). Dumb name, great track.
After the initial base simulation run, I then added 10% grip and re-ran the group. The lap times dropped across the board (especially at the autocross course), and I logged the data.
I then removed the additional grip and added 10% more power. So at this point, we’re back to the base car, this time with 110 hp instead of 100. Lap times fell again, but not always in the same order.
Finally, I removed the extra power and changed the coefficient of lift from -0.5 to +0.1. This is not a drastic change, one could easily get this from an airdam and small spoiler. I left the drag (Cd) the same, as it probably wouldn’t change much (it would actually have less drag, but I chose to concentrate only on downforce).
The table below shows the base lap time, and then what happens when I added more power, more grip, and minor aero. I ordered the table by tracks that favor power at the top, in the middle are tracks that favor aero, and at the bottom of the table are the tracks that favor grip.
Track
Base
Grip
Power
Aero
Favors
VIR
154.73
152.7
151.85
153.10
Power
Mid-Ohio
112.57
111.26
110.99
111.06
Power
Watkins Glen
157.30
155.33
154.97
154.97
Power and Aero
Summit Pt
93.93
92.76
92.69
92.35
Aero
NYST
112.71
111.70
111.68
111.02
Aero
Big Willow
109.46
107.98
108.18
107.11
Aero
Lime Rock
71.06
70.01
70.22
69.60
Aero
Thunderhill
142.71
140.60
140.74
140.59
Aero and Grip
Gingerman
118.76
116.82
117.26
117.34
Grip
Thunderbolt
107.01
104.91
105.87
105.21
Grip
Waterford
87.32
85.49
86.67
86.08
Grip
Autocross
68.11
66.83
67.85
67.49
Grip
Start by looking at the Base column, which is the lap time before I modified any values, and then look across for the time in bold, which is the fastest lap.
Race tracks with long straights favor power, and so it’s not surprising to see VIR and Mid-Ohio at the top of the list. Likewise, an autocross course, or a smaller technical track like Waterford, are grip tracks. Finally, some tracks are fast and flowing, and suit aero.
Not every track was definitively a power, grip, or aero track; some tracks are a mix of two. Watkins Glen favors both power and aero, while Thunderhill (3 mile) favors grip and aero.
I then re-ran the simulations using a Miata in a higher state of tune. I left the weight the same, but gave it 120 whp and 1.2g grip, to see if the relationships would change at all. Nope, they stayed the same. Astute readers will cite that a high-power car like a Corvette rarely benefits from more power at any track. But this isn’t a site about Corvettes….
Note: As I stated earlier, the coefficient of lift value (Cl) for the aero car is 0.1, which is pretty low. A Miata with an airdam, splitter, and wing has a Cl of 1.0, which is way better. If I re-ran all the simulations using that value, then it would show that every track is an aero track, and that wouldn’t tell me much about the nature of the track. So I purposely chose a low Cl value that would illustrate which tracks are more favorable to power and grip, and put the aero into equal perspective.
I’ve been de-aeroing my street car this year. What?
Last year I was experimenting with aero and I made an airdam and splitter on my 1993 street car. The airdam was a vertical 3″ extension under the stock lip, and the splitter was simply the forward part of the undertray. I built an adjustable spoiler to balance it out.
September 2019. Small airdam, splitter, adjustable spoiler (the black plastic part can be moved up or down into three different heights).
It went pretty well until I stuffed it into the weeds. The splitter dug in hard, bending the mounting brackets, the undertray got shoved underneath the car, and I sheared some bolts and plastic. It wasn’t pretty.
Oops. Shoved the splitter/undertray back and broke my side spats.
So like I said, I’m de-aeroing my car. My hope is, that if I go off track into the weeds again, the car just glides over them, rather than the splitter ruining my day.
The front end is now the popular R-package front lip. The brake ducts aren’t really functional, so I covered them up. Underneath, I still use a full undertray so I can duct the radiator and whatnot, but the front edge terminates right at the R-package lip.
One of the things I don’t like about the NA front end is that it doesn’t have enough tire coverage, and so I built some front spats to deflect air away from the tires.
R-package front lip with plywood undertray and covered brake duct. From this angle, it looks like the wheel spats cover the whole tire, but they don’t.
Last time I made spats out of extra HDPE plastic I had lying around from making the airdam. This time I decided to use metal, so I could pre-form the shape. It was pretty easy to mock up in cardboard, then bend it over and get the shape right.
I fastened the bottom of the spats to the undertray, sandwiching them between the undertray and the front lip. At the top I folder over the extra material, drilled a hole, and used the standard fender mounting bolt.
Angle aluminum wickers on each side.
Finally I added some 1/4″ angle aluminum to the edge of the spats. These required a bit of effort to form. I had to clamp it in a vise as I bent the arc slowly. If I hadn’t clamped it down, the whole piece of aluminum would have come out bent in more than one dimension.
The purpose of the angle aluminum is to act as a wicker (Gurney flap), and fool the air into thinking the spats are wider than they are. As air moves around the front end, it encounters this raised edge which deflects air around it, effectively making the spats wider.
Wicker helps deflect air around the tire.
I suppose the angle aluminum also makes the outer edge stiffer, but I’m not sure if that was an issue, these are pretty strong and very light. I don’t know if they can handle any serious grass cutting, but at least it’ll just be the spats I lose next time, and not the whole shebang.
Wind Tunnel Testing
Back when I wrote this article, I hadn’t done any wind tunnel testing. Since that time, I’ve tested tire spats as well as spoilers, and I was on the right track back then. For all the details, purchase my Miata Wind Tunnel Report and you’ll receive a download link.
The wind tunnel report has a lot more than just spoilers and tire spats, it also covers the following.
Splitter diffusers and spill boards.
Canards in various locations and combinations.
Closed windows versus open, plus modifications to reduce drag and turbulence from the open windows, including wickers, mirrors, and venting the rear window in two different locations.
Singular hood vents fender vents.
Brake ducts, NACA ducts.
OEM hardtop with and without a rear window spoiler, versus a CCP fastback.
Blackbird Fabworx spoiler at different angles/heights.
Wings from 9 Lives Racing, Wing Logic, and a couple prototypes.
At our last race we had two different fuel jugs, VP and Hunsaker. Both jugs hold about 5.5 gallons. The Hunsakers have unleaded fuel nozzles and pour a lot slower, but they have a convenient venting system that keeps you from getting gasoline on your race shoes.
I was curious how fast each can could dump its contents, so I filled them up with about 5 gallons of water and did a little test. But first, let’s see the contenders and how I modified them.
Hunsaker
My Hunsaker jugs have the small diameter nozzles that fit a standard unleaded restrictor plate. This has been useful for the Lemons team I race with, since their car (minivan), is street legal. The small nozzle’s .59” inside diameter (ID) restricts the amount of fuel that can flow, and makes fueling take a lot longer.
Unleaded nozzle on the left, DIY on the right
But my race car doesn’t have the unleaded restrictor plate, and so it’s kind of silly to use the Hunsaker cans as is. However, if I remove the nozzles, the large diameter tubing on the Hunsaker is too large to fit in my filler tank neck. So I made new nozzles that were as large as I could fit inside the clear tubing. I bought 1.25” aluminum tubing which has a 1.12” ID.
VP Jugs
We typically use the VP jugs for fueling because the hose is a larger diameter and they dump faster. The VP caps have a screw-in plug, and if you remove it, you can thread in a brass adapter that fits a 1” tube. Add a piece of tubing and a hose clamp and you’re done. The inside diameter of the brass adapter is 3/4”.
At the last Lemons race, my teammate Dieter modified one of my VP jugs with a Hunskaker-like air vent. This seemed to work pretty well, as no fuel escaped the vent or got on our shoes. I bored out the vent tube a bit to give it freer breathing, it looks like this:
Poor-man’s Hunskaer
Speed test
First up is the standard Hunsaker with unleaded nozzle: 44.4 seconds. That’s with the small air valve popped open. My teammate Pat always removes the entire vent cap from the Hunsaker jugs, instead of just opening the vent. I always thought that was silly, but I wanted to see what the difference was in dump time: 38 seconds. Huh, he wasn’t wrong about that.
Next up is the standard VP jug with homemade nozzle: 25.4 seconds. Having seen the benefit of a larger vent hole, I opened up the vent on the VP can. This can also has the “poor-man’s” Hunsaker vent, which is basically a long piece of tubing on the vent hole so you can invert the can and no gas drips out. This one dumps at 22.5 seconds, better still!
Finally, I tested the Hunsaker fuel jug with an aluminum 1-1/4” tube in place of the unleaded nozzle. Having already seen the benefit of the unscrewing the vent cap, I did that: 10 seconds. Woot!
Fuel Can Configuration
ID
Seconds
Hunsaker, unleaded nozzle, small vent
.59″
44.4
Hunsaker, unleaded nozzle, unscrew cap
.59″
38.0
VP with standard air vent
.75″
25.4
VP with larger vent and tubing
.75″
22.5
Hunsaker with 1-1/4″ aluminum nozzle
1.12″
10
Final results
I was actually unprepared for how fast the last configuration dumped the fuel, and could be off by a second when I fumbled to time it. It doesn’t really matter anyway, the point is to use the largest diameter nozzle you can, and don’t neglect the size of the air vent.