Beating up Miatas in a Yaris

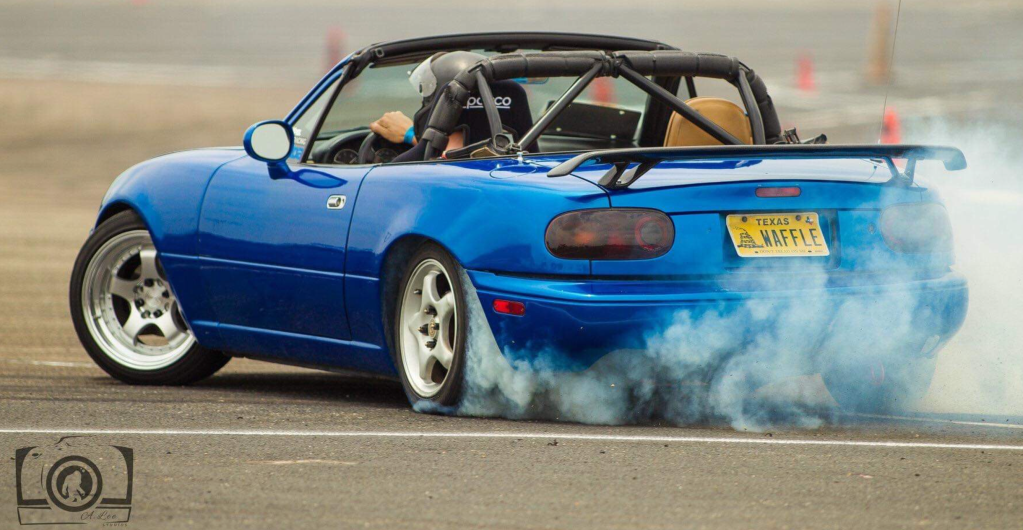
I’m a Miata guy. I like how economical they are. I like how they handle and communicate, and that lets me extract every bit of performance. Miatas are slow, but they punch above their weight, and you can generally pass people in cars that cost 10x as much. If I’m being honest, it’s especially fun to put the hurt on German sports car owners. But this time the shoe was on the other foot. Racing one of the only cars that is slower and more economical than a Miata, we beat 10 out of 12 Miatas in a lowly Toyota Yaris.

Where this shameful event occurred was at the 24 Hours of Lemons race at Thunderhill. Lemons often runs here, combining the 3-mile and 2-mile course using a bypass from Turn 7W to the front straight. That removes Turn 8W, which is a fun right hander that crests a hill and unweights the tires, and two 2nd-gear corners that are about the only place a Miata or Yaris can accelerate quickly.

Thunderhill 5 mile is fun. Backwards is more fun!

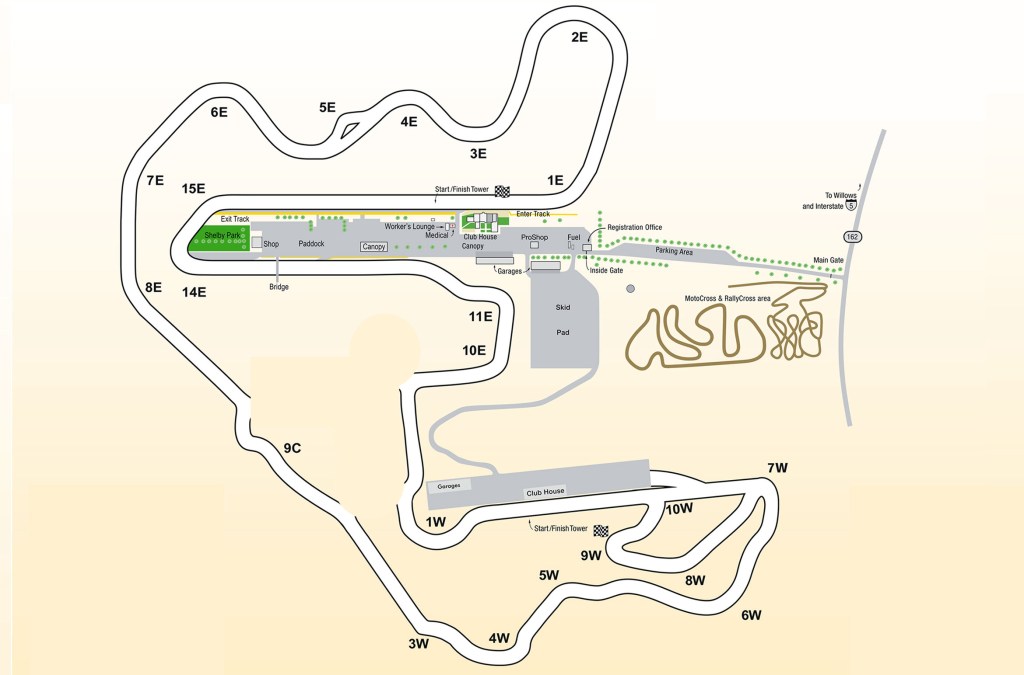
The one time they ran the full course without the bypass was back in 2014 when they set the Guinness Book of Worlds Records record for most cars in a race with 216 cars simultaneously racing on track. We were in that race, in a Miata of course, and it was as crazy as that sounds.

For this event, Lemons decided to run the entire track without the 7W bypass, and this full 5-mile configuration ranks as my all-time favorite track. Elevation, blind corners, off camber… the layout has everything you could ask for. But Lemons being Lemons, they decided to run the entire course backwards, which nobody has done before. When you run a course backwards, the curbing isn’t in the right spot, the usual reference points are gone, and you end up figuring shit out as you race. It’s exciting, but not exactly safe.

Because stupid is as stupid does, Lemons further decreed that they’d switch to the 3-mile track on Sunday. And run it in both directions. That’s right, they’d stop the race in the middle of the day, re-grid the cars, and run them in the opposite direction.

Because stupid is as stupid does, I booked a flight to Sacto. I packed my helmet, gloves, shoes, and maxed out the rest of my 50-lb weight limit with aluminum street signs, rivets, wing mounts, angle brackets, and various fabrication tools.

Yaris > Yarnis

Ian originally built his Yaris for the B-Spec class, but after one race where a backmarker idiot ran him and another car off track, and discovering the rampant cheating in the class, he gave up trying to race with the SCCA.

The Yaris has only 100 hp, and to make matters worse, the gaps between the gears are so large that the engine falls out of the powerband on every shift. There are momentum cars, and there are momentum cars; this is the latter.

For being a soft FWD car, it handles surprisingly well. What it lacks in power it makes up in being frugal, and burns only 4 gallons per hour. The car once went 2 hours and 42 minutes in a stint, but there were a lot of full course yellows. Still, it’s quite possible to get 2.5 hours out of a 10-gallon tank, and you can’t say that about many race cars.

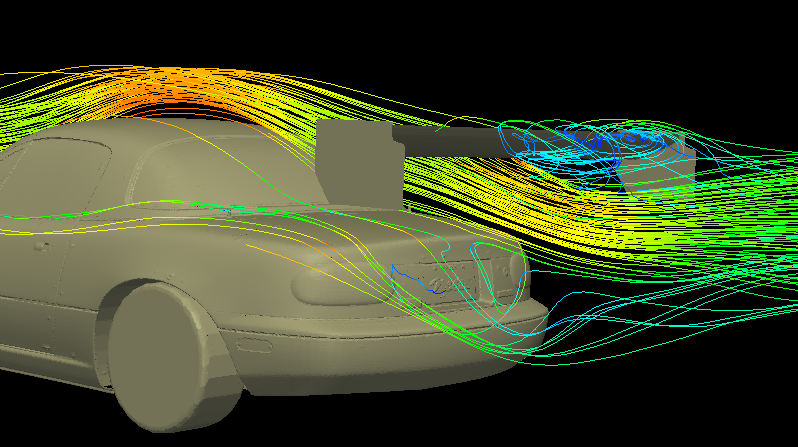
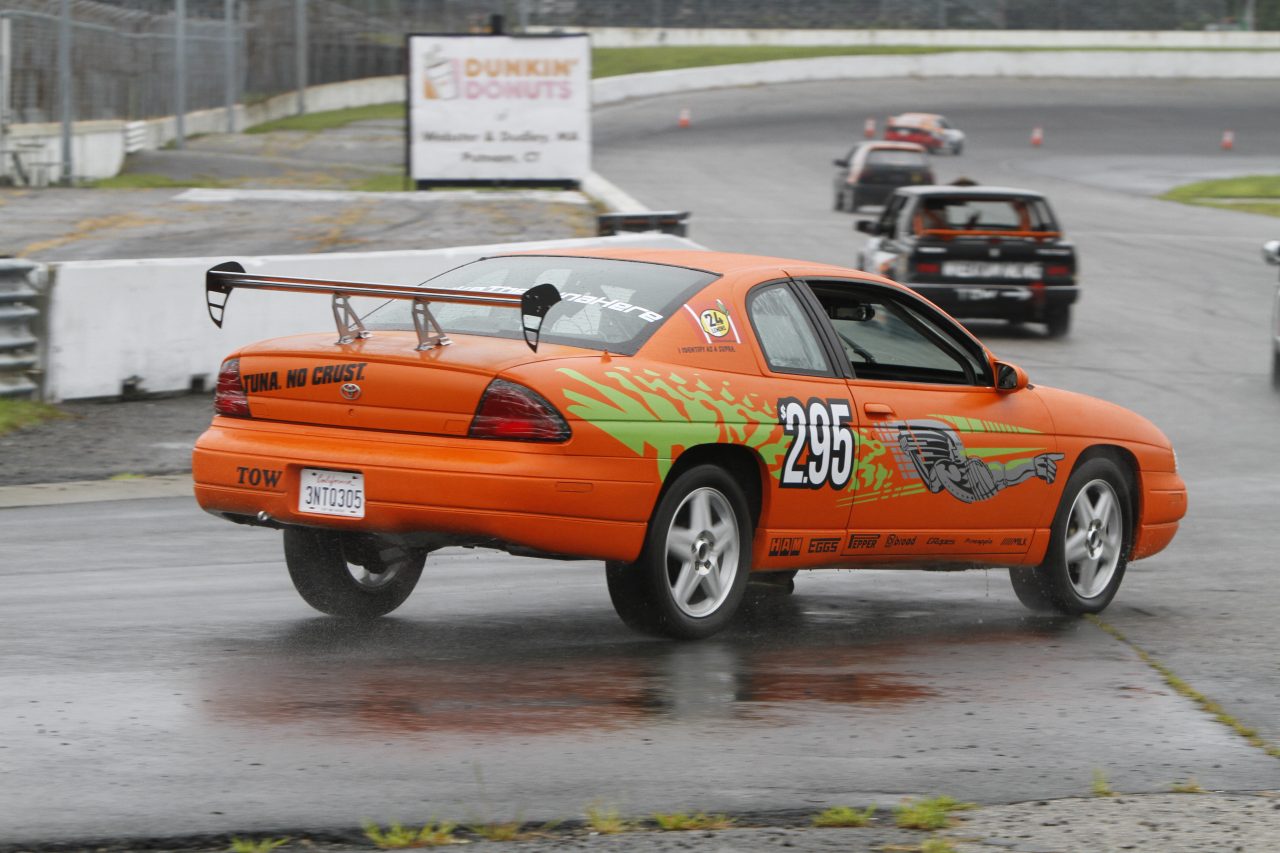
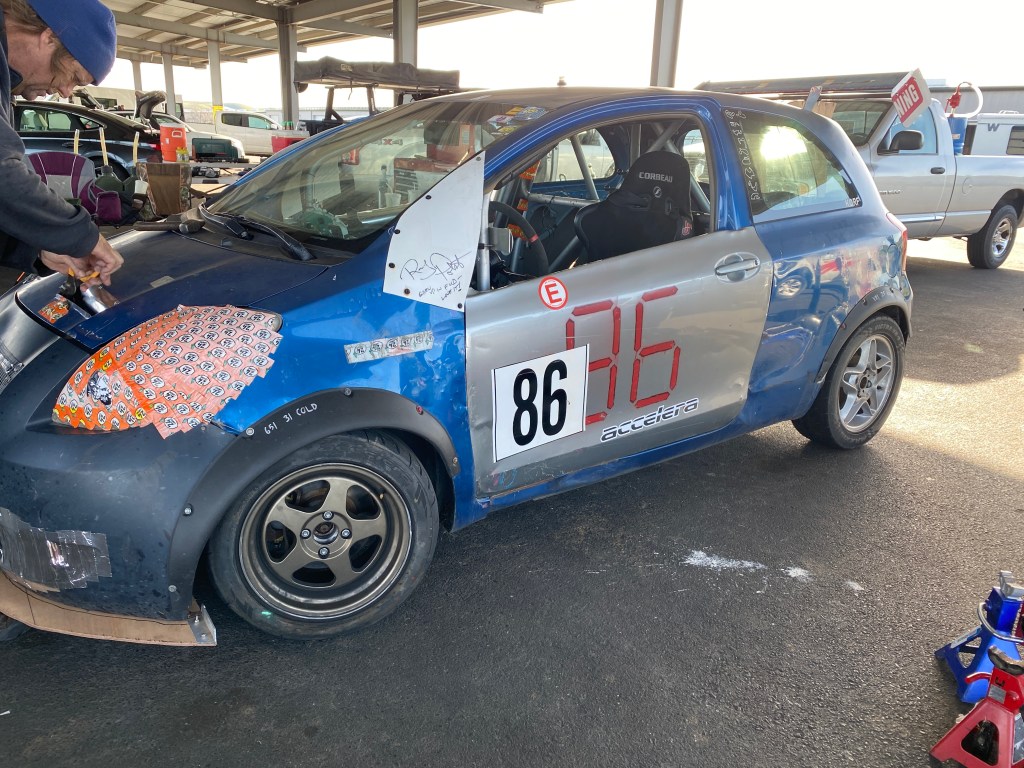
We themed the car by putting yarn tufts all over the car, like you would for visualizing airflow. Our official team name was Toyota Kazoo Racing, but after theming we were pretty much Team Yarnis.

Tires

I’ve been using Accelera 651 Sport tires as a dual-duty tire for street and mild track use. The 651s have a 200 TW rating, but in my testing I found the performance similar to the 340 TW Continental ExtremeContact Sport. I’ve also raced these tires in Lemons before, and found they were about a second per mile slower than a proper 200 TW endurance tire.

So they are definitely at the slower end of what I’d consider an endurance racing tire, but we’d race on them anyway. Why?

Partly because the 651s go on sale occasionally for half price, and the first set has free shipping and a 30-day money back guarantee. Ian purchased a full set for $260 to his door. In addition, the importer, Tire Streets, has a racing program which awards free tires for winning in a recognized racing series. A win gets you four free tires, second gets you a pair, and third gets you a single tire. So not only were the tires cheap, depending on where we finished, they might even be free.

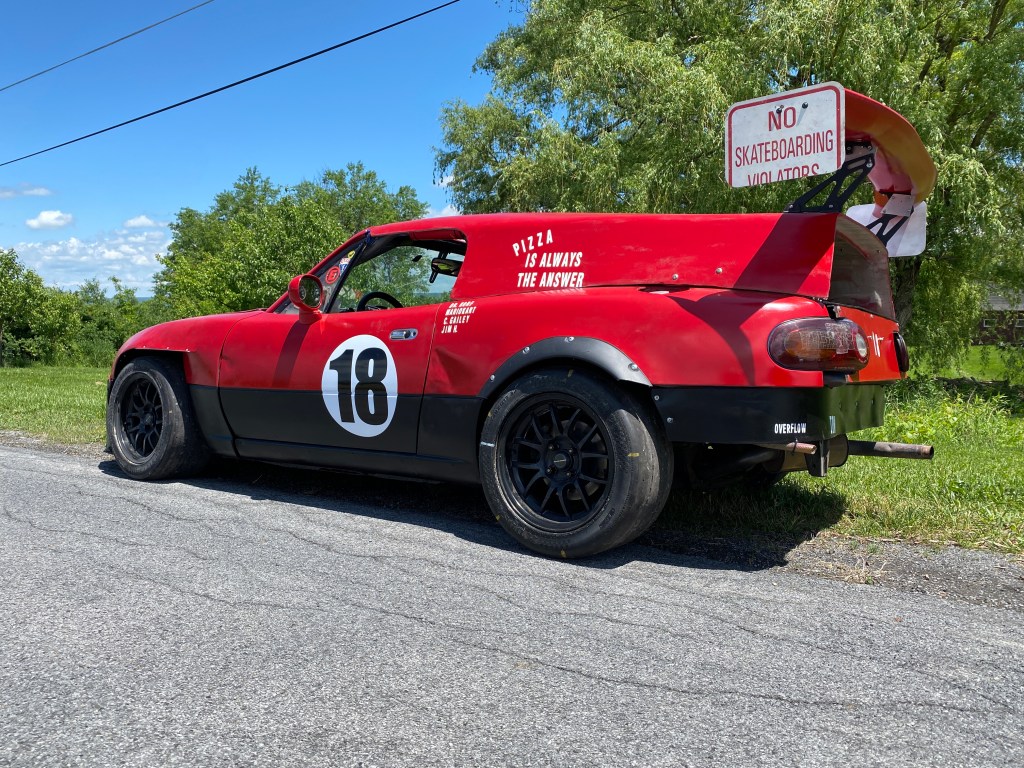
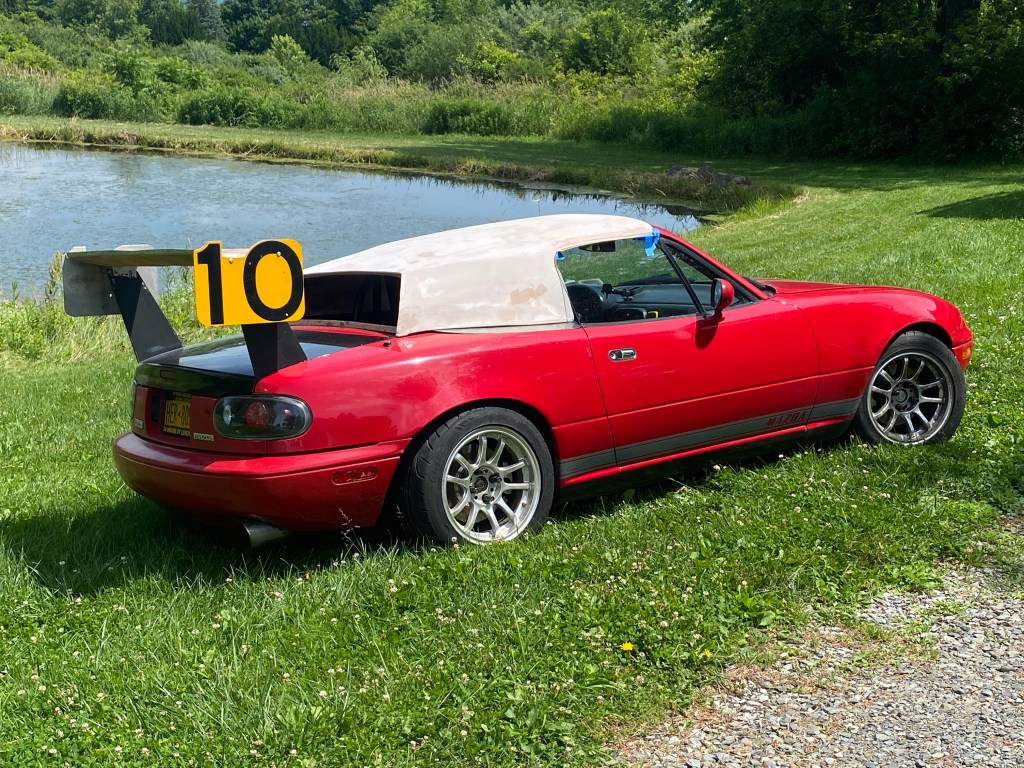
We’d run the Accelera 651 on the front, because the rear tires were already chosen. These are old-stock (as in 6-7 years old) 205/55r16 Maxxis VR1s. Ian got these on closeout and bought a pallet of them. The tires are 25″ diameter (compare with 23″ front tires) which required jacking up the rear shocks for clearance. The combination of tire diameter and coilover height gave the car extreme forward rake, putting way more weight on the front tires than is necessary, and way too little on the rear. But the car looks really cool this way, like a Hot Wheels car, and that is super Lemony.

To recap our amazing tire strategy: the fronts are an off-brand low-grip, $65 tire; the rears are the wrong size chosen primarily for looks, and were $59.95 each. That’s a performance-first strategy right there.

Aero

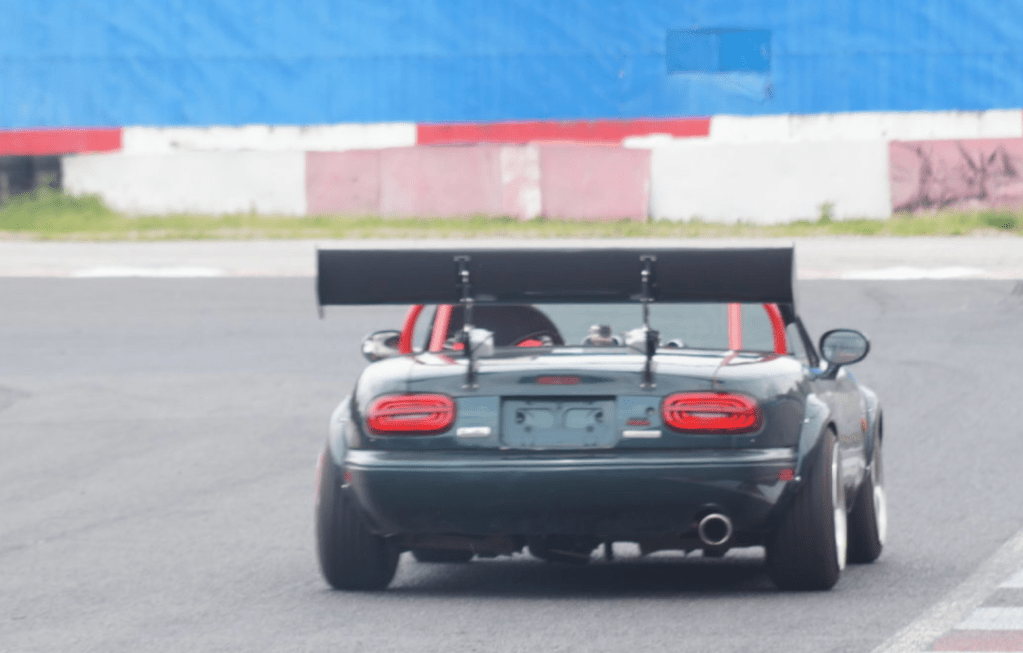
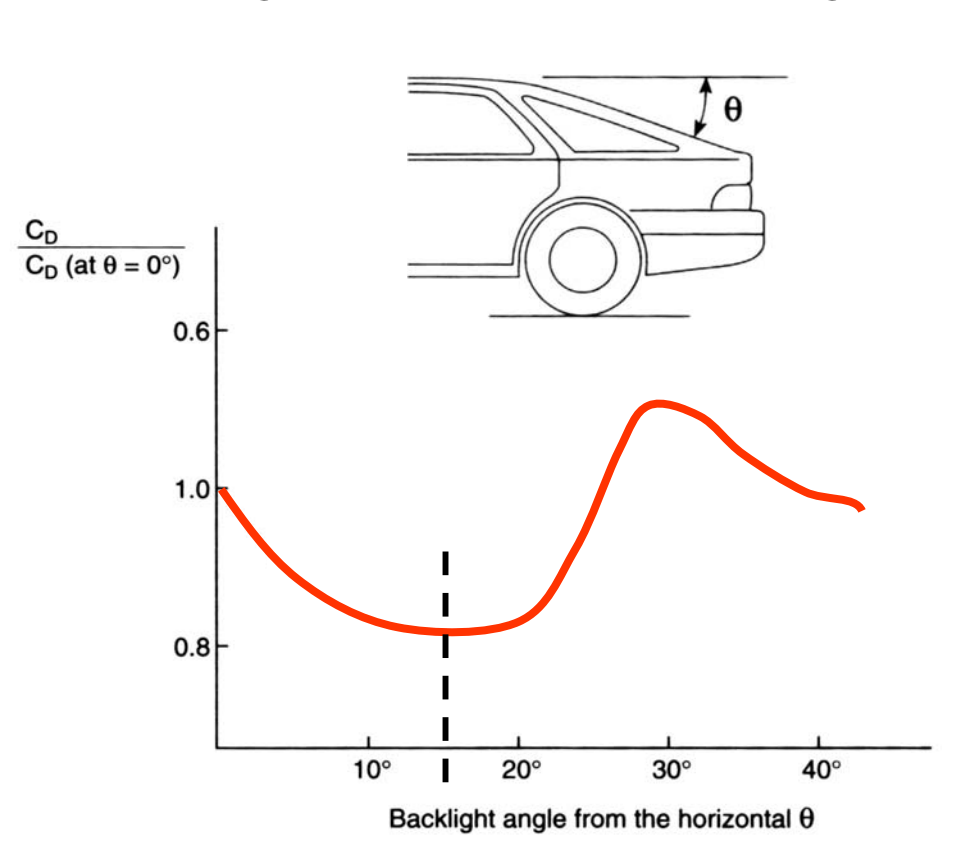
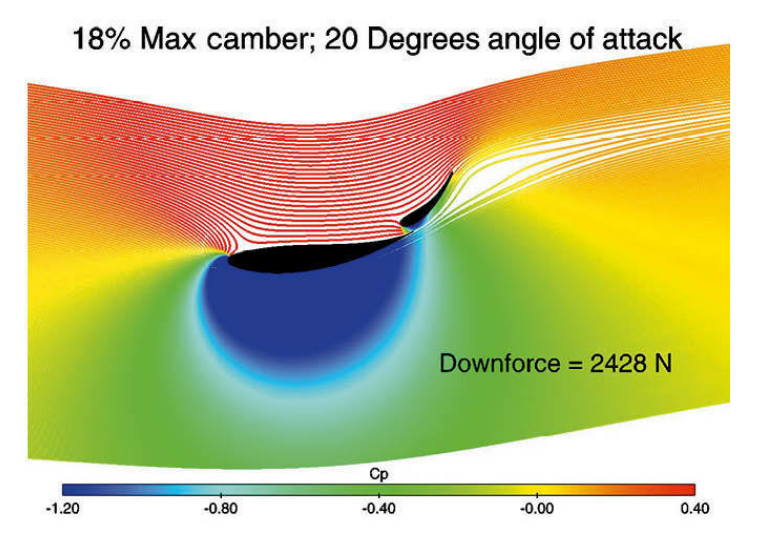
With all of that extreme forward rake from the mismatched tire sizes, I knew that we’d have to add rear grip or the car would rotate too much in fast corners. The easiest way to add rear grip at speed is to use a wing.

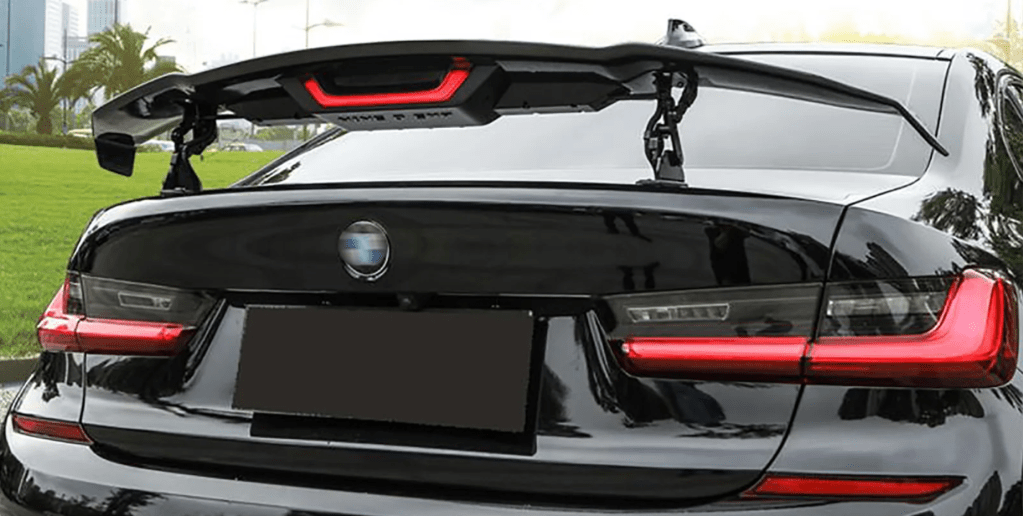
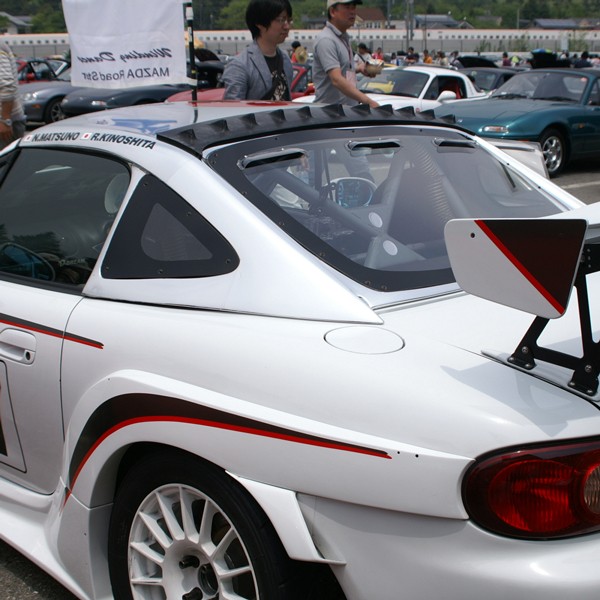
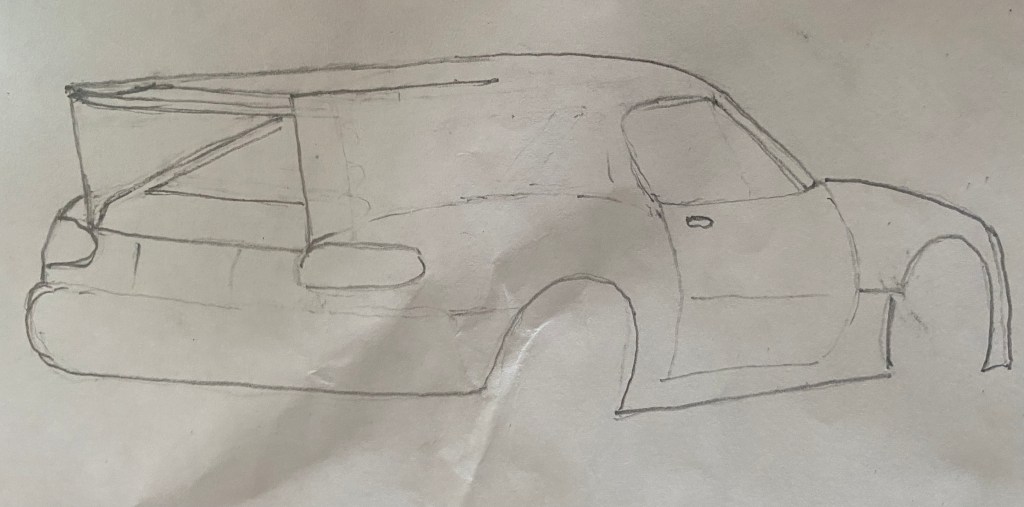
Ian’s teammate Mike did a really nice job making a double wing from two cheap single wings, but I felt it was mounted too close to the roof. A wing needs about a chord length under the wing so that it can create suction, and if you mount a wing too close to a trunk or roof, the low pressure region collides with the high pressure region, and you get a spoiler, not a wing.

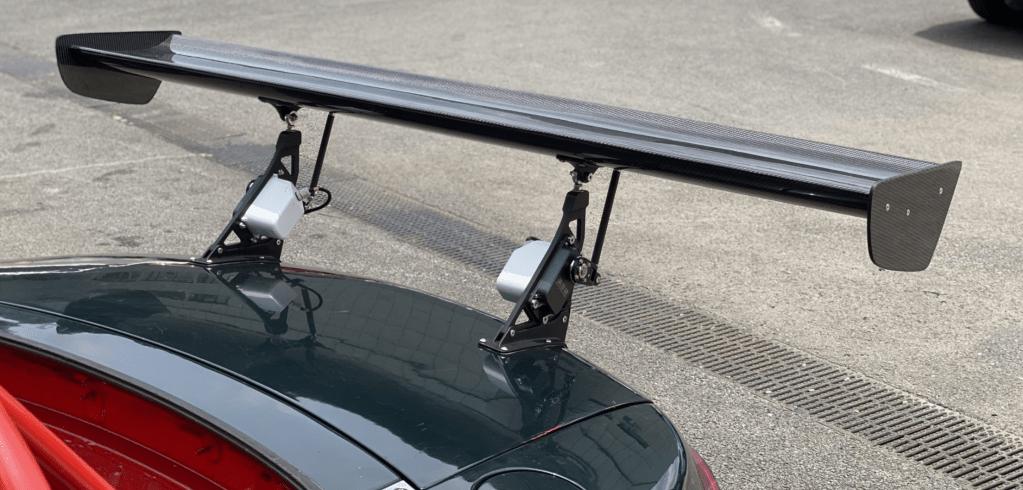
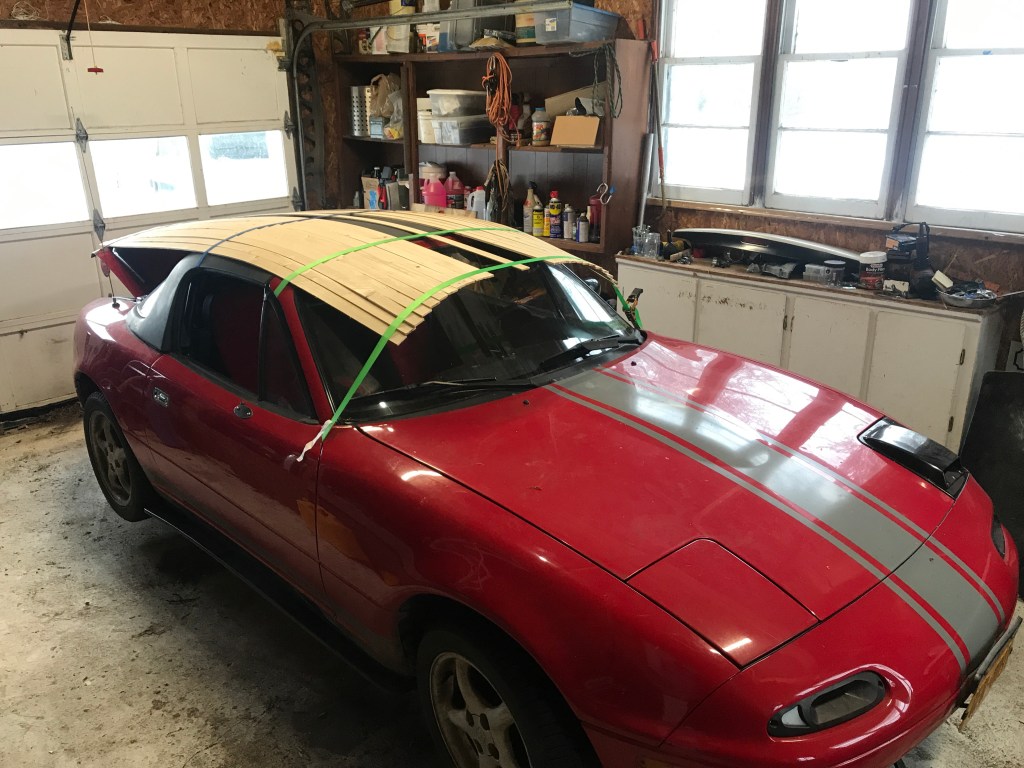
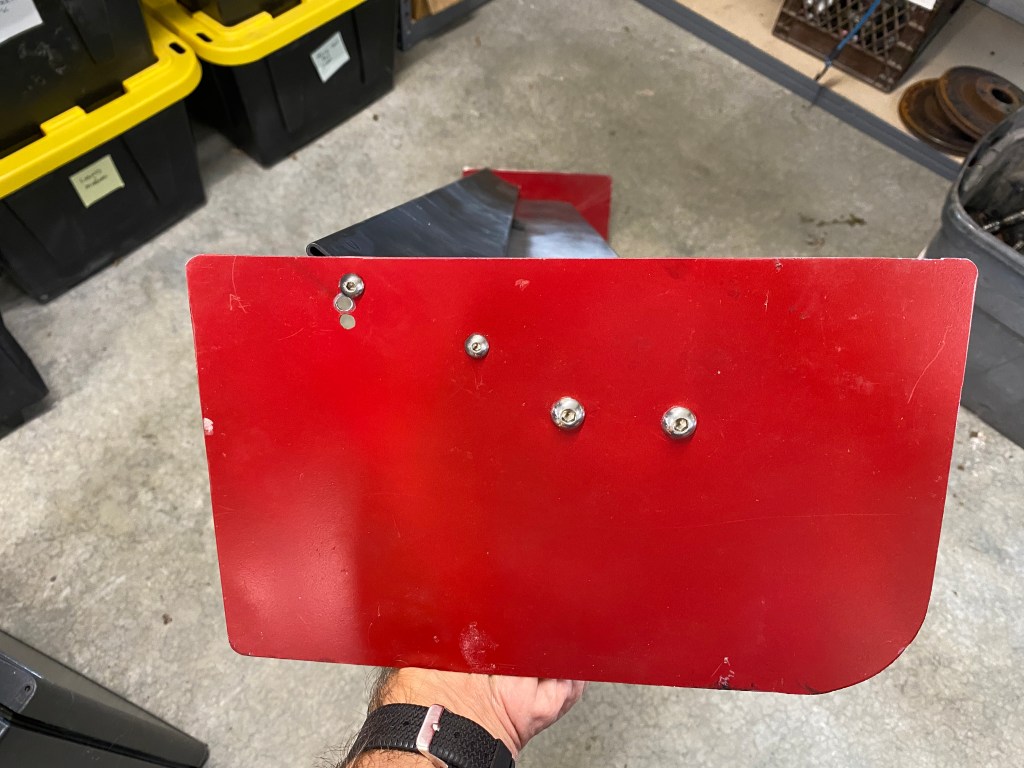
So I made new wing mounts out of splitter plywood and bolted them to the hatchback. These wing mounts allow the wing to move forward and back, so we could theoretically adjust front/rear aero balance via leverage, independent of wing angle.

Plywood wing mounts were surprisingly sturdy.

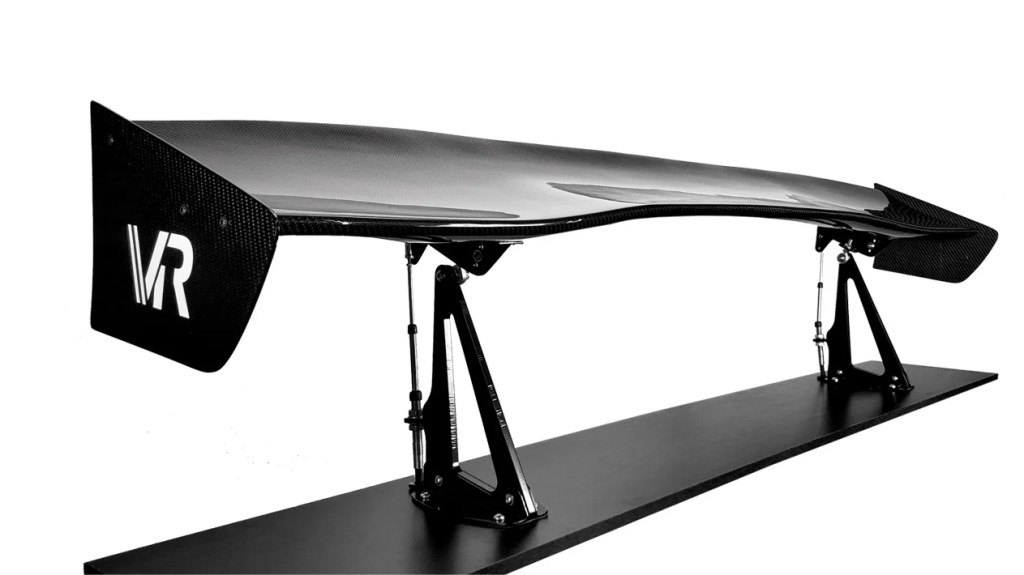
Ian also had a 9 Lives Racing wing, but hadn’t welded on the wing mounts I gave him. So I riveted on some mounts and we’d test that wing on Sunday. With rear aero addressed, the next thing was to add more front grip and reduce drag.

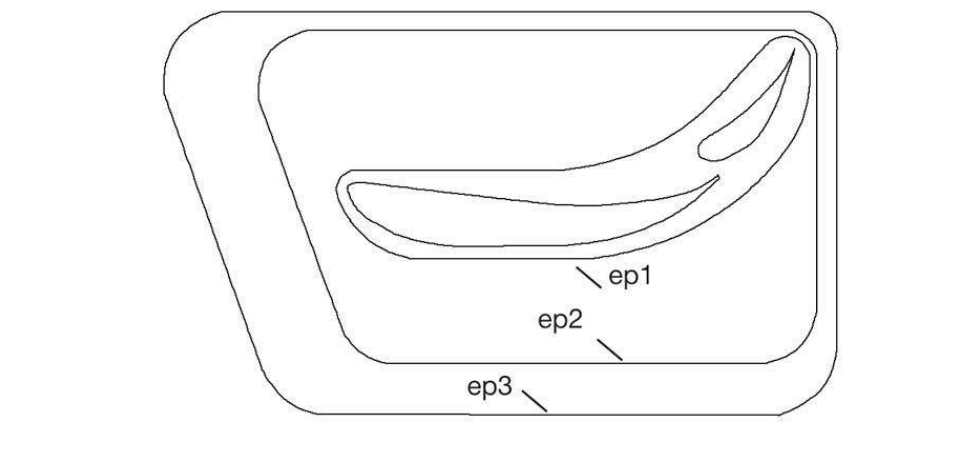
For the front, my specifications were the following:

  • Flat undertray with 12-degree ramps (diffusers) dumping into the wheel wells.
  • Removable splitter, adjustable for length, with cutouts for the diffusers.
  • Radius the underside of the front splitter edge and bevel the trailing edge upwards.
  • Spats in front of the tires.
  • Duct the radiator and put an extractor vent in the hood, to make sure no air from the engine compartment could get below the splitter.
  • Vent the front quarter panel to extract any air in the wheel arch.
The original aero plan.

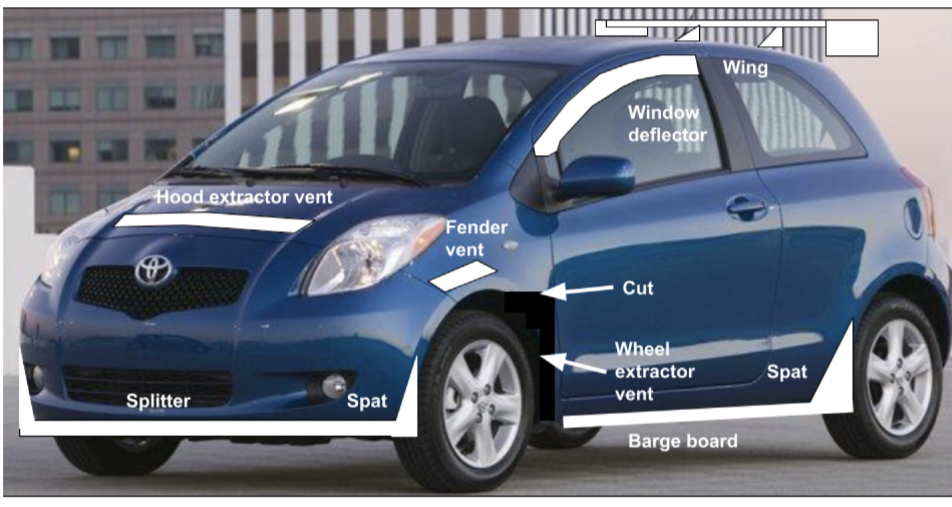
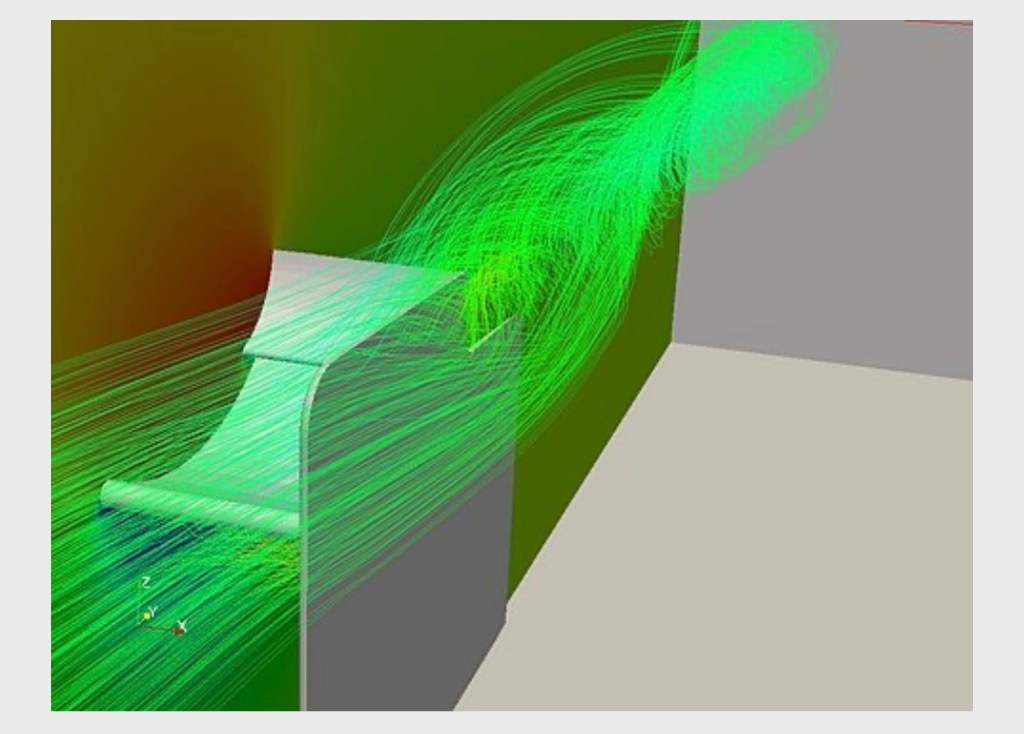
The next thing to address was drag reduction. The Yaris has enormous windows, and when opened, turns the rear of the car into a parachute. Mike rounded the B-pillars with sheet aluminum, which would help extract some of that air. He also added rear wheel covers to reduce drag. We also reduced the openings in the front of the car by more than half, blocking off the bottom grill, and reducing the radiator opening by 1/3.

That all went mostly to plan, but it took more than the single day I had set aside, and so we were building aero in the pits all weekend. Whenever the car was not racing, it was getting cut, riveted, ducted, and otherwise transformed. I didn’t get a chance to make barge boards, they were pretty low on the list anyway.

Aero would continue to evolve through the weekend.

With all of that aero work happening in the pits on Friday, we missed our early tech spot, but we got classed in C with zero laps. We also missed our chance to test the car on track, or see what the track looks like in reverse. But we’ll figure that all out in the race tomorrow. We have four fast drivers and I feel like we have a shot of winning our class. The question is, can we stay out of the penalty box?

Attention circle

The Yaris has done well in past Lemons races, and should have won Class C by now. But the team keeps getting too many black flags from exceeding the limits of the “attention circle”.

A driver’s attention circle is a lot like a tire’s friction circle. A tire that is being used 90% for cornering has only 10% left for braking or acceleration. If you ask for more than that, you slide out. The attention circle is the same. If you have 90% of your attention on going fast, you have 10% left for watching flag stations, monitoring the car, and avoiding other idiots driving like idiots.

Unfortunately Ian’s teammates spend 95% of their attention on beating each other, and so they exceed the limits of the attention circle and get black flags regularly. From watching their progress over the past couple years, I’d guess they average about four black flags per race.

Let me just get on my high horse for a minute here…. In the past 11 years I’ve done 26 endurance races and have accrued three black flags: One was a blend line violation when I was avoiding another car; One was when I hit a car because I was driving like an idiot; And one time when I got hit from behind by someone else driving like an idiot. All of them are my fault. When you drive the car, you put yourself into situations where things happen. If you’re in the car and lighting hits it, it’s your fault; you put yourself in that situation.

Those incidents aside, I have never spun, put four off, or made a pass under yellow. Yet. I’m sure those things will happen, because that’s racing. But I also know that in endurance racing, my primary job is to take care of the car for the next driver. I won’t put the car in a compromising situation, I won’t flat spot the tires, I’ll watch the gauges and mirrors, I’ll see every flag station, and I’ll stay the fuck out of trouble.

Driving with all of those things in my attention circle means that I’m not concentrating so much on going fast. I lift when I should be flat footed, I don’t steal apexes or defend my line, I point people by, and I drive like a gentleman. I’m not the fastest driver on the team; I’m occasionally the slowest. But if you do the math, I generally come out up top.

The math is this: A black flag is at minimum a 5 minute penalty, and for the Yaris on the the 3-mile track, it works out to just over 6 seconds per lap. That’s right, whatever your best lap was, add 6 seconds to that one, that’s your fastest lap. And add 6 seconds to every other laps as well. The fact is, one black flag makes you the slowest driver on the team.

If you get a second black flag in a Lemons race, they will start to hold you longer, and as you rack up more and more BFs, they will park your car for an hour and/or make you do stupid and embarrassing shit. The organizers made sure to mention this in the driver meeting, that longer penalties would happen at your second black flag. You can probably tell I’m going somewhere with this….

I keep telling Ian there is no learning without consequence, and he should fine his drivers for black flags: $100 for the first offense, $200 for the second, and so on. Get four black flags and you’re out a thousand bucks. That’s a teachable moment right there.

Instead, Ian removed the Rumblestrip lap timer from the car, feeling that this should remove the incentive for a fast-lap competition. In addition, Ian said there would be a competition for whoever gets the best gas milage. That’s pretty clever, and he thought it might keep Danny and Mike from competing against each other for once. Unfortunately, I’m the only one who followed team orders.

Saturday

95 cars registered for the race, but I believe only 88 cars actually started. This is normal for Lemons, some cars never make the starting grid. There was a Lucky Dog race at Sonoma the same weekend, which pulled some of the attendance away, and so weren’t going to get anywhere near the 216 cars we had when we set the record. Which is fine by me, that was too many cars. With 88 cars it works out to 17.6 cars per mile, which should leave everyone plenty of room for racing.

I drove the first stint. There was no time to test all the aero changes we’d made, so my sighting laps were the only testing I’d get. Unfortunately I got stuck behind a really slow car and had a train behind me, so I couldn’t get heat into my tires. Going just half speed I lost the rear end in T7, then again had to save a spin in T1W and T7W. The extreme rake on the car meant there was very little weight on the rear tires, and even with repetitive braking couldn’t get any heat into them .

I did one full lap, and about half way through my second lap, on the west-east connector, they threw the green flag. So I started the race about 2 minutes away from the starting line, which wasn’t very good luck, but as I picked up the pace I felt the rear tires come in, and was able to push a bit.

You’ll recall that the strategy was to get the most MPG, and so I hypermiled my way around the track, short shifting and coasting into braking zones. There’s no economical way to take the 2nd-gear corners on the West side, but it was fun to out accelerate some cars. That’s really the only place that can happen.

I drove a clean stint for two hours and 27 minutes, making a lot of safe passes and bringing the team up to 24th place overall and 2nd in class. I didn’t light the track on fire, but it was a solid effort averaging 15.3 mpg. Unfortunately I set up the Aim Solo incorrectly, and Ian forgot to turn on the video cameras, so all I have are my memories from this stint.

Mike got in the car next and after a few good laps suddenly went four off in Turn 5. This is a tricky, blind, tight corner, and I saw several people go off here. But I’m not going to make excuses for Mike – there’s no reason to go off the track when you’re all alone and you’re competing for who can get the best gas milage.

Mike caught another black flag for a blend line violation exiting Turn 1. The organizers warned about this in the driver’s meeting, and said to treat all blend lines as walls, and yet at least a dozen people got black flags for this. Mike said he was going three wide there and had to cross the blend line to avoid traffic, but since he put himself in that situation, he’s 100% at fault.

That second black flag cost us a bit more time, and we discussed throwing in the towel and using the rest of the weekend for testing. I lobbied to stay the course, because other teams could also have drivers with poor judgement, or mechanicals, or simply bad luck. So with about 20 minutes in penalty time already in the bank, and knowing the next flag would park us for an hour, Mike got back on track and ran some quick, clean laps to finish out his stint.

Danny drove next and did some very fast laps that got us back to fourth place in class, and then Ian drove a short stint to close out the day. His Achilles tendon hasn’t fully healed, so he didn’t want to risk that, but wanted to get in some hot laps on this unique reverse 5-mile layout. Mission accomplished.

Saturday evening we continued on aero until the sun went down, adding more venting and spats on the spitter in front of the front tires.

Sunday

Before the race we discussed strategy and reckoned we were still in for a podium if we could avoid black flags and skip a pit stop. If all three drivers focused on economy and not lap times, we’d make the whole race on only two pit stops.

We changed to a 9 Lives Racing wing on Sunday. It was better.

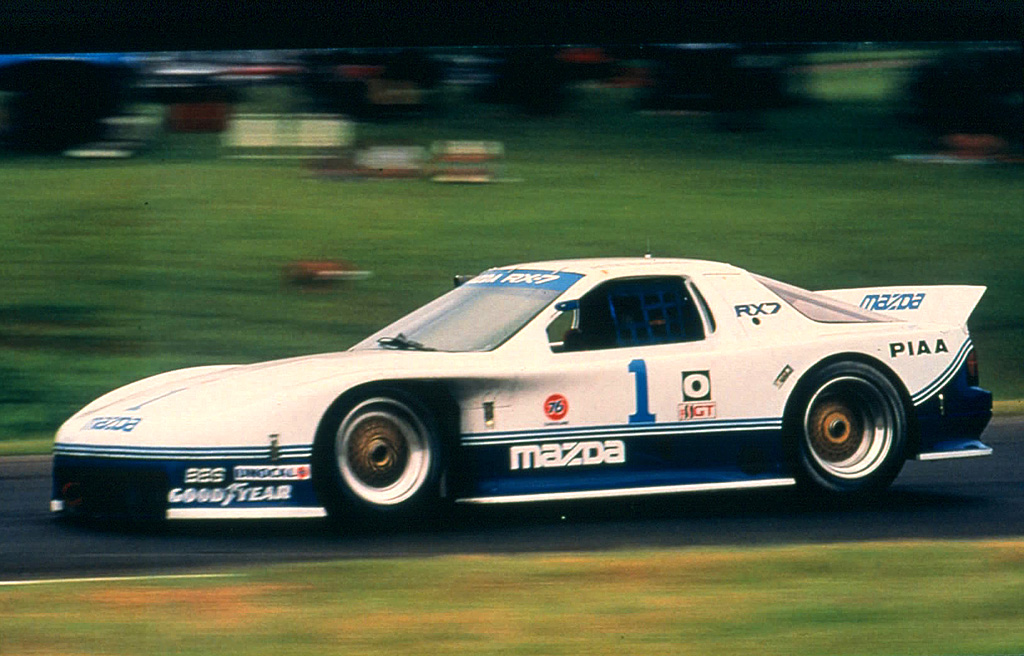
I drove the first stint again and settled into hypermile mode, netting 16.3 mpg in a 2 hour and 28 minute stint. I drove a pretty boring race, but mixed it up with a GTi and a RX7 in the following clip. They have more top speed, but our aero works around Turns 8 and 7, which makes Turn 6 my passing zone (recall we are running it backwards, so the turns are descending in order). I get by the GTi and then get on the RX7, who gives me a point by on the front straight, right into a waving yellow! I back off and then make room for a second-gen MR2 to blend onto the track, which puts the RX7 out of touch for a bit. But I get by the MR2 and RX7 eventually.

A lap after I pass the RX7 I see the IS300 of the team pitted next to us. He’s closing fast but I want to show him a little of what the car can do, and I break out of hypermiling mode for a single lap and do a 1:28.14. (This is at 1:44 in the video if you care.) It doesn’t matter, the IS300 catches me and I point him by just before the front straight

I got us back into the podium positions and handed the car off to Danny, who’s job it was to drive economically and finish out the reverse direction, stay in the car for the switchover, and run the tank dry in the forward direction. It wasn’t necessary to drive flat out, since our strategy relied on skipping a fuel stop. In fact, the only way the strategy would fail is if we had to fuel an extra time. After watching Danny’s full stint, I don’t think he heard a word of the race strategy, and just went out there as usual driving with aggression and trying to make passes, not distance.

Here’s a single lap of me and Danny doing about the same lap time, compare the driving styles and notice how many steering corrections he makes. Everyone has their own driving style, but I have to think mine is easier on the tires and gets better economy. Indeed I did beat him by 1 mpg.

Just after noon was the switchover, where they stopped the race, re-gridded the cars, and put the cars back in the regular forward direction. Ian and I were in the tower watching when they threw the double yellow, and as we looked across to find Danny, we watched him pass another car going up to Turn 8. We hoped the judges didn’t see that, or we’d have earned ourselves another black flag.

Danny got lucky because the judges missed that infraction, and he got lucky again by avoiding a big pile up on the front straight:

Our last driver was Mike, and on his first lap had to return to the pits immediately for a black flag. It turns out it wasn’t for Danny’s pass under yellow, but a 4-off right before entering the pits. Jesus.

After that Mike got back on track, ran some decent (but I wouldn’t say economical) laps, and then picked up another pass under yellow at Turn 14 or 15. That one was pretty hard to see, and even the organizers felt a bit sheepish about it.

So now with four fucking black flags (shoulda been five), we’ve blown our four lap cushion, and now Anal Probe Returns to Earth are only a lap down on us. To Mike’s credit, he put in some fast laps and kept us out of danger. But turning fast laps uses more fuel, and the only way this race strategy would work is if we conserved fuel.

I was up in the tower for the end of the race, and knew there were only a couple laps left; all we had to do to get 2nd in class was cross the line without pitting for fuel or running out of gas. Then I see Mike come across the line with his index finger up, meaning he’s coming in next lap, so I run down to the hot pits and find Ian and Danny, who are planning to do a fuel stop and driver change! I yell that we can’t do that, we have to send Mike right back out again, there’s only one lap left!

Like a nightmare, we see Mike pull into the pits on the last lap, and we yell at him that he has to go back out and if the car runs out of gas, so be it. If we pit, we lose 2nd place. So he goes back on track, makes it around for a lap, and returns on fumes. We get 2nd place in class after all. Phew.

There was no time to take fuel. We ended up just 43 seconds ahead of 3rd place.

We got 13th place out of 88 cars, and like I wrote too many words ago, we somehow beat 10 out of the 12 Miatas in the race.

The team that won C class had slower lap times than we did, and yet they beat us by 8 or 9 laps and placed 9th overall. They drove a clean race and deserved to win. They also deserve to be in B class in the future, because they’ve won C class 3 times now. The Yaris is also arguably a B class car, but as long as the team keeps shooting themselves in the foot, they belong right where they are.

2nd in class, 13th overall.

All in all, it was a great race weekend. I had Mexican food every day, got in 5 hours of racing, did a ton of aero work, visited family, and made new friends. That the racing didn’t work out exactly to plan is normal, and it honestly went better than it should have.

We have some ideas for the next race (or possibly a test day), setting the car back to a normal ride height, corner balancing, using better tires, faster fueling, and better coms. And of course more aero.

Active Aero Wings and Spoilers

There’s a scene in The Road Warrior where Max hits a switch on his shifter and his supercharger spins up, giving him an extra boost of speed. I’ve always wanted something like that for my Miata. Or rather, I want something more effective than turning off the A/C.

It makes a noticeable difference.

The aerodynamic equivalent of that is a DRS system, like on Formula 1 cars. In F1, the upper wing of a dual-element wing can pivot into two positions, one for downforce, and one for low drag. It works, and makes F1 racing a lot more fun to watch. But you don’t see active aero much in other racing series, which is a shame, because racing improves the breed.

Since active aero is largely banned in racing, most of the advancements are happening on street cars. The first street car with active aero was way back in 1986, the exotic and unattainable Porsche 959. But just two years later you could get an active spoiler on a pedestrian Volkswagen Corrado.

Corrado active spoiler.

And two years after that, the Mitsubishi 3000GT had active aero on both ends! A Russian magazine did some testing and reported that front lift reduced by half, and rear lift became actual downforce. This reduced top speed by 5 mph, which is an acceptable trade.

Russian spy data on Mitsubishi 3000GT active aero.

Those cars are now considered vintage, and on modern supercars like the Pagani Huayra, active aero is much more sophisticated.

Pagani Huayra active aero.

Given unlimited resources and time, I’d develop a system that changes around the track based on GPS points: On the straights the aero would settle into the position of least drag; In braking zones the aero devices would move 90-degrees to the wind and behave like a parachute; In corners, the aero would pivot into the position of max downforce. I’d also have rudders and vanes on the sides of the car to help bank it into turns, loading up the tires differentially and using air resistance for turning.

But bringing this back to reality, I’d start with something simple, like the VW Corrado spoiler. I’ve got a pair of Miata pop-up headlight motors on a shelf that I’m saving for just such a project. I’d hook them up to the headlight toggle switch on the dash, which would give me a high downforce setting I’d use for most of the track, and a low-drag DRS setting for straight line speed.

Before I embark on that journey, I’m going to look at a few aftermarket active aero systems, and then run some simulations to see how much active aero is worth.

NINTE Lifting Spoiler

I’d never heard of NINTE before writing this article, but apparently they make active aero for many sedans. You can tell from the shape and the integrated 3rd brake light that this is not a wing – they really don’t care what the underside is doing.

Active spoiler.

The spoiler rises up automatically when speed reaches 60 km/h, and descends automatically after 10 seconds when the speed drop down to 30 km/h. You can also control it manually.

In general, I’m a fan of spoilers on street cars, because they reduce drag and lift, and cars look better with them. Aesthetically, I like simple spoilers and this one is not. But at $850, it’s not outrageously expensive for something that could be fun and different.

Active Miata Wing

Carbon Miata sells an active wing for Miatas. It’s a three-position system for DRS, normal, and airbrake. The motors and levers are exposed and the entire thing has a DIY look about it. Normally I’d dig that, but if I was shelling out $3k, I’d want a more professional look. I think they could have hid the motors on the underside of the trunk lid or something.

Exposed motors don’t do much for the looks of it.

The airbrake mode is interesting, it tilts the wing to 90 degrees and while I believe it would be effective, it also scares the shit out of me. With the wing in airbrake position you’d lose rear downforce, but you’d move the center of pressure rearward and get a lot of drag to boot. I wonder how much stress the system can take, and if it’s designed for fast racetracks or just autocross.

Airbrake activated!

The carbon wing looks quite nice, and even if you never used the airbrake mode, the standard setting and DRS would be useful.

TRK1 Active Aero Smart Wing

If you have $3500 bucks lying around, you might want to try the SPT 1 Smart Wing. The wing comes in different sizes from 58″-70″, and has five downforce settings, low-drag, three downforce levels, and airbrake. The downforce levels can either be preset or programmable.

If you opt for the presets, you get three downforce levels: 10 mph, 50 mph, and 80 mph, plus the low drag and airbrake settings. If you buy the CPU version, you can program the wing to change angle at any three speeds you want.

The wing looks nice and the active aero strut is unobtrusive.

For example, you might set the wing for low downforce at speeds up to 40 mph, to help the car rotate in slow corners, then transition to a maximum downforce setting up to your fastest corners, say 80 mph, and then start dropping wing angle at 100 mph, and go into full DRS mode at 120 mph.

You set the airbrake based on longitudinal Gs. Now I imagine this one would be a little tricky to set up, because just lifting off the gas will give you around .3 G of deceleration, and there are times when you want to lift and brush the brakes slightly, but still retain maximum downforce and grip. In such a situation, you wouldn’t want the wing to pivot into airbrake mode. So maybe after some experimentation you’d find that around .6 or .7 G translates to straight line braking, and that’s when you’d activate the airbrake.

It all sounds very high tech and fascinating, and one wonders what it would be worth in a lap time. The manufacturer claims that their single-wing DRS system was 10 mph faster than a fixed wing when tested on a Shelby GT350 at COTA. I’m not going to call total bullshit on them, but if F1 cars get only 7 mph out of a double-wing DRS system, it does sound a little far fetched.

OptimumLap simulations

This is Occam’s Racer, where we do simulations and pretend it’s meaningful. In this make-believe world, I’ll do the simulations at Watkins Glen. The straights are long enough to use active aero, and in the real world, the track is only 25 miles from me, so I might be able to test this for realz one day.

You might want to skip ahead to Single element wing. The rest of this section recaps how I made an error in the simulations, then figured out a more accurate way to measure DRS, and a neat trick in OptimumLap to see small deltas.

The first time I ran the simulations, I cheated: I simply took a wing and reduced its drag value, reckoning that this was the same thing as active aero. It’s just less drag, right? Wrong. I immediately saw my error because the active aero wing had a lower top speed than the low-drag wing. The reason is, the car weighs less in when the wing is in a low-drag setting. Wings make downforce, which is the same as weight. So I had to scrap everything and start over.

To properly simulate active aero, you have to take into account not only drag reduction, but weight reduction. To do this required increasing mechanical grip of the low drag wing, such that it matched the exit speed of the high downforce wing. And then I had to determine the amount of time from corner exit to the braking zone between the active wing and the low drag wing. Good fucking god that was a lot of work!

And not to get too far ahead of myself, but the values were tiny, and difficult to see in the data. However, in doing these simulations, I found out something useful, which is that you can easily zoom in or out in OptimumLap. If you draw a rectangle on any of the charts starting in the top left and drag to the bottom right, it zooms in. Do the reverse and it zooms out.

Using this method, I was able to zoom into the time-distance graphs and get the exact amount of time it takes to cover any amount of distance on track. By subtracting starting and ending points, I then got the delta for how much faster the low-drag setting was. Ugh, tho.

Single element wing

On a Miata, you typically run a single element wing at 3-5 degrees angle of attack. Air comes down the roofline at an angle, which puts the middle of the wing at around 10 degrees. Most wings will stall at more than 10 degrees, and so you don’t want to set the wing with much more angle than that. A wing set like this adds 3 points of drag, so if your Miata has a Cd of .45 without a wing, it’ll be .48 with a wing.

In the low-drag wing configuration, the car would have a Cd of around .465. This is really the best you can do on a 2D wing, as the ends of the wings are always 5-7 degrees offset from the middle of the car, and a properly set up wing doesn’t have a lot of drag anyway.

Watkins Glen has eight potential DRS zones: the front straight, the back straight, and the short straights between the corners. In those DRS zones, I’d have to push a button to lower the wing after exiting each corner and then push the button again to raise the wing before the start of every braking zone. Sixteen button pushes would take some concentration, and I might find my lap times were worse using DRS.

Instead I’m going to say that there are three DRS zones: front straight, back straight, and between turns 7 and 8. I’ve added 10 lbs to the car with active aero, to account for motor and levers.

I’ll simulate going around the track three times. Once with the wing fixed in the low drag position, another time with the wing fixed in the standard downforce position, and then using active aero in the three DRS zones. Here’s the lap times:

WingLow dragStandardActive aero
Lap time2:18.122:15.282:14.92
Fixed wing and active aero configurations.
  • The slowest configuration would be the wing set to the lowest drag setting. This corresponds to the wing set for maximum efficiency, which is why choosing a wing or angle of attack based on its efficiency is meaningless.
  • Setting the wing to the standard 3-5 degrees angle of attack makes the L/D ratio of the entire vehicle the most efficient. This is faster than the low-drag setting by almost 3 seconds.
  • Finally, the active aero wing would be about 0.36 seconds faster than a fixed wing. Now wait a goddamn minute… that’s it? Yep.

Single element wings are efficient at producing downforce and do so with very little drag. In fact, a wing has about the same amount of drag as your two side mirrors combined. Thus, active aero on a single element wing is about as effective for drag reduction as if you moved one of your mirrors inside the car on the straights.

Given that, is active aero worthwhile? For causal lapping at a track day, notsomuch. In a racing situation, sure.

At Watkins Glen, the back straight is where drag reduction makes up the most time. From the exit of Turn 2 to the braking zone of the Inner Loop is about 3000 feet. Setting the wing into the low-drag position makes the car go 1.5 mph faster, and gains 0.17 seconds per lap over a fixed wing.

Speed trace from Start/Finish to the braking zone for the Inner Loop.

But a better way to visualize that is that DRS gains about 25 feet on the car with a fixed wing. So with two evenly matched cars racing close together on the back straight, the car with active aero should be able to pass the car with a fixed wing.

And that’s pretty much how it happens in Formula 1. The trailing car activates DRS and makes a pass on one car at the very end of a straight. Speaking of F1, wouldn’t a dual element wing be a better usecase for active aero?

Dual element wing

Dual-element wings aren’t as aerodynamically efficient as single wings. As you add elements, you gain downforce, but you gain drag at a higher rate. However, because the wing contributes a very small amount to the overall drag of the car, the aerodynamic efficiency of the vehicle is better with a dual wing. As I’ve simulated it, the aerodynamic efficiency of the single-wing car is 2.08, and the dual wing is 2.98.

The first simulation I’ll run is a fixed single wing versus a fixed double wing. Despite a 2 mph slower speed on the back straight, the double wing is about 1.5 seconds faster than single. It makes up time in every corner and keeps that speed onto the shorter straights.

Speed trace of a double wing (green) vs single wing (blue).

So now I’ll make the upper wing active and it goes .60 seconds faster than a fixed dual wing. Here’s the lap times:

WingSingle wingDouble fixedDouble active
Lap time2:15.282:13.862:13.26
Fixed wing vs double wing vs double active aero.

That’s not too shabby, and most of the gain is on the back straight. Activating DRS on the run from T2 to the inner loop is worth .35 seconds alone. This is a gain of over 50 feet of track on a car with a fixed dual wing. So as you can see, active aero makes more sense for a dual-element wing than a single wing.

So how come active aero isn’t as effective as we see on TV? Mostly because F1 cars are so damn fast. Drag force doubles with the square of speed, so there’s four times as much drag at 200 mph than 100 mph. At autocross speeds, drag is inconsequential, but at high speed it’s a game changer. Even so, on a F1 car, DRS is only worth about 6-7 mph. So it stands to reason that a dual-element DRS wing might be worth only 1.5-2 mph on our cars.

New York Safety Track

Watkins Glen is a long, fast track with a higher top speed than any other track I’ve been on, and represents a DRS best-case scenario. I also simulated what would happen at New York Safety Track, because it has shorter straights and a lower top speed, and is more similar to the average road course. I also coach at NYST several times a year, so if I build a DRS system, I’ll be able to test it in the real world as well.

NYST has just one DRS zone, the 1400′ front straight that they use as an airstrip for small planes. I only simulated the dual-element DRS wing, as it was the most effective.

If I activated the DRS system at the exit of T18, I’d gain .058 seconds to the Start/Finish line, and from there to the braking zone for T1, I’d get another 0.062 seconds. All told, DRS would be just 0.12 seconds faster than a fixed dual wing. In terms of top speed, it’s a difference of less than 1 mph. That’s enough to make up only one car length against an evenly matched fixed wing car, and would be of dubious benefit.

Conclusions

Active aero is typically banned at the club racing level, and after doing this theoretical investigation, I’m inclined to agree with that restriction. Active aero adds weight and complexity, and mechanical things fail mechanically; I can only imagine the jank that me and other DIY pioneers would litter the track with.

Now if you’re racing in 24-hours of Lemons, go ahead and make an active aero system and see if it’ll pass tech. Or build an anti-aero device that makes a jack-in-the-box pop out of your roof. But for serious racing, you’ll achieve more by reducing drag anywhere else on your car.

Think about it: if you want to reduce the weight of your car, you don’t look at all your carbon fiber components and try to lighten them. You go after the parts that weigh the most.

Wings are already designed for optimum performance and low drag. Reducing drag on what is already the most aerodynamic part of the car, is as silly as trying to lighten what is already made out of carbon fiber. Your hardtop, cooling system, mirrors, wheels, rear surfaces, and everything else on your car are better places to concentrate on drag reduction.

For HPDEs, there’s even less to be gained with DRS than in racing. Moreover, I ran these simulations at a very fast track with three long DRS zones. Most race track have fewer and shorter straights, and DRS would be worth only a tenth of a second.

Just the same, I’m pretty sure I could build a robust DRS system. And I have those headlight motors just sitting there on a shelf. And it’s still over half a second at WGI that I’m not going to get anywhere else….

Addendum: Spoiler

The first simulations I ran were with spoilers, but once I realized that I’d made incorrect assumptions, I didn’t bother recalculating the lap times to the same level of detail as I did with the wings. However, someone might be curious about the effectiveness of spoilers and this data is close enough.

  • A low spoiler makes the car about a second faster than a car with no rear aero.
  • A tall spoiler is about a second faster than a low spoiler.
  • An active spoiler is .28 seconds faster than a tall spoiler.

If you read my previous posts on 3D wings, you’ll know that a 3D wing designed for the Miata’s roofline shape is marginally better than a 2D wing. I’ve included the 3D wing data and a car with no rear aero in the summary data below.

Rear aeroLap time
None2:19.63
Low spoiler2:18.70
Low-drag wing2:18.12
Tall spoiler2:17.66
Active spoiler 2:17.38
Fixed single wing 2:15.28
3D single wing2:15.09
Active single wing2:14.92
Dual-element wing2:13.86
Active dual wing2:13.26
Simulated lap times for all versions.

2D vs 3D Wings

Fact: Interaction with the car’s roof can have a large impact on the effectiveness of a wing. Case in point: my 9 Lives Racing wing generated 130% more rear downforce when using a fastback than with the OEM hardtop. Same wing, same height, same angle of attack, more downforce. Put another way, the fastback made my 60″ wing behave as a 78″ wing. Although the converse is closer to the truth, which is that the shape of the OEM hardtop made my 60″ wing behave as a 46″ wing. Ouch. There are at least three reasons for this.

  • Less turbulence – Turbulence is bad for wings, it makes less downforce. Here’s proof: when I removed the OEM hard top (making the car into the convertible it was designed to be), I got only 40% of the downforce as the hardtop. Going in the opposite direction, the fastback had less turbulence than the hard top, and that’s where some of the 130% comes from. In other words, you could make anywhere from 40-130 lbs of downforce, at the same speed, from the same wing, just by changing the top and nothing else.
  • Air shape – The wing is flat, the roof is not. As air moves over the center of the car, it has to go up over the windshield, across the roof, down the rear window, and then across to the trunk. This creates a large curve, and air follows this curve in what I’ll call downwash angle. In the center of the car, there’s a downwash angle, outside the car where the wing is in clean air, little or none. It’s probable that the fastback flattened the shape of air, making the center of the wing work more similarly to the sides of the wing.
  • Better wing angle? – During the testing I did at Watkins Glen, I set the wing angle to 4 degrees. When I swapped roofs, I didn’t adjust wing angle. If I’d spent time optimizing wing angle for each roof, this might have made a difference. But I had other things to test and didn’t have time. 9 Lives Racing’s CFD shows that the wing stalls at 5 degrees with an OEM hard top, which is fairly close to what I measured, and so the wing should have been nearly at peak downforce behind the hardtop. However, it’s possible the fastback gave a more optimal wing angle due to a different downwash angle of air. Or it could have been worse, I don’t know. I just don’t want to leave this stone unturned.

The easiest way to mitigate all of these differences is to get the wing as high as possible, where the air is less affected everything in front of it. While the wing may make more downforce in this configuration, the car may not (based on the rear wake and and if it has a diffuser). There are other problems with wings that are too high, but that’s a different article.

I typically mount my wings at roof height, which is a good baseline. But some racing rules limit wing height to substantially less than roof height (SCCA ST) in which case the shape of the roof is going to have a big impact on the effectiveness of the wing.

3D-wings solve this problem by having a center section that has less angle than the ends. But how do you know the shape of air? How wide should the center section be, and how much offset should there be between the center angle and the ends? I mean, it’s got to be different for every car!

Making a 3D wing is expensive and requires composite materials, and a company like APR Performance isn’t going to make a 3D wing that is optimized for each and every car. It just wouldn’t be economically feasible. Instead, they make a few wings that cover typical applications for most cars. The width of the center section, and the offset between middle and ends, are going to be happy mediums.

Image result for 3d car wing gtc

Let’s take a look at some sexy carbon fibre APR wings.

  • The APR GTC-500 is 71″ or 74″, has a 10-degree offset. APR designed this wing for cars with a low-angle fastback, such as a Corvette, NSX, etc.
  • The APR GTC-300 comes in 61″ and 65″ and has a 15-degree offset. According to APR, this wing is designed for widebody sports and touring cars. This wing has a very narrow cross section.
  • The GTC-200 comes in two versions, the original 59.5″ with a 12-degree offset, and a newer 60.5″ with 14-degree offset. I have the 59.5” version, and I’ll get in the details on this one later. According to APR, these wings are designed for sports and compact cars.

Miatas are listed as one of the applications for the GTC-200. Since APR is suggesting the GTC-200 for Miatas, we can conclude that they think there’s a 12-14 degree difference in downwash angle between the center of the car and the outsides. That’s a huge difference!

If you look at CFD for different wing shapes, you’ll see most wings operate most efficiently in a pretty narrow range, between 0-10 degrees angle of attack. What APR is telling us with a 12-14 degree offset in the middle of the wing, is that a 2D wing on a Miata will stall in the middle of the wing. Indeed, this stall condition was corroborated by CFD done by the Hancha Group.

Stall in the middle of the wing. Graphic from the Hancha Group

In the picture, notice how air coming down the Miata’s roof effectively increases the angle of attack on the wing. This downwash angle is less at the sides of the wing, and more in the center. The blue lines indicate that there’s a stall condition in the middle of the wing. Stall means more drag and less lift; it’s bad.

9 Lives Racing did their own CFD, and in it they found their wing stalled at around 5 degrees behind a Miata hard top. Based on the profile of the wing (which is similar enough to a CH-10-48-13, which stalls at around 10 degrees), we can conclude that the downwash angle on a Miata OEM hard top is around 5 degrees at roof height. Does that mean 9 Lives Racing’s CFD, or APRs wing design is wrong? No. APRs wing mounts are lower, and the downwash angle is greater closer to the trunk.

In my own testing with a DIY airflow visualizer I measured a 5-7 degree downwash angle at roof height, the greatest angle was just inside the wing stands, whereas in the middle of the roof it was flatter, at about 5 degrees. When I lowered the airflow visualizer to half height, the angle in the middle increased over the span, to about 15-degrees near the trunk. So, that means me, 9 Lives Racing, and APR are all in general agreement about the downdraft angle. Good.

APR GTC-200

I own a GTC-200, let’s take a look. They have a website with data, which APR has a lot of. They show streamlines and pressure plots, but mostly from the top-side of the wing. The suction side of the wing does more work, but they mostly ignore that. I’m also not sure what to make of pressure plots anyway. While they are colorful and look impressive, I don’t know how that translates to anything useful, like lift and drag.

They did CFD analysis and give results in spreadsheet form, which pleases me. However, the CFD appears to be done entirely in free-stream air, which completely misses the point of a 3D wing! They mention this in their explanation of how to read CFD, and this is how they put it: “Basically, this airfoil was never intended to be used in this CFD simulation’s environment of free-stream air.” Totally agree. So why do it?

If I were comparing two wings in free stream CFD, one a 3D wing, and another a 2D wing, I’d expect the 2D wing to perform better. Likewise, in the real world, I would expect a properly designed 3D wing to outperform a 2D wing.

I was going to include a CFD analysis here, but got cock blocked. The APR has a disclaimer on their website: The information contained herein is property of APR Performance, and may not be reproduced in whole or in part without prior written consent from APR Performance. I emailed them to ask permission to use this data and never got a reply.

APR have a blurb on their website that says nobody can republish their CFD without permission. I asked for permission, but they never emailed me back. I also emailed to get new end plugs and they didn’t email me back. Lame on both counts.

Since I don’t have permission to use their public data, I’ll look at my own wing. The GTC200 chord measures around 8.5″ in the middle of the wing, 7″ at the extreme ends, and averages around 8″ across its 59.5″ length. The cross-section shape of the middle of the GTC200 is shown below. I went to Airfoil Tools to find a similar shape and came away with a lot of things that are similar, but because of the chubby tail section, nothing was a really good match.

The airfoil shape that spans most of the wing.

For kicks, I’ll take a look at some numbers for a Gottingen 222 airfoil, which is not dissimilar from the shape of the middle of the wing. When I examine the numbers for the usual 200k, 500k, 1M Re plots (Ncrit = 5), I see a good all-purpose wing.

Not the same profile, but in the same neighborhood.

In the 500k Re range (78 mph at mid chord), the wing is most efficient at 0 degrees, but 3-5 degrees seems like the sweet spot for a range of speeds. The wing stalls around 12 degrees, where lift goes down and drag goes way up.

The ends of the wings taper in chord, and there’s a radical change in shape for the last 10 inches. Just looking at the profile on the ends of the wing, I would imagine there’s flow separation or at least turbulence at the trailing edge with this much upsweep and angle. But I’m not a professional aerodynamicist, and I trust they did their homework. It might even be that some turbulence or separation at the ends is desirable to cancel a trailing vortex. Smarter people than me designed this.

The ends are cast aluminum, my hardware seized inside it. The trailing edge is rounded, which is a no-no in aero. This wing needs a Gurney flap.

I’m curious to see if I can find an airfoil shaped like the ends of the wing, and the closest I can find is the Gottingen 531, which, if I increase the thickness to 140 percent, is not the same, but in the same family of weird.

While this isn’t the same profile, it’s the closest I can find, and I want to see what the numbers look like. I probably should have left off the 1M plot (orange), since that represents this wing traveling at over 180 mph! But if I look at Re 200k and 500k, this shape can take a lot of angle without stalling (see the blue arrow), and 12-14 degrees actually does seem OK (recall this is the offset from the main wing). However, there’s a lot of drag at this steep of an angle.

Given all this data, I’d mount the wing 6-8” off the trunk surface. If it’s higher than that, the downdraft angle changes, and the 3D shape of the wing no longer matches what’s coming down off the roof. I’d set the angle in the center of the wing to zero degrees. If set to more than 3 degrees, the wing ends will stall, creating less downforce and a lot more drag.

Roof-height 3D wing

To be perfectly honest, I’m not crazy about APRs GTC200 wing. I don’t like the profile in the middle or the ends of the wing, and anything with a rounded trailing edge is highly suspect. I also don’t want to mount a wing close to the trunk, because you need space for the negative pressure zone under the wing.

I’d much prefer a 3D wing with a different shape, and I’d mount it at about roof height. There isn’t really anything like that in the market, but it would be simple to build one. If I created a custom 3D wing for a Miata, how much better would it be than a 2D wing?

It’s not that difficult to figure out using existing data. If we say half of the wing is working in the desired range, and the other half is working 5 degrees off (at roof height) we already know the following.

  • If you set the wing to 10 degrees, the ends of the wing will be at max downforce, but the middle of the wing will be effectively at 15 degrees. At this angle, the middle of the wing is stalling, and drag goes way up. This setting has a lot of downforce, but at the cost of too much drag. Don’t do it.
  • A better setting for maximum downforce is to set the wing to 5 degrees, then the outsides are working in a good range and the middle is essentially at 10 degrees. This gives about the same downforce as above, but a lot less drag. I wouldn’t set a wing to more than this.
  • If you set the wing to zero degrees, then the middle is making good downforce at 5 degrees, and the sides are at peak efficiency (zero). This is a good all-purpose setting.
  • You could also set the wing to a couple degrees negative, which would be the wing’s highest lift/drag ratio, but your car would go slower around every track that isn’t a high-speed oval.

Note: The wing ends, meaning the area outside of the wing mounts, accounts for 36% of the total area, but because the air is less turbulent here, they produce more downforce by comparison. That’s why I’m saying that half the wing is working in the desired range, even if it’s a 36/64 split.

Using published CFD data, let’s see how a 2D and 3D wing optimized for roof height mounting would compare at 100 mph.

Wing angleDFDragL/D
2D 0 deg15311.513.35
3D 0 deg126914
2D 5 deg1901711.18
3D 5 deg1811412.93
2D 10 degstalllotswho cares?
3D 10 deg199209.95
Calculated 2D vs 3D using 9LR CFD.

So, is a 3D wing on a Miata worth it? Barely.

At zero degrees, the 3D wing has a 5% better L/D ratio. At 5 degrees AOA, it’s about 14% better. I don’t usually look at the efficiency of a wing, because it’s the efficiency of the entire vehicle that matters, and that figure is generally the highest when the wing is making the most downforce. So how much more downforce can you get out of a 3D wing? About 5%.

That’s not very much, and because Miatas are front-downforce limited, you’re not going to get a lot of performance out of adding more in the rear. But on a low powered car, on a high speed track, then a small reduction in drag for the same amount of downforce can be marginally useful.

I’m toying with the idea of making a DIY 3D wing with Miata-specific dimensions. I’d increase the chord to 12” and maybe use a reverse swan mount. With that much rear downforce I’d need to optimize the shit out of the splitter. But that’s already in the works.

Spoiler vs Wing

In this article I’m going to compare spoilers and wings, from cars that have used both, to the effects of trailing car aerodynamics, to when you’d choose one vs the other (or both) based on different rulesets.

Note that I wrote this article before my recent tests in the wind tunnel, where I was able to test a Blackbird spoiler at three different heights, versus wings from 9 Lives Racing, Wing Logic, and others. The test data and conclusions are in my Miata Wind Tunnel report, along with many, many other tests, which you can purchase here.

First things first: some people get confused about the difference between a spoiler and a wing. Air goes over the top of a spoiler; Air goes on top of and underneath a wing.

This is a spoiler.

Napp Motorsports Miata looking hawt with a spoiler.

This is a wing.

9LR street wing on a E30 is fuggin dope.

This is a wing, but it’s mounted so close to the trunk that it behaves like a spoiler.

Wings don’t work well on a convertible. When you mount them this low, they are effectively spoilers. Oddly, in this situation, it might be better.

Key differences

If you look at the aerodynamic efficiency of a spoiler, most aerodynamic texts show they are around a 3:1 lift to drag ratio. So if a spoiler creates 30 pound of downforce, it’s also creating 10 lbs of drag. In my own wind tunnel testing, I’ve seen spoilers range 2:1 to 11.5:1, depending on the shape of the car and the height of the spoiler.

Wings typically have higher lift/drag ratios, and depending on the shape of the car, can range from 3:1 to 24:1. But around 8:1 is a normal range. Wings are more efficient because unlike a spoiler, air goes under the wing, and it’s the underside that’s doing most of the work. So if the top of the wing is generating 20 pounds of downforce via pressure, the bottom side is generating 60 pounds underneath due to suction, at the same 10 lbs of drag. That’s a simplification to illustrate a point, the actual numbers depend on wing angle, airfoil shape, etc., but just know that the low-pressure region under the wing is what’s important.

The low pressure area is often about the same height as the chord. Meaning, if you have a wing with a 10″ chord, you don’t want to mount it any closer than 10″ to the decklid, or the wing loses performance. Now this is only a guideline, because cars with diffusers might want to mount the wing lower to extract more from the diffuser.

I’ve seen a lot of poorly mounted wings, mostly due to people thinking the top of the wing does the work. Another common error is too much wing angle, from not taking the roofline downwash angle into account. And then there are the low-performance wings that are largely cosmetic; pretty much any wing with a rounded trailing edge is a piece of shit.

As a practical matter, wings are more expensive and complex than spoilers. Initially you need to figure out the height and setback distance to extract the most performance, and then you might have to compromise with trunk access. Then there’s the question of Gurney flap size, after which you’ll probably mess with wing angle ad infinitum. Some people enjoy that kind of thing (guilty), but wings are not ideal for the set-it-and-forget-it crowd.

Spoilers on the other hand are dead simple. They are cheaper, lighter, and easier to mount than a wing. Small spoilers (less than an inch) are great for street cars, as they reduce drag and add downforce for free. But for racing, you want more downforce than a small spoiler can give you.

So yeah, let’s talk racing. What are the effects of drag and lift when using a spoiler versus a wing, and what happens when following a car with one or the other? Let’s start this investigation by looking at some cars that had both spoilers and wings on the same body.

Spoiler vs wing on a Mazda RX-7

A good apples-to-apples comparison is the 1990 RX-7 IMSA GTO race car. The svelte body kit included a small splitter, airdam, and spoiler. I’m still trying to figure out what the B-pillar vent was for, but those sexy extractors at the front wheel arches that blend seamlessly into the side skirts…. so fucking hot. But I digress.

Great looking aero kit.

The car originally came with a spoiler, and had a coefficient of drag (Cd) of .51 and a coefficient of lift (Cl) of -.44, for an aerodynamic efficiency of .86. Later the spoiler was replaced by a wing, resulting in a Cd of .48 and a Cl of -.53, for an aerodynamic efficiency 1.10.

In comparative terms, the wing produced 6% less drag and 17% more downforce, for a 128% improvement in aerodynamic efficiency. OK, but what does that mean for a lap time? Let’s find out.

Wing version of the same car.

If you follow my blog you know I like to quantify things in OptimumLap. So I’ll build the exact same car, and then change the aero values for drag and lift. The IMSA car had a four-rotor Wankel that put out 600 hp, which is a bit unrealistic for most of us, so I’ll also run another simulation with the engine detuned to 200 hp. I’ll simulate them at my home track of Watkins Glen, and see what happens. (Note that I chose 200TW generic values for tire grip, so the lap times aren’t meant to represent real-world lap times. The important part is the delta in lap time, by changing the aero.)

SpecificationLap time in seconds
600 hp wing122.32
600 hp spoiler123.40
200 hp wing131.89
200 hp spoiler132.73
Lap times at WGI

With the 600 hp engine, the wing was 1.08 seconds faster than the spoiler. With the 200 hp engine, the wing was .89 seconds faster than the spoiler. So on average, the wing version is about a second faster than a spoiler.

But I think there’s more that could have been done with the wing. If you look at the following pic, you can see the wing is the full body width of the car, which is the maximum width in a lot of wheel-to-wheel racing rules, but the wing is mounted quite low, and would make more downforce if it were higher. There are reasons to run a wing this low, but that has to do with extracting more from a rear diffuser, which this car doesn’t have.

So sleek. But could we get that wing a bit higher?

Borrowing CFD from the JKF Aero course I took, putting the wing higher would result in .043 more downforce and .005 less drag. If I re-run the simulations with those values, the powerful car drops another .46 seconds, and the 200 hp car goes .29 seconds faster. Adding that all together, the wing is faster than the spoiler by 1.54 seconds with the 600 hp engine, and 1.18 seconds faster with the 200 hp engine.

What would you give to be 1.2-1.5 seconds faster than your competitors? I’d give my left nut for that. (But I’m already fixed down there, so they are merely decorative at this point anyway.)

OK, so on this car, you clearly want a wing and not a spoiler. Which is precisely what the IMSA team did, and they dominated. So are there any other cars that had both wings and spoilers on the same body?

Spoiler vs wing in NASCAR

If you think the aerodynamic package on a NASCAR racer is crude, you’d be wrong. The bodywork is highly developed and there are numerous aerodynamic tricks. One source cites drag and lift numbers of Cd .39 and Cl -.46. If you compare that to the IMSA RX-7, you can see that the stock car has a lot less drag, and the downforce value is between the spoiler and wing versions. Put both bodies on the same chassis and a NASCAR stock car would go faster than the RX-7 with a wing. You can read about that here.

So if NASCAR stock cars are sophisticated aerodynamic missiles, why don’t they use wings instead of spoilers? Well, for a brief period of time, 93 races to be exact, they did. This was in an era where the car was dubbed the “Car of Tomorrow,” and amongst many other changes, there was a rear wing.

Spoiler replaced by wing, and then back to the spoiler agin.

The airfoil NASCAR chose was for low drag and high speed, and they mounted it low on the trunk. NASCAR is primarily concerned with the spectacle of close racing, so performance was not their driving factor.

So why did NASCAR get rid of the wing and go back to the spoiler? Safety and aesthetics, mostly. The safety issue was this: cars that spun 180 degrees went into the air and flipped upside down. Spinning at 180 mph isn’t something that happens to most of us, but it happens a lot in NASCAR. Also, fans hated the look of the wing and demanded the spoiler back.

There’s also the fact that the racing was better with the spoiler than the wing. Fans want drafting, slingshot passes, and trains of cars moving through the field. There were some good races in the COT wing era, but spoilers made for closer racing than wings.

Trailing car aerodynamics

Racing history is full dominance, where one car is so technically superior that it lines up in pole position every time and is never headed during a race. While those eras are memorable, they are boring to watch. Close racing is much more fun, and so rules are changed all the time to control costs, especially aerodynamic costs, and achieve parity.

If you follow Formula 1 rules, you’ll know there was a big rewrite in 2022. Just like NASCAR rule changes, the purpose was closer racing. The main problem was the “dirty” wake created by the lead car, such that trailing cars lost downforce, and even with DRS, they had a difficult time passing the lead car. Among the changes for 2022 were a rear wing designed to push the aerodynamic wake up and over the car following behind. The front wing, body, and wheels also had wake deflectors and other gizmos so that the trailing car didn’t lose as much downforce. All of this was so that cars could draft each other better.

(If you are reading between the lines here, then you know it’s possible to create an aerodynamic package that makes it difficult for other people to follow you. If I had any concrete information on how to do that, I sure as shit would not be posting this publicly. Am I developing such a package on my race car? Maybe.)

Drafting

Whether you’re talking about bicycles or NASCAR, racing on oval tracks is a game of drafting. The leading vehicle punches a hole in the air, creating a low pressure wake behind it. The person behind the leader can get in that wake and gain straight line speed. How effective is drafting? At the 2023 IMSA race at Daytona, MX-5 Cup cars were about 4-5 seconds faster per lap when they were drafting, rather than driving on their own.

As drafting relates to spoilers vs wings, take a look at the CFD below, comparing spoiler (top) to wing (bottom). Notice how the wake of the spoiler is both higher and longer than with the wing. If we’re racing against each other, and your car has a spoiler, thank you – I’m all up on your ass.

Spoiler vs wing wakes.

When is a spoiler better?

Wings have more downforce and less drag than a spoiler, and if your racing rules allow one or the other, you’d chose a wing every time. So are the any instances where a spoiler is better than a wing? Kinda.

Racing spectacle

From the spectators perspective, less aero is better. Wings don’t work as well in turbulent air, and so the trailing car loses downforce and stability. This makes passing more difficult, the cars spread out more over time, and it’s just not as fun. Watch NASCAR, Spec Miata, or really any non-aero series and you’ll see more drafting, with closer and better racing.

If I was designing a racing series from scratch, I would absolutely spec a spoiler over a wing. The Superspec Cup series in California (nee Supermiata) does this, and for some reason it hasn’t caught fire like everything else in California. Maybe another series (ahem, Grid Life 18:1 enduro class) could adopt their aero rules? Spoilers are cheap, they make street cars look like race cars, and are safer, as they cancel out the rear-biased lift generated by virtually all street cars.

Street

Beauty is subjective and so this either applies to your or not, but I don’t like the look of most wings on street cars. OEM wings are typically cosmetic and don’t do shit. Big wings look gaudy, and invite too much attention from cops and wannabe racers. Small wings are stupid and useless. The only wings I like the look of on street cars seem to be on Porsche 911s. Well, I like the 9 Lives Street Wang a lot, but it reminds me of a P-car whale tail, so that’s the same damn thing.

On the other hand, I like the looks of a spoiler on pretty much any street car. A low spoiler (less than 1″) reduces drag and lift, so a car will handle better and get higher the car milage than the same car with or without a wing. For a street car that gets occasional track use, a taller spoiler is appropriate. Get one that is adjustable for height/angle and you have the best of both worlds.

Autocross

SCCA national autocross aero rules were written by people who were afraid of or didn’t understand aero, and so they don’t allow wings until you get to the Modified category. Once you get to that category you’re allowed a dual-element wing with 8 square feet of area, which is absurdly large.

On a Miata, this would be a 12″ chord main wing and 6″ upper wing, which is about twice the amount of area you’d see on a typical track Miata. A car set up thusly would have so much rear-aero balance it would have criminal amounts of understeer on a race track.

Now those are the national rules, and at the regional level there’s an Xtreme Street category for track cars with wings. However, the rules allow the same ridiculous 8 square-foot wing as the Modified category.

There are no national or regional rules that have concessions for sane people who want to do both track driving and autocross with normal sized wings. So if you aren’t building a car specifically for the parking lot grand prix, you might be better off racing in the Prepared category. In which you are allowed an absurdly tall 10” spoiler.

I just don’t get SCCA autocross rules, it’s as if they’ve never seen a wing or spoiler? Who drives around with a 8 foot wing or a 10” spoiler? The hilarious thing is they allow a gigantic wing, but then restrict what you can do on the front. You can’t even put an end plate or fence on your splitter.

Anyway, for casual autocross, I’d wager a spoiler is better than a normal-sized wing. Not only because SCCA autocross rules are fucking stupid, but because a spoiler might actually be faster around your mall parking lot. I tested a spoiler and wing at Pineview Run, and I found the spoiler was half a second faster than the wing in A-B-A testing. Pineview Run is a tight and twisty track, with many fast changes of direction; it’s a lot like autocross.

Why was the spoiler faster? Because the wing added 14 lbs, at roof height, at the far end of the car, and this creates a higher center of gravity and more polar inertia. If you’re unsure of what that is, take a broom and hold it out in front of you and “slalom” around your house. Now pull the broom in tight to your chest and do the same thing.

Mass centralization is important for handling, and when you have weight high up at the far end of the car, it makes it more difficult to change direction. So even if the wing was performing statically better (more downforce and less drag than the spoiler), it was slower than the spoiler.

Grid Life Touring Cup

GLTC rules allow a 250 square-inch wing or spoiler for free. Justin Lee and I tested a 250 sq-in wing versus a 9 Lives Racing wing, and it was clear that the larger wing was faster, even if it did require a 3% lbs/hp penalty. Moreover, the 9 Lives wing wasn’t the full 701 sq-in size that the rules allow, or the smaller wing would have fared even worse.

One of the reasons for that is that a 250 sq-in wing has a very small chord. For the most part you can ignore Reynolds numbers (which you can think of as low speed, small chord, or both), but most airfoils don’t perform well at low Reynolds. The following image shows the airfoil efficiency of the CH10 airfoil at different angles of attack, with 200k (brown) and 500k RE (blue). This graph is essentially the difference in efficiency between a 250 sq-in wing and 625 sq-in wing at the same speed (100 kph, 62 mph).

Wings are less efficient at low Reynolds numbers.

I tested a 250 sq-in wing vs a 250 sq-in spoiler in a wind tunnel, and it was an even match. A 250 sq-in spoiler has more surface area because it’s using not just the blade, but the entire decklid to aggregate pressure (downforce). Consequently, the spoiler should have a much larger Reynolds number, which would be less affected by low-speed aero losses.

However, as we already saw, a spoiler creates a larger and higher trailing wake, making it easier for cars to follow you. So while a 250 sq-in spoiler might turn a better lap time than a small wing, the wing might actually be better for racing. I don’t know the answer to this question, and I’m unlikely to test it.

Why? Because regardless of which “free” option you choose, a spoiler or small wing, a bigger wing and a 3% penalty to lbs/hp ratio has already been proven superior, so I don’t know why anyone racing in GLTC would consider a small spoiler or wing to begin with. Just to be contrary? Or because you like losing?

Convertible

If you drop the top on a convertible, it destroys a wing’s performance. If you were making 100 lbs of downforce with the top up, you’ll be at 40 lbs with the top down. That’s not conjecture, that’s hard evidence.

So, if you have a Miata or other convertible, and you’re dedicated to the drop-top, a spoiler is probably better. This isn’t total guesswork on my part, but conclusions drawn by Kyle Forster in the video Do Rear Wings Work on Convertible Race Cars. With the top down, the spoiler lost less performance than the wing, not just because there’s less performance to begin with, but a spoiler just doesn’t seem to be affected by turbulence as much as a wing.

Spoiler and wing together?

So what about using a spoiler and a wing at the same time, is this a Nuts and gum, together at last situation, or the best of both worlds?

Most club racing and time attack rules don’t allow you to use both a spoiler and a wing, you have to choose one or the other. And you’d choose the wing, natch. But if the rules allow it, or if you have a HPDE car that doesn’t have to conform to a ruleset, then using both a wing and a spoiler is like peanut butter and jelly.

A spoiler helps extract more out of the wing in a similar manner as a second wing element. Air kicking upwards can activate the trailing edge of the wing, which in turn can allow you to run more wing angle without separation.

I tested a wing with a spoiler and without in the wind tunnel, and the spoiler added downforce and drag, as you’d expect. But the resulting L/D ratio was good enough that you’d want to use it on anything but a high speed oval.

The spoiler will also raise the height of the rear wake, which pushes the rear of the car down. If you have a rear diffuser, that upwards airflow will help extract more from the diffuser as well. Win-win, hallelujah, and let’s see more of that on something other than a Noble M12.

Author’s choice

After all this investigation, you might wonder what the author uses on his two Miatas.

  • My street car has a Galvez spoiler. It’s a neat design that mounts easily, but I felt it could be both taller and more rigid. I made a new spoiler blade that is taller and narrower, and matches the profile of the roofline more closely.
  • My race car has a DIY spoiler and a 41×16 S1223 wing mounted via the end plates. I have rivnuts in the trunk lid so that I can quickly swap between a small 1” lip or a more aggressive 4” kicker. Or I can run it without a spoiler when the rules call for that.
Author’s (current) choices.

DIY Miata Opera Coupe

Depending on how old you are, opera coupes reek of nostalgia or they just plain stink. Originally opera coupes were designed so that the rear-seat passengers could sit in the coach with their top hats on (presumably going to the opera). And so the canopies of these coupes were tall and elongated, and they put a tiny window in it so occupants could see out, but prying eyes couldn’t see in.

That’s how the story goes, and the styling endured for many years as the five-window coupe. Even into the ’50s the styling was classy, and despite the funky round porthole window, the Ford Thunderbird charmed.

Nice.

And then suddenly in the 1970s, American manufacturers embraced opera coupes en masse. To name names: Buick Riviera, Chevy Monte Carlo, Chrysler Cordoba and New Yorker, Dodge Charger, Ford Granada and Thunderbird, Mercury Cougar, and Plymouth Gran Fury, among many others (Wikipedia lists about 80 cars with opera windows).

Opera coupes.

The styling and details varied from different manufacturers, but they all shared an unmistakeable “she’s my sister and my daughter” resemblance. This collection of recessive genes resulted in cars with flat, elongated roofs covered wholly or partially in plush pleather-vinyl, even though they weren’t convertibles. Inset into the C-pillar of that fakery was a window too small to be useful, often with some kind of meaningless symbol.

Mercury Cougar typified the style. See more opera coupes here.

European manufacturers didn’t jump on the bandwagon, but you can see some of the influence in various cars from that era. By the 1980s, the nostalgia had worn off, and a more futuristic angular styling took over. Consumers were like deer stuck in front of headlights… as long as they were pop-up headlights. And the opera coupes died out.

No opera window, no pleather, but similar shape.

Against this obvious trend, and the fact that everyone else had stopped making opera coupes, the dubious team of Chrysler and Maserati brought back stupid and begat the T/C in 1986. They consummated this mistake atop the most soulless milquetoast chassis of any era, the Chrysler K-car. To be fair, the T/C was a convertible, so it wasn’t entirely a styling exercise.

Chrysler T/C by Maserati, with round port light and Maserati logo. You can read more in Worst Car Wednesday.

At the time, they probably argued who’s name would go first. 600 million dollars later, I’d wager both manufacturers would like to disassociate their names entirely. I wonder who was responsible for the spoiler?

The T/C was the last of the breed, and thankfully opera coupes haven’t made another comeback. But if you squint, you can kinda see the opera coupe shape in a C5 Z06 (ducking). If you put a tiny window in it (ducking and covering), it’s there.

Opera coupe hardtop, convertible, and fastback.

The C5 Z06 roof came about about because Chevrolet wanted something lighter and more rigid than the fastback, and so they made a fixed-roof coupe (FRC) version of the C5 using the convertible body. The C5 FRC Z06 then became their high performance model, and it’s equal to just about any sports car today. And while the opera coupe hard top has more drag than the slippery C5 fastback, the hardtop has less lift, and with a powerful car like this, reducing lift is more important than reducing drag.

To bring this back to Miatas, my friend Cameron built a custom hard top for his NA race car, and it shares some of the FRC genes. I rather like it, and it gave me some ideas.

Cameron’s Miata top is made from a Mustang roof, facing backwards.

Miata Opera Coupe?

I don’t race with NASA, but I find their rules intriguing. The ST/TT rules allow you to change the shape of a convertible top, as long as the top doesn’t extend past the forward edge of the trunk lid. Ergo a fastback convertible would not be legal in this series. However, there’s still plenty of room for improvement and rules bending.

The first thing I’d do is elongate the roof, using the shape of the aerodynamic template. I’d boat-tail the sides, but leave the top rather broad and flat at the trailing edge. Miatas have rounded rooflines and this creates lift and also makes air passing over the roof hit the wing at different angles along the entire length of the wing. A flatter wider trailing edge should feed the wing air at a more consistent angle, and with less turbulence.

The longer roofline would result in a nearly vertical rear window. It’s not intuitive, but the worst angle for a rear window is 30 degrees, and the Miata’s is about that. I’d recess the window to create a box cavity, because that should reduce drag as well.

Finally, just like my fastback, I’d make the B-pillar region narrower in the hips than a standard hard top. This would come with a compromise, because in the rain with the windows up, I’m sure a reverse eddy would suck water into the gap behind the window. But I consider damp shoulders a fair tradeoff for a canopy that’s less of a parachute.

As I put those design considerations from my head onto pencil and paper, a shape emerged. Oh shit, here I go bringing back stupid.

Construction

I’ve built several tops, and for all of them I’d say construction isn’t difficult, but it is time consuming. I can make a functional version in a weekend. To make one that also looks good takes fucking forever. It reminds me of something I heard on a boat building forum: “I’m 90% done with the sanding; I’m half way there.”

I started by using the front bow of the soft top frame, so that I can quickly attach it to any NA/NB Miata. I then took a piece of thin luaun plywood and cut slits in the back half of it, and then shoved this under the soft top frame.

Plywood with slits allows it to conform to shape.

Then I made some forms that would allow the plywood to take shape over the roof, and tacked everything in place with brads. I covered the slits underneath with blue tape, then filled the gaps with thickened epoxy.

Ready to fill the gaps with thickened epoxy.

With that done, the roof would hold its shape enough to sand down the high spots. I did that, then covered the entire roof with a layer of fiberglass cloth. I wasn’t originally going to fiberglass the inside, but then I decided I was going to make it bomber strong, and glassed it. So it’s essentially a surfboard construction, with a lightweight core and fiberglass all around.

I originally swept the sides of the top all the way to the rear of the trunk, as in the pictures above. However, after closely reading the NASA rules, I cut the sides shorter so that no part of the top was further rearward than the forward part of the trunk lid.

Design Elements

The roof is so strong that I started thinking about it as a stressed member, and it occurred to me that I could bolt the roof into the usual spots (windshield frame, behind the doors, and Frankebolts), but I could also attach it to the Hard Dog rollbar. I sourced some rollbar clamps online, put big T-nuts into the roof, and now the roof bolts down in eight locations. This should provide some rigidity to the chassis, and the reassurance that this top is not coming off unless God wills it.

For all of that strength, it’s about the same weight as an OEM top. A lot of the weight in an OEM top is the greenhouse, which provides amazing visibility. This one does not. The rear-view mirror gives a fairly unobstructed view straight back, but if I turn my head, it’s a big ole blind spot. I may have to fix this with, you guessed it, an opera window.

It could use an opera window to complete the look. Or landau bars?

In the end, I feel like I succeed on all counts, but she ain’t much of a looker. Part of that is it looks like an opera coupe! The other part is I suck. I like making aero, but I hate doing the final stages of bodywork. I have no patience for it. My body has decided it doesn’t either, and developed a sympathetic allergy to Bondo. I always wear a respirator, but if I sand Bondo without covering my skin, I break out in hives wherever it’s exposed.

That’s inconvenient, because at this point I’m 90% finished with this top, and I only have a little Bondo and sanding to do before I have it painted. But now I’m like, someone else please finish this for me!

Custom wing and opera coupe top, like peanut butter and jelly.

And then it occurred to me… you know what would be even easier than painting it? I wouldn’t even have to finish sanding! That’s right, vinyl. Cover it with fake leather, just like they did in the ’70s. Fuggin opera coupe.

Miata Fastbacks and Aftermarket Tops

You don’t see a lot of Miatas with aftermarket roofs, so I thought I’d write an article and put them all in one place. There’s a lot of performance to be gained by changing the top, and yet very few people bother. They’ll throw thousands of dollars into time-attack aero, and then use the OEM hardtop. Why?

My DIY fastback reduced drag by 15% and increased rear downforce by 130%. Another way of thinking of that is it made my 60” wing into a 78” wing. Although more accurately, the fastback didn’t do anything at all, it’s the inefficiency of the OEM hardtop that’s the problem. Flow separations and turbulence of the hardtop effectively made my 60” wing behave as a 48” wing, and increased total car drag from .41 Cd to .48. Yuck.

I hope to inspire people to build their own hardtops, so this article ends with some tops I’ve built, and the different ways I went about it. But before I get to that, give me a minute to review the primary design considerations, and show some tops from the aftermarket.

Before we get into this, note that I recently tested the OEM roof versus the CCP fastback in a wind tunnel, and so if you’re after the data (what’s faster, how much downforce and drag do each make), see my Miata Wind Tunnel Report. You can purchase that for $35, and it includes many more tests than just the different tops. I tested hood and fender vents, splitter diffusers, spill boards, tire spats, a spoiler at three different heights, wings, and many other ways to reduce drag or increase downforce.

Design Considerations

To achieve the lowest drag, the canopy should be a continuous curve, gradually getting steeper over its length. The Ecomodder website has a neat tool called the Aerodynamic Template, which allows you to superimpose this shape over your car. I did that in a previous article, let’s see what that looks like.

A roof this long would be impractical, and you just don’t need to. Tapering to a point is not necessary, as there are diminishing returns after about a 1:1 ratio. Meaning if the roof is 44″ wide, the fastback can be 44″ long. This is often referred to as a Kamm back, and you’ve seen it on cars like a Honda CRX.

On many older cars, the rear window is just about flat, and it’s easier to think of the slope of a roof as a single fixed angle, rather than a continuous curve. This backlight angle should be around 12 degrees maximum, because air doesn’t like to change direction at more than that. It’s not intuitive, but the worst angle is 30 degrees (plus or minus 5). Guess what the backlight angle of a Miata rear window is?

Side taper is basically the same thing as backlight angle, just from either side. Each side should taper at a maximum of 12 degrees, any more than that and flow separations occur unless you use strakes, guide vanes or other tricks. If you think about a car going around a corner in yaw, you can imagine that flow separations will occur along the inside side of the car, and so an angle of less than 12 degrees is probably desirable.

Compromises

Knowing that the top should taper to the trunk at no more than 12 degrees, and the sides should taper inward at the same amount, it gives you something to work with. Unfortunately, there are things on a Miata that make this difficult or at least impractical.

  • Visibility – Miatas are short cars, and if you follow the teardrop shape, it won’t be easy to see out of the rear window. You may need to compromise with a steeper backlight angle (more drag), or do something like Honda did with the CRX and Insight, and put a small vertical window on the trunk.
  • B-pillar – The width of the canopy at the B pillar needs to cover the gap where the convertible top goes. This increases frontal area, exaggerates the parachute effect with open windows, and complicates the side taper (boat tailing) of the canopy.
  • Fuel filler The location of the fuel filler is annoying. If you taper the sides at 12 degrees, the sides go directly over the middle of the fuel filler. If the angle is greater than 12 degrees, air won’t stay attached. If you go outside the fuel door, you’ll have to figure out a new fuel filler location.
  • Spoiler – Fastback roofs are longer, and so air stays attached longer, creating more lift. You need to balance that out with a spoiler, or if you also do front aero, a wing.
  • Trunk – A Miata’s trunk is lower and wider than ideal for a fastback. If you want a functional hinged trunk, it leads to compromises, such as a steeper backlight angle, and a kink in the side taper.

Coupes and fastbacks

I’ll start by reviewing the Miata coupe, because it’s interesting to see how Mazda addressed these design considerations. Then I’ll take a look at a few fastbacks, a couple alternatives to the OEM hard top, and some tops I’ve built.

Mazda Miata Coupe

Mazda only made 179 of these for the domestic market. I won’t delve too far into this, because Motor Trend did a good write up. But I want to point out a few key details.

First, notice they raised the height of the trunk, it’s taller both at the front and the rear. Raising the trunk allowed them to achieve a better backlight angle. (The BMW E30 M3 did something similar, but much less gracefully.) As a practical matter, a taller trunk also means more trunk space.

From behind you can see that the tapering of the canopy doesn’t run the full length of the car, because the width of the trunk opening. This is a difficult area to design around, but they did a nice job fairing this into the fuel door and trunk.

While this isn’t a fastback, and the top is both wider and shorter than ideal, I really like this coupe. If Mazda made these for our market, I’d own one.

CCP Fastback

These seem to be the most popular fastback, and for good reason – they look great, are readily available, and function better than an OEM hardtop.

Image result for autokonexion miata fastback
Nice fastback.

If I’m going to nitpick it, I feel like it’s too wide at the B pillar, but that’s always going to be the case because of how wide the convertible top is there. The side taper looks a bit steep, but that’s necessary to duck inside of the fuel filler. The side taper isn’t carried in a straight line, because it has to flare out for the trunk opening.

Side taper should follow the purple line.

The backlight angle is too steep as well, but that’s because the trunk is too low. A higher rear deck (like the Mazda Miata coupe) would have been better.

All of these details amount to something that looks more kit-car than OEM. But this is about as well as a fastback can be executed on a street car, given the design elements. Well done CCP.

Renderos Racing Longtail

The longtail looks like a longer CCP. It’s not exactly the same, as I see some differences in the B pillar and the rear window, but the general shape and the way it dodges around the fuel cap look similar. I think I understand what they are trying to do, and I like the execution, but I would do it differently.

When using such a long rear extension, your wing overlap won’t be ideal unless you move the wing rearward, and that may create front balance problems. As is, you’ll probably lose some downforce in the shape of the rear wake, which you could get back by increasing wing angle, but that increases drag, which seems the exact opposite of what this is trying to achieve.

I mean, it’s a damn cool fastback, but I think you could achieve the same drag reduction using a short box cavity. That would not only integrate the sides better, but put wing overlap in the quarter-chord range. That would help extract air from underneath the car, which is especially important for a diffuser.

Hardcore Design Fastback

Panos of Hardcore Design is making new fastbacks in Greece. I’ve seen a couple of his designs, the first looks a bit like the CCP, but the trunk hinge is carried all the way to the roof. I like it better, it’s not only a cleaner look, but better for trunk access. You might also notice that it’s a targa top. So cool!

There’s a very aggressive side taper at the quarter windows, and I suspect there’s some turbulence here, right around the location of the fuel cap. Not much you can do about that without relocating the fuel neck. But the rest looks awesome, and I especially like the shape and size of the spoiler.

Panos was making these to order, and there was a group-buy at one point. Good luck to him, and I hope he can keep the customers that were invariably burned by global shipping during the pandemic.

Lightyear Fastback

The Lightyear fastback is nice looking, with a large trunk opening that breaks cleanly at the rear window. The side taper looks good, and the backlight angle is a bit too steep because they are trying to get the height of the trunk lid the same as stock. It looks very sleek, but needs a spoiler.

Image result for lightyear miata fastback
Smoof

3D printed

If you have a 3D printer or know someone who can print stuff for you, you can make a 3D printed fastback. The files will cost you $100, and you’ll need various other parts like fiberglass, epoxy, window seals, Lexan, and the know-how to put all that together. All told you’ll be $400 into it, but it’s the labor that is the killer.

40 parts come together like this.

I’d guess there’s at least 100 hours here, with lots of head scratching the small details. Because you’re glassing the topside and not working off a plug, there will be a lot of fairing. As I often say when I’m doing bodywork, “I’m 90% done with the sanding; I’m half way there.”

The top itself looks like a Lightyear, both in the way the trunk line comes to the rear window, and the way the roofline ends before end of the trunk lid.

If you’re considering building one of these, there are lots of details on the Hutchins Racing YouTube channel. If you haven’t worked with fiberglass and epoxy before, you’ll make some mistakes and go through probably twice as much glass and resin as a professional would. Still, this is a worthy project and I may yet build one for a street car.

Monocraft

This is a very rare body kit from Japan, there was one for sale recently in the US, but it might be the only one. This is a full body, not just a roof, and there are trick details all around it.

Monocraft body kit is strange and beautiful.

The roof is quite wide, as is necessary to seal the windows, and they’ve thrown in Opera Coupe style rear quarter windows.

This top shows some of the shortcomings that you need to design around if you want to build your own top. You’ll notice they had to relocate the fuel door, and the trunk does not appear to be functional.

Trunk lid appears to be bolted down, I don’t know how you’re supposed to get in there.

Hardtop Alternatives

There are a couple hardtop alternatives that are similar to OEM and use the stock trunk. They both have the same shortcomings as a standard hardtop being, short, wide, and with less than ideal angles for drag and flow separation.

The price of used OEM hardtops now regularly exceeds $2000, and so there’s definitely room for some alternatives tops, even if there is no performance advantage.

Smoothline

Smoothline makes a replacement top that’s priced economically. The shape isn’t much different than OEM, but there are two rear window options, and the smaller of the two looks pretty cool. Honestly though, one of the best things about the OEM hardtop is visibility, and the smaller window would be a lot like the convertible window. But they also have a vinyl top option, which is like a convertible top pulled tight. Neat.

Image result for miata smoothline
Smoothline top with a vinyl cover almost looks like an opera coupe.

Based on the dimensions of the Smoothline top, I’d expect it to function very similar to OEM. There’s nothing to be gained aerodynamically here, but it’s visually interesting.

Garage Vary

I like this top. I don’t know what the backlight angle is, but they did their best to reduce it. The top of the rear window is dropped slightly, and they used as much of the rear deck as possible while retaining the stock trunk.

The sides are longer also have a more gradual taper, and I bet there’s less separation on the sides of the canopy. I was inspired to build my own version of this top, which I call the TT, more on that below.

Image result for garage vary miata top

I’m not a fan of vortex generators, because in my testing, they created drag and ruined downforce of the wing. So when I see a picture like the following, I die a little inside. You don’t need vortex generators on a curved surface! However, these vortex generators are fake and do nothing.

Image result for garage vary miata top
Sides and rear window are as long as possible. Rear window vents done correctly.

But I have to give them a shoutout for putting the rear window vents in the correct spot. I often see window vents at the base of the window, which is a high pressure zone. Placed there, air goes in the cockpit. Placed correctly at the roofline, air is extracted from the cockpit.

Tops I’ve built

I build fiberglass-wood composite boats, and building a hardtop is similar. When I build them, I like to experiment with construction methods, and so they are all a bit different.

Original chop top

I built a chop top on my first Miata. Construction was strips of wood, epoxied together which I covered with vinyl. Look closely and you can see the longitudinal strips of wood underneath the black vinyl.

Cute! Hard top is not bad, either.

The rear window was a clear vinyl sheet, grommeted and tied to the rollbar. The top didn’t keep the rain out, but that was OK because I was living in California at the time.

Fastback V1

My first fastback design started as a Treasure Coast (CCP) Chop Top, to which I grafted on a rear canopy made from thin skateboard laminates and fiberglass.

Angle aluminum frames defined the side taper.

The rear hatch was hinged so I could get to the battery, and the entire top weighed (I think) 14 pounds. The main problems were that the large Lexan windows got dinged for too many points in Champcar, and the whole assembly consisted of too many parts. It was rather complex to put on and off.

Fastback V1 at Mid-O.

Fastback V2

My second version is built on top of the first, creating one solid structure rather than a pivoting trunk. The battery has been relocated to the engine compartment, so there’s no need to get into the trunk now, anyway. The top uses the front bow from a soft top frame, and bolts down to the Frankenbolts in the rear, and so this top can be put on just about a NA Miata in a couple minutes. (NBs have a slightly longer trunk so I don’t think it’ll fit.)

Fabricating this as one piece meant using more fiberglass and metal than V1, and now it weighs about the same as an OEM hard top. But that includes the trunk, and so it’s about 12 lbs lighter than an OEM top/trunk combination. But light weight wasn’t the concern here, it was to simplify, reduce window size, and decrease drag.

Some of those improvements include rounded B-pillars like NASCAR stock cars, a drip edge above the window for rain and to keep air from curling under, a slightly smaller window opening for less air intrusion, and rivnuts in the trunk so that I can quickly attach spoilers of various heights.

B-pillar smoothing and drip-edge detail.

I also removed the quarter window on the driver’s side, as it was useless anyway, and reduced the size on the opposite side. The rear window got 1/3 of it taken out. The window size reductions were done in case I ever race Champcar again, who penalize 3 points per square foot of plastic. As it sits now, the top comes in at 22 points, and half of that is the rear window.

<rant>C’mon Champcar, just make any roofline or rear window modifications 10 points, which is the same as other aero mods. This will speed up tech, and it’s just plain silly how many of your cars have no rear windows because of the points penalty.</rant>

Keen eyes will note that Fastback V2 has a lower trunk lid than V1, which is something I complained about on other people’s fastbacks. This is because V2 is designed to work with underbody aero, an area I’ll be testing at some point

Shooting brake (breadvan)

I like hatchbacks for their utility, and as a hunter, I like shooting brakes for their history. I’ve always wanted to build one and sketched up a plan.

After seeing this picture of a Ferrari shooting brake, I wanted to build one for a Lemons theme. We were going to serve pizza out of it during the race.

Inspiration.

The construction method was different than the fastbacks, being more like a strip-built canoe. I took a 2×4 and cut it into narrow strips on my table saw, then laid them down longitudinally to create the shape.

I then tacked it in place, filled the gaps with epoxy, and covered the top with fiberglass fabric. The sides were mocked up in cardboard and transferred to plywood.

I completed the top but never raced it because I got Lyme disease and shit all over myself.

Functionally, a top like this should have less lift than a fastback, but it might have more drag due to the larger rear wake. If you mount a wing, the wing stands need to be tall and/or rearward, as there will be interference with the low pressure zone under the wing. This is conjecture; I need to test this one against other tops.

I still have the top and want to race it at least once before I give it away to a Lemons team that wants to run that theme. Or I’ll turn the top into an enormous duct to feed a wing.

Breadvan V2 will be an enormous ducted wing. With some sculpting of the wing supports, it could be a Batmobile.

Opera coupe

If you don’t know what an opera coupe is, then you’re probably from a later generation than I am. As a kid, I saw these everywhere and they are nostalgic. If you aren’t from my era, you can call them what they are: ugly.

I wanted to build one, not for the look, but to fit some design considerations. The NASA ST/TT rules allow you to change the hardtop on a convertible, but the rules state that the top must end before the trunk begins.

I thought about that and started drawing a top with a roofline that stopped just short of the trunk opening. I swept the sides longer with a gradual taper to the trunk opening. Stepping back I said, shit, this looks like a 70s Supercar. A Pantera, M1, or 512 Boxer had that shape because of a mid engine, but it might work on a Miata, and unlike the Monocraft top, left a functional trunk besides.

I got about 75% finished building it and then realized that some rules-lawyering jerk would say that the sides of the roof extend past the front of the trunk. So this top would be illegal. It would have been cool, tho, kind of like a Lancia Scorpion.

It almost ended up looking like a Lancia Scorpion….

But to be compliant with rules, I cut the sides at the forward trunk opening and found I’d suddenly built an opera coupe.

But then I hit it with the ugly stick.

I have a long write up on this one, and will share that in the future.

TT Top

This roof is my second attempt to bend to the NASA rules, which state the top must end before the trunk begins. The problem with that stipulation is that the backlight angle is going to be about 25-30 degrees.

Least possible angle from rollbar to trunk opening.

I measured the angle from my rollbar to the trunk opening, and it’s about 25 degrees. That’s as much as I can reduce the backlight angle, and I’d like to get the angle close to 20 degrees, as it would have a lot less drag.

25-35 degree angle is the worst.

To reduce the backlight angle, you have to figure out some way to drop the height of the roof or raise the front edge of the trunk. I did both.

I chose to drop the height of the back window by putting a vent at the roofline. My thinking was twofold: 1) the vent would extract air from the cockpit, and 2) the extracted air would then “fill in” the gap to the rear window.

Steel straps define the shape

I also created a small gap at the bottom, which should hold a recirculating air bubble there, making a taller transition to the trunk. (I hadn’t filled in the bottom gap in the following pic, I definitely don’t want a vent here!)

Early construction photo showing the roofline vent.

I haven’t finished this one yet, as I’m skeptical that it’s worth it. The top is a bit narrower than an OEM hardtop, and the sides should have less turbulence because they are more gradual. I have no idea if the roofline vent will work, because the cabin air is low velocity (and there’s a rollbar in the way), so it may not fill in that rear window region very well.

But it looks interesting, was fun to build, and is a good conversation piece. For someone who is above the pounds per horsepower limit and can spare the .4 lbs/hp penalty that a custom top brings, it might be worth trying.

What else?

If you know of any other aftermarket Miata fastbacks or hardtop alternatives, drop me a comment and tell me about it. If you make your own, I’d love to see it.

I’m hoping to be able to do a lot more testing this year, but hardtops are just one of several things I’m interested in. So if you’re doing a track day or racing at Watkins Glen and want to A/B test one of my tops, contact me, I need the data. I’m about 25 miles away from WGI and can set you up pretty quickly.

DIY Wing End Plates

Updated 1/12/2023

I originally published this article in August 2020, but after taking the JKF Aero course, and doing more independent research, I’ve updated it.

Wings without end plates allows the low-pressure air below the wing to collide with the high-pressure air on top of the wing. This interaction reduces suction under the wing and creates vortices, which further reduce downforce and create drag. The middle of the wing still works well, but you get progressively less downforce and more drag at the ends. For a quick video on why a wing needs endplates, see this video by Kyle.Engineers.

End plates separate the flow between the top and bottom of the wing, effectively reducing drag and increasing downforce. The end plate has to be large enough to keep these two pressure zones from colliding.

In the following image, notice how different wing shapes have similar high-pressure areas above the wing, but very different low pressure shapes below the wing. Indeed, at first blush you might think that the shape of the end plate should be similar to the pressure zone shape. Note that the low pressure side (suction) is more important than the high pressure side, and so end plates must extend further below the wing than above.

End plate shape should match pressure zone shape. Image is upside down so that it relates to car wings. Image from Race Car Aerodynamics, buy the book.

Take a look at the wing shapes above:

  • The first one (on the left) is a wing with a NACA profile around 4410. (4 degrees of camber, max camber at 40% of the chord length, thickness of 10% of chord length). Most car wings have low pressure zones that look similar to this.
  • The second “wing” looks like a skateboard deck. I’ve seen a lot of DIY wings in 24 Hours of Lemons (skateboard decks, snowboards, and just a piece of curved wood), and I love the spirit. Mostly I don’t see them with end plates. Do it!
  • The third one is a symmetrical airfoil. It doesn’t make a great wing for a car, but can excuse that because it was the first one. This shape is still good for stanchions and other places where you need to hold something up with little drag.
Inside the race cars of future past
Early days with no end plates and symmetrical air foil. We don’t use this shape now except for wing stands or other braces.

Rectangular vs shaped

Before you get started on making your own end plates, let me leave you with a couple pieces of advice from a Formula 1 aero engineer who has tried various shapes of end plates on touring cars (like Miatas):

  • First, whatever end plate you choose will make very little difference in your aero package. You will find bigger gains literally everywhere else on your car.
  • Second, if you can model your car in CFD or put it in a wind tunnel, there are some minor gains to be had by modifying the shape of the end plate. If you can’t do that, your best bet is to stick to a rectangular end plate. Changing the shape of the end plate is just as likely to be worse as it is to be better!

Let’s take a real-word example, say you have a 9 Lives Racing wing, you can use their standard rectangular end plates or pay up for their CFD end plates, or pay $130 for Kazespec endplates with gills and a cutout. But is there a true benefit? Let’s take a look at Kazespec.

First, it looks like it’s a double wing. Uh… why are you showing me this and selling me something different?

Then if you look at the data, you’ll see that the most downforce was created with the plain endplate. All the cuts and slots reduced drag, but they did so by reducing downforce.

Free stream wing data is worthless, because you have to take into account the entire vehicle. Because wings don’t have much drag to begin with, the L/D ratio of the entire vehicle is the highest when creating the most downforce, regardless of the wing’s drag. It really doesn’t matter how efficient the wing is in free stream. So when you look at that table above, you should realize that every modification to the endplate resulted in less downforce, and consequently the L/D ratio of the vehicle was the best before they modified the end plate. Just leave the damn thing alone already.

OK, so how big should this rectangular end plate be? Different racing organizations have rules on end-plate size, and for simplicity, you can make a rectangle of whatever the maximum size is.

In an article in Racecar Engineering from 2008, Simon McBeath CFD tested end plates of various depths in 25mm increments to 300mm on a 300mm chord wing. For the American audience, I’ve converted his results to inches and pounds, and summarized them in the table below. All end plates were identical in shape (rectangular), except for the depth below the wing.

DepthDownforce lbsDrag lbsL/D Ratio
0″20338.65.26
3″22439.95.61
4″22139.15.66
5″234.940.65.78
6″215.438.45.61
12″217.738.45.76
24″228.539.95.73
Lift and drag based only on end plate depth

The first thing you might notice in the table is that there’s about a 10% difference in L/D ratio between no end plate and the best end plate. That’s a big difference, and it’s why every wing needs an end plate.

However, notice that there’s less than a 3% difference in L/D ratio between the smallest end plate (3″) and anything else. To put it in practical terms of the only thing that matters, the most extreme difference in end plate performance resulted in 100 lbs versus 103 lbs of downforce. I don’t know about you, but I couldn’t feel that amount of difference.

But this is Occam’s Racer, and we don’t do things with feelings, we do them with data. On a Miata (2400 lb race weight) going around a 75 mph corner, that’s a difference of about 0.13% additional grip. It’s not nothing, but it’s close to nothing. So as long as you have something on the end of the wing, you’re good.

Notice that the highest downforce and best lift/drag ratio is with the 5″ deep end plate. The author goes into a long investigation about why this is, but it’s too complex of a relationship to go into here. It’s kind of a magic number he stumbled upon, and trying to find this on your own would be folly, because on either side of 5″, the numbers are worse.

If you throw out the 5″ outlier, then the 12″ depth end plate has the best L/D ratio, which conveniently matches the chord of the wing. So a good rule of thumb here is make your end plates the same depth as the chord of your wing.

One final note on end plate size is that end plates move the center of pressure rearward. The larger the end plate, the more the center of pressure moves rearwards. This could be useful if your car tends to oversteer in high speed corners, and it could be a hindrance if it pushes too much already.

DIY single-element end plate

I use recycled street signs for my end plate. I pay $1 per pound at my local scrapyard, so about $2 all in, and the graphics are free! But you could use any sheet metal, carbon fiber, plywood, etc. The endplate needs to be relatively stiff and light.

Pro tip: Lay a straight edge across the chord of the main wing, and use that same angle for the top of the end plate. This makes it easy to set and adjust your wing angle using the top of the end plate.

Rectangular end plates are boring, and even though I just warned you that a different shape might lose performance, it won’t be much (because there’s so little to be gained, to begin with). So, if you roll the dice, you might get lucky on your own design, or you could copy someone else’s and hope that works on your car.

  • The first thing I did was shape the bottom of the end plate to match the pressure zone of my wing, putting most of the area well forward, rounded at the front, and tapering upwards at the rear. At some point you will knock your head on the endplate, so rounding the bottom is a safety precaution as well.
  • I then cut a notch on the top trailing edge to lessen the vortex here. That’s what other people do, it must work, right?
  • I also bent a small Gurney flap on the outer edge of the wing, which theoretically increases downforce, at the expense of some additional drag. (Gurney flaps typically measure 1-5% of the chord, so on a 12″ end plate, the wicker should be 1/8″ to 1/2″ in height.)
My single-wing endplate, with a wicker

Now that’s not a very extreme end plate, and anyone could make something similar. However, if you look at F1 end plates you’ll notice slots above and below the wing, a leading-edge slat, strakes along the sides, and a gurney flap at the trailing edge. Most of the these tricks are used to tame vortices, which reduce drag, but usually results in a loss of downforce as well.

Bite-size tech: Red Bull RB12 rear wing endplates
These end plates are overkill on a Miata, but what the heck, let’s talk about it.

I personally wouldn’t bother with these modifications, because a Miata ain’t a F1 car. But end plates are a good place for personalization, and like many questionable performance modifications, great conversations pieces. And it’s always fun to build stuff.

End plates for dual wings

Last summer I raced in the 24 Hours of Lemons race at Thompson, and saw some good aero, and a lot of bad. Lemons cars have wings largely for looks, it doesn’t really matter that some of them were a slab of plywood set at an angle. Among these quasi-aero devices were a lot of cheap eBay/Amazon wings that would have worked, but were done poorly.

Case in point: on one orange Chevy Lumina (winner of the IOE), the wing was on backwards. I enquired about this, and apparently the wing came pre-assembled with the pointy part of the wing facing forward! That’s just dumb from the “factory” but shame on the team for not correcting it. Or maybe it was intentional? This is Lemons, it’s hard to tell.

Lemons Pittsburgh: Lemons Adds Pitt Race for 2019, Moves NJMP ...
The wing is assembled backwards, with the trailing edge pointing forwards. Love those end plates, they do nothing for the low-pressure side of the wing.

At the race I saw a lot of dual wings with absolutely ridiculous end plates that had big holes or cutouts on the underside. As you saw from the first image, the underside of the wing is what matters! Moreover, they had the upper wing mounted so far away from the main wing that it defeated the purpose of a dual wing setup.

I’ve seen a lot of terrible end plates that are more for show than go. They have most of the surface area of the endplate at the back of the wing, or cutouts below that would let the pressure zones collide. It would be easy to correct the function of these wings by building your own end plates.

GT Wing Spoiler 52Inch Universal Lightweight Aluminum Rear Spoiler Wing Adjustable Angel Double Deck Racing Spoiler BGW Drift JDM Drift Black
Designed by fucktards. No adjustability of the upper wing, too large of a gap between the wings, and the end plate is facing the wrong way.

DIY dual-element end plates

So if you have a crappy dual-element wing with crappy end plates, and you want to make it work better, build your own end plates. Again, let’s start by looking at the pressure zone below the wing.

This image is from Competition Car Aerodynamics. Buy this book.

It’s not intuitive, but the suction side is more important than the pressure side of a wing. This is apparent in the numbers: the blue is 3x the value of the red. Notice that the low-pressure zone extends below the wing by almost the length of the chord of the main wing. Meaning, if you have a 10″ chord wing, you’re going to need at least a 10″ deep end plate. Also notice that the low pressure zone extends in front of the wing, but not much at the trailing edge.

In Competition Car Aerodynamics, McBeath examines what happens with end plates of different sizes. At first he uses no end plate (ep0), and then end plates of increasing size. The larger the end plate, the more downforce and less drag.

End plates of different sizes on a dual-element wing.
End PlateDownforce% IncreaseDrag% Decrease
ep0 (none)769.2Equal194.8Equal
ep1 (minimal)786.72.3%188.33.5%
ep2 (medium)873.413.6%183.86%
ep2 (large)900.117%178.19.4%
Bigger end plate means more downforce and less drag.

OK, so if bigger is better, how big is too big? There is a height at which end plates start creating more drag, and a diminishing return on downforce. But I don’t want to give away all the secrets, so please buy the books on my Resources page and learn yourself some aero.

Make ’em

Here’s how I’d DIY myself end plates:

  • Start with a 12″ x 12″ piece of sheet metal. Use a street sign if you’re Lemons, otherwise plain aluminum will do.
  • Put most of the surface area at the front and below the wing (as pictured in the drawing, above).
  • Lay a straight edge across the chord of the main wing, and use that same angle for the top of the end plate. This will help you set and adjust your wing angle.
  • After mounting the main wing as above, mock up where you want the holes for the secondary wing. I would put a single mounting hole in front that acts as a pivot and drill two or three holes at the rear. Don’t exceed 35 degrees. I don’t trust adjustment slots because they can shift out of whack, and so I go with holes instead.
  • Make the gap between the wings about a half inch in height, and overlap the upper wing on top of the lower wing by about a quarter inch. This should create a convergent gap between the wings, meaning the front opening is larger than the rear. This will accelerate the air going through the gap.
  • Set the lower wing angle almost flat (zero degrees). Most wings will have the highest lift-drag ratio in this vicinity.
  • Start the upper wing at 25 degrees and if you need more downforce, use the 35 degree hole. Don’t exceed 35 degrees with the upper wing. If you still need more downforce, rake the entire wing a few degrees.
Three adjustment holes on the upper wing, the main wing is adjusted by the mounting bracket.

JKF Aero Course Review

I recently completed Race Car Aerodynamics: the Definitive Course, by Kyle Forster. This online course consists of 10 hours of videos, in which Kyle lectures you on aerodynamic fundamentals, and provides case studies of real-world examples. Kyle uses a whiteboard to explain theory, and switches to computation fluid dynamics (CFD) to show specific examples of touring cars and open wheelers.

Because single-seaters (open wheelers) are often quite different than touring cars, Kyle separates much of the content into specific sections for each. I found the single-seater content interesting, but it’s highly unlikely I can put any of it into practice.

The touring cars Kyle examined in CFD were a time-attack Porsche 944, a Mustang, and a new Supra. The 944 was especially interesting, as it had two Venturi tunnels and a huge diffuser. No Miatas, but that’s OK, he has some YouTube content already with Miatas, which I’ll get to in a different post.

I don’t have a lot of experience with video-based learning, and I was initially skeptical, but all in all, I was extremely happy with the course. About half way through the course, I thought to myself, there’s no way this course is only 10 hours of videos! So I opened up a spreadsheet and summed up all the lessons, and indeed, it’s 10 hours.

The course probably took me over 40 hours though, because I’m an obsessive note taker, there are tests (knowledge checks), and hands-on learning with tools to try out (Java Foil, OptimumLap, Race Studio 2), and spreadsheet calculators to mess with.

You can also ask Kyle questions from within in the course, and he answers them in the sidebar. This is a great resource, because you can see the questions other students ask, and some of it is very illuminating. For example, I wanted to know about Front/Rear aero balance, and how that’s different for rear-wheel drive and front-wheel drive cars. No, I’m not going to tell you the answer.

That’s another thing I learned in this course, which is to hold your cards close to your chest. Knowledge is free on Facebook, YouTube, etc, and you get exactly the value that you paid for it. I used to correct people online when they made silly aero mistakes or lead others down the same path. Now I just bite my tongue and/or message them privately.

Some difficulties

The last time I took a math class was in 1985, and I still have nightmares about unfinished homework assignments. There isn’t much math in this course, but it’s on the cusp of what I’m comfortable with. You can skip over the math as long as you understand the principles behind it.

Another minor difficulty was that it’s hard to follow the CFD at first. Kyle often cycles quickly forward and backwards through the pressure plots, and it takes a while before you understand which way he’s going. The pressure plots themselves are an aerodynamic LSD trip, complete with all the vivid colors, confusion, and eventual revelations you’d expect from dropping acid. I get it now, but it took some getting used to.

CFD LSD Trip
Psychedelic butterfly or open-wheel CFD?

Kyle is obviously passionate about his work, and sometimes that comes out in a cursor that moves a little too quickly. His computer arrow is small and white, and it can be difficult to pick out at times when he’s moving it on the screen to show a particular area of interest.

But even if there were some difficulties, it’s nothing I couldn’t handle, and by the end of the course I knew what to look for.

The cheat codes

If you simply want pragmatic advice, like how long and low your splitter should be, where to mount your wing, how to optimize airflow through your engine, etc, you can jump ahead to Key Development Areas. In this section Kyle follows airflow from the front of the car to the rear, providing you with all the aerodynamic solutions for your touring car or open-wheel single seater.

Honestly, I don’t want anyone I’m racing against to take this part of the course. This section has all the cheat codes for the game of aero, and if everyone knows this stuff, then the playing field is level. And I can’t stand that kind of parity, I want an advantage!

But since most of you cheap bastards won’t pony up a thousand dollars, I figure the secrets are pretty safe. The course goes on sale occasionally for 30% off, which is how this particular cheap bastard afforded it.

Consultations

I’ve also done six hours of video consultations with Kyle, some of this as a fly on the wall, and some of this on my own car. The way it goes is you send Kyle details on your car, and he analyzes your full aero kit. He points out the good and bad, and what you can do better based on your ruleset.

Kyle charges $175 per hour for video consultation, which is a downright bargain considering he was a Formula 1 engineer. For the best in-depth analysis you’ll need to get your car laser scanned, and then he can do CFD. I don’t know where to do scanning, and I’m not sure I ever will bother with that because I’m not very serious about winning. But if you are, that’s the second step.

If you’re interested in getting a consultation, then taking the course is the first step, it will save you a lot of time in the long run. This way you can get all of the fundamentals out of the way and start optimizing a car that’s done 90% right.

Conclusion

This course was the best money I spent in 2022. I don’t think that will be the case for everyone, but I’m an armchair aero nerd, and it was exactly, precisely what I wanted. I came into this course knowing a thing or two about aero, and all of that background knowledge definitely helped me get more out of this course. But I think the average person with a keen desire to learn could jump right in without any prerequisites.

As I look back on what I learned in this course, and look ahead to the practical ways of putting it to use, I’m super excited about working on version 2.0 of my Miata’s aerodynamics package. Fucking hell, I’m positively giddy about it.

Syndication Didn’t Work Out

I don’t write mainstream automotive content. I’m technical, confrontational, and have no allegiances to manufacturers, organizations, or anyone in the motorsports industry. I drop the occasional Fuck-Bomb, and when I’m feeling really spicy, I might threaten my readers with a dick punch. This doesn’t make me particularly attractive as an automotive journalist. Which is fine because I’m not really a journalist, and writing about car aerodynamics is a fucking hobby.

Why am I telling you this? Because 18 months ago I had an agreement with Hagerty, who said they would syndicate the articles on my Occam’s Racer website. Hagerty wants to sell track insurance and promote events on motorsportsreg.com, so they created a new website aimed at track enthusiasts, and they recruited me to be an integral part of that.

My role was to tighten up the content I’d already written on racing, testing, and aerodynamics, and to create net new material of the same. (TBH, I was once a motorcycle journalist and I was secretly hoping they’d get me back in that game, as well.) I’d be paid handsomely, and get to expense things like tires, fuel, and track days. In preparation for that, I locked down a lot of my website so they could publish my articles as if they were new.

After a year and a half of rewriting and waiting patiently, Hagerty has pulled the plug. They published one of my articles in a “soft launch,” but won’t be syndicating the rest of content.

I didn’t pester them during that year and a half, so I don’t know all of the details on why the deal fell through, but reading between the lines, it seems like upper management regularly fucked with the website team. As they do. This delayed the launch by over a year, during that time there were significant changes in design, strategy, and staffing.

The end result was me without the deal I was promised. I have a signed contract, and a litigious person might go after compensation, but I’m not that guy. I can go right back to doing what I was doing before and be happy with that. And honestly, it was nice to be noticed and appreciated by a real journalist, so I’m thankful.

Which brings me to the other reason the Hagerty deal fell apart, which is that I was recruited by Jack Baruth. In the small pack of automotive journalist who are worth following, he’s my alpha dog. To other automotive journalists he’s not so much pack leader as lone wolf. Jack is an iconoclast. A shit disturber. A ruffian. Obviously he’s my people. Or vice versa?

I was gobsmacked that Jack wrote for Hagerty to begin with. Hagerty’s readership is geriatric white guys buying vintage cars at ridiculous prices; auctions and concourse are their bread and oleo. That Hagerty kept Jack on for so long is surprising, considering that when Jack wrote about air-cooled Porsches, his primary appeal was nailing chicks on the hood of the car.

It wasn’t all raunchy, most of Jack’s writing was spot-on, unbiased automotive journalism. But after too many years of dropping truth bombs on the automotive industry, Hagerty fired Jack. And if I believe what he’s saying in his sig, he’s been blackballed by most of the automotive industry.

When I’d heard about this, I had immediate feelings of solidarity on the order of, “fuck this, I’m going with Jack.” But Jack isn’t bringing me anywhere. In fact I’ve heard nothing from him. Which is not unexpected, he’s got problems of his own.

And when it comes right down to it, I have to look out for myself. I’d like to get paid more than a cup of coffee for an article. A byline writing for an online magazine is still a feather in a cap lacking plumage. And damnit, some of my articles are worth syndicating! But that’s out of my hands.

Which is good news for you, reader, as I have now unlocked the articles on my site. Some of the content will remain password protected because it cost me time and effort to obtain the information. Moreover, some people in the past year and a half have decided that my articles are worth paying for, and so I’ll continue to give them some exclusivity.

You can get the password to all the articles for five bucks, by buying me a cup of coffee virtually, or buying me a beer in person (something hoppy, nothing Belgian). I also take donations if you appreciate highly independent “journalism”, or are just feeling generous.

Even though I’m feeling snubbed, I want to wish Hagerty good luck with their new Imola website, which is aimed squarely at the club-level racers and track enthusiasts I call friends. The website could turn out to be a great resource, even without my involvement. And I have to thank them for the article they printed, and buying me the equivalent of a thousand coffees; it pays for a lot of gas and tires.

I don’t know if Hagerty will print another article of mine in the future, but I’m not waiting on that any longer. I have some great content I’ve been sitting on, including another DIY wing, a bizarre opera coupe top, and several hours of consultations with Mercedes F1 aero engineer Kyle Forster. You can also look forward to more real-world testing in 2023, and now that I seem to have kicked Lyme disease, maybe some race reports.

Lastly, if you’re a Jack Baruth fan, you can help him out by subscribing to Avoidable Contact Forever, which contains everything he wrote for Hagerty, plus lots of new content without fetters. Or filters. I’m going to warn you straight up about the Rodney stories… they are not for everyone.

Addendum: After reading this post, Jack wrote a public apology on his site, and even better, invited me to try his Radical. What he said about the one article of mine that Hagerty printed, I’m hanging onto forever: “It’s brilliant, and it contains more intelligent thought about how to go faster via aero mods than pretty much all of the rest of motoring journalism combined.” So, yeah, that felt pretty fucking good.

GLTC Watkins Glen Simulations

Grid Life is coming to my home track of Watkins Glen International, April 28-30 2023. This is the first time Grid Life will come to this iconic track, and I hope to race in one of the events.

Unfortunately my Miata doesn’t have anywhere near the 12.5:1 lbs/hp limit of Grid Life Touring Cup, and I’m not an A-class driver besides. The end result is I wouldn’t be competitive. Still, I thought it would be fun to run some simulations and see my car’s potential. There have been a few rule changes to balance out engine performance, and I thought this would be a good opportunity to smoke test those as well.

For these simulations I’ll use five different Miatas. Each has an identical aero kit that results in .48 Cd and -1.0 Cl (values I’ve measured on my car), with standard values for air density and rolling resistance. I’ve spec’d the same tires at 1.2g of lateral grip, and 1.1g of longitudinal grip.

Per GLTC rules, all the builds take a 4% penalty to weight because they run a splitter and large wing, but being Miatas, they get some back by having no ABS (-2%) and running wheels 16″ or smaller (-1.5%). The end result is that all the builds take a .5% weight penalty to the standard 12.5 lbs/hp ratio.

Now here’s where it gets interesting: each Miata has a different engine, and this changes the final lbs/hp ratio. Per the latest rules, small-bore engines less than 1999cc get a 1.5% break and 1999-2500cc get a 1% break. Turbos are penalized 1.5%, K24 swaps are a 2% penalty, a 5-liter is a 4.5% penalty, and so on.

I’ll do five simulations based on different engines. Note that I went out and created each engine in OptimumLap using dyno charts I found online, and so the torque curves should be pretty accurate.

  • N/A – 170 hp, 2103.75 lbs. This represents a well tuned 1.8 BP. NB2s would have more torque, as I used the dyno graph from my NA8 and bumped it by 141%.
  • Turbo – 200 hp, 2512.5 lbs. I pulled this dyno from someone on Miata Turbo. The 1.5% penalty for using a turbo is offset by the 1.5% benefit for under 1999cc.
  • Ecotec – 192 hp, 2388 lbs. I used the dyno chart from an Ecotec swap I found somewhere.
  • K24 Z3 – 200 hp, 2562.5 lbs. I used the dyno from KMiata’s Z3 blog post. I could have used the A2, but then I’d have to detune it more. Notice the power output is the same as the turbo, the 50 lb weight penalty comes from the K-swap.
  • 5.0 Mustang – 220 hp, 2887.5 lbs. Fox Mustang old school V8 Miata.

It’s worth noting that four of the cars came in at less than 2725 lbs, and would be limited to a maximum 245mm average width tire. The 5.o Mustang swap is slightly heavier, and thus could run a 255 tire. To simulate that, I’ve given it a very small bump in grip (from 1.2g to 1.212g).

Before we look at the lap times, understand that I’m not trying to predict an accurate lap. OptimumLap is a tool that’s good at predicting the differences in changes you make to your car, but can’t factor in weight distribution, elevation, camber, surface friction, or other variables. So how did the different engines shake out? Take a look at the speed trace:

  • 2:09.11 – Turbo (orange, like 949 Racing)
  • 2:09.20 – Ecotec (green, cuz eco)
  • 2:09.39 – N/A (red, because mine is)
  • 2:09.82 – 5.0 Mustang (blue, for USA int’l racing color)
  • 2:09.85 – K24 Z3 (purple, for Miata royalty)

The first thing you might notice is that the red car (N/A) is considerably slower on the back straight. However, because aero works better on lighter cars (the percentage gain in grip is higher), the red car has higher min speeds in the fast corners. I thought the N/A would be last, but it’s right in the middle.

The fastest builds are the turbo and Ecotec, but there’s not much between them. The Ecotec has a great powerband, but the little turbo has a fatter torque curve and wins overall. The slowest cars are the K24 and Mustang swaps, about half a second adrift. These engines are penalized the most, so it’s not surprising.

But what is surprising is how close the times are on such an extreme speed track. I’d say the rules parity is very good right now. Naturally, there are some caveats here, because OptimumLap is a single-point mass calculator, and can’t factor in elevation changes or camber.

And that’s a problem because all but one of the corners at Watkins Glen has favorable banking. If the simulated lap times seem slow, that’s why. If I adjust the grip by 110% and re-run the simulations, two seconds disappears. Notice that the K24 and 5-liter swap places, but the other cars remain where in the same order:

GLTC cars have yet to race at WGI, and so I don’t know if 2:09 or 2:07 is more accurate, that’s not really the point of this experiment anyway. I’ve seen some NASA TT5 cars do 2:08-2:09, so that’s in the same ballpark, though.

Now it’s time to see how my Miata (black in the following speed trace) would do against these cars. While the engine is down on power, my car has better aero than the average Miata. On the back straight I’d give up 7 mph, but over a lap it would be only about a second slower. Not that bad, actually.

Grid Life will be at several tracks this year, including Gingerman, Mid-O, Lime Rock, and Laguna Seca. I have those track maps in OptimumLap, so I ran those simulations as well. The parity across the classes is pretty good, and the order stays mostly the same. However, there is one surprise winner.

One final comment is that these simulations were all done on Miatas with aero, and aero favors light weight. But air has resistance, and it takes power to overcome that. A heavy, torquey car with maximum tire width and a lot of mechanical grip exploits that imbalance. I don’t have the data for such cars so I can’t run those simulations, but if you look at the race results, that’s also a winning formula. Therein lies the success of GLTC, a diverse selection of cars and evolving parity in the rules.

I’m really looking forward to April 28-30, although I’m not sure if that will be as a participant or spectator. The weather probably won’t be great, but it’s going to be a heck of a party.