Blog

Racing a Veloster N in Time Trials

Updated March 2025

I originally wrote this in 2024, but the 2025 classing rules have changed for both NASA and SCCA time trials classing. Changes below are in italics.

I’ve been thinking about taking my car to a time trial race, and as part of that, researching all of the time trials rules. But one thing that may throw a spanner into my plans is that I don’t want to turn any spanners myself. So if racing in time trials voids my warranty, I’m not racing.

But I have other options. If you’ve been following my blog, you know about Falconet, my Hayabusa-swapped Miata. It’s a serious race car that can do wheel to wheel or time trials. It will compete next year.

Anyway, as this is towards the end of the track season, I’ll ruminate on which series and classes my Veloster could compete in, if and when that happens.

NASA TT5

NASA time trials divides cars into classes by weight and horsepower. Power is averaged over a range of RPMs, so that peaky (low torque) motors have more parity with engines that have a broader spread of power. And there are modifiers for many things from aero to suspension to tire width. On paper, it’s all very fair, although some of the rules are questionable.

If I use the class calculator at 3200 lbs race weight, and specify that my car is FWD, has narrow tires, uses a splitter and wing, the car is allowed 256 average wheel horsepower. My car makes 244 peak horsepower at the wheels, and so you see it fits into the TT5 class with some room to spare (12 hp) for a cold-air intake and an exhaust. If I were to remove the splitter and wing, and use the base trim aero modifier (BTM), the car is allowed 275 average wheel horsepower. Since I’m not going to modify my engine, that puts my car 31 whp under the class maximum, and I’d have a hard time being competitive.

Now here’s the problem: TT5 has a maximum factory horsepower limit of 270 hp. So even though my car is 31 hp under the class limit, I can’t race in it! If I had the non-PP version of my Veloster N, at 250 crank hp, then I could tune the shit out of it, up to 275 at the wheels and be class legal. But my engine, which is 244 peak horsepower at the front wheels, is somehow illegal.

I’d like to see the logic behind this power cap in a lbs/hp series. Are they just trying to keep out the heavy cars? How does that even make sense in age when every new car is north of 3000 lbs?

Other cars that should be able to race in the TT5 class based on lbs/hp, but can’t because they have more than 270 hp, include the BMW 135i and 335i, Ford Mustang (EcoBoost), Dodge Challenger and Charger SXT, Hyundai Elantra N, Kia Stinger, Mitsubishi Lancer EVO, Nissan 350Z, Subaru WRX, and a slew of others. These aren’t popular track cars anyway, so who cares, right? And so instead of TT5 my Veloster N and the aforementioned cars all have to race in the next class up, TT4.

In 2025, NASA changed the maximum factory (crank) horsepower to 264 hp for AWD and RWD cars, and 275 for FWD. This makes the Veloster N legal, but the Elantra N isn’t, even though it’s heavier and ends up with the same power to weight ratio. While I don’t get the reasoning, I’d like to thank NASA for making my car legal for TT5, and also thinning out the competition. I may be racing with you sometime in the future!

If I’m going to nitpick the other rules, the other thing I don’t like is they don’t allow aero items from other classes. I mean… just use the point system you already developed, and instead of making canards, fender vents, diffusers, etc., illegal, make them cost points.

Grid Life

My Veloster can race in the Street class, which allows 4-cylinder turbos and 6-cylinder normally aspirated engines. Performance wise, there are some ringers in the class, but the Veloster isn’t that far off the pace. I wouldn’t be able to use any aero, or that would put me in Street Mod, which I could never be competitive in.

My Veloster also fits perfectly into GLTC, but that’s a wheel to wheel race class. However, COM has a GLTC-spec class in time trials, and I’ll get into that later.

In Canada, I could also race in Canadian Time Attack Challenge, which uses Grid Life’s rule set.

SCCA Time Trials Nationals

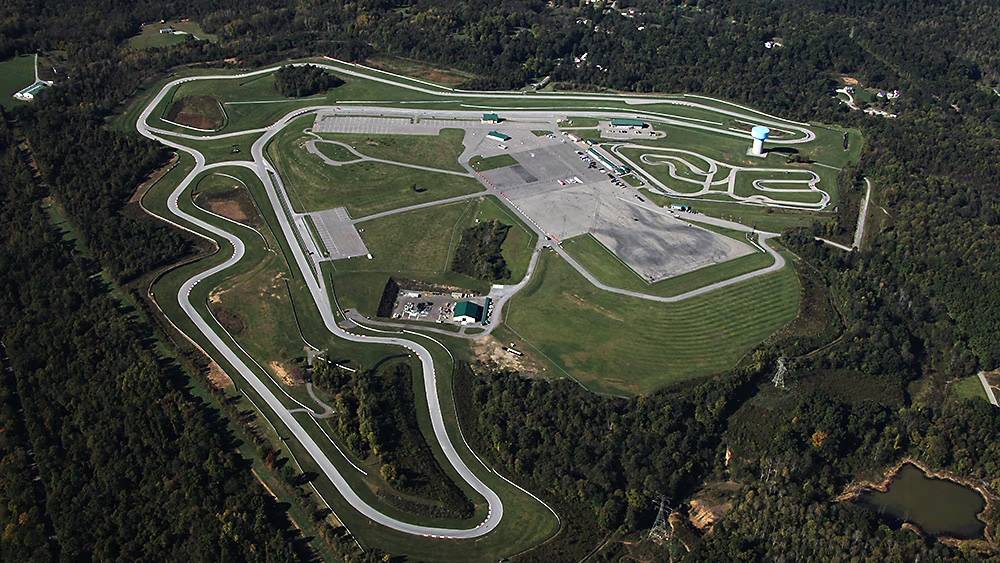
SCCA Time Trials Nationals (or is it Time Attack Challenge in 2025?) is moving their home track from National Corvette Museum to PittRace, and will hold the Nationals competition on Sept 18-21 2025. This is exciting for me, because PittRace is one of my favorite race tracks, and it’s a lot closer than NCM.

PittRace is awesome.

There are three classes I could race my Veloster in:

  • Max 3: This class allows a lot of aero, suspension, and engine tuning. I could use all of the aero I’ve built for my Veloster and race in this class, but for reasons I’ll explain in a minute, the car would be considerably down on power.
  • Tuner 3: This class has the suspension mods and engine tuning of the Max classes, but no aero mods. I won’t be racing in this class. (Side note, I feel like cars that are prepped to the Sport level should be able to use aero mods if they don’t take any other Tuner mods.)
  • Sport 3: This class allows minimal modifications, like lowering springs and intake/exhaust plumbing, but that’s it. It would be easy to prep for this class, but the Veloster isn’t at the higher end of the performance spectrum.

But that was in 2024, and now in 2025, instead of Max 3, Tuner 3, and Sport 3, my car goes into Max 4, Tuner 2, and Sport 3.

Max 3 Max 4

I’m an aero guy, and so my first thought is to race in the Max classes because the Sport and Tuner classes don’t allow aero. The aero rules in Max are quite good and show a constant evolution, losing some of the silly restrictions (flat splitters) that the legacy rules had. Therefore, I could use all of the aero I’ve developed in the wind tunnel, without making more parts to a different rule set. Kudos to the TT rules makers for their willingness to adapt and change.

The Max classes use engine displacement to determine classing, and unmodified 4-cylinder turbos up to 2.46 liters go into Max 4. My 1998cc Veloster gives away displacement to engines like a 2.3 Ecoboost, resulting in a 75 hp deficit. So that puts me at a slight disadvantage to some turbo cars, but I shouldn’t complain, as 3-cylinder engines are only allowed 1.9 liters (?).

N/A engines are allowed up to 4.5 liters. In this category you have cars like the E92 BMW M3 and 718 Porsche Cayman GT4, both putting out 414 hp. That 140 hp deficit would be OK if my Veloster had a handling advantage, but these are pedigreed German sports cars I’m up against. Even worse, a 911 GT3 makes 500 hp from a naturally aspirated 4-liter flat six, and is in the same class as my Veloster. Grumble grumble.

This would also be in Max 2?

All said, if I want to be competitive, the Veloster doesn’t look like a great choice in Max 2. But I could also build the car with aero and not care about how I place, and do this race just for fun. That’s compelling, but also exactly what HPDE is for. Why enter a competition if you’re not going to be competitive?

Tuner 2

I never really considered the tuner classes, but I did notice a lot of cars moved from Tuner 3 to Tuner 2 in 2025, including the Veloster N.

Sport 3

Given that a stock-engined Veloster is way outclassed in Max 3, let’s see how it fares in Sport 3.

Unlike the Max classes which were based on displacement, the SCCA uses a list to determine which cars go in the Sport category. The rules say that the list of cars in each class is not based on a balance of performance, but on a “balance of popularity.” But I feel like that explanation is selling themselves short. The SCCA time trial board has done a great job of re-classing cars annually, and there’s better parity every year.

For example, the Acura NSX was originally classed in S2, but has been reclassed to S3, and is now considered an equal sparring partner to my Veloster N. The NSX is lighter and more powerful, but the 20-30 years between the cars may be significant. Other cars that moved from S2 to S3 include the Chrysler Crossfire (310 hp), Dodge Challenger R/T Scat Pack (470 hp), Kia Stinger (368 hp) Lexus GS-F (467 hp), and Nissan 370Z Nismo (350 hp). While all of these cars are more powerful than my Veloster, they are also heavier. Maybe it’s a fair fight?

370Z Nismo is in the same class as a Veloster N.

As of this writing, the following cars are in S3:

Acura Integra Type S 2024, NSX 1990-2005; Alfa Romeo Giulia Ti 2016+; Audi A3 2.0T All 2015-2018, S3 2013-2020, S3 Quattro Wagon 2006-2013, S4 2009-2016, S5 3.0T FSI 2008-2017, TT S 2009-2018; BMW 135i 2008-2013, M235i 2014-2016, 330i xDrive Sport Wagon 2017-2019, 335D 2004-2013, 335i All 2006-2013, 440i xDrive 2014-2020, 535i RWD 2004-2010, 650i Base 2005-2010, M3 2001-2006, M5 1998-2003, Z4 Coupe M 2006-2008, Z4 35i M 2009-2016, Z4 35is M 2009-2016; Cadillac ATS 3.6L V6 2013-2015, CTS V 2004-2007, CT4 V 2022; Chevrolet Camaro SS 1998-2002, Corvette Z07 1984-1991, Corvette Base 1984-1997, Corvette Non-Z06 1997-2005, SS 2014-2017; Chrysler Crossfire SRT6 2004-2008, Dodge Challenger R/T Scat Pack 2015-2022; Ford Focus RS 2016-2018, Mustang Ecoboost 2015-2023, Mustang GT 2011-2014, Taurus SHO 2010-2018; Genesis G70 3.3T 2019-2022; Honda Civic Type R 2016 +; Hyundai Elantra N 2022, Genesis R-Spec (All) 2013-2016, Veloster N 2019-2022; Kia K5 GT 2021-2023, Stinger GT 2018-2023, Stinger GT2 2018-2023; Lexus GS-F 2016-2020, GS350 FSport 2016-2020; Lotus Evora Base – NA 2010-2014; Mercedes C450 AMG 4MATIC 2015-2016, C55 AMG 2004-2007, CLK55, AMG 2003-2006, SL550 All 2007-2013, SLK55 AMG 2005-2011; Mitsubishi Evo All; Nissan 370Z Nismo 2009-2013; Polestar 2 Dual Motor, Performance Pack 2020-2024; Pontiac Firebird Firehawk/Formula/Trans Am 1998-2002, GTO 2004-2006; Porsche Boxster S 2005-2012, Cayman S 2005-2012, Cayman Base 2009-2012, Cayman Base 2014-2016, 911 Carrera 2, 2S, 4, 4S 1999-2008; Subaru WRX ALL 2009-2021, WRX STI All; Toyota Supra GR 2.0 2021-Current, Corolla GR 2023-Current; Volkswagen Golf R 2015-2021; Volvo V60 Polestar 2016-2018

I’m not super interested in what the SCCA thinks about a balance of popularity, what I really want to know is, how do these all compare in performance? Hello COM.

COM

Corvette Owners of Massachusetts (COM) has perhaps the fairest time trials rules in existence. They calculate a car’s performance using the weight of the car divided by its power and then factor in a Performance Adjustment (handling).

To calculate power, COM uses an average of horsepower and torque, which is smart because the torque curve is hugely important. COM then modifies the power-to-weight score using Performance Adjustment points that range from -25 to +28.5. This factor takes into account things like suspension, brakes, tire width, aero, etc. Those two numbers are added together, resulting in a Showroom Assessment score, and from this the cars are placed in classes ranging from T30 (the slowest) to T110 (the fastest.)

The Veloster N is listed at 71.7 points, at the bottom of class T70. I could compete fairly in COM taking modifiers to aero or tires and come right in at the class limit.

But the other thing COM is great for is comparing the relative performance of different cars. And so I did that for all of the cars on the SCCA Sport 3 list, and the average is 72.5 points. So on first blush, it looks like the Veloster is right in the middle of the performance range.

However, there are a lot cars that are ranked higher, including the aforementioned Nissan 370Z Nismo, several BMWs (E46 M3, 135is, M235i, and Z4M), and every generation of Mitsubishi Lancer EVO or Subaru WRX STi. Given that every one of these has a better power to weight ratio, and that they are AWD or RWD vs the Veloster’s FWD… I have to think I’d be on the back foot against them. But I also feel like I’m a decent driver and my car is close enough in performance that I’m up to the challenge.

But there are even faster cars in Sport 3, and at the pointy end of the class are several cars that COM puts in T80, meaning they have more than 80 points. Among these is the Veloster’s nemesis, the CTR.

FK8 CTR is a class favorite.

When the Veloster N came out, it was regularly pitted in comparison tests against the Honda Civic Type R (80.2 COM points). The CTR beat the VN every time, but it was close. In the comparisons, many YouTubers would choose the Veloster for the fun to drive aspect, but the fastest lap times were all owned by the Civic.

Some of the Type R advantage is Honda power, with +31 hp and +35 torque out of the same displacement. But COM also rates the Performance factor at 8.3 vs 7.5 points. So not only does the CTR out power the VN, it out handles it as well.

Which I find surprising because I think the Veloster is the best handling FWD car I’ve driven. Admittedly, I haven’t driven a Civic Type R, but I think the Performance Adjustment discrepancy comes down to the size of the wheels and tires. The Veloster comes stock with 8″ wide wheels, and 8.5” is about as wide as you can fit. Ergo, most people are using a 235 width tire.

Conversely, the Civic Type R comes stock with 9.5″ wheels, and you can go wider still. So it’s quite possible to fit 265 tires on a CTR, and maybe even go all the way to the class maximum of 285? The Elantra N isn’t on the COM list as of this writing, but like the CTR, it has more power and wider tires than a Veloster.

But my competition doesn’t end there, the overdogs in the S3 class are the 987.2 Cayman (80.4 points), 992 Carrera (82.3), Ford Focus RS (82.5) and non-Z06 C5 Corvettes (83.1). These T80 cars are higher performance than anything else on the Sport 3 list, and might even stomp a CTR.

S3 overdog would be a full class higher in COM rules.

So even if my Veloster N is in the middle of the COM performance window for SCCA’s Sport 3 class, it’s likely that a majority of the cars will have a better power-to-weight ratio, and significantly wider tires. The question is, can a 275 hp FWD hatchback on 235 tires beat a 350 hp RWD on 285 tires or 350 hp AWD on 265 tires? To find out, let’s see some historical results.

Sport 3 lap times

SCCA TT lists the results for every race, and after dumping them all into a spreadsheet (and correcting the fact that they don’t put the fields in the same place each time), I got an idea of which cars are the fastest and most popular in Sport 3.

At the top of the list is the FK8 Honda Civic Type R, with seven wins and lots of podiums. The next most popular is the 2017+ Camaro SS with five wins. After that you have a pair of German sportscars, the Porsche Cayman and BMW E46 M3, with four wins apiece. The Ford Focus RS is the first of the AWD cars and nets three wins, and then you have a contrast of early Porsche 911 vs modern Ecoboost Mustang with a pair of wins each. Finally there’s a smattering of cars with just one win, such as a 2014 Cadillac CTS, 2012 Audi TT, 2022 GR86, 2006 350z, 2015 M235i, and finally a 2021 Veloster N. Which is especially poignant because it won the 2021 Sport 3 class at PittRace.

PittRace lap times

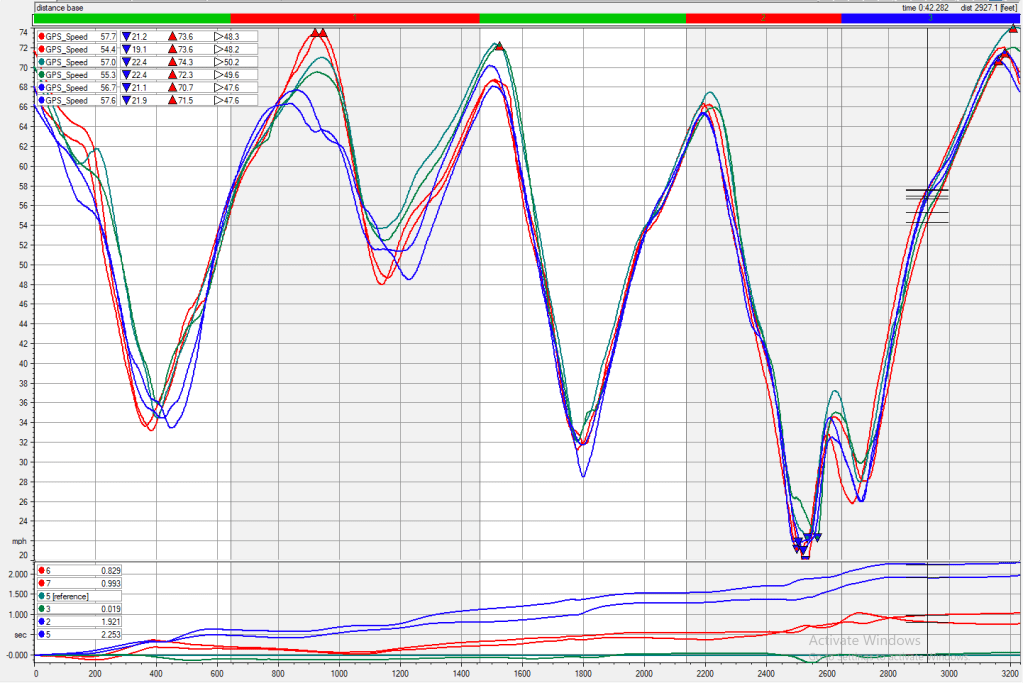
SCCA Time Trials has been to PittRace a couple times, and looking at the results, it appears that I should be aiming for a 2:05 lap if I want to be the fastest ever Veloster, or a high 2:02 if I want the fastest all-time S3 lap (yeah, right). I’m sure that people will up their game for Nationals, and so I don’t doubt that someone will make a new lap record, weather permitting, but can someone go under the 2:00 minute mark?

YearDriverCarLap
2019Thomas Edward Philipps2018 Civic2:02.997
2021James Avellina2021 Veloster2:05.397
2021Shelly Avellina2021 Veloster2:06.767
2019Randall Prince2017 Camaro2:08.580
2019Fausto Sarmiento2016 M235i2:10.817
2019Jared Romanyak2009 370Z2:12.012
2022Christopher Schimmel2009 370Z2:12.190

I also looked at the Tuner 3 lap times at PittRace, and most are a couple seconds faster, with one car going under 2 minutes. Meanwhile, two FK8 Civics did 1:58s in Max 3. So the delta between Sport 3 and Tuner 3 is a little over two seconds, which is about the same gap between Tuner 3 and Max 3. Comparing Sport 3 and Max 3, I would need over 4 seconds from aero to make my Veloster competitive in Max 3, and I have a hard time seeing that happening.

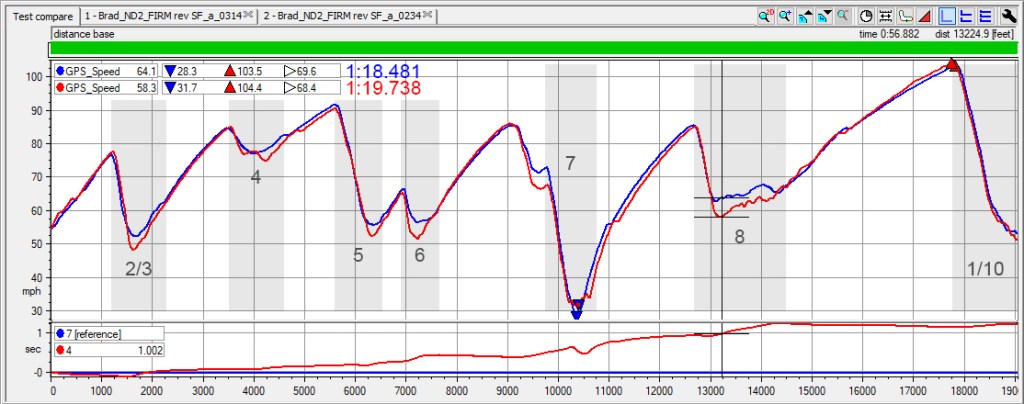
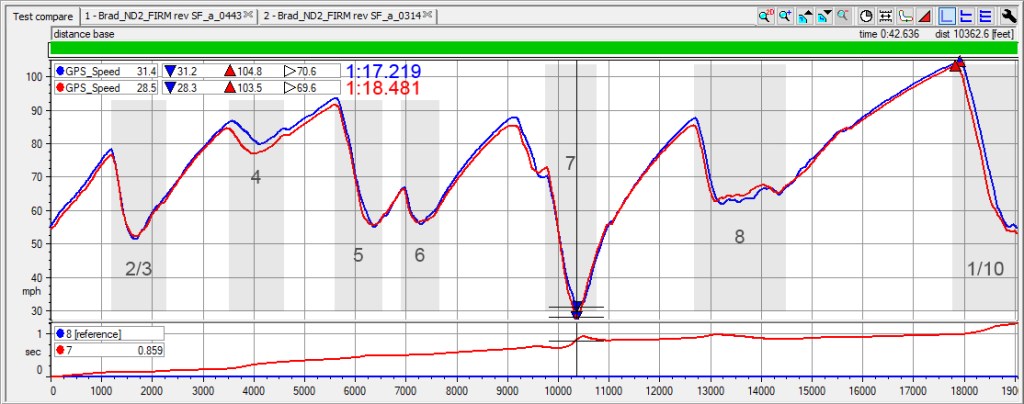
Racing and Sim racing

I’ve raced at PittRace a few times in 24 Hours of Lemons and Champcar, and I’m slated to race a B-Spec Honda Fit this year with the Garage Heroes in Training. The event is is a Lucky Dog endurance race, and so with no mechanicals or mishaps, I’ll get a decent amount of track time. Which is important, because by next year, I need to know PittRace like the back of my hand.

To that end, I’m also doing some sim racing. My brother Ian (yousuckatracing) set me up with a sim rig, and I do a few laps every morning. I’ve been playing Gran Turismo since GT came out, but with a controller, and so it’s taking me a while to get the feel of a wheel and pedals. I’m currently only racing Assetto Corsa, because it has the PittRace track. A lot of my friends seem to be on iRacing, but that costs money and doesn’t have PittRace, so….

I’m just getting started sim racing, so I’m not too proud of these times, but in the spirit of transparency and learning from others, this is where I’m at:

CarTiresLap
Miata NAStreet2:17.9
Alfa MitoSemi-slick2:07.8
GT86Street2:09.0
Giulietta QVStreet2:08.2
Audi S1 +200kgSemi-slick2:07.8
Abarth 500 s1Semi-slick2:07.8
GT86Semi-slick2:07.6
Miata ND1Semi-slick2:07.6
Audi S1Semi-slick2:05.5
370ZSemi-slick2:01.0

Unfortunately I don’t have a car that approximates at Veloster N, but Ian is good at modding things, so I’ll get him to make me one eventually.

Rounding the Leading-edge on Splitters

Flow separation is the enemy, and is to be avoided at all costs. One of the main culprits of flow separation is a sharp leading edge, which can cause a separation bubble behind it, and results in downstream turbulence, increased drag, and loss of downforce.

Where I see sharp leading edges most often is on splitters, and oddly, the more expensive the splitter, the more like it is to have a sharp leading edge. Shitty plywood splitters are blunt to begin with, and usually get rounded over by their owners, either intentionally or through use. On the other hand, Alumalite and carbon splitters usually have a sharp edge, and the manufacturer (or DIY-er) does nothing about it.

Which is fine when conditions are perfect and air hits it directly head on. However, when a car pitches forward or backward due to acceleration and braking, or when the splitter blade is heaving up and down due to suspension movement, or you’re drafting a car in front of you and in its wake, then the air hits the splitter at an angle. In these situations the flow separates on one side or the other, and you get downstream losses.

Take a look at the following drawing. Air is coming from the left and hitting the nose of the car. In each case, the splitter is dividing the air into two halves, one that goes above the blade, and one that goes below. Let’s take a look at how this changes with air hitting the front at an angle, and with the shape and thickness of the leading edge.

Splitter leading edges.

A. This represents the best case for a splitter with a sharp leading edge; air hits evenly at the front and splits evenly around. This is also known as fantasy land.

B. This represents a car that is pitching due to acceleration, hitting a bump, cresting a hill, following another car, or really any other situation that makes air hit the front of the splitter at a slight angle. In this case the air separates at the leading edge, losing laminar flow, creating a separation bubble behind it, and causing downstream turbulence. Further downstream, the air might reorganize again, but the downforce you are trying to achieve is gone, and instead you got drag in its place. That carbon splitter may have cost you a pot of gold, but in exchange you got a bag full of shit.

C. This is the same splitter and air angle, but the top of the splitter has been thickened and rounded at the leading edge. Air now flows around the underside, staying attached the whole time. The top side may get a small separation bubble depending on the angle, but the pressure side of the blade is of little consequence.

D. This time the splitter lip is thickened and rounded on the underside, and the effect is similar to C, but not quite as good. The problem is this may cause ground clearance issues, which would require you to reset the height of your splitter. Also, if you race in a series that requires a flat or horizontal splitter blade, you no longer have one. You’ve also created a shape that may have an adverse pressure gradient where the thicker lip meets the flat splitter; when curving a splitter, the curve is usually an arc that goes the other way.

Conclusion

My best inspiration for splitters comes from wings. Take a look at the leading edge, they are always thick and well rounded on the underside (or top side for an airplane), because wings work through suction.

The same is true for wing mounts. Swan neck wing mounts are optimized for the underside. By placing the brackets on the less important pressure side of the wing, the suction side is left undisturbed, which results in lower drag and increased downforce.

And it’s the same for splitters; we don’t care too much about the air that goes on top of the blade, as this is the pressure side of the splitter. Air on the pressure side can be a bit disorganized and it still works fine. We care a lot about the underside of the splitter, because this is the suction side, and any turbulence or flow separation here has massive consequences.

Splitters need to be optimized for the underside of the blade, and this begins with the leading edge. A thick and well rounded leading edge allows air to stay attached at varying angles of attack, and keeps flow laminar along the surface. If you have a sharp leading edge, add some material (plywood, 3D printed plastic, foam/fiberglass, etc), so you can thicken and round it. This will add some rigidity as well.

Peter Liu’s 3D printed splitter lip fixes the sharp leading edge problem.

If you have modified a sharp splitter blade, send me a picture and I’ll add it here to inspire others.

A proper leading edge. Thanks Peter Liu.

[Update 10/16] Shane Wilcox had the typical splitter with a sharp leading edge and sent me an email asking what he could do? I sent him to Peter and he got a 3D lip on the leading edge. The change was nothing short of dramatic.

The increased downforce ripped off the lightweight bumper, and required a heavier OEM and additional splitter rods to avoid dragging. Once that was solved the car had so much downforce it started to oversteer. Well, I can’t wait to see what happens when Shane addresses that with more rear downforce, lap times be falling!

James Mewett also thickened and rounded his front splitter lip, and took the following picture.

This picture says so much.

It’s illuminating to see how the path of air is influenced, so far above and ahead of the splitter. Since the underside of the splitter does the most work, this modification should work really well.

I love I hear success stories like these, so if you’ve fixed your splitter lip (or used any other tips and tricks on this website), contact me and I’ll write up a testimonial.

Miata Hood Vents

In the world of car aerodynamics, it’s rare to get drag reduction and downforce at the same time. Usually there’s a trade off, where a certain part adds downforce, and with that you get more drag.

Hood vents are one of those magic items that often benefit both drag and downforce; it’s a double win. And because hood vents also aid in engine cooling, that makes them a triple win. Every race car that is allowed to have hood vents should have them. Period.

But what kind of hood vent? There are many products available online, from Gutentight, Race Louvers, Singular, Spiked Performance, Trackspec, and many others. And then there are the DIY options such as stamped steel floor vents from a home improvement store, or 3D printing huge time attack style vents, or simply cutting a gaping hole in the hood. What’s best?

Luckily someone has done a lot of that testing, and provides the data for free. Al Watson of Race Louvers has 27 PDFs on his site, detailing wind tunnel runs on many different cars. I encourage everyone to read those, but I also want to do a deep dive on Miata hood vents in particular, since I race one, and compare his data with my own. Let’s get into it.

Commercial Vents

When it comes to Miata hood vents, the shape of the hood dictates the shape of the vent to some degree. First, because there’s a bump in the middle of the hood that’s difficult to work around, and second, because there are support structures underneath.

Take a look at the following picture of Gutentight louvers installed on a NB hood, and you can see the reason the vents are shaped the way they are; to preserve the support ribs under the hood.

RGR is another company making similar louvers with the same strategy: keep the support ribs. This makes for easier installation, because there’s just a single layer of sheet aluminum to cut through, but it sacrifices some of the venting area.

RGR louvers are priced well, and preserve the support ribs on NA/NB hoods.

Is it important to preserve those support ribs? Kinda. The hood is aluminum, and if you delete all of the supports underneath, the skin is too floppy on its own. So keeping some of the ribs makes sense, but you certainly don’t need all of them.

Spiked Performance hood vents require cutting out one of the support ribs on each side. This makes for a larger vent, and is still structurally sound. However, Spiked doesn’t include a vent in the middle of the hood directly behind the radiator. If you’ve read the PDFs on the Race Louvers site, you know that venting directly behind the radiator is the most important area to vent!

Which brings me to Singular, who makes a three-piece louver that’s like the Spiked vents on the sides, but also includes a center vent . It’s a smart design that I tested in a wind tunnel. They worked well, and you can read about that in my wind tunnel report.

If you’re going to keep most of the support structure underneath, that about wraps up the options for Miata hood vents. However, there are some hood vents that aren’t constrained by the OE hood supports, and designed to put as much venting as possible directly behind the radiator. This will provide the optimum performance, but you pay for that twice: more money and a more difficult installation.

Among this variety of hood vents you have products from Trackspec and Race Louvers. For $330, the Trackspec louvers are priced well, but I haven’t seen them in person, so I don’t know how far above and below the surface the louvers extend, and that’s a very important variable.

Trackspec louvers have a lot of surface area, and should perform well.

If you dig into the Race Louvers reports, you can see that the height of the louver is important, and that more is height is better. However, the distance the louver extends below the hood is equally important, and many manufacturers ignore that aspect entirely. So until I get my hands on some Trackspec louvers and measure them, I’ll have to reserve final judgment.

Race Louvers

Which brings me to Race Louvers, and the two types of vents they offer for NA/NB Miatas. The first is a double vent called the XL. Compared to other side vents, these are quite large and universal, meaning not specifically designed for a Miata.

The XL vents just fit around the center bump on a NA/NB hood.

Race Louvers also sells a center vent that can be paired with two smaller side vents. You end up cutting out the center hood bump, and a lot of the support structures underneath.

Center vent and side vents before installation. Like most metal louvers, you bend them to the desired angle after installation.

So how do the vents compare? If you look at the data from Race Louvers, you can see that the triple vent out performed the double vent, with more downforce and less drag. However in radiator pressure differential (which we can interpret as cooling benefit), the XL side vents were slightly better (data not shown here).

Image from Race Louvers

Let’s ignore cooling for now and just look at the performance numbers. The double vents made about 25 lbs of downforce at 100 mph, and added two pounds of drag. The triple vents had 35 pounds of downforce the same speed, and only one pound of drag.

Why the difference? Probably it’s the efficiency of the center vent. The most important place to extract air is directly behind the radiator, and side vents just aren’t as effective as a center vent.

Note that more downforce is possible using the taller RX louvers. The louvers Al tested on this Miata were NASA ST/TT 4-6 legal and only 3/8” tall; if your car is unbound by silly racing rules or in NASA ST/TT3 and faster, you can use the full-height RX louvers and gain more downforce.

So how did the Singular triple vents compare to the Race Louvers triple vents? They made almost half the downforce, at 16.5 lbs, and reduced drag by 3 lbs over Race Louvers. That drag reduction is worth about .6 hp, and not a bad tradeoff. Whether you want double the downforce or half a horsepower is up to you, but I would personally take the downforce.

But these were two different Miatas on two different days, and so there may be some minor differences associated with that. Both cars had the same 9 Lives Racing front aero, and I’d guess the variability between the cars isn’t worth a re-test.

DIY Solutions

If you’re more concerned with price than performance, or need to work your hood vents around a custom motor swap, then you may want to design your own. One thing I learned from the JKF Aero course was that you don’t absolutely need louvers, you can make a big gaping hole in the hood, and it actually works quite well. The main problem is a loss in rear downforce from turbulent air exiting the duct, but that can be an acceptable trade for more front downforce.

Hood vents in general have been shown to reduce rear downforce, but it’s less than a 5 lbs at 100mph. It’s unclear how much of that is due to the leverage effect versus dirty air hitting the wing, but in either case, the loss in rear downforce is usually so negligible that you can ignore it.

My Miata has a Hayabusa swap from Spec13, and the engine sits quite tall at the rear of the engine bay, but leaves the front completely open. For an application like this, a fully ducted extractor hood makes more sense than hood vents. Although I will still need vents on the side of the hood to make sure the engine bay itself is cooled, from the heat dumping off the headers.

For side vents, the obvious solution is Race Louvers, but the cheapskate in me isn’t ruling out 3D printing, Amazon shit, or just using a can opener on the hood.

Cheap vents like this work better upside down, with the vents sticking up proud of the surface, not below. Don’t install any vents so far rearward such that high pressure air from the windshield reverses the flow.

Best practices

The number one piece of advice I can give you is to buy Race Louvers hood vents, they have been designed to outperform every other hood vent on the market, and the data is clear in this respect. For the cheap bastards who DIY their own aero (ahem, my people), here are some guidelines.

  • The rule of thumb for hood vent placement is to go as wide as you can, starting the vent 2″ behind the radiator. The vent should extend no further than 20″ from glass in the center, 15″ on the sides. Bigger is better so long as the vents are behind the radiator and not too close to the high pressure cowl area.
  • Use louvers that extend both above and below the hood. The larger the louver, the better the performance. Note that if you race in NASA, they complicate the shit out of it. In ST/TT 4-6 louvers are limited to 3/8″ height above the surface of the hood. In ST/TT 2 and below, hood vent size is unregulated. In ST 3, you need to use the ST 4-6 rules if you choose BTM aero, otherwise use the ST 2 rules. Sigh.
  • Add a 1″ tall vertical Gurney flap in front of the hood vent opening (although see above if you race in NASA). A taller Gurney adds more downforce, but there are diminishing returns, so stick with 1”. Note that on a poorly designed hood vent (what Al calls time-attack style), a Gurney flap will only add drag, so don’t bother.
  • More is better: More height, more depth, more area. Don’t scrimp on the size of the vents.
  • Duct the front of the radiator, so that all the air goes through the rad and not around it. You can use canvas instead of sheet metal, which survives crashes better.
  • Seal all gaps in the nose. Air that enters the engine bay bypasses the heat exchangers and pressurizes the engine bay. This creates lift and reduces cooling.

Reader’s Rides: Brad’s Bolt-on Aero Recipe for a ND Miata

If you read Grassroots Motorsports, you’re probably familiar with Andy Hollis’ Triple Threat MX-5 Miata. This is an ND2 Miata that has evolved over time to showcase the benefits of small, incremental improvements to suspension, safety, and brakes, while serving as a test bed for various wheel and tire combinations. These basic modifications enhance performance on track without sacrificing much comfort on the street. I’ve followed this GRM build, this has been much of my philosophy with my ND Miata too – take a simple approach to modifications to have an HPDE and time trial competitive car that can still be enjoyed on the street. 

Having owned several older Miatas over the years, I now strongly prefer mine to have a warranty, cold AC, Apple CarPlay, and 40 mpg fuel economy. I roll up to the track, turn a few knobs, put down a lap, and drive home in relative comfort. For me, I consider this to be the sweet spot for enjoying motorsports in a relaxed capacity. No wheel-to-wheel racing risks. No dedicated race car towed with a truck and trailer. A casual approach with a dual-purpose car checks several boxes, keeping costs relatively low. But when time trial competitors take a more serious approach, sometimes it requires stepping outside of that comfort zone.

Brad’s ND1 was a frequent winner at Pineview Run, and the pair of them won the Pineview Challenge Cup championship. Here he is in his ND2, photo credit: Derek Palmer Creative

When I started running time trial style events at Pineview Run a few years ago, I relied heavily on “cheater tire” mechanical grip and driving my ND1 Miata in a way that only an extended drivetrain warranty and a AAA membership could permit. I didn’t want to potentially sacrifice reliability with additional horsepower and I didn’t want to disfigure stock body panels with lips, vents, and wings.

During this phase of aero reluctance, I still managed to get good enough at the short course to set a class record, win my class, and the overall Challenge Cup series championship for 2021. Pineview (at least in its legacy short course configuration) is a very Miata-friendly track. The past three champions can confirm. 

I’ve since moved back to central Florida and consider the Florida International Rally and Motorsport Park (or better known as the FIRM) as my new home track. The FIRM is a fun and challenging track in its own way, but makes me really miss having some elevation changes. For the most part, the layout favors horsepower, not Miatas.

The main straight is more than three times longer than the one on Pineview’s original 1.1 mile short course. There’s just more speed available to make a strong case for aerodynamic assistance. And that’s what many of my TT5 class competitors have opted for – big wings. When you see these wing-equipped cars running nearly four seconds faster, you realize it’s time to stop being so stubborn about aero. 

At this stage, I had a stiffer front anti-sway bar and a set of Sakebomb Garage tuned Ohlins DFV coilovers – which I give most of the credit for shaping what a dual-purpose ND2 Miata should be. The stock dampers and springs on NDs just make them downright hazardous. The softness can be masked with a good 200 treadwear tire, but quality coilovers absolutely transform these cars. Eliminating the unpredictability of stock suspension allows the car to communicate and quickly inspire more driver confidence and control. If you’ve ever been at a track day and seen an ND do a tank-slapper following some oversteer correction, I’ll bet it was on bone stock suspension.

Pre-aero time trial at the FIRM, photo credit: TRJ Photography

During pre-season testing at the FIRM, I barely broken into the 1:19s on 15-inch 225 Yokohama A052s. I knew the addition of aero would be necessary to chase some of the faster cars in my class, but I still wasn’t quite ready to start drilling holes in my three-year-old Miata.

In early 2023, I finally broke down and purchased a Nine Lives Racing Big Wang kit. I also found a spare trunk lid on eBay to be the sacrificial new home for the 68-inch rear wing. The downside to this trunk-mounted wing setup is a lack of rigidity due to flimsy hinges, but in the spirit of a dual-purpose street car (and not wanting to permanently draw Fast and Furious style attention on the street), trunk lids with an extra pair of hinges can be swapped in a matter of seconds by undoing four 10mm nuts from the interior of the trunk.

Properly dressed with wing and splitter, photo credit: Tom Beers Photo
.

In order to balance out the new massive rear wing, I picked up a sheet of half-inch birch plywood from Home Depot and spent a weekend in the garage building a basic splitter. To be honest, this wasn’t something that I did a ton of research on before just diving in. I would have been content to buy a splitter kit designed to complement the rear wing, but there still isn’t much available in the aftermarket for ND splitters. Thanks to some helpful posts in the MX5 ND Track & HPDE Junkies Facebook group, homemade examples aren’t hard to find and duplicate. For ND owners who track, and aren’t afraid to rub through some fender liners, this is a fantastic community of like-minded members.

The chassis-mounted brackets were constructed with 1×1 inch angle aluminum – the height of which determines the splitter’s proximity to the ground. I targeted around four inches of generous ground clearance on stock-sized 17 inch wheels and tires, but this drops down half an inch when switched to my 15×9 setup.

I gave the splitter blade roughly 3.5 inches of length beyond the bodywork and painted it with some cheap exterior latex paint. I used garden edging and a cardboard-traced strip of 1/8-inch HDPE from Speedway Motors to make an air dam – sealing the gap between the splitter and front bumper that now lacked the OEM Club lip. Overall, this DIY effort is still in the Occam’s Racer D+ grade range, but similar to the trunk lid, it can be quickly dropped with the removal of four bolts. It also helps that it was built for less than $150 in materials. 

The 2023 Time Trial series season at the FIRM was still a struggle to try to get to the front of the pack, especially during the summer with a heat-intolerant tire like the A052. I played with rear wing AOA, stiffened rear suspension to leverage the dose of downforce, and even reluctantly cut some holes in the hood to further optimize my basic splitter.

But after putting it off for so long, I’ve become a firm believer in aero. I initially noticed a slight drop in top end speed, but looking into the data, more than a second was found with the increased cornering speed. 

Speed trace showing aero (blue) vs no aero (red). Notice the smoothness through T4 – more speed on entry and quicker to get back on throttle. Aside from the hairpin (T7), approximately 4 mph more minimum speed per corner and nearly 6 mph more through T8!

I’m pretty pleased with the personal improvements made during the season, but the car still wasn’t fully optimized for the TT5 class, leaving some headroom for horsepower, and tire width. I ended up placing third in class overall without doing anything to the stock engine – mostly in an effort to preserve the allegedly fragile manual transmission.

But the FIRM demands horsepower. So for 2024, the car got a header, tune, and full exhaust. The updated dyno numbers didn’t show much in peak power, but looking at AIM data, there’s certainly a slight improvement to corner exit acceleration. I’m still running a 225 tire, but made the switch to a more forgiving RE-71RS.

Engine mods and a more forgiving tire brought peak speeds up and dropped another 1.2 seconds. Cleaning up T8 could have yielded a 1:16 lap. 

The FIRM management made the wise decision to avoid scheduling events amidst the blazing summer temperatures in Florida. But once things cool off, there are still a couple more rounds of time trial competition remaining this fall. I believe I’m on target to run my first 1:16 on this combination of aero and a modest 10-15 hp bump over the stock engine. This was a lap that seemed impossible to me a couple of years ago – especially with what I still consider to be a casual approach to track driving, data coaching, and aerodynamic “development.” 

To summarize my rudimentary introduction to aero: a little bit goes a long way. It’s certainly a slippery slope, but you don’t need to run some wind-tunnel-perfected setup on the first pass to see significant results. My Miata still has a basic, user-friendly aero-on-demand package.

Could it go faster with more expensive, race-focused improvements? Totally. Do I want it to become a car that loses streetability and lives on a lift or trailer? Absolutely not. Maybe this is an easy stance to take on a car that still has less than 30,000 miles on the odometer. Perhaps I can get away with drilling a few more holes while retaining a reasonable trade in value. But in the meantime, I’ll keep enjoying the best of both worlds. 

Thanks to Brad Alderman for this guest post, and proof that you can have your aero, and eat it, too. If you have an aero success story of your own, or car you want to brag about, see the details in Reader’s Rides.

Tire Test: Is the Armstrong Blu Trac Race the Best HPDE Tire?

This tire test starts with a rant; bear with me for a minute while I get this off my chest.

Once upon a time, treadwear (UTQG) meant how long the tire would last. A 300 TW tire lasted longer than a 200 TW, which in turn lasted longer than a 100 TW. Grip was inversely proportionate to wear, and so 100 TW tires gripped more than 200, which gripped more than 300. Makes sense, right? Wrong. That ship has sailed, and it ain’t coming back.

These days treadwear values are total bullshit, especially in the popular 200 TW category. Back when treadwear meant something, honest 200 TW tires, like the Falken RT615k, Nitto NT05, Yokohama AD08R, and other similar tires lasted 20+ hours on track, had good heat tolerance, and respectable speed. Crap can racing series like 24 Hours of Lemons and Chumpcar standardized on the 200 TW tire, and you could chose any of them with relative fairness.

But the landscape completely changed when autocross-specific tires came out, such as the RE71R and Rival 1.5S. Like endurance racing, most autocross classes also require 200 TW tires, but with only half a dozen 45-second runs per day, durability didn’t matter. So the autocross “Super 200” tires were developed and became a completely different animal than any 200 TW tire that came before.

Because autocross is a competition, every autocrosser wants the fastest 200 TW tire. And since treadwear values are set by the manufacturers, they can take a domestic 140 treadwear tire, write 200 on the sidewall, and sell it in the USA as such. And thus began the idiotic 200 TW tire wars where tires got faster, less durable, and the treadwear number remained the same.

The result of that is you can buy a 200 TW Falken 615K+ that last two to three times longer than the 200 TW Falken 660. Bridgestone, Nankang, and Yokohama also offer an endurance 200 TW tire that lasts three times longer than their 200 TW autocross tire. And yet they all have the same treadwear rating. So much for treadwear meaning anything about wear.

So does 200 TW mean there are now two classes of tires? No. Because there are also tweener tires like the Kumho V730 and Nexxen Sport R, which are part way between an enduro and autocross 200. And then you have Accelera, Kenda, and Valino, who offer bargain 200 TW tires that are slower, but cheaper, than the enduro 200s.

Which brings me to a brand new 200 treadwear tire, the Armstrong Blu Trac Race. It’s certainly a bargain 200 TW, but I was curious to see whether it was also an autocross or enduro 200 TW. Or something else.

Armstrong Blu Trac Race

You may not have heard of Armstrong tires; I hadn’t. They are available through Tire Streets, who deal in lesser know brands, mostly from Indonesia, I believe. If you are in the drift community, you know Accelera tires, which are the official tire of the LZ World Tour. If you’re outside the drift community, you may not know Accelera or Armstrong or Tire Streets.

I ordered the 235/40r18 size, which were on sale for $135 each, shipping included. This is about half of what most 200 TW tires cost, and so you can see we are clearly in the bargain 200 TW segment.

The first thing I noticed about the Blu Trac is that the tread pattern looks a bit like the venerable Nitto NT05. There are two very wide center grooves, and a symmetrical tread pattern, so you can flip the tire on the rim and get a little more life out of them.

Armstrong Blu Trac Race

When new, they give off a low whoop-whoop sound like a helicopter. I found a resonant frequency at about 35 mph that was uncomfortably loud. But once the tires wore down some, the sound level went down to where I stopped noticing them entirely.

But the street is no place to test a track tire. To properly evaluate them, I’d need to take them to a racetrack, record lap times and G forces, and compare them to a known quantity. Before doing that, I heat cycled them with a few laps at Pineview, and let them sit for 24 hours.

Kumho V730

To see if the Blu Trac were any good, I compared them to Kumho V730s. I’ve been using the V730 recently, and I feel they set a new standard for track tires. I used to feel that way about RS4s, but a ridiculous sale price on the Kumhos got me to try them, and the gain in grip is an acceptable tradeoff for increased wear.

The V730 tread pattern isn’t symmetrical, and is similar to another ancient Nitto track tire, the NT01. Now there was never anything wrong with the NT01, and I think Nitto could have written UTQG 200 on the sidewall and nobody would have blinked.

V730s are well regarded in the track community, and inhabit the tweener space between autocross tires and enduro tires. The smaller tread grooves disappear quickly, leaving two off-center groves that could be mistaken for a Maxxis RC1. Like the RC1, these won’t work well in the rain. But I have other tires for that.

Pirelli PZero PZ4

To make this more interesting, I’ll also throw in a set of Pirelli PZ4 tires, which I bought specifically as a wet tire. The Veloster N originally came with PZ4s, and most comparison tests put them on par with the Michelin PilotSport 4S and Continental ExtremeContact Sport. The PZ4 is rated at 280 TW, and is not a dedicated track tire. It’s a good street tire, OK on a dry track, and great in the wet.

Track testing

For tire testing I go to Pineview Run, mostly because I’m a member and can go whenever I want. It’s empty on weekdays, so I can run as many laps as I want. They run a much shorter track during the week, and so I can get a lot of laps and normalize the data.

I use a pyrometer to properly set tire pressures, and bleed them down to get an even gradient, slightly hotter on the inside. I use an AiM Solo DL for lap times and data gathering, and then convert the lateral Gs into a CSV file. This way I can average the various peaks and valley, to find a more stable lateral G value.

I did the testing over two days, doing back to back runs an hour apart. Pineview runs their track sessions on the hour, and so I couldn’t get sessions any closer than that. However, weather conditions didn’t change much, and so I don’t think that was much of a factor.

All of the tires were mounted on 18×8.5” wheels. The Kumho tires were mounted on Koenig Countergram +43, and the Pirelli and Armstrong tires were mounted on Motegi MR140 +45. The wheels are all within half a pound of each other, and I feel the offsets are close enough that the differences will be down to the tires themselves.

But note that I also threw in a mismatched set of tires, to see how the V730 front and PZ4 rear would work. I reckoned that less rear grip would allow me to rotate the car easier, and perhaps set the fastest time. But it didn’t.

TireLap
Armstrong Blu Trac Race46.596
Pirelli PZero PZ445.401
V730 front, PZ4 rear45.030
Kumho V73044.616

The fastest lap was the Kumho V730 all around, going about four tenths faster than the cocktail with the PZ4 on the rear. The handling with mismatched tires was a little too loose for my tastes, and I even spun the car once with the Pirellis on the rear.

With the PZ4s front and back, I went .8 seconds slower than with V730. People love to hate the PZ4, but it’s not a terrible tire. Compared to the V730, the PZ4 is noticeably less sharp everywhere, but especially on turn in.

Which brings us to the Armstrong Blu Trac Race, which where 1.2 seconds slower than the Pirelli PZ4, and a full 2 seconds slower than the V730. On a longer race track with a more typical lap time of 90 seconds, Blue Trac Race would have you 4 seconds off the pace of the V730.

If you look at the following speed trace, you can see where the Blu Trac (blue) loses out to the PZ4 (red) and V730 (green). Blu Tracs have a corner speed that’s similar to the PZ4, but I’m consistently later to throttle on these tires, which results in a lower top speed. The Kumhos have more grip and allow me to maintain a higher minimum corner speed, which results in the fastest lap times.

Speed trace with Armstrong (blue), Pirelli (red), and Kumho (green).

But let’s talk about how the tire feels and wears. I really like the way the Blu Trac Race tires break away early, and are predictable when sliding. I often use all-season tires for hooning, and the lateral Gs of the Blu Tracs are similar. The difference is, Blue Tracs have fewer grooves and wider tread blocks, and these combine to make a really friendly tire that begs to be driven sideways.

Pineview has a rough surface with a lot of right turns, and so the left tires get a lot of abuse. My Veloster is front-wheel drive, and the combined braking, accelerating, and turning with all the weight on the nose absolutely murders the front left. As such, I ruined my Pirelli PZ4s in just seven 15-minute sessions. I had bought them for rain use, but the forecast was wrong two Wednesdays in a row, and I ended up eating the tires before I got to use them in the rain.

Front left tire on Blu Trac Race shows even wear and no blisters, with plenty of life left. Front left Pirelli PZ4 is in the trash.

Conversely, I ran eight sessions on the Blue Trac Race tires, and they are wearing superbly. They certainly have the durability to last an endurance race, but you’d be well off the pace of everyone on RS4s. However, there’s a better use for Blu Trac’s than racing.

The best HPDE tire?

I started this article by wondering if the Blu Trac Race was an endurance 200 or a Super 200. But what I found out was, it’s neither. It’s a HPDE 200. Yeah, that’s right, I’m starting a new category of 200 TW tires, and I’m putting the Blu Trac in there at the top.

HPDE stands for High Performance Driving Education, and if you want a tire that is exceptional for learning how to drive, this is your tire. The lower grip, predictable breakaway, and durability combine to make a tire that is perfect for the E in HPDE.

Armstrong Blu Trac Race tires are not going to win any timed competitions. Full stop. But they will help you learn how to drive your car at the limit, because the limit is lower, easy to find, and easy to recover when you invariably go over.

My Veloster N is a well balanced car that doesn’t know it’s FWD. In fact it pushes less than many RWD cars. I can pitch it into a corner and get a four wheel drift, easy-peasy. Ergo, driving it on tires that have less grip is actually more fun. No tire has put such a big smile on my face as the Armstrong Blu Trac Race.

At the end of the session, many people came up to me to tell me how fast my car looked (because it certainly wasn’t fast on the stopwatch). And I think this was down to the car sliding everywhere, and just how loud the tires are. See and hear for yourself.

This is what fun sounds like.

In the following video, I do some laps in front of and behind a Mitsubishi Evo X. He’s got a 400 hp tune and Kumho V730 tires; I’m 130 hp down, driving a stock Veloster N, with Blue Trac Race tires. I point him by part way through the session, and I’m able to keep a similar pace. So a decent driver can wheel the shit out of these tires and run with faster cars on better tires. And have more fun in the process.

Veloster N Blu Trac vs Evo X V730

Note this is on the shortest track layout at Pineview, which is about 6 seconds faster than the lap times in the previous table. To learn more about the track, see Pineview Run Layouts.

If you appreciate articles like this, and websites with no ads, no pop-ups, or other annoying shit, consider buying me a coffee. Thanks!

Veloster N Lowering Springs, Splitter, and Diffuser Undertray

Earlier this year I installed ARK lowering springs, which lower the car 1.25” front and 1.15” rear. I chose ARK springs because they are only slightly stiffer than OE springs (134% stiffer front and 125% rear), and that should allow me preserve the Veloster’s decent road manners. Most lowering springs have a higher spring rate than ARK’s 263 F and 336 R, and would beat the shit out of me on potholed New York roads.

I chose lowering springs over coilovers mostly for the price ($250 on FB marketplace), but also because I like messing around with the OE shock settings. I set my N Custom mode for medium stiff suspension when on track, but can quickly soften the suspension on the touch screen, for rain or street.

Lowering springs alone can reduce roll stiffness and increase bump steer, so they aren’t always a performance benefit. So I also installed the Whiteline front roll center bump steer correction kit. As near as I can tell, the combination of lowering springs and Whiteline kit have improved the handling, and I don’t feel a hint of bump steer or any negative handling traits.

I tested the lowering springs in the A2 wind tunnel, and it resulted in less drag and less downforce than when the car was on OE springs. If you’ve read my wind tunnel report, you’d know the Veloster makes a little bit of downforce, straight from the factory. With the lowering springs, this turned into a small amount of lift, mostly on the rear. That was surprising, as I expected that lowering the car would increase front downforce, but the front also lifted a little.

Lowering the car also reduced drag, which was probably a result of less frontal area and less air going under the car. It’s not a huge change (.014), but the result of both drag and lift shows a very, very slight aero advantage over the base car.

One caveat is that I didn’t use the same wheels and tires on my second trip to the wind tunnel. I made a mistake and had my track wheels and tires (18×8.5 +43 with 235/40R18 tires) rather than the OE wheels I used on my previous trip to the wind tunnel (19×8 +55 with 235/35R19 wheels). This put the tires 18mm (3/4”) wider on each side, and could account for some of the difference in lift, but not drag reduction.

New splitter mounts

I also improved the splitter mounts both in front and in the rear. I placed the support rods further apart on the bumper, which reduces the angle of the rods. The rods are turnbuckles from the Lowe’s racing department, allow easy height adjustment, and with 3/8” bolts, are plenty strong.

I also made a new aluminum rear undertray and added a full width piano hinge to it. Thus, the entire splitter can be adjusted via the splitter rods, which changes the height and angle of attack on the splitter.

Splitter has wider support rods and a hinged undertray.

But the lowering springs are too soft or too low, because the splitter touches down on bumps and compression turns. In fact the vortex strakes I put so much work into have now been ground down to insignificance.

Vortex strakes clearanced out on the asphalt grinder.

I figured I have three choices going forward:

  • Revert to OE springs – The lowering springs aren’t much of a performance benefit, and if I had to do it all over again, I wouldn’t.
  • Coilovers – Digressive coilovers with heavier springs would swallow hard bumps on the street and curbs on track, while allowing stiffer springs. I’d also be able to corner balance the car, and change ride height. And I could still change suspension compliance, just not from the touch screen.
  • Remove the splitter – It’s been grounding out on steep driveways and on track, so I could just remove it. But I want more front downforce, damnit! Can I have my cake and eat it, too? What if I made a front undertray that fits exactly the same as the OE undertray, but has a built in diffuser? Hm….

Diffuser undertray

Digressive coilovers are the obvious choice going forward, but for the sake of experimentation and another DIY project, I decided to make an undertray with a diffuser. This won’t make as much downforce as a splitter, but it’s also completely tucked up and won’t hit anything, and invisible from the outside.

I started by tracing the OE undertray onto scrap aluminum. A single piece of aluminum would have been best, but I didn’t have anything 63” wide, so I pieced together three street signs. I get street signs from my local metal recycler for $1 per pound, and so this represents about $10 in materials.

I then cut out the general shape and drilled the mounting holes. To create the curve of the diffuser, I clamped the aluminum down to the table and alternately leaned on it and tapped with a hammer to create a curve. It looks like a single bend in the picture, but it’s actually three bends, with a gradual radius.

Diffuser kick is gradual.

There are little aluminum ramps, sort of a Z-plate, that connect the flat portion in front of the wheels to the curved section in the middle. You can see those little triangles in the previous (blurry) image. These are fastened with rivets.

Aluminum signs riveted together.

I guessed at the shape and length of the diffuser, and guessed wrong. It took a few tries to get the shape of the trailing edge, because the oil pan and intake plumbing are in the way. While doing that trimming, I also decided to add a hole for oil filter access. I later taped over this, and so accessing the oil filter is as simple as removing the tape.

Final shape of undertray, compared to OE.

The undertray attaches at the OE mounting points, but I replaced the plastic pop fasteners with 6mm speed clips. I used long countersunk Allens for the four bolts that attach to the radiator bracket. It’s fuggin solid.

How will it work? It’s hard to say, but I’ll make a guess. A flat splitter was 132 lbs of downforce at 100 mph, while the curved splitter was 163 lbs. So the diffuser portion alone might be 30 lbs of downforce, and when coupled with the differential in front pressure… let’s call it 60 lbs of downforce.

Splitter curvature (and/or vortex strakes) also contributed to a significant reduction in drag (.019) that resulted in a gain of about 3 hp vs the flat splitter. So the diffuser undertray may have some drag reduction, as well.

As DIY projects go, this was a satisfying one. It cost me $10 in materials and was finished by lunchtime. It weighs only 2.5 lbs more than the OE plastic, and is just as unobtrusive. The diffuser likely confers a performance benefit in both downforce and drag, and would probably pass scrutiny for a street (unmodified) class. I’ll take that as a win.

There are some racing rules that specify a flat splitter, but say nothing about the undertray (SCCA STU, for example). A clever person could add a flat splitter in front of this type of undertray, and get the full benefit of a fully curved splitter, while also adhering to the written rule. Likewise, there are some racing rules where a splitter costs some performance points, but you can add an airdam and (unspecified) undertray for less. Undertray diffusers FTW!

If I Designed a Race Series…

Northeast GT recently decided to cancel or at least rethink their new racing series after just one race. A lot of people were initially interested, and the 30+ cars that entered the first race at Thompson was a good sign. But only 8 cars signed up for the second race, and so they’ve cancelled the series.

It’s difficult to understand why this failed, but it’s possible they didn’t get the classing done correctly. Originally there were five divisions: 14:1, 11:1, 9:1, 7:1, and unlimited. I remember the early discussions on Facebook, and I was one of the minority that said they needed a slower class than 14:1. I also felt that 7:1 and Unlimited were silly, because of closing speeds with other cars. Six months later they removed the Unlimited class and added a 18:1 class, but by that time, I wonder if people even noticed the pivot.

So it got me to thinking, If I was going to design a new racing series, how would I do it? Well I wouldn’t have people build cars to a new and untested set of rules; I would make a series for cars that are already racing in the most popular classes.

I’d have the same rules for both wheel-to-wheel and time trials. This is just like NASA has done with ST and TT series, that use the same rules for both racing and time trials (TT). This is also similar to GLTC and Club TR, with the time trial division being a feeder class into racing. The classes would go something like this:

  • B-Spec and Sundae Cup – The fastest growing SCCA class, plus the popular Grid Life time trial class.
  • Clubman – Spec Miata, SE30, 944 Spec, ITA, ST6, HC2, and others of around 18:1 lbs/hp. Plus a time trial version of the same.
  • Touring – A combination of the GLTC and NASA ST4 rules, with Club TR and TT4 for the time trialers.
  • TA – Faster time attack cars.

B-Spec / Sundae Cup

In my fantasy racing series, the slowest class would be combination of B-spec and Sundae Cup. B-Spec is a class for front-wheel drive hatchbacks like Honda Fits and Minis, and it’s the fastest growing SCCA class. The number of cars on the grid is astounding, because the enthusiasm for these little cars far outweighs the performance.

You can see the same thing in Grid Life’s Sundae Cup time trial class, with lots of people excited about racing the slowest class. Sundae Cup doesn’t specify FWD cars, but most of them are, and with a 25:1 lbs/hp cap, the performance is quite similar to B-Spec. If you put a B-spec and Sundae on the same tires (or vice versa), they’d be very close in performance, and whatever difference could be adjusted with a small amount of ballast.

So there’s your first class, which would encompass one wheel-to-wheel division, and one time trial. Competitors could start in the time trial class and then as their skills improve, they can cage the car and enter wheel to wheel racing. Or not.

Clubman

If you go to a NASA or SCCA race, the most popular class is Spec Miata, and so it makes sense to have a class based around Spec Miatas, and any car with the same level of performance. If you look at lap times, SE30, and 944 Spec are nearly identical to Spec Miata, so right away you have three different cars racing in this class, and that should fill the grid.

So what else fits here? SCCA has classes like ITA and H Production that are similar in performance to Spec Miatas, and I’m sure there are other classes in NASA (H2 maybe) that do similar times.

This class would also include pretty much any car with 18:1 lbs/hp. I’d include NASA ST6 here as well, even thought it’s a 19:1 class. But because they measure average horsepower over several data points, it’s closer to 18:1 anyway.

Naturally, there would be a time trial division for this class, which serves as the feeder series for wheel-to-wheel racing, or as the end point for anyone who simply wants to race in a time attack format.

Touring

The fastest wheel-to-wheel class would be a combination of two very popular classes, Grid Life Touring Cup and NASA ST4. If you don’t know what GLTC is, you must be under a rock, because it’s got more excitement and momentum behind it than any other wheel-to-wheel racing series. Grid Life has a time trial series called Club TR, which has similar performance to GLTC, and it proves how popular cars with this level of performance are.

GLTC is based on 12.5 lbs/hp, with various modifications taken for engine performance, aero, and the like. This allows cars from Miatas to Corvettes to compete equally, and number of interesting builds is remarkable. The racing is close (at least in the mid pack), and it’s just so fucking obvious that this is the way forward.

NASA ST4 is a class with similar performance, and the time trial version, TT4, is even more popular. In fact I believe Hyperfest is based on the TT4 rule set. So if you add the GLTC and Club TR people to the ST4/TT4 people, you have a winning formula. I wouldn’t have a faster wheel-to-wheel class than this, because Grid Life doesn’t, and they are fucking killing it.

Time attack 1 and 2

I’d also have two classes for faster time trial cars. These probably would be based on NASA TT2 (10:1 lbs/hp) at the lower level, and then one unlimited class, but I’d be open to ideas. I don’t really follow this level of time attack racing, so I’d have to see what is the most popular, and then make two classes based on that. But it’s clear that time trial racing is popular, and 12.5:1 ish isn’t fast enough in the non-racing category.

Conclusion

I guess Northeast GT expected people to build cars from scratch to their unique rules, rather than allowing people who are already racing to simply show up and race. Do you race in Spec Miata? Show me your log book and you’re in Clubman. Do you race in GLTC? Show me your log book and you can race in Touring. Have you built a time attack car that fits into one of the classes? Let’s fucking go! My fantasy racing series would bring together the most popular race cars into an endurance racing format, without reinventing the wheel.

Aside from the classing, I think Northeast GT had some great rules and a neat weekend format with short endurance races. Every weekend included a free race school as well. I especially liked their aero rules, and would work some version of that into my fantasy race series.

The people behind NEGT, Nick and Armin, are good people. They hosted a free two day Instructor Fest earlier this year, and were brave enough to try something new, from scratch. I know more great things will come from this idea factory.

The most recent communication is that there may indeed be races next year, so the series isn’t yet kaput. This year there will be a Corner Faster day at Palmer on Sept 22. There will be racing, time trials, and tracking, and it looks like a fun time. I guess I have to finish Falconet if I’m going to make it there in time!

Veloster N Aero Builds and Lap Times

As a follow up to the previous post, I wanted to see how much aero was worth at various race tracks. To do this, I’ll build a Veloster N at three stages of aero development, and see how they compare in OptimumLap. Let’s call these aero packages OE, Sport and Track.

OE aero is simply the car as delivered. If you read my wind tunnel report, you’ll know the coefficient of drag is .421 and the coefficient of lift is -.027. The drag is higher than you’d expect, and the fact that the car makes a little downforce straight from the factory is remarkable.

Sport aero consists of parts you’d drive on the street, so I’ll add lowering springs, but not a splitter, because that would take damage on driveways. I’ll add top and bottom canards to get more front downforce, and I’ll balance that out with a wicker/kicker on the spoiler. Wind visors worked really well on my VN, so let’s add those, too. Given these modifications, we have a car with around .50 drag and -.50 downforce, not bad.

The more extreme aero kit I’ll call Track aero, and this is my curved splitter and a wing, plus hood vents. I’ll keep the canards as well, and this brings the drag up to an even .60 and downforce to 1.00.

Note: The Veloster N hatchback isn’t very efficient when used with a wing. As a result, most wings I tested are worse than a 4:1 L/D ratio, which is pretty awful. Sedans and coupes would return much higher L/D ratios, and I’ve seen 8:1 or even 12:1 L/D out of a wing. So the aero builds in this article represent a worst-case scenario, and one can surely do better using a different car. But since I own a Veloster N… it’s my party, I’ll cry if I want to.

I’ve tested all of these parts in a wind tunnel, and so the drag and downforce numbers are accurate to within a couple percent, even though it looks like I’m just choosing round numbers. To compare lap times on each aero build, I’ll throw them all into Optimum Lap and see the time deltas for different tracks. In the following table, the numbers represent the time advantage per lap versus the OE aero.

TrackSport aeroTrack aero
Watkins Glen1.51.9
Palmer1.32.3
Thunderbolt1.31.9
Club Motorsports1.22
Road America1.21.25
Waterford.91.7
NYST.91.5
Gingerman.91.45
Mid Ohio.91.4
Summit Main.81.25
Thompson.71.9
Lime Rock.71.1
VIR.7.3
Pineview long.61.2
Canaan.61
Pineview short.5.9
Lap time deltas vs OE aero

From this you data you can see a couple outliers, and the most obvious is VIR. Sport aero was a .7 second advantage over OE bodywork, but Track aero was only .3 seconds faster. Meaning, you’d go faster with the Sport aero than Track aero! This is the only track where this is true, and so drag is obviously a dominant factor at VIR.

VIR: green is OE, red is Sport, blue is Track.

Drag also plays significant role at tracks like Watkins Glen and Road America, and coming up with an aero package for these tracks is more challenging, because you really need to strike a balance between drag and downforce. Knowing exactly how much downforce and drag each part makes is essential, because then you can just put the numbers into OptimumLap and find out which aero will make you fastest.

On the other end of the spectrum are tracks where cars spend most of the time cornering, which makes it quite easy to design a car’s aero: add as much downforce as you can, and ignore drag completely. For example, at Palmer, the big aero build goes a full second faster than the medium aero build, which in turn goes 1.3 seconds faster than OE aero. That’s 2.3 seconds in your pocket from aero alone, that’s awesome.

Remlap (Palmer backwards) with the same color schemes.

That same strategy can be used for any race track where there are shorter or fewer straights, and more corners. And so Canaan, and Club Motorsports, Pineview’s various layouts, and Waterford are also tracks where you’d go after as much downforce as possible, and completely ignore drag as a matter of any consequence.

In the middle of these extremes are most of the race tracks in the USA, which have both fast and slow sections, but not too much of either. Tracks like Gingerman, Lime Rock, Mid Ohio, NYST, Summit Point, and Thunderbolt come to mind. At these tracks, the lap time delta between Sport and Track aero is around 160%, and for the most part, you can again ignore drag and go after as much downforce as possible.

If you’d like to know how fast your car goes around various race tracks with different aero parts, I’m available for consultations. I can build your car, any options you choose, and simulate the lap times at any race track (I can make any track from 10hz GPS data). I charge a measly $50 per hour, and it takes about that long, so contact me if you are interested in this service.

Veloster N Aero Success Story

This is a guest post from Dan Ayd, chronicling his adventures in performance driving and aerodynamics.

I love tracking my Veloster N. However, the specter of losing control, either by incompetence or mechanical failure, terrifies me. So over the past three years I’ve been gradually improving my car’s aero, and my driving skills. 

I primarily participate in an annual high performance driver education (HPDE) hosted by the Minnesota BMW CCA chapter at Brainerd International Raceway (BIR) using the 13-turn competition course. This club runs an extraordinarily safe and well structured event over the course of three days in the first week or so of June in northern Minnesota. 

The first year, 2021, I had just gotten this car and my goal was a two minute lap measured by my Apex Pro. In 2022 I upgraded tires from the 300 treadwear OEM Pirelli PZero rubber to Nitto NT05. These are old technology, but a tried and true weekend-warrior 200TW tire, back when that rating actually meant something.I also had an alignment done changing front from 1.5° to 2.5° negative camber, and zeroed toe both front and rear toe. These changes brought my my best lap down to 1:58. 

In 2023, I got down to a 1:56.42 with only the addition of a 22mm Whiteline rear anti-sway bar. It’s unlikely this addition was responsible for a 2 second improvement so I will chalk this up to an excellent instructor, Rory Lonergan, who is an outstanding FWD-car driver, for making inroads on my skills. 

In 2023 I also started exploring car aerodynamics, mostly because of Turn 2, a flat, high-speed right-hand sweeper. I tried focusing on braking points, turn in, apex, and track out, but I found myself highly inconsistent with entry, maintenance, and exit speeds. I’m sure this is in large part due to my lack of practice–only coming to this track for two days of lapping a year isn’t enough to really improve, except in qualitative aspects like comfort with speed, noise, flags, traffic, etc. Despite the data showing manageable G forces, I simply didn’t trust the car, so I’d arbitrarily brake and/or lift at a safe speed below 100 mph. 

Turn 2 Bugaboo.

The data showed only 0.7-0.8 lateral Gs and I knew from looking at other corners, the car was capable of much more than that, more like 0.95. I never looked down at the speedometer to know how fast that was, but looking at the lap data I usually arrived at that turn around 116-117mph. There was so much going on still on the track that I didn’t have the mental currency to focus on details. I felt that by adding some aero, I could not only reduce the speed by increasing drag, but also increase lateral grip to the point that the turn would become no-lift. As in, I could floor it from the exit of turn 13 and not decelerate until braking into turn 3 almost a mile later.

I was only familiar with aero in terms of making the car slippery, but not how to use downforce to increase grip. After watching some YouTube videos by Julian Edgar I bought his book and was inspired to make a flat floor beneath the lumpiest part of my car, the rear third. 

The Veloster N comes with a front undertray that’s quite smooth and it joins up to a center section at the passenger footwells that are also quite smooth. Once past the fuel tank the exhaust and suspension are hanging in the wind followed by a stupid cosmetic “diffuser” that is probably only good at acting like a parachute. I felt that Julian’s MPG-chasing aero concepts could help here at little cost and almost zero impact to weight and aesthetics. 

I purchased sheet aluminum and wrapped the entire muffler and extended it over the edge of that parachute. I also fashioned some ABS sheet plastic covers over the control arms, and included a strake to maybe keep air going straight. I picked up a couple miles per gallon in subjective highway fuel economy, but I saw no improvement in Turn 2. 

Everyone who follows Julian Edgar’s advice wants to make a flat floor; they also seem to get the same flat results.

I shared my mods with the forum on www.velostern.com, and one of the members pointed out to me that someone he knew was buying a Veloster N and would be writing about it on his blog while he “aeroed the shit out of it.” Through this networking I met Mario Korf, and when he began writing about his Veloster N, I started following his Occam’s Racer website, reading all of his posts, messaging him directly, and listening to his guest spots on club-racing podcasts. 

What I started learning was that most street cars, especially hatchbacks, create lift rather than downforce. However, the folks at Hyundai poached Albert Bierman from the BMW M division, and with his guidance, they created a car that actually creates downforce, right from the factory. 

The use of the flat undertray and the wing-like OE spoiler resulted in car that didn’t lift at speed, and had minor amounts of downforce. Based on his session at the A2 wind tunnel in North Carolina, Mario opined that there would be huge gains to be had with a big, properly designed splitter and a wing out back and up in clean air. 

Ok, I’m in, but how do I make this stuff? I hadn’t a clue. After purchasing his wind tunnel report, reading his blog entries from the archive, and peppering the poor guy with hundreds of texts I began formulating a design based on his wind tunnel splitter.

I started by getting a 4×8 foot sheet of 5mm Meranti plywood from a local boating store. I set to work measuring, cutting, and gluing three layers together and cutting the laminated structure overnight under the weight of my car in a curved shape to resemble a wing. This was Mario’s theory of making the entire width of the splitter a diffused surface. 

Laminating the splitter and adding thickness to the leading edge, so that it can be properly rounded on the underside.

Once dried solid, I used a belt sander and began sculpting the underside of the leading edge to be rounded to keep air attached and flowing smoothly. I tapered the end to combine with the curve to reach about 13° of upward rake under the car mirroring his least draggy splitter design. It measured 67” wide and 24” long. 

The trailing edge sweeps upwards at about 13°.

I used Professional Awesome normal 6” long quick release brackets connected to custom rear vertical supports I made using clevis-cotter-pin quick releases of my own making along with their carbon splitter rods up front. These were extremely secure and allowed a small amount of angle and height adjustment.

Custom splitter brackets use Pro Awe quick release mounts.

I set it to have an upward tilt of 0.6° at the front and a height of about 4” from the ground. I initially tested the splitter in daily driving, and it seemed to reduce drag by about 10%. According to Mario’s data, it should be good for about 150# of downforce at 100 mph.

The Veloster N is aerodynamically balanced from the factory, and so adding front downforce alone would be a disaster on track; I had to add a wing. Getting a wing high enough or far enough back to get into something resembling clean air on this car isn’t easy. With the sloped glass and weak plastic shroud there’s not much support for 100 pounds of downforce without drilling holes in metal to support gaudy uprights, and I prefer a cleaner, less Ricky Racer aesthetic. 

Mario and I passed ideas back and forth as I iterated in my head. When I was in upstate New York for work he invited me to join him at his home track, Pineview Country Club, for a coaching session in his car.

Dan flogging Mario’s car at Pineview Run. You can read about that in How Experience Level Affects Lap Times.

Upon finishing, he surprised me with a gift of the wood prototype roof piece he made for a wing mount. When I got home I needed to modify it slightly to ensure air would separate cleanly above the rear window so I added a layer of Meranti plywood, sculpting and smoothing the enlarged structure so it would look good enough to make Mario proud. Now I needed to mate metal to wood attaching the wing to the car with solid and reliable uprights.

Hatchback roof extension is bolted in place and holds the wing securely.

After several rounds of mental iteration I settled on plate aluminum uprights like an F40 Ferrari with a Performance Car Innovations (PCI) V2 airfoil 48” in length. At the height I selected, 9” at the rear, 7” up front I expect it will produce around 80 lbs of downforce at 100mph. This was one of the wings featured in Mario’s wind tunnel report although slightly shorter. If I needed more downforce, I could add a 1/2″ Gurney flap and get around 120 lbs. Those figures are based on his wind tunnel testing, and should be pretty accurate.

Because the Veloster roof slopes downward, I needed to verify the proper wing angle. The folks at PCI said the wing would start stalling at around 10°. So I did tuft testing on the wing and discovered that the 3.5° angle of attack resulted in some stalling at the rear edge of the wing. So I slotted the rear holes and flattened the wing to 2.7° from horizontal, and the wing now has full attachment. 

Tuft testing to find the maximum angle before separation.

The Veloster N has about 65% percent of its weight on the front wheels, and the typical formula is to match aerodynamic balance with chassis balance. However, you’ll recall that I added a thicker rear sway bar and significant amounts of front camber, and thus moved the mechanical grip further forward. This is not good for a doofus like me, on a track that has a 100 mph turn! 

By biasing the aero at 55/45, the car transitions more to understeer the faster I go. This makes me feel safe and helps me focus on braking, turn-in, apex, and track out. Since my track car is my daily driver, this is extra important. 

Overall, the car looks pretty badass in my opinion, and the aero parts are sturdy. I can stand on the splitter. I can lay on top of the wing. This homemade crap is strong, even if it seems a bit weird to put plywood on a car!

Looking great on the track and on the street.

And at the track, the shit actually worked. Over the course of 8 sessions, or almost a hundred laps, I felt increased confidence in turn two, and the data bore this out. Lap times plummeted from 2023’s best of 1:56.42 to 1:52.42, a staggering drop of 4 full seconds. Mario predicted about 2.5 from aero alone so let’s say the additional seat time and coaching (it was a driving school after all) was responsible for the other 1.5 seconds. 

Looking closer at the data between 2022 (pre-aero) and 2024, my minimum speeds are still very inconsistent, but there are glimpses of what a new personal best if I could string them together. Slow, difficult turns like 3 and 13 were a mixed bag, and aero has little impact. The biggest benefits of aero seem to occur at turn 2, where I’m going 8 mph faster, and turn 4, where I have an additional 6 mph. In the S-turn (turns 10/11) I picked up sometimes 8 mph. I’d wager there’s another 2-4 seconds, but we’ll see next time out on the track.

T2,and T10/11 are the biggest wins.

This adventure in aerodynamics has been a huge success. My car is faster and safer, and along the way I’ve gained a friend in Mario. I’ve learned new skills in woodworking, and stoked a desire to fabricate with metal as well. Time at the track has added other friends and given me great memories, so anything that extends that is great in my book. Cheers to aero!

Wing Logic vs 9 Lives Racing

The availability of inexpensive extruded aluminum wings has changed motorsports. Ten years ago it was rare to see a wing on a budget endurance racer or HPDE car. Now they are everywhere. A lot of the credit (blame?) goes to Johnny Cichowski of 9 Lives Racing, who sells an inexpensive extruded aluminum wing that sets the standard for the industry.

When you have a winning formula, people copy you. That’s the nature of business. That’s also the nature of racing. And so it’s no surprise that someone else has created a similar product.

This new extruded aluminum wing comes from Michael Jui of Wing Logic. He got wind that I was going to a wind tunnel, and asked if I would test his product. Of course I said yes, because I want that data, and I think the racing community as a whole would like that as well. So let’s take a look at this new wing in as much detail as I can, and compare it to the 9 Lives Racing Big Wang.

Wing Logic’s chord measures about 9.8”, while the 9LR wing is 9.2” across the top. So, the Big Wang is actually the smaller wing.

The wingspans are slightly different, as Wing Logic’s comes in standard lengths of 60″, 65”, 70″ and 72″. 9 Lives makes their wings to fit certain models, but you can also order a custom length. This is important because most racing rules limit wings to body width, and so if you have a Miata, you need to trim an inch off the 65″ Wing Logic, and re-tap the holes on one side. I didn’t do that for this test, so Wing Logic has a slight advantage, with 1″ more wingspan.

The construction of the wings are pretty similar, but Wing Logic has some extra internal thickness in a couple places, and while 9 Lives uses 5mm hardware for the end plates, Wing Logic uses 6mm. The Wing Logic end plates are 3mm, which is thicker than I’ve seen anywhere. All of this adds up to a wing that is sturdier, but heavier. A 65” Wing Logic fully set up with end plates and welded bottom mounts weighed 16.6 lbs. A 9 Lives 64” wing dressed the same weighed 14.6 lbs.

Wing Logic is 2 lbs heavier.

The shape of the wings are similar, but not the same. Anyone who says Wing Logic copied the 9 Lives Racing shape is simply wrong. As near as I can tell, Wing Logic is using a CH10 (Chuch Hollinger CH 10-48-13), which is a low Reynolds high-lift aviation airfoil, while the 9 Lives Racing wing was designed as a motorsports wing from the start.

If you measured Wing Logic in Benzing coordinates it’s a Be 133-105, while 9 Lives measures Be 123-125. That means the position of maximum thickness and maximum camber are the same in both wings, and that’s why they look similar. But Wing Logic’s is thicker and 9 Lives has more camber.

9 Lives top, Wing Logic bottom

If you want to dive deep on that topic, I wrote an article on Car Wing Comparisons. Of all the wings I investigated, the most efficient was the CH10. But that is based on free stream efficiency, which means that the wing is not on a car, but just suspended in the air.

Cars are large and aerodynamically inefficient compared to wings, and when you put a wing on a car, the drag doesn’t go up that much, but the downforce does. So you usually get the best vehicle efficiency by choosing a wing that has the most downforce, not by choosing a wing for its efficiency or low drag.

Enough preamble, how do the wings compare in the wind tunnel?

Wind tunnel testing

I use the A2 wind tunnel, because for people like me, it’s the only game in town. I’ve tried to get into other wind tunnels, and either I’m not allowed, or it’s prohibitively expensive. The Aerodyne wind tunnel next door has a rolling floor, and I’d like to try it, even if it’s 4x the cost. But the rollers are designed for NASCAR, so unless I bring a car with a 109″ ish wheelbase (Miatas are 90″), I’m shit out of luck.

A2 doesn’t have a rolling floor, and so the effect of the tires rolling on the ground can’t be measured. This is significant for underbody testing, but you can measure things on the front of the car and over the body with acceptable accuracy.

There’s a lot of online conjecture by people who have never been to A2, that the small size of the wind tunnel, and the proximity of the walls, contributes highly to a blockage rate (or ratio?) that makes this wind tunnel results inaccurate. However, the walls in the tunnel are designed to reduce the blockage, by being curved rather than flat. And I’m also not after 100% accuracy, I’m looking for deltas – the difference between this or that. Did this wing have more or less drag than the previous wing? Did it produce more or less downforce? These things can be measured with accuracy at A2.

For the wind tunnel testing, I wanted to to use a car that already had CFD done on it, so I borrowed Phil Sproger’s car. His NA Miata has a 9 Lives Racing medium aero kit, and we set the ride height so that it would be as close as possible to the specifications that Morlind Engineering used when they ran CFD for 9 Lives Racing. (AJ Hartman and I did 42 runs on this car, baselining the car vs CFD, and then testing wings, spoilers, fastbacks, and many other ideas for drag and downforce. You’ll be able to read about that in a future report.)

9 Lives Racing Big Wang.

We tested a 65″ Wing Logic back to back with a 64″ Nine Lives. Wing Logic has a built-in 1/4″ Gurney flap, and 9 Lives Racing has a slot for Gurney flaps of various heights, and we used a 1/2” Gurney. But because the slot is slightly recessed, this is more like 3/8”. So while one wing was slightly larger, the other had a slightly taller wicker, and it should be a fair fight.

Wing Logic – notice the smaller end plates.

I also threw in a strange DIY wing I made to see how it compares. It measures 41″x16″, and looks like an old-school F1 wing. The low-aspect ratio would not work in its favor, however the extra chord should make the wing slightly more efficient by having a higher Reynolds number.

Let’s see how they measured up at 100 mph, using the following fields:

  • Front downforce – This is a negative number, which you can think of as lift. When you add rear downforce (or drag), it lifts the front of the car through leverage, like a see-saw.
  • Rear downforce – This is the wing’s job, and varies with wing angle, Gurney flap height, and many other variables.
  • Total downforce – Front lift and rear downforce combined.
  • Drag – The number of pounds of drag the wing adds. This is a pretty meaningless number on its own, but is used to calculate the L/D ratio.
  • HP – An easier way of thinking about drag is how much horsepower it consumes.
  • L/D ratio – This is also known as aerodynamic efficiency, and is usually a good way of determining which part is better on the car. Note that the numbers in this table are not the bullshit free-stream efficiency you see in CFD, but the actual returned efficiency as run on the car.
Three wings compared at zero and 5 degrees.

As you can see from the data, at zero degrees angle of attack, Wing Logic, 9 Lives Racing, and my DIY wing are all better than a 10:1 L/D ratio. At this setting, the Big Wang makes the most downforce, and is thus the most efficient by about 5%.

When I set the wings to 5 degrees, Wing Logic and 9 Lives are identical in terms of aero efficiency. The Big Wang makes slightly more downforce, but the bigger wing makes less drag, and they are effectively the same at this setting. This is also about the maximum angle you can set, because air is coming down the roof at 5-7 degrees, and so if you use more angle than this, the center of the wing stalls, which adds drag and reduces downforce.

As a side note, my chunky DIY wing was similar to the other wings at zero degrees, by virtue of less drag. I should have tested it at the same 5 degrees as the others, because it was stalling at 7 degrees. It’s definitely the worst wing here, but not by a lot. On the plus side, it weighed on average 6 lbs less than the aluminum wings, and it cost me $30 in materials!

To get back to the actual contenders here, the two aluminum wings performed the same at 5 degrees AoA, but that isn’t the whole story, because the Big Wang is dimensionally the smallest. If you are racing in a class that limits total wing area (GLTC 500 square inch wings, for example), then the 9 Lives wing will give you about an 8% advantage over Wing Logic. It’s not a huge difference, but in a rule set that limits wing area , I’d take the Big Wang.

The full results of the wind tunnel testing are in my Miata Wind Tunnel Report, where I go into not only wings, but different tops, front end options (canards, hood and fender vents, splitter adornments, etc. You can purchase the report here by clicking the button, and you’ll get a link where you can download it.

If you don’t want to invest in the wind tunnel report, but you want to support this kind of investigative content, Buy Me a Coffee. It takes 15 coffees ($5 each) to pay for one run in the wind tunnel. That doesn’t count the many hours of preparation, towing 11 hours each way, gas, hotel, and other expenses I accrue on the way. Your support makes it possible for me to do community-driven wind tunnel testing. Thanks!

CFD vs wind tunnel

Both 9 Lives Racing and Wing Logic publish CFD results of their wings, and I thought it would be illuminating to see how accurate those are compared to the A2 wind tunnel. Wing Logic use Kyle Forster to do their CFD, and he used a 70” wing on a Mustang rather than a 65” wing on a Miata, so it’s not a direct comparison. Kyle used the same CFD settings as he did for AJ’s wings, which have generally landed within about 3% on loads in the same tunnel with matching cars/positions etc, so A2 correlation should be OK for this data.

Note that the reference area for the Miata is 1.67 meters squared (18 square feet), while in the CFD, it’s set at 1 meter squared. Ergo, I need to multiply the CFD numbers by 1.67 so that they match the wind tunnel data. When I do that, you can see, the wind tunnel returns similar downforce as the CFD, but drag is higher in the simulation.

Wing Logic wind tunnel (65″ Miata) vs CFD (70″ Mustang)

Is this a big problem? Not really. After testing the same wing on a Veloster N, an 8th Gen Civic coupe, a Miata, and a Supra, I can tell you that the shape of the car has a greater impact on a wing’s performance than any CFD error. On a hatchback, I’ve seen a 3.5:1 L/D and on a coupe up to 24.5:1. In the end, the main difference between CFD and wind tunnel results isn’t computer vs real world, it’s the shape of the car. A Miata ain’t a Mustang, and that’s likely where most of the differences lie between the Wing Logic CFD and wind tunnel data.

9 Lives Racing also publishes CFD using a 64″ wing on a Miata, and that’s exactly what we brought to the tunnel. So we can get an apples to apples comparison on this wing for shiz. But 9 Lives doesn’t publish coefficients, they only give us drag and downforce. Still, it’s enough to work from.

9 Lives Racing wind tunnel vs CFD at 100 mph.

Comparing the wind tunnel results to CFD, the computer predicted both less drag and less downforce than we got in the wind tunnel. The fact that the CFD was off by 33% in downforce points to some kind of problem with that model.

I base that on another nugget Kyle dropped on me which is that as a general rule of thumb, if CFD is off by <20% it could be correlation, <30% it’s setup differences, >30% something has gone wrong with the output numbers at some point or the CFD is extremely broken. So I’m not sure what’s going on with the 9 Lives / Morlind Engineering CFD, but it’s not matching real-world values very closely. When we tested the whole car (not just the wing), the drag was also off by a lot (as in .4 vs .6).

70″ Wing Logic, end plates, 3/4″ Gurney

I was also able to test a 70″ Wing Logic on my Hyundai Veloster N, which allowed me to compare the effect of wingspan on a hatchback. Last year I tested a 55″ Big Wang on my Veloster, and since Wing Logic and 9 Lives are pretty similar, I can get find out how much I was giving up with a shorter wingspan.

I also wanted to try 12″ square end plates to see if the smaller end plates were giving up some performance. And since Wing Logic has a built-in Gurney flap, I also wanted to see what would happen if I butted up a 3/4″ Gurney flap against that. (If you’re wondering what a 1/2″ Gurney would do, you can just average the numbers).

70″ Wing Logic on Hyundai Veloster N.

Comparing the 70″ Wing Logic to 55″ 9 Lives is absolutely not fair, so think of this only as a comparison of wingspan. The longer wing made 10 lbs less downforce (what in the actual fuck?), but had a lot less drag. The end result is a much better L/D ratio of 7.4:1 for the longer wing compared to about 3:1 for the shorter wing.

Now this is flatly absurd, because according to Kyle, an increase of 100mm span is worth about 7% load on the same car, so an increase in 15″ span (375 mm) should be an increase of 26% difference in load, not a decrease of almost 7%. I’m not sure what’s going on here, as the wing was in a similar position, and on the same car.

Changing the smaller end plates for 12″ square end plates added 7.2 lbs of downforce, but also used an additional 1.1 hp in drag. The change in parts returns a L/D ratio of 1.3:1, which means the smaller end plates would be faster anywhere but an autocross course.

Adding a 3/4″ Gurney flap added 48.1 lbs of downforce for 21.4 lbs of drag, which works out to a 2.25 L/D ratio. If you need more rear downforce, adding the larger wicker would be worthwhile on just about any track that isn’t a high speed oval.

Conclusions

Comparing the two wings, my main gripe is that Wing Logic’s wing is 2 pounds heavier than a 9 Lives wing of the same length. That’s not a lot of weight, but the location of the weight, high up and at the polar end of the car, isn’t helpful. As previously stated, in a racing class that limits the wing size to a certain amount of total area, 9 Lives has a slight advantage.

Those negatives aside, Wing Logic has a fine product that is well constructed and performs similarly to the Big Wang. At $349-399 with free shipping, Wing Logic’s wing is a downright bargain.