| This is a guest post from Dan Ayd, chronicling his adventures in performance driving and aerodynamics. |
I love tracking my Veloster N. However, the specter of losing control, either by incompetence or mechanical failure, terrifies me. So over the past three years I’ve been gradually improving my car’s aero, and my driving skills.
I primarily participate in an annual high performance driver education (HPDE) hosted by the Minnesota BMW CCA chapter at Brainerd International Raceway (BIR) using the 13-turn competition course. This club runs an extraordinarily safe and well structured event over the course of three days in the first week or so of June in northern Minnesota.
The first year, 2021, I had just gotten this car and my goal was a two minute lap measured by my Apex Pro. In 2022 I upgraded tires from the 300 treadwear OEM Pirelli PZero rubber to Nitto NT05. These are old technology, but a tried and true weekend-warrior 200TW tire, back when that rating actually meant something.I also had an alignment done changing front from 1.5° to 2.5° negative camber, and zeroed toe both front and rear toe. These changes brought my my best lap down to 1:58.
In 2023, I got down to a 1:56.42 with only the addition of a 22mm Whiteline rear anti-sway bar. It’s unlikely this addition was responsible for a 2 second improvement so I will chalk this up to an excellent instructor, Rory Lonergan, who is an outstanding FWD-car driver, for making inroads on my skills.
In 2023 I also started exploring car aerodynamics, mostly because of Turn 2, a flat, high-speed right-hand sweeper. I tried focusing on braking points, turn in, apex, and track out, but I found myself highly inconsistent with entry, maintenance, and exit speeds. I’m sure this is in large part due to my lack of practice–only coming to this track for two days of lapping a year isn’t enough to really improve, except in qualitative aspects like comfort with speed, noise, flags, traffic, etc. Despite the data showing manageable G forces, I simply didn’t trust the car, so I’d arbitrarily brake and/or lift at a safe speed below 100 mph.

The data showed only 0.7-0.8 lateral Gs and I knew from looking at other corners, the car was capable of much more than that, more like 0.95. I never looked down at the speedometer to know how fast that was, but looking at the lap data I usually arrived at that turn around 116-117mph. There was so much going on still on the track that I didn’t have the mental currency to focus on details. I felt that by adding some aero, I could not only reduce the speed by increasing drag, but also increase lateral grip to the point that the turn would become no-lift. As in, I could floor it from the exit of turn 13 and not decelerate until braking into turn 3 almost a mile later.
I was only familiar with aero in terms of making the car slippery, but not how to use downforce to increase grip. After watching some YouTube videos by Julian Edgar I bought his book and was inspired to make a flat floor beneath the lumpiest part of my car, the rear third.
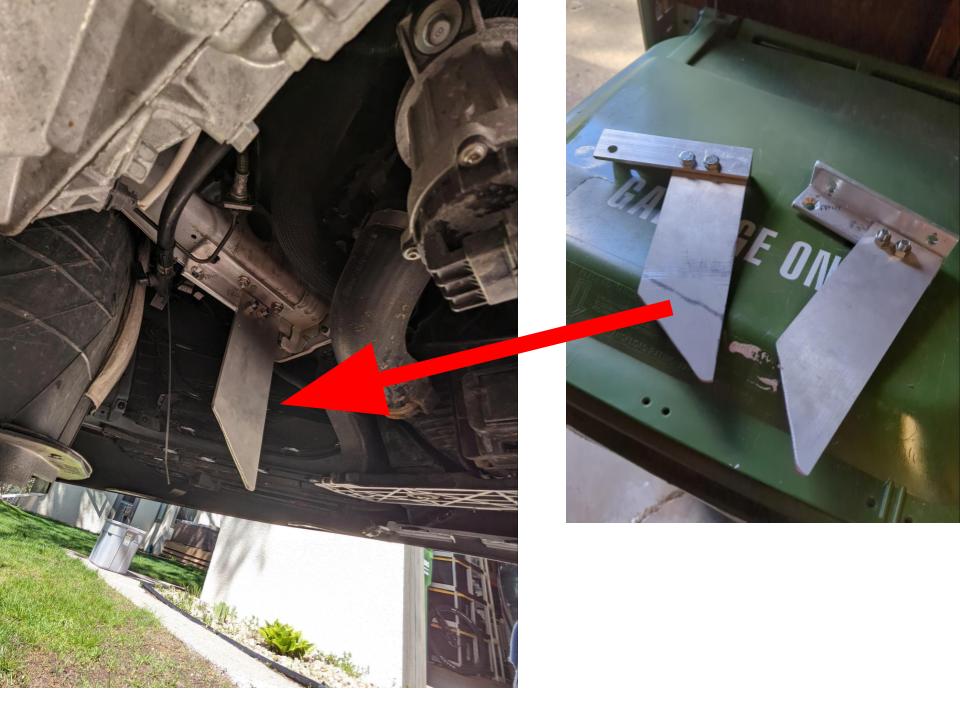
The Veloster N comes with a front undertray that’s quite smooth and it joins up to a center section at the passenger footwells that are also quite smooth. Once past the fuel tank the exhaust and suspension are hanging in the wind followed by a stupid cosmetic “diffuser” that is probably only good at acting like a parachute. I felt that Julian’s MPG-chasing aero concepts could help here at little cost and almost zero impact to weight and aesthetics.
I purchased sheet aluminum and wrapped the entire muffler and extended it over the edge of that parachute. I also fashioned some ABS sheet plastic covers over the control arms, and included a strake to maybe keep air going straight. I picked up a couple miles per gallon in subjective highway fuel economy, but I saw no improvement in Turn 2.

I shared my mods with the forum on www.velostern.com, and one of the members pointed out to me that someone he knew was buying a Veloster N and would be writing about it on his blog while he “aeroed the shit out of it.” Through this networking I met Mario Korf, and when he began writing about his Veloster N, I started following his Occam’s Racer website, reading all of his posts, messaging him directly, and listening to his guest spots on club-racing podcasts.
What I started learning was that most street cars, especially hatchbacks, create lift rather than downforce. However, the folks at Hyundai poached Albert Bierman from the BMW M division, and with his guidance, they created a car that actually creates downforce, right from the factory.
The use of the flat undertray and the wing-like OE spoiler resulted in car that didn’t lift at speed, and had minor amounts of downforce. Based on his session at the A2 wind tunnel in North Carolina, Mario opined that there would be huge gains to be had with a big, properly designed splitter and a wing out back and up in clean air.
Ok, I’m in, but how do I make this stuff? I hadn’t a clue. After purchasing his wind tunnel report, reading his blog entries from the archive, and peppering the poor guy with hundreds of texts I began formulating a design based on his wind tunnel splitter.
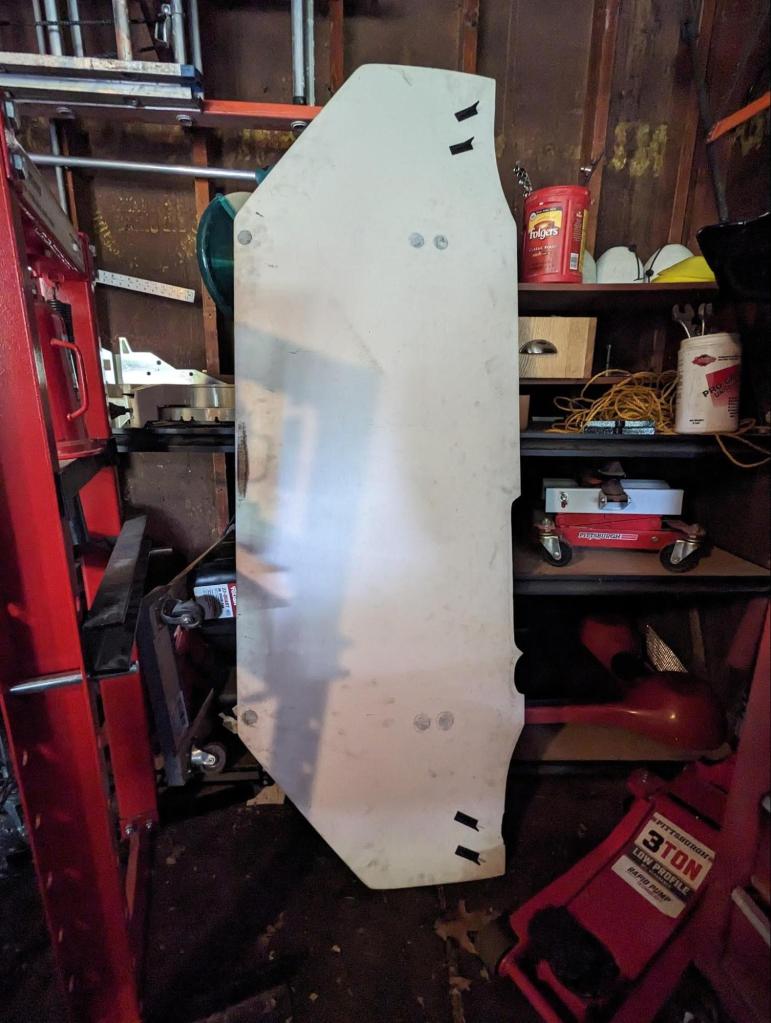
I started by getting a 4×8 foot sheet of 5mm Meranti plywood from a local boating store. I set to work measuring, cutting, and gluing three layers together and cutting the laminated structure overnight under the weight of my car in a curved shape to resemble a wing. This was Mario’s theory of making the entire width of the splitter a diffused surface.

Once dried solid, I used a belt sander and began sculpting the underside of the leading edge to be rounded to keep air attached and flowing smoothly. I tapered the end to combine with the curve to reach about 13° of upward rake under the car mirroring his least draggy splitter design. It measured 67” wide and 24” long.

I used Professional Awesome normal 6” long quick release brackets connected to custom rear vertical supports I made using clevis-cotter-pin quick releases of my own making along with their carbon splitter rods up front. These were extremely secure and allowed a small amount of angle and height adjustment.
I set it to have an upward tilt of 0.6° at the front and a height of about 4” from the ground. I initially tested the splitter in daily driving, and it seemed to reduce drag by about 10%. According to Mario’s data, it should be good for about 150# of downforce at 100 mph.
The Veloster N is aerodynamically balanced from the factory, and so adding front downforce alone would be a disaster on track; I had to add a wing. Getting a wing high enough or far enough back to get into something resembling clean air on this car isn’t easy. With the sloped glass and weak plastic shroud there’s not much support for 100 pounds of downforce without drilling holes in metal to support gaudy uprights, and I prefer a cleaner, less Ricky Racer aesthetic.
Mario and I passed ideas back and forth as I iterated in my head. When I was in upstate New York for work he invited me to join him at his home track, Pineview Country Club, for a coaching session in his car.

Upon finishing, he surprised me with a gift of the wood prototype roof piece he made for a wing mount. When I got home I needed to modify it slightly to ensure air would separate cleanly above the rear window so I added a layer of Meranti plywood, sculpting and smoothing the enlarged structure so it would look good enough to make Mario proud. Now I needed to mate metal to wood attaching the wing to the car with solid and reliable uprights.

After several rounds of mental iteration I settled on plate aluminum uprights like an F40 Ferrari with a Performance Car Innovations (PCI) V2 airfoil 48” in length. At the height I selected, 9” at the rear, 7” up front I expect it will produce around 80 lbs of downforce at 100mph. This was one of the wings featured in Mario’s wind tunnel report although slightly shorter. If I needed more downforce, I could add a 1/2″ Gurney flap and get around 120 lbs. Those figures are based on his wind tunnel testing, and should be pretty accurate.
Because the Veloster roof slopes downward, I needed to verify the proper wing angle. The folks at PCI said the wing would start stalling at around 10°. So I did tuft testing on the wing and discovered that the 3.5° angle of attack resulted in some stalling at the rear edge of the wing. So I slotted the rear holes and flattened the wing to 2.7° from horizontal, and the wing now has full attachment.

The Veloster N has about 65% percent of its weight on the front wheels, and the typical formula is to match aerodynamic balance with chassis balance. However, you’ll recall that I added a thicker rear sway bar and significant amounts of front camber, and thus moved the mechanical grip further forward. This is not good for a doofus like me, on a track that has a 100 mph turn!
By biasing the aero at 55/45, the car transitions more to understeer the faster I go. This makes me feel safe and helps me focus on braking, turn-in, apex, and track out. Since my track car is my daily driver, this is extra important.
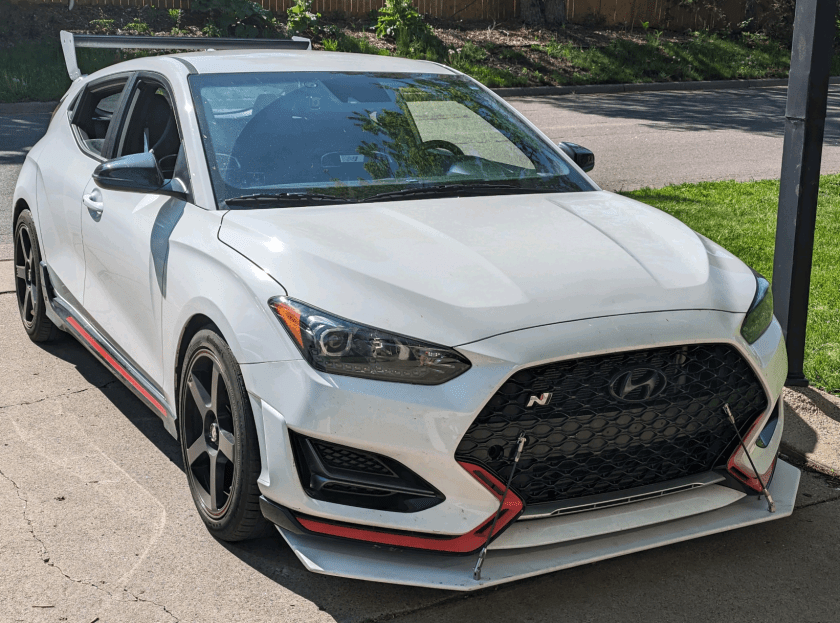
Overall, the car looks pretty badass in my opinion, and the aero parts are sturdy. I can stand on the splitter. I can lay on top of the wing. This homemade crap is strong, even if it seems a bit weird to put plywood on a car!

And at the track, the shit actually worked. Over the course of 8 sessions, or almost a hundred laps, I felt increased confidence in turn two, and the data bore this out. Lap times plummeted from 2023’s best of 1:56.42 to 1:52.42, a staggering drop of 4 full seconds. Mario predicted about 2.5 from aero alone so let’s say the additional seat time and coaching (it was a driving school after all) was responsible for the other 1.5 seconds.
Looking closer at the data between 2022 (pre-aero) and 2024, my minimum speeds are still very inconsistent, but there are glimpses of what a new personal best if I could string them together. Slow, difficult turns like 3 and 13 were a mixed bag, and aero has little impact. The biggest benefits of aero seem to occur at turn 2, where I’m going 8 mph faster, and turn 4, where I have an additional 6 mph. In the S-turn (turns 10/11) I picked up sometimes 8 mph. I’d wager there’s another 2-4 seconds, but we’ll see next time out on the track.

This adventure in aerodynamics has been a huge success. My car is faster and safer, and along the way I’ve gained a friend in Mario. I’ve learned new skills in woodworking, and stoked a desire to fabricate with metal as well. Time at the track has added other friends and given me great memories, so anything that extends that is great in my book. Cheers to aero!

It’s great to see successes like this. It keeps me motivated!
LikeLike
I did sell Julian’s book BTW and with the OEM smooth base model roof piece on for daily I’m enjoying forty plus mpg. Looking forward to some canards, 3/4″ Gurney on the wing, kuhmo V730 tires to get closer to 1.1 g and 400# of downforce.
LikeLike
40mpg is incredible
LikeLike