Updated 9/4/2023 after wind tunnel test.
A splitter separates airflow above and below the car, reducing drag and lift by decreasing the amount of air going underneath the car. A splitter also creates downforce via pressure on top of the splitter blade and suction below the undertray. Various things you do on and around the splitter can make it perform better or worse.
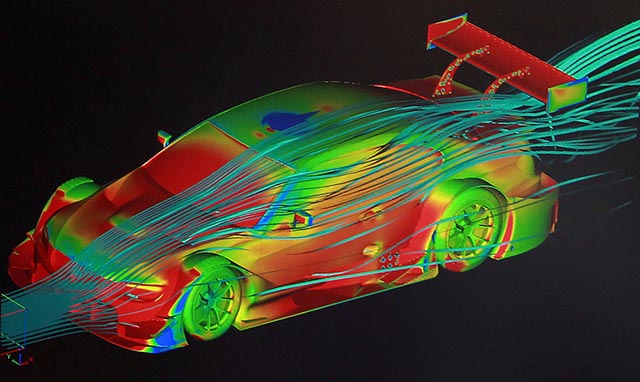
When I look at splitters on typical track cars, I see a lot of common mistakes. I tested some of those things in the wind tunnel recently, and have updated this article and turned it into a Top 10 kind of thing.
Now before I dive into that, let me get off my high horse and admit that I’m as guilty as anyone. In the past, I really only considered splitter length and ground clearance, and those were mostly for durability. After taking the JKF Aero course, I have a much better understanding of how splitters work, and I hope to help my readers avoid the same mistakes I made. Here’s my Top 10 of splitter mistakes:
1. Misunderstanding how splitters work
The single biggest mistake people make are not understanding that it’s the underside of the splitter that does most of the work. Splitters are essentially wings, in that they create much more downforce from suction than they do from pressure.
This misconception cascades into a series of mistakes that results in things like people rounding the wrong side of the splitter blade, or completely ignoring the underside.
You’ve seen people who put wings really low on the trunk lid, with the result that very little air it no goes under the wing. There’s also no space below the wing for the low-pressure region to form, and so the wing doesn’t work as it’s supposed to.

When a wing is mounted that low, it behaves as a spoiler, creating downforce through pressure, and not suction. But it’s the underside of the wing, the suction side, that creates most of the downforce.
Misunderstanding how a wing works is the same thing as misunderstanding how a splitter works. Let’s fix that, starting with…
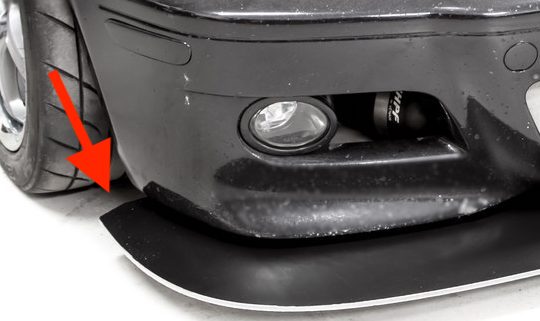
2. Sharp leading edges
Aerodynamic wings (airfoils) always have a rounded leading edge. Air must flow around either side of the stagnation point at the front and stay attached along the entire surface.
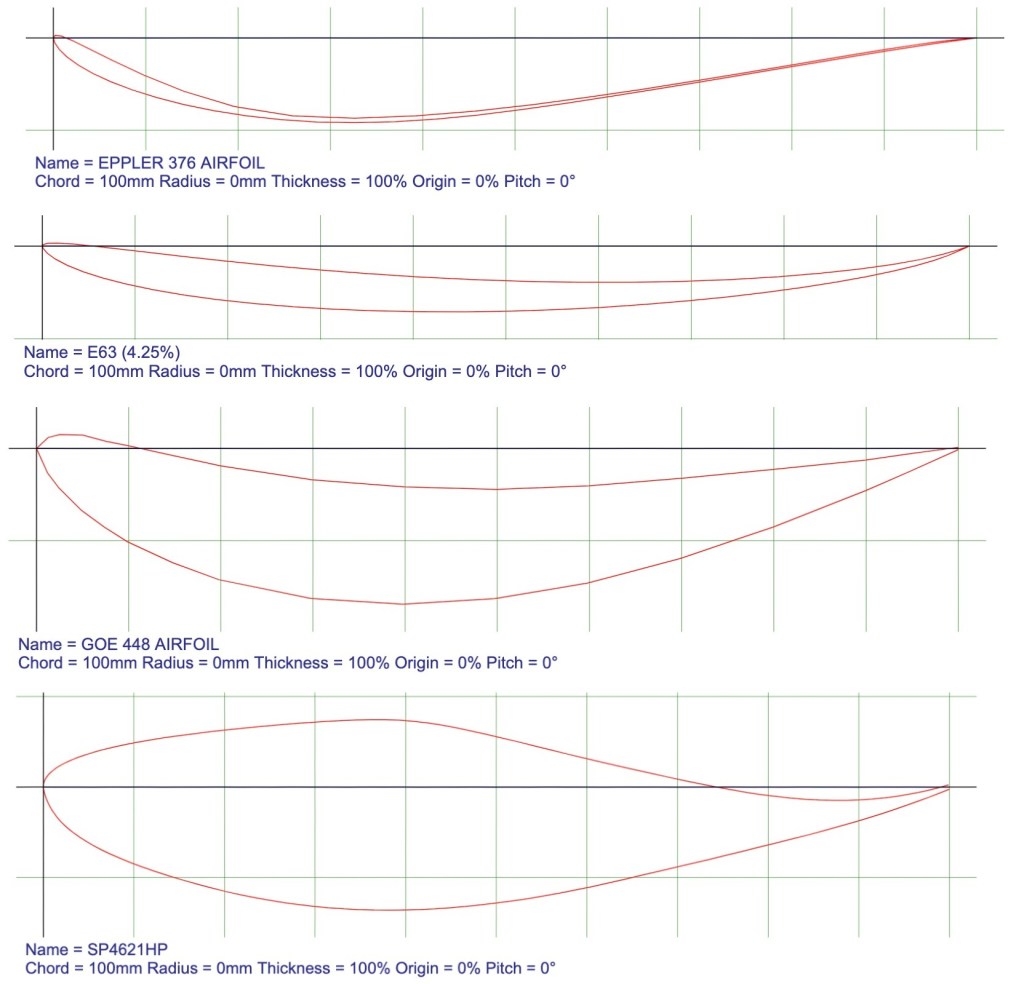
Sharp leading edges cause flow separation, which results in drag and turbulence. If you want a really shitty wing, turn it backwards so that there’s a sharp leading edge and a rounded trailing edge. You’re not going to do that with a wing, but you might be doing that with your splitter!
In fact I see way more splitters with rounded top edges and flat bottoms than I do the reverse. Sorry, but you all have that wrong; round the underside.
Sometimes sharp leading edges are a consequence of the material, such as when using aluminum or carbon fiber. But if you’re going through the trouble of making a splitter from composite materials, you can certainly go through the trouble of thickening and then rounding the leading edge! When you round the leading edge of your splitter blade, round the bottom of the splitter blade more than the top, obviously.
On high-end sports cars, I see a lot of aftermarket splitters that are super thin, made from carbon fiber, and costing thousands. Something that expensive makes you believe it works as designed, but that sharp leading edge creates flow separation, no matter how much you paid for it.
3. No height adjustment
Splitters are ground effect devices and the downforce changes up to 250% depending on proximity to the ground. A splitter that isn’t adjustable for height is like a wing that isn’t adjustable for angle.
There was a recent conversation on Trackable Miatas regarding splitter height. One internet pundit gave everyone else the benefit of his inexperience by stating that you should run the splitter as close to the ground as possible. His reasoning was that the splitter keeps making more and more downforce the closer you get. That’s not entirely accurate.
Yes, downforce increases as the splitter gets closer to the ground, and the gain is fairly linear. However, from around 3” to 1.5”, downforce increases sharply, and if you’re going after maximum downforce, that’s where you want the horizontal portion of the splitter (measured with driver, full fuel tank, and at speed).
However, going after maximum downforce also creates a very sensitive car, liable to lose all downforce in an instant. If you go lower than 1.5”, the splitter starts to get flow separation, which results in drag and a drastic reduction in downforce. Ergo, setting your splitter too low is quite a bit worse than having it too high.
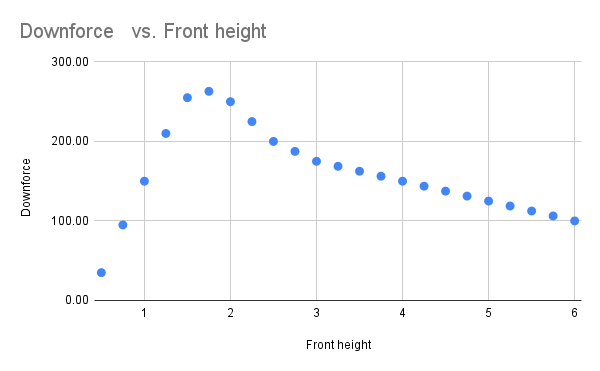
To put some round numbers on it, let’s say your splitter makes 100 lbs of downforce at 6″ of ground clearance. It will make about 175 lbs at 3″, and max out at 250 lbs at around 1.5″. If you go lower than that, the situation reverses and the splitter loses downforce dramatically until it’s back to 100 lbs at .75″.
To the people who run their splitters as close to the ground as possible, I want to race you. For money.
4. Lacking an undertray
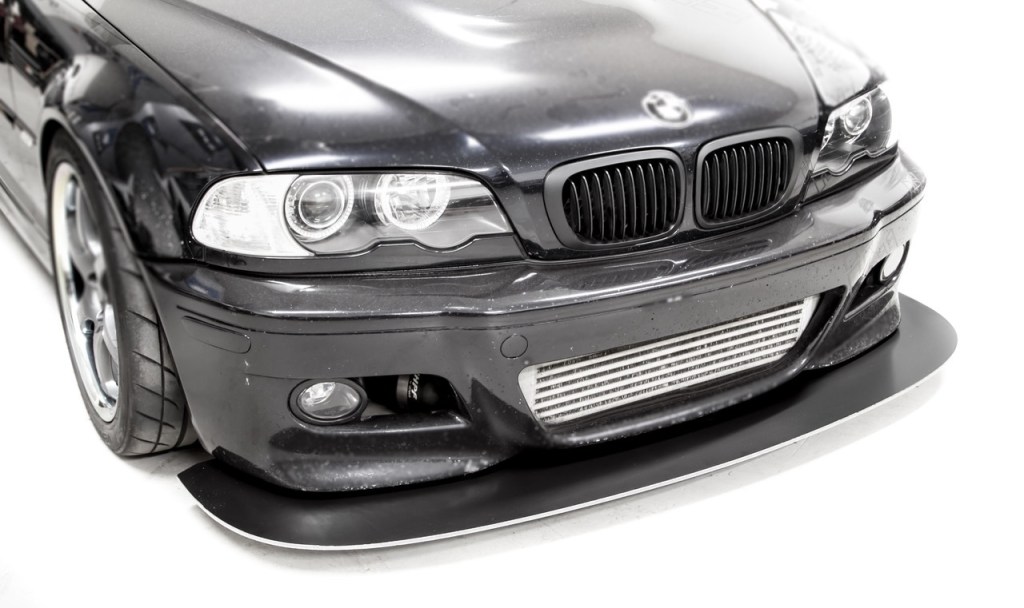
Airdams and front lips don’t create much downforce unless there’s planform area under the car where a low pressure region can form. In other words, the front lip needs to be connected to, and supported by, a horizontal undertray. Factory or aftermarket front lips that aren’t connected to a rigid undertray only create a tiny (negligible) amount of downforce.
On NA Miatas, the R-package front lip is a popular add-on. This will keep some air from going under the car, and in that way can reduce drag and lift. Larger versions like the Garage Vary (GV) front lip also can build a small amount of local pressure on the convex portion, but it won’t be much.

This kind of unsupported front lip is the only situation where you’d want to run the aero as low as possible. You won’t lose downforce because you haven’t gained any, and less air under the car is better. But compared to a proper splitter, these cosmetic doodads aren’t really an aerodynamic device, they are just for show.
5. Flexible
Splitters can create more than two hundred pounds of downforce, so the blade needs to be rigid. I see people standing on their splitter blades and that’s an OK benchmark for how strong the lip needs to be. And yet I’ve seen so many amateur splitters (both DIY and aftermarket) that would flex under the weight of my big toe.
Case in point, a guy I met at Miata Day (Canaan, NH) who had never been on track before. Like many street enthusiasts, he had a very “appearance grade” Miata with eBay aero tacked on everywhere. His spitter was so flimsy I could deflect it with a touch. I told him he should remove the “splitter” or he was going to lose it in the first session. He lost it.
Now before you go building a splitter out of 1” plywood so that you can stand on it, note that the low-pressure area is about 1/3 of the way back from the splitter lip. It’s not the front or the top of the splitter that is doing most of the work, so you don’t need to be able to stand on your splitter blade, you just need to keep it from flexing at speed.
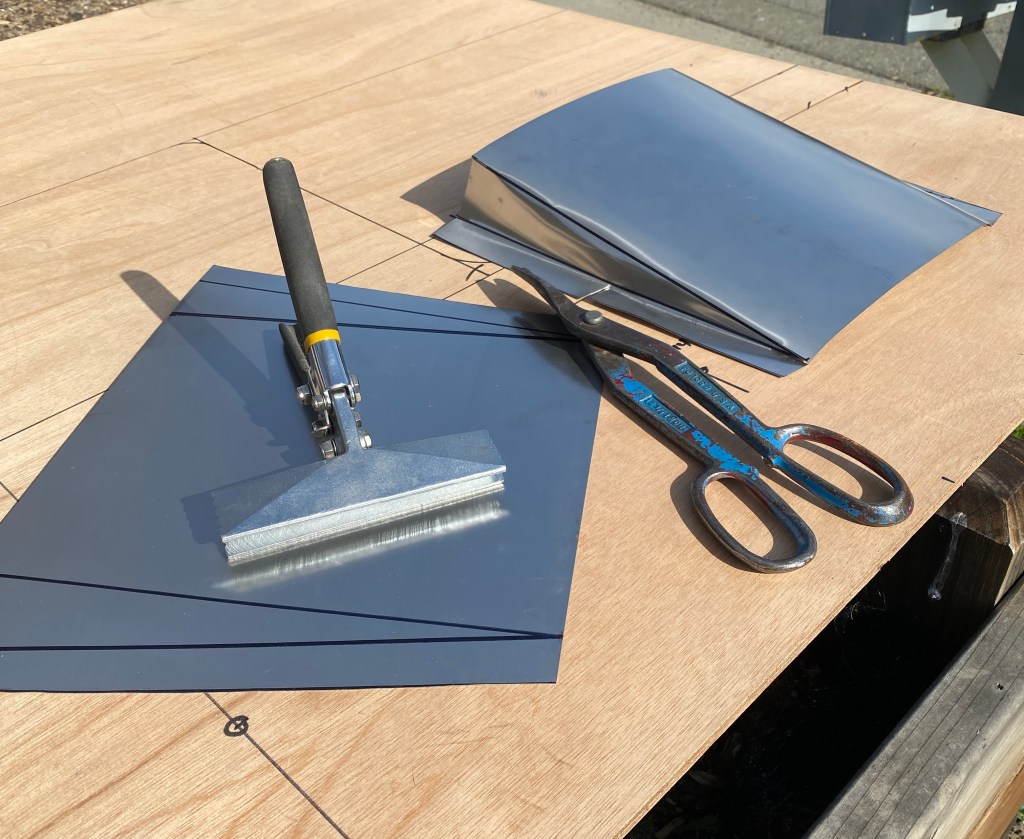
6. Shitty materials
Plywood is probably the most common splitter material. Regular exterior plywood from your lumber yard is junk: it’s heavy, has knots and voids, very few plies, and delaminates when wet.
Sometimes you can find a better quality of plywood, such as oak or birch, but often only the outer veneers are better wood and the inside is the same knotty, void-ridden, pine-based shite in the exterior plywood racks.
If you look hard you can get true Baltic Birch, which is a furniture-grade wood with a good strength to weight ratio, and lots of thin laminates. But I’ve seen Baltic Birch splitters delaminate, and suspect the glue is usually the water-soluble type.
To avoid delamination, plywood splitters need to be made out of marine plywood. Marine plywood has different grades, and what the “marine” distinction really means is that the glue is waterproof.
I once ordered a sheet of 3/4” marine plywood from my local specialty lumber store. What I got was a 80-pound slab of 5-ply Douglas Fir. I returned it immediately. A similar sheet of Meranti plywood weighs 64 lbs, has 11 plies, and is stronger.
The ideal wood is certified boat building plywood. There are two grades, BS1088 and BS6566. 1088 is an appearance grade, more expensive, but generally easier to find. 6566 isn’t as pretty, but is built to the same specification. The BS specification is void free (X-rayed, I believe), and tested for delamination by boiling in water.
I like Meranti BS6566 Aquatek made from mahogany. There are other BS-certified plywoods made from sapele, gaboon, and other hardwoods, and some of them are lighter than Meranti, but none of them are cheaper or better. For example Okume is about 10% lighter than Meranti, but it’s also more flexible and more expensive, and so I don’t think it’s better for splitters (for boatbuilding it’s superior).
I make my splitters by laminating two sheets of 6mm so that I can add curvature. For a flat splitter, I’d spec 15mm for the extra durability.
You can also make a splitter from aluminum, Alumalite, carbon fiber, etc. Sheet aluminum is heavy and has a sharp leading edge, and I wouldn’t build a splitter out of solid aluminum.
Alumalite is a common splitter material, it’s two very thin layers of aluminum bonded to a lightweight hollow plastic core. The material is mostly used for street signs, but has wound up underneath a lot of budget race cars as a flat bottom, or as a splitter.
I have an Alumalite spoiler, and I’m not sure why people love this material. You can’t weld it, it doesn’t glue well, it’s more difficult to work with, and it’s not particularly light. A square foot of 10mm Alumalite and 9mm Meranti weigh the same and the Meranti is stiffer, more durable, easier to fix, and half the cost.
If I had unlimited funds I’d build a splitter from carbon and Kevlar, but for my current situation, I don’t think a couple pound savings is worth it.
7. Unused ends
Time-attack cars often have splitters with “hammerhead” extensions on them, which are wider than the car. When properly constructed, these extensions are wing shaped in profile and cause air to move upwards and away from the car, which creates pressure on top and (more importantly) suction below the splitter extension.
On Miatas, I often see smaller splitter extensions that are basically unused splitter material, they are horizontal and don’t change the direction of airflow. Here’s the thing: if you don’t change the direction of airflow, you aren’t doing dick. A flat horizontal plate just causes drag. Why have a splitter that’s wider than the bodywork if you aren’t using that in some meaningful way?
I sometimes see these exposed splitter ends coupled with a spill board on the outside edge. The first thing I always think is, “this is going to get caught on grass and rip the splitter off.” For the life of me I don’t understand why people do it, as there are better uses of that space.
I’m not saying it’s useless: a spill board acts as an air curtain, directing air along the side of the car. This can reduce the wake of the front tires, and reduce drag of the car as a whole, but the drag reduction is tiny. On a street car doing 15k miles a year, reducing drag can be useful.
But for a race car, it’s far better to kick the air upwards or out sideways. If you have some extra width on your splitter, by all means make a vertical back wall. This will create a high pressure zone on the top surface, generating downforce. That spat will also send air up and out, creating a suction zone under the splitter extension, creating even more downforce.
I wrote about this in Splitter Length and Side Fences and you should read that if you haven’t. The gist of it is that MacBeath tested spats of different shapes and sizes in a wind tunnel, and a vertical spat increased front downforce by 150% and had the best L/D ratio. The car was an Integra, not a Miata, but you can imagine the results would be pretty similar. Now that’s using the exposed splitter end to good effect.
You can put a fence on the outside of that vertical spat, which will capture more local pressure (more downforce), or leave it bare, which will kick air out sideways. Directing air outwards will help prevent air from intruding beneath your splitter, and helps extract air from the wheel arches, which in turn makes your splitter more effective.
Whether it’s better to kick air up or out is debatable. There are downstream effects of both, which you could estimate in CFD or test on in a wind tunnel. But surely, however you direct the air off that extra splitter width is better than leaving it unused.
8. No diffusers
Splitters create downforce by accelerating air through a restriction, which creates a low pressure region under the blade. You can increase the suction if you allow air to expand upwards behind the lowest point of the blade.
The easiest way to do this is to curve the entire splitter upwards at the rear. Many racing rules state that splitters must be flat, but they also give you some wiggle room. In the wind tunnel, my flat splitter made 134 lbs of front downforce, and one with a 5-degree curve made 195 lbs.
If the rules allow it, or if you simply have a track car unbound by racing rules, absolutely you want to curve the entire trailing edge of the splitter upwards at a 12 degree angle. It’s such an advantage over a flat splitter, it’s not even funny.
If you have a flat splitter and can’t curve it, then install splitter diffusers (splitter ramps) underneath the splitter. The concept is the same as a diffuser behind a car, it allows air to expand, which accelerates the air in front of it, creating more suction.
Splitter ramps can be 3D-printed into a continuous curve, or just an angled ramp of sheet metal. If you go the latter route, don’t exceed a 12-degree angle, or you risk flow separation. If you don’t have an angle meter, that’s about a 2.5” rise over 12” run.
If you buy 3D-printed splitter ramps, beware of what you’re buying. I just saw someone in the Miata 3D printing group who is trying to sell a product with an 18-degree slope. That’s too steep and will cause flow separation. His price was also too steep, considering you can make your own out of scrap metal for a dollar.

Where you place the splitter ramps depends on where you can get the required height for them. Generally you can dump air into the wheel wells as there’s room to work with and it’s a fairly lossy area to begin with. But if you dump air into the wheel wells, you need to extract it.
9. Suction management
Nature abhors a vacuum; if you have suction underneath the splitter, then air from everywhere else is at a higher pressure and wants to hate on it and spoil the party. To make the splitter perform at its peak, you need keep the bad air out. And yet, I often see cars that make no attempt at keeping air from bleeding air into the low-pressure zone beneath the splitter.
The largest source of this air comes from the engine compartment. Think about it: all the air that goes through the radiator has to go someplace, and it often goes under the car. If this air can wrap around the sides of the splitter, it ruins the suction you’ve worked so hard to create. So the best way to mitigate this is ducting the radiator and using hood vents. Hood vents aren’t just for cooling (or looking cool), they make downforce.
Vents on top of the fender and extractor vents behind the wheels will also relieve pressure in the wheel arches that’s trying to get under your splitter. If you have splitter diffusers, you’ll need as much venting as you can get.
Both hood vents and fender vents should ideally eject air upwards, thereby creating an opposing force, downforce. Unfortunately the downstream effects of these vents is turbulence, and with that, a loss on rear wing performance. But since most cars are front limited with respect to downforce, it’s a good tradeoff, just use more wing.
Getting back to the situation under the splitter, another area of loss is air that comes in through the wheel spokes. Optimizing this area doesn’t provide a lot of benefit, but it’s worth going after if you’ve done everything else already. If you take the JKF Aero course, he goes into a lot of detail on caketin covers, and it’s beyond the scope of this article, so if you’re looking for the last bit of performance, take the course.
10. Cooling ducts too low
So far I’ve concentrated only on the underside of the splitter, but the top of the blade also matters. There’s a recirculating bubble of high pressure air on the top of the splitter blade, and you want to hold it there. For the people that ignore what’s happening underneath the splitter, this is the part of the splitter that matters to you.
If you place vents (radiator inlet, intercooler, brake ducts) low down on the airdam/fascia, that high pressure air goes through the holes instead of being held on the blade. Directing air into ducts might be beneficial for cooling, but it reduces the downforce.
The other problem with a radiator duct that’s too low is that air has to bend upwards to get to the radiator. If that angle exceeds 12 degrees, you’ll get flow separation (drag, turbulence, loss of velocity and cooling ability) inside your air duct. You’ll get better cooling and less drag with a straight shot to the rad, and you’ll create more downforce by holding pressure on the splitter lip.
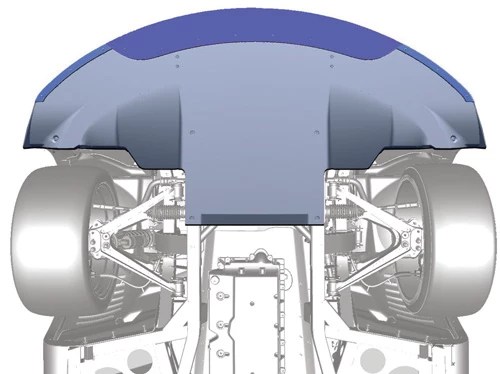
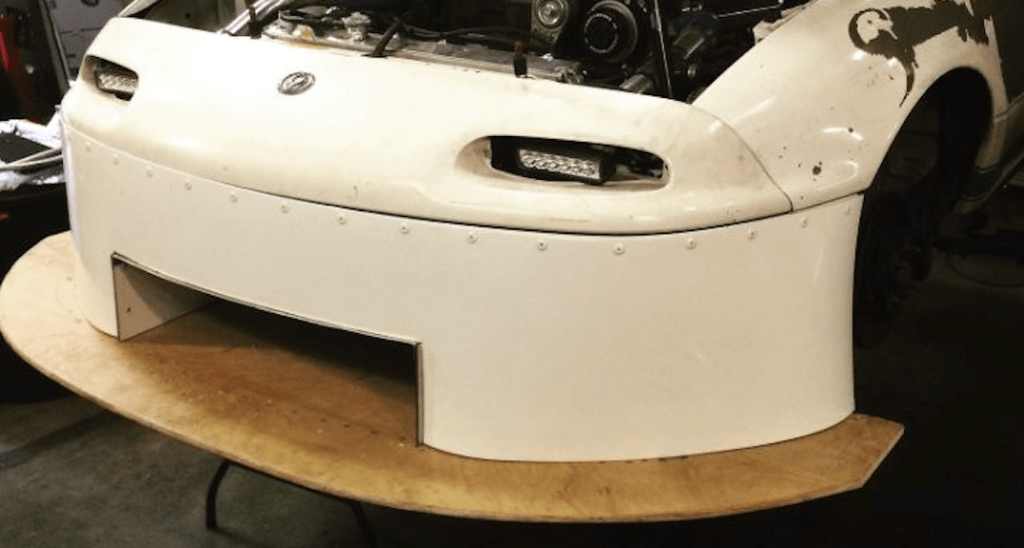
If you’re racing in a series that doesn’t allow you to use a splitter, but allows an undertray, you could use an arrangement like the pic above (imagine the airdam and undertray being flush, with no splitter extension). This would allow you to hold some pressure on top of the undertray and make suction below. In that case, I’d certainly put the radiator opening at the bottom and trade downforce for the consequences.
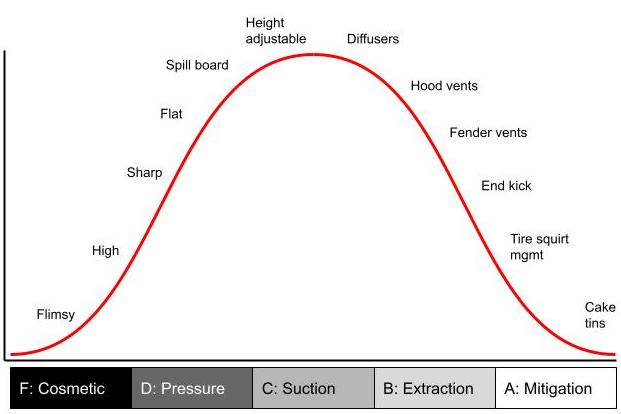
Grade your splitter
If I was to throw a grade on the average splitter I’ve seen on the average Miata, I’d give it a C. On other track cars, the average is a D+. I know that grades are supposed to fall on a bell curve, but I grade strictly, and you non-Miata people suck at aero.
My teammate Alyssa recently made a Grade-A Miata Splitter. And you can see how I made my DIY Veloster Splitter, which also gets an A.
How would you grade your own splitter?
- Grade F: Flimsy splitters or front lips, usually bought on Amazon or eBay. These do nothing but look like a splitter.
- Grade D: A misunderstanding of how splitters work results in splitters that are optimized for the top side, not the underside. They are are too high, have sharp leading edges, and are flat. They might have a spill board on the outer edge, which does fuck all of nothing for the underside.
- Grade C: A splitter gains downforce through suction, which is achieved primarily through proximity to the ground and using diffusers and/or curvature to accelerate the air underneath.
- Grade B: With great suction comes great responsibility. You need to extract the air upwards and outwards using hood vents and fender vents, and also by directing air up and out on the blade using canards, spats, and wickers.
- Grade A: Mitigating losses from high-pressure air around the wheels and tires is the last frontier. Tricks like spinning a vortex into the face of the tires and caketin covers are ways to achieve this grade.
Your splitter sucks!
The purpose of this article was to point out the most common mistakes people make with splitters, and to tell you that your splitter sucks. Literally. It sucks to the ground and that’s where most of the downforce comes from. I see a lot of aftermarket and DIY splitters that could be easily modified for less drag and considerably more downforce.
Now that you know that your splitter sucks, take a look at it with fresh eyes and ask yourself how you can optimize what’s going on underneath. What can you do to make your splitter suck even more?

hey man, just wanted to ask, there’s your mate @tzagallo_racing on insta and yt that made the front wing (canards hammerhead thingys) and rear wing on his miata with 3d printed ASA with 2 aluminum tubes in them and i thought about the foam+carbon sandwiches and thought”what if you used the asa or even pteg in them?(not pla cuz its biodegradable so it doesnt last long)” and i wanted your opinion on matter. (could be used for making 3d endplates and other stuff real easy)
LikeLike
I’m sure you could do that, sounds smart.
LikeLike
the amount of invaluable information and time of tested and failed.And tested and failed that have been given in this write up is phenomenal.The information is almost priceless.Thank you so much for divulging your hard work.Time and effort into this well crafted essay will certainly put it to use
LikeLike
Thanks for the kind words. Make yourself a good one!
LikeLike
Thank you tremendously for this! My first DIY splitter build would’ve been a Grade-D if I didn’t find your website!
LikeLike
Most of mine have been C-,mounted securely and good materials, but not optimized. it’s only recently I found out I had no idea what I was doing.
LikeLike
I’d guess that 90% don’t; 9Lives, Professional Awesome, etc., are advertising their products with photographs of splitters that are not close to your bullet points. I would like a 9th point of tear-away disconnects (brackets and rods/cables) but I can’t comment with a photograph here, so I will Messenger you to ask for your recommendation for a quick connect, and disconnect, for my ABS plastic side fences/spats, which I attached to my front bumper’s wheel wells. I read your DIY, but I want mine to stay where they are if my splitter breaks off, but the issue is having them airtight VS just hanging out behind, or bent horizontal to be under, the splitter.
LikeLike
directly to the right part : https://youtu.be/X8BufOqfZlE?t=109
p;s : I need edit buttons on comment ^^
LikeLike
That might be the best way to use the extra width on a splitter, but if it’s something the pros are still experimenting with, it’s beyond most of us. What he’s saying about how the inside gets more downforce in yaw is very compelling, and could be applied to a rear wing’s endplates as well.
LikeLike
Really good informations again.
If you have time watch few seconds of this video : https://youtu.be/qLL-vm2fPkw?t=1913
I like how he makes his endplate but I don’t know if it’s better to do some cut in endplate to make vortices, like nine live splitter endplate : https://9livesracing.com/products/splitter-endplates-aka-spoil-boards
LikeLike
Thanks for sending a video link directly to the section. He’s doing this 100% correct and his explanation is spot on. I really hate videos, but this is excellent. I don’t know why you’d want to spin up a vortex on the end of the splitter, I’d send the air upwards and out, as he’s doing. You can play with the size of the fence on the side and the height of the back wall, as he said, it depends on your power and speed of the track.
LikeLike