
In the previous article, I mounted a Wing Logic wing to Steve Leo’s WRX. He’s been pretty happy with it, but I’ve been wondering about adding more rear downforce. An excess of rear downforce can make a car boring to drive, but it also improves braking, high-speed stability, and requires fewer corrections when you lose control. So while more rear downforce might ruin the aerodynamic balance, if the driver goes 2 seconds faster, let’s call that a better car.
If you want more downforce from a Wing Logic wing, you can increase the size of the Gurney flap by duct-taping down a piece of angle aluminum butted up against the built-in 1/4” Gurney flap. And with the larger wicker, you can add a little more wing angle. But you’ll soon hit a point of diminishing returns, and shortly after that, the wing will stall out. I haven’t run a full sweep on this wing, but I’ll guesstimate that a Gurney flap 1″ tall (very draggy) and an angle of attack around 11-12 degrees is the limit.
If you still need more downforce, the easiest way to do that is add a second element above the main wing, set somewhere between 25-35 degrees angle of attack (in relation to the main wing). Unlike the single wing, the double wing won’t stall because of the slot between the wings; Air shoots through the gap at great speed and this keeps air attached to the underside of the upper wing. Thus you can run more angle on the upper wing, which effectively increases both the chord and camber of the entire wing, without flow separation.
If you have a 9 Lives Racing wing, they can sell you a dual element wing for around $440 (with shipping). The kit includes the upper wing, plus adjustment brackets that go inside the standard end plate, plus little brackets that go in the Gurney flap slot. It’s a clever arrangement that’s easy to install and remove. I tested the double wing in a wind tunnel, and came away really impressed with how well it worked.
If you have a Wing Logic wing and you want a dual element, you’re shit out of luck. There isn’t a similar kit available, and I have yet to see anyone cobble something together. I wonder if the reason for that is because some people believe (incorrectly) that you can’t put a dual-element wing on top of a wing that has a Gurney flap? There was a recent discussion of this on the Professional Awesome Facebook group, and it seemed like most of the people said you should cut off the Gurney flap, or a dual wing won’t work with a Gurney flap on the lower wing, or that Gurney flaps only work on the top wing. That’s horseshit.
You can absolutely put a Gurney flap on the lower wing. Two research papers (James C Moss , and later F.M. Catalano and G. L. Brand) concluded that adding a Gurney flap to the main (bottom) element of a dual-element wing added downforce and improved L/D ratio. By fiddling with the Gurney flap height, overlap, and gap, they increased lift by 12% and increased L/D ratio by 40%.
But before you go adding a Gurney flap to your double wing, you should know that the authors only got those results after tons of experimentation. The height of the Gurney flap, the distance (gap) between the wings, and the overlap between the wings all need to be set correctly to get the most out of it. Knowing all of this, if you’re going to put an upper element on a Wing Logic wing (or any wing with a Gurney flap), you’ll need to be able to adjust the upper wing’s X-Y-Z coordinates for angle, gap, and overlap.
If this is all too much work for you, go and buy a 9 Lives Racing Big Wang and add The Deuce double element kit. It’s already set up with the right overlap and gap, and is simple to adjust for angle. The performance is excellent, and you will not be disappointed. Tell Johnny I said hi.
But if you’re a DIY-or-die kind of person (ahem, guilty), or you have more time than money, then maybe putting together your own dual wing how you want to spend a day. If that’s the case, read on and I’ll walk you through how I made a dual element for a Wing Logic.
Assembling the upper wing
I make wings rather than buy them, mostly so that I can experiment with different shaped airfoils and construction methods. My S1223 is a torsion box, and my MSHD is a foam core with fiberglass. But neither of those construction methods works great for a wing with a much smaller chord and less thickness. So rather than build one from scratch, I bought a couple cheap extruded aluminum wings on Amazon for $35 each. You can sometimes find them cheaper, and my friend Bill Fischer of Garage Heroes in Training once bought one of these wings and got a box of 10 for the same price.
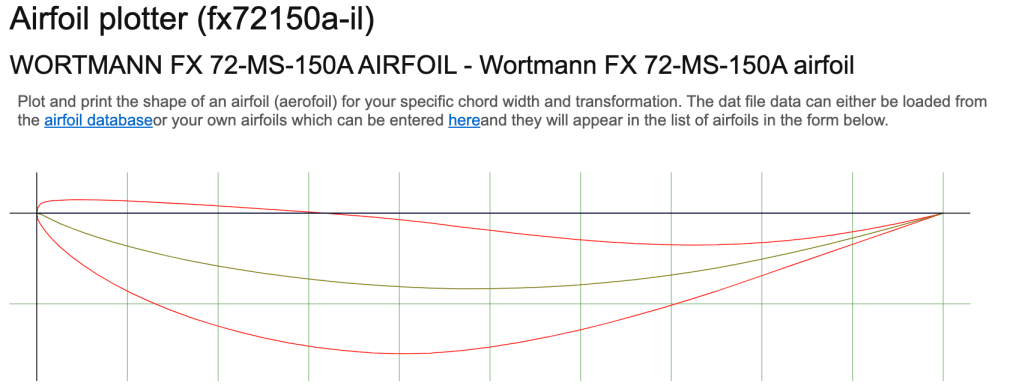
I’m not exactly sure what the airfoil is, but it looks a bit like a Wortmann FX 72-MS-150A. With a cL of 1.8, this is decent, but not what I’d call an ultra-high lift wing. According to my Car Wing Comparisons article, the airfoil outperforms the NASCAR used for in their Car of Tomorrow for a hot second.
These cheap extruded aluminum wings are strong and light. They have two internal semi-circular spars that run the length of the wing, and provide a lot of stiffness. These supports are also tapped with M8 threads and do double duty fastening the end plates. While I might wish for a different shaped airfoil, the entire design is lightweight, sturdy, and inexpensive.
The wing has a 4.7” chord, which is larger than the upper element 9 Lives Racing uses. A rule of thumb is that the upper element should be about 30-40% the chord of the total wing (combined chord of main and second element), and this second element comes in at 32% of the combined 14.7”, and that’s right in the ballpark.

The longest of these cheapo wings I’ve found is 135cm (53.3”), and so if you want a bigger wing than that, you’re going to have to figure out a way to join them together. Welding is the obvious solution, but I didn’t want to rely on skin strength alone, I wanted to add an internal support as well.
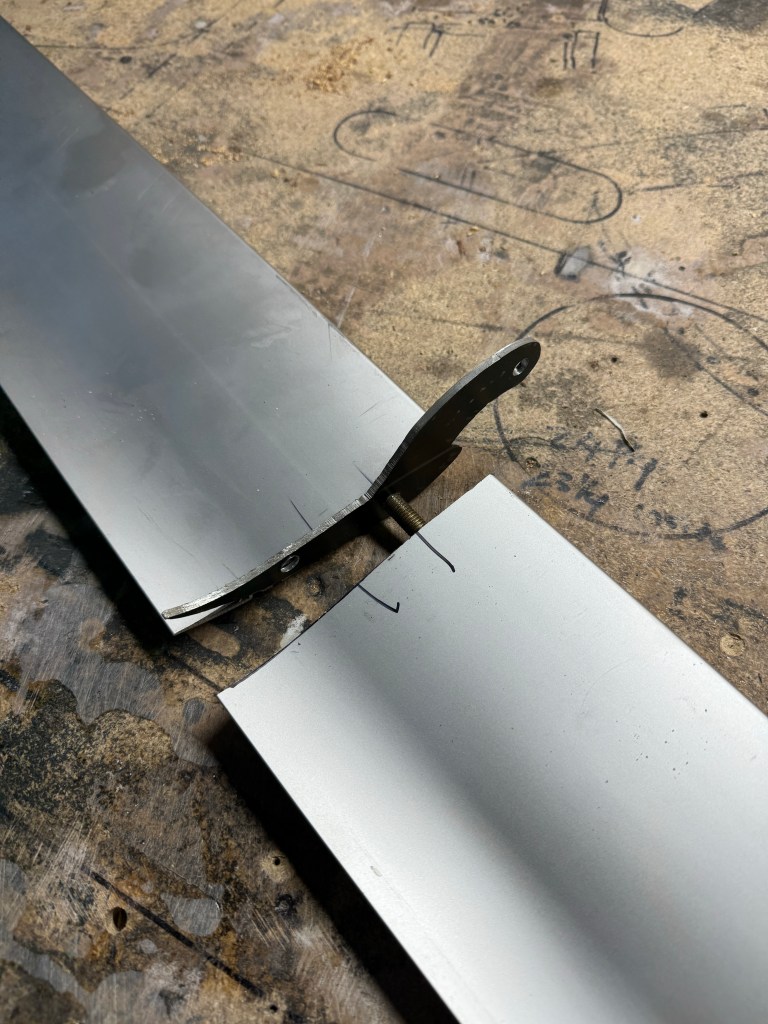
I cut threads into one of the wing holes and installed a M8 stud, bottoming it out on the threads. Then I tapped the same hole on the other wing. I sandwiched a little bracket between them, which will be used to hold up the center of the wing, and then twisted them upon each other, essentially threading the two wings together.

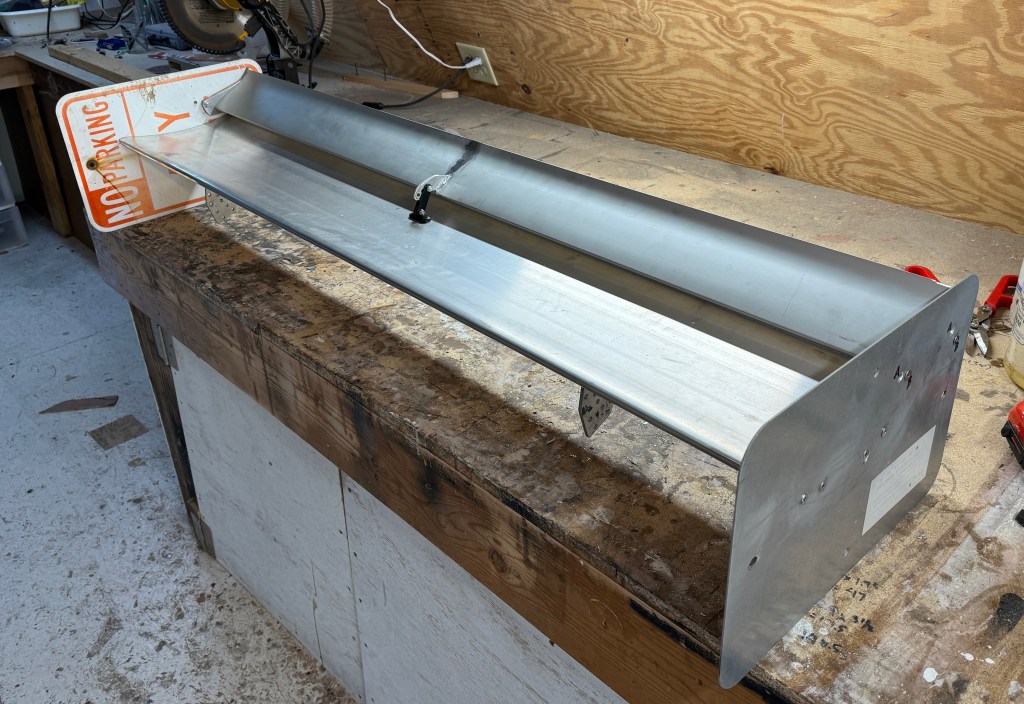
I took the wing to a local fabrication shop and they charged me their hourly minimum of $80 to weld it up. So that’s $150 for the upper wing, all in. I’m sure the welding could be done cheaper, especially if I was doing several wings at the same time.
Double wing end plates
To mount the upper wing to the lower, I’d need to make new larger end plates that hold the ends of the upper wing. The top wing also needs to be able to adjust for angle, gap, and overlap, and because it fits inside the end plate, it’s kind of an end plate within an end plate situation. I made the inner plates from 9mm plywood because I needed to countersink the 8mm hardware into the ends. If I used 12 gauge aluminum, the bolt heads would stick up proud and keep the wing from changing angle.
Maximum angle for a second element is typically around 40 degrees, measured from the bottom element. But at this angle, the upper wing risks flow separation. A safer bet is to set the upper wing to 35 degrees, which should provide nearly the same downforce as the maximum angle of attack. I traced all this out on the end plate (a No Parking street sign, per my usual $1-per-pound source at the metal recycler).

I first made the maximum downforce 35-degree setting, and to this I added a low-drag setting of 25 degrees. I don’t see needing any more adjustment than that, because I can always rake the entire wing to adjust between the high- and low-downforce settings. If I want less downforce, I’ll just remove the upper wing and run it as a single. From there I can tune wing angle and Gurney flap height as I would any other single element wing.

The completed double wing weighs 22.8 lbs total, and so the upper wing added only 6.2 lbs, including all of the things required to mount it. That’s pretty light, and it feels quite sturdy. Eventually I’ll lighten the main wing by milling out slots and wrapping it with carbon fiber. But more on that DIY project when I’ve liberated the wing from Steve.
Data?
This section is supposed to be filled with A/B testing data, including vital details about the ideal gap height for a dual-element wing that has a 1/4” Gurney flap on the bottom wing…. but instead it’s filled with a pissy rant.
Steve and I had a full test day planned, which involved him setting a few laps and then coming into the hot pits, where I could quickly change the main and upper wing angle, gap height, and swap between single vs dual wing. But despite an entire day at Watkins Glen, we got shit all of nothing. The problem is the same as the first time I did aero testing… Watkins Glen.
The weather is always variable, and the first session was wet and made data irrelevant. In the second session, a McLaren (620R?) dumped it’s coolant and oil on the first lap. This sent four cars into the T11 wall, and the cleanup crew onto the track for a lengthy stint. In the third session, again on the first flying lap, a Corvette stacked itself in Turn 2, requiring a full session of cleanup. And in the fourth and final run of the day, a BMW M2CS decided to get some new baby-blue racing stripes in T10. In the end, I don’t think the Advanced/Instructors run group got more than 15 minutes of track time the whole day.
Now this is the same run group I would have been in if I chose to drive that day. The two people I was with (Steve and Gregg) were the first two cars through the oil. Steve was going slowly because the McLaren directly in front was misting oil on his windshield. Gregg went through at speed and saved it like a hero. But he has a ton of experience at WGI and has proven many times over that he can save a spin.
Well, if I was out there, I would have certainly been passing both of them in the session, which would have made me the first car through the oil. Dodged a bullet right there, I did! (I’m kidding about passing them; I drive like a grandma on this track.)
And this is why I seldom drive Watkins Glen, even for free. There are so many other tracks that have runoff, sand traps, and slower speeds, and are much safer as a result. Where I find enjoyment is pushing the car to the limit, and I’m not going to do that here, it just doesn’t make sense, financial or otherwise. My understanding is that some track day insurance companies will no longer cover cars at Watkins Glen, and I can’t blame them for that.
But I also understand that many of you like the combination of high speed and steel walls; you feel it gives you focus or commitment or whatever. Good for you. But the reason i have no data or wing gap information is because someone else also felt that way, and lost their focus or commitment or whatever.
