Wing Logic Dual Element

In the previous article, I mounted a Wing Logic wing to Steve Leo’s WRX. He’s been pretty happy with it, but I’ve been wondering about adding more rear downforce. An excess of rear downforce can make a car boring to drive, but it also improves braking, high-speed stability, and requires fewer corrections when you lose control. So while more rear downforce might ruin the aerodynamic balance, if the driver goes 2 seconds faster, let’s call that a better car.

If you want more downforce from a Wing Logic wing, you can increase the size of the Gurney flap by duct-taping down a piece of angle aluminum butted up against the built-in 1/4” Gurney flap. And with the larger wicker, you can add a little more wing angle. But you’ll soon hit a point of diminishing returns, and shortly after that, the wing will stall out. I haven’t run a full sweep on this wing, but I’ll guesstimate that a Gurney flap 1″ tall (very draggy) and an angle of attack around 11-12 degrees is the limit.

If you still need more downforce, the easiest way to do that is add a second element above the main wing, set somewhere between 25-35 degrees angle of attack (in relation to the main wing). Unlike the single wing, the double wing won’t stall because of the slot between the wings; Air shoots through the gap at great speed and this keeps air attached to the underside of the upper wing. Thus you can run more angle on the upper wing, which effectively increases both the chord and camber of the entire wing, without flow separation.

If you have a 9 Lives Racing wing, they can sell you a dual element wing for around $440 (with shipping). The kit includes the upper wing, plus adjustment brackets that go inside the standard end plate, plus little brackets that go in the Gurney flap slot. It’s a clever arrangement that’s easy to install and remove. I tested the double wing in a wind tunnel, and came away really impressed with how well it worked.

If you have a Wing Logic wing and you want a dual element, you’re shit out of luck. There isn’t a similar kit available, and I have yet to see anyone cobble something together. I wonder if the reason for that is because some people believe (incorrectly) that you can’t put a dual-element wing on top of a wing that has a Gurney flap? There was a recent discussion of this on the Professional Awesome Facebook group, and it seemed like most of the people said you should cut off the Gurney flap, or a dual wing won’t work with a Gurney flap on the lower wing, or that Gurney flaps only work on the top wing. That’s horseshit.

You can absolutely put a Gurney flap on the lower wing. Two research papers (James C Moss , and later F.M. Catalano and G. L. Brand) concluded that adding a Gurney flap to the main (bottom) element of a dual-element wing added downforce and improved L/D ratio. By fiddling with the Gurney flap height, overlap, and gap, they increased lift by 12% and increased L/D ratio by 40%.

But before you go adding a Gurney flap to your double wing, you should know that the authors only got those results after tons of experimentation. The height of the Gurney flap, the distance (gap) between the wings, and the overlap between the wings all need to be set correctly to get the most out of it. Knowing all of this, if you’re going to put an upper element on a Wing Logic wing (or any wing with a Gurney flap), you’ll need to be able to adjust the upper wing’s X-Y-Z coordinates for angle, gap, and overlap.

If this is all too much work for you, go and buy a 9 Lives Racing Big Wang and add The Deuce double element kit. It’s already set up with the right overlap and gap, and is simple to adjust for angle. The performance is excellent, and you will not be disappointed. Tell Johnny I said hi.

But if you’re a DIY-or-die kind of person (ahem, guilty), or you have more time than money, then maybe putting together your own dual wing how you want to spend a day. If that’s the case, read on and I’ll walk you through how I made a dual element for a Wing Logic.

Assembling the upper wing

I make wings rather than buy them, mostly so that I can experiment with different shaped airfoils and construction methods. My S1223 is a torsion box, and my MSHD is a foam core with fiberglass. But neither of those construction methods works great for a wing with a much smaller chord and less thickness. So rather than build one from scratch, I bought a couple cheap extruded aluminum wings on Amazon for $35 each. You can sometimes find them cheaper, and my friend Bill Fischer of Garage Heroes in Training once bought one of these wings and got a box of 10 for the same price.
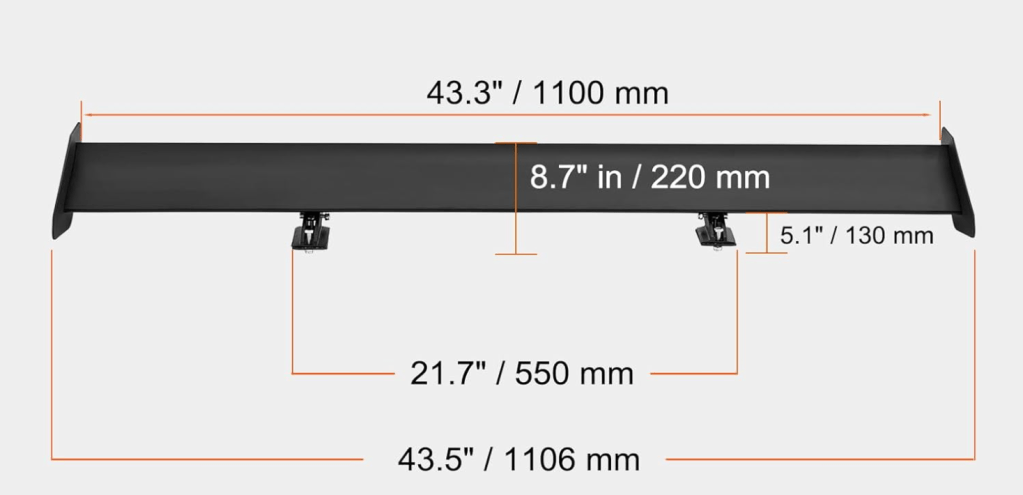
Cheap extruded wing from Amazon, eBay, etc.

I’m not exactly sure what the airfoil is, but it looks a bit like a Wortmann FX 72-MS-150A. With a cL of 1.8, this is decent, but not what I’d call an ultra-high lift wing. According to my Car Wing Comparisons article, the airfoil outperforms the NASCAR used for in their Car of Tomorrow for a hot second.
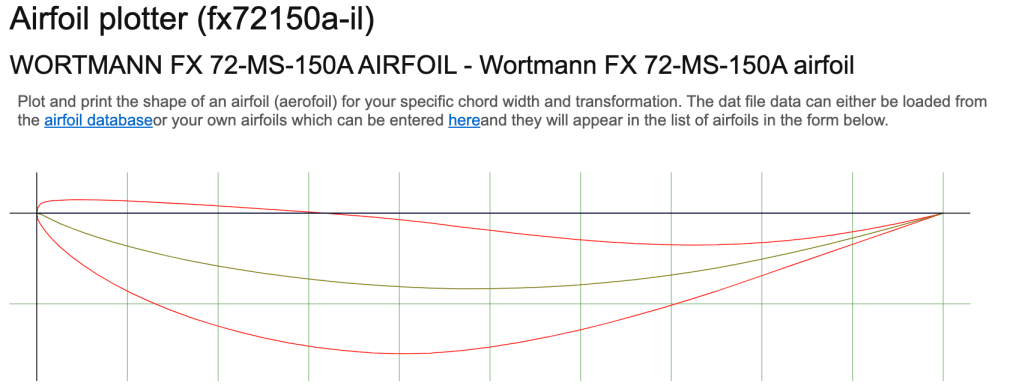
Airfoil Tools is a great place to research wings.

These cheap extruded aluminum wings are strong and light. They have two internal semi-circular spars that run the length of the wing, and provide a lot of stiffness. These supports are also tapped with M8 threads and do double duty fastening the end plates. While I might wish for a different shaped airfoil, the entire design is lightweight, sturdy, and inexpensive.

The wing has a 4.7” chord, which is larger than the upper element 9 Lives Racing uses. A rule of thumb is that the upper element should be about 30-40% the chord of the total wing (combined chord of main and second element), and this second element comes in at 32% of the combined 14.7”, and that’s right in the ballpark.

Wing profile and center support.

The longest of these cheapo wings I’ve found is 135cm (53.3”), and so if you want a bigger wing than that, you’re going to have to figure out a way to join them together. Welding is the obvious solution, but I didn’t want to rely on skin strength alone, I wanted to add an internal support as well.
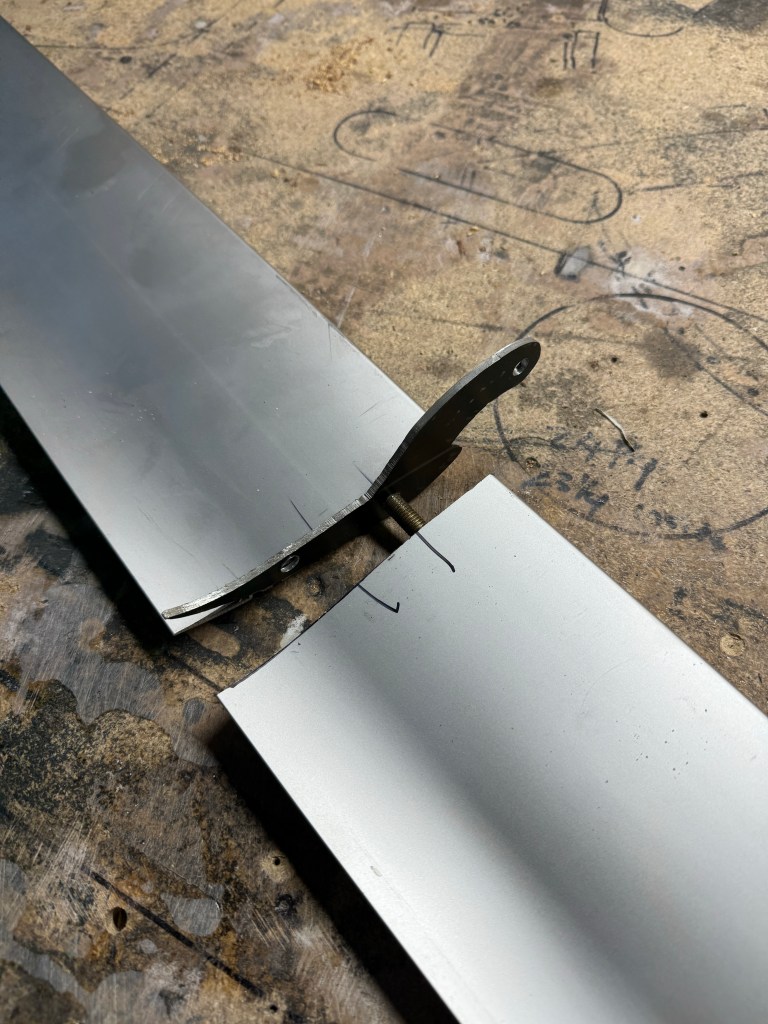
M8 stud is threaded into both sides.

I cut threads into one of the wing holes and installed a M8 stud, bottoming it out on the threads. Then I tapped the same hole on the other wing. I sandwiched a little bracket between them, which will be used to hold up the center of the wing, and then twisted them upon each other, essentially threading the two wings together.

Both halves threaded together.

I took the wing to a local fabrication shop and they charged me their hourly minimum of $80 to weld it up. So that’s $150 for the upper wing, all in. I’m sure the welding could be done cheaper, especially if I was doing several wings at the same time.

Welded all the way around, and pivoting on the center support.

Double wing end plates

To mount the upper wing to the lower, I’d need to make new larger end plates that hold the ends of the upper wing. The top wing also needs to be able to adjust for angle, gap, and overlap, and because it fits inside the end plate, it’s kind of an end plate within an end plate situation. I made the inner plates from 9mm plywood because I needed to countersink the 8mm hardware into the ends. If I used 12 gauge aluminum, the bolt heads would stick up proud and keep the wing from changing angle.

Maximum angle for a second element is typically around 40 degrees, measured from the bottom element. But at this angle, the upper wing risks flow separation. A safer bet is to set the upper wing to 35 degrees, which should provide nearly the same downforce as the maximum angle of attack. I traced all this out on the end plate (a No Parking street sign, per my usual $1-per-pound source at the metal recycler).

I always lay out the chord line parallel to the upper edge of the end plate, this makes it easy to set the angle of the wing. I’m also mocking up the position of the upper wing.

I first made the maximum downforce 35-degree setting, and to this I added a low-drag setting of 25 degrees. I don’t see needing any more adjustment than that, because I can always rake the entire wing to adjust between the high- and low-downforce settings. If I want less downforce, I’ll just remove the upper wing and run it as a single. From there I can tune wing angle and Gurney flap height as I would any other single element wing.
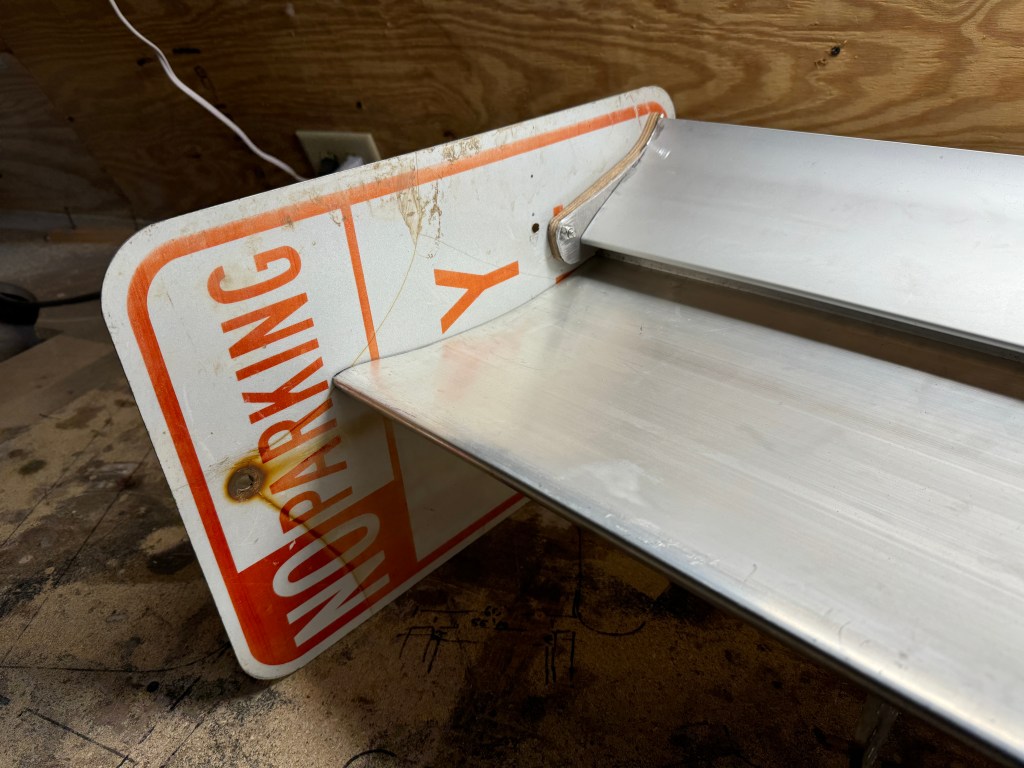
Upper wing pivots inside of end plate. You can see the forward hole, which increases overlap and gap. The gaps are larger than you’d have normally, because of the Gurney flap.

The completed double wing weighs 22.8 lbs total, and so the upper wing added only 6.2 lbs, including all of the things required to mount it. That’s pretty light, and it feels quite sturdy. Eventually I’ll lighten the main wing by milling out slots and wrapping it with carbon fiber. But more on that DIY project when I’ve liberated the wing from Steve.
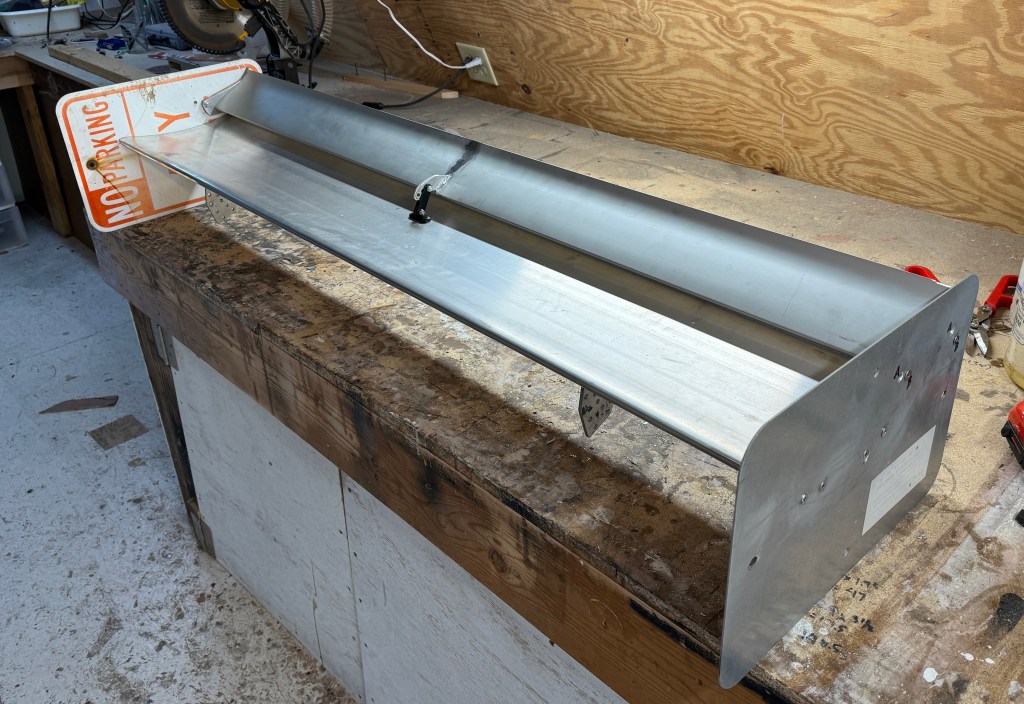
Completed wing.

Data?

This section is supposed to be filled with A/B testing data, including vital details about the ideal gap height for a dual-element wing that has a 1/4” Gurney flap on the bottom wing…. but instead it’s filled with a pissy rant.

Steve and I had a full test day planned, which involved him setting a few laps and then coming into the hot pits, where I could quickly change the main and upper wing angle, gap height, and swap between single vs dual wing. But despite an entire day at Watkins Glen, we got shit all of nothing. The problem is the same as the first time I did aero testing… Watkins Glen.

The weather is always variable, and the first session was wet and made data irrelevant. In the second session, a McLaren (620R?) dumped it’s coolant and oil on the first lap. This sent four cars into the T11 wall, and the cleanup crew onto the track for a lengthy stint. In the third session, again on the first flying lap, a Corvette stacked itself in Turn 2, requiring a full session of cleanup. And in the fourth and final run of the day, a BMW M2CS decided to get some new baby-blue racing stripes in T10. In the end, I don’t think the Advanced/Instructors run group got more than 15 minutes of track time the whole day.

Now this is the same run group I would have been in if I chose to drive that day. The two people I was with (Steve and Gregg) were the first two cars through the oil. Steve was going slowly because the McLaren directly in front was misting oil on his windshield. Gregg went through at speed and saved it like a hero. But he has a ton of experience at WGI and has proven many times over that he can save a spin.

Gregg saves it and avoids the wall. The next four cars don’t.

Well, if I was out there, I would have certainly been passing both of them in the session, which would have made me the first car through the oil. Dodged a bullet right there, I did! (I’m kidding about passing them; I drive like a grandma on this track.)

And this is why I seldom drive Watkins Glen, even for free. There are so many other tracks that have runoff, sand traps, and slower speeds, and are much safer as a result. Where I find enjoyment is pushing the car to the limit, and I’m not going to do that here, it just doesn’t make sense, financial or otherwise. My understanding is that some track day insurance companies will no longer cover cars at Watkins Glen, and I can’t blame them for that.

But I also understand that many of you like the combination of high speed and steel walls; you feel it gives you focus or commitment or whatever. Good for you. But the reason i have no data or wing gap information is because someone else also felt that way, and lost their focus or commitment or whatever.

Veloster N Engine Modes Dyno Tested

The Veloster N has three power levels and three exhaust sound settings, which you can customize to your liking. There is also an economy mode that limits boost pressure and should provide better fuel milage. But how much do these modes differ in power output?

The N Custom mode shows the engine and exhaust sound have three settings each.

I wanted to know, so I went to Overdrive Automotive in Johnson City and had them dyno my car. (Side note, if you are in Central or Southern NY, I would highly recommend Overdrive for tuning your Megasquirt or whatever, they know Miatas really well.)

The rollers are at ground level, so the car is lifted up for dyno testing.

I didn’t test all the modes, figuring it was most important to get the data for the lowest and highest power settings.

  • Eco: This mode is supposed to limit boost pressure to 6-7 psi and return better fuel milage. I believe this is a separate setting than the lowest engine mode available in N Custom mode, so I selected this mode from the preset modes on the steering wheel button.
  • Normal: This is the lowest setting in N Custom mode, and probably the same as choosing Normal mode from the presets. This is the mode I use for all street driving (or when I’m on track and forget to turn on N Custom).
  • Sport: I didn’t test the tune in between Normal and Sport+. I didn’t test the middle exhaust setting either.
  • Sport+: This is the highest engine setting, which I initially set with the quietest exhaust, because I don’t like pops and bangs or loud pipes.
  • Sport+ with exhaust: Same as above, but with the exhaust in the loudest setting. This mode has the burble tune and exhaust valve open, and should show the highest power output.

Note that this test was done on a DynoJet, and so all readings are corrected for elevation and temperature. The engine is bone stock and has about 4000 miles on it (it was replaced once under warranty).

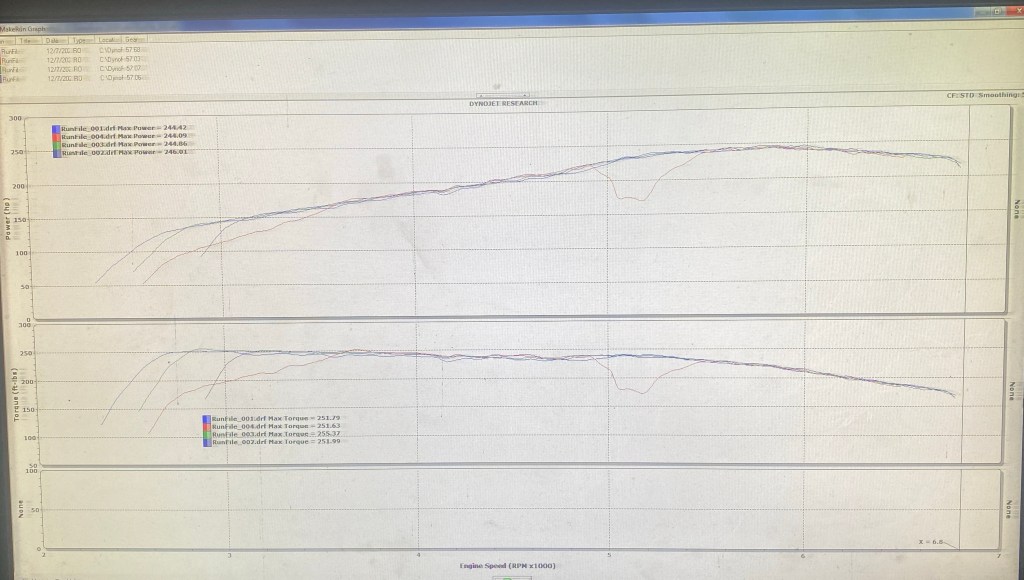
Shockingly, the dyno recorded virtually identical power output in each mode. Even in the green Economy mode, which is supposed to limit boost pressure, the dyno read 244 hp and 251 ft-lbs.

244 hp, 251 ft-lbs

Notice there’s a dip in the chart at one point, the dyno operator said this was likely the ECU pulling timing for a second to deal with heat. The engine was in Eco mode on this pull, but you can see that just a second later the engine picked back up again and posted identical numbers to the other modes.

244 hp is about a 12% drivetrain loss, which is better than I expected. But note that the car was going into winter storage, so I filled the tank with ethanol-free 90 octane, and it may make more power on 93, and even more when the engine loosens up.

What do the engine modes do?

Given that all modes made the same amount of power, the next question is, do the engine modes do anything at all? Knowledgeable people in the N world have stated that the different tunes change the engine’s responsiveness and boost targets in the mid-range, rather than max power. Other sources suggested that the engine modes are only different at partial throttle.

Maybe that’s true, but what about Eco mode? From every account I’ve read, nobody is actually getting better fuel mileage in Eco mode. One source claimed Eco mode only works in the UK. Or that Eco mode is different on different platforms, and limits Velosters to 12-13 psi, but Elantras are limited to 6-7 psi. Well one thing is for certain on my car, either there is no low-boost mode, or all modes are low boost.

Next let’s talk about the tunable exhaust. It did add loudness, but without adding power, I don’t see the point. I like to hear my tires working, it helps me drive at the limit. And so louder pipes just limit my driving.

Finally, there’s the pops and bangs of the burble tune. Internet pundits claim this is to keep the turbo spinning, so that there’s less turbo lag between shifts. I can’t confirm or deny this, as dyno pulls are done in one gear, and so lag (or the lack of lag) doesn’t show up on the dyno. I have a manual transmission, and so I could see this being useful if I missed a shift, but for someone with a 8-speed DCT, I’d question the usefulness of the Rice Krispies soundtrack.

Next year I’ll test the different modes on track and see if I can determine any difference in the data. It may be difficult to ascertain that through the noise of driver error, but we shall see what the Aim Solo data logger says.

At this point, all I can say for sure is that there’s no difference in power or torque in any engine mode or exhaust setting.

Novice vs Advanced: How Skill and Experience Level Affects Lap Times

I recently had an opportunity to put three drivers of different experience levels in my Veloster N, and have them drive the same track on the same day. I logged the data on my Aim Solo, and by interpreting that in Race Studio we can see exactly how each driver went about their business.

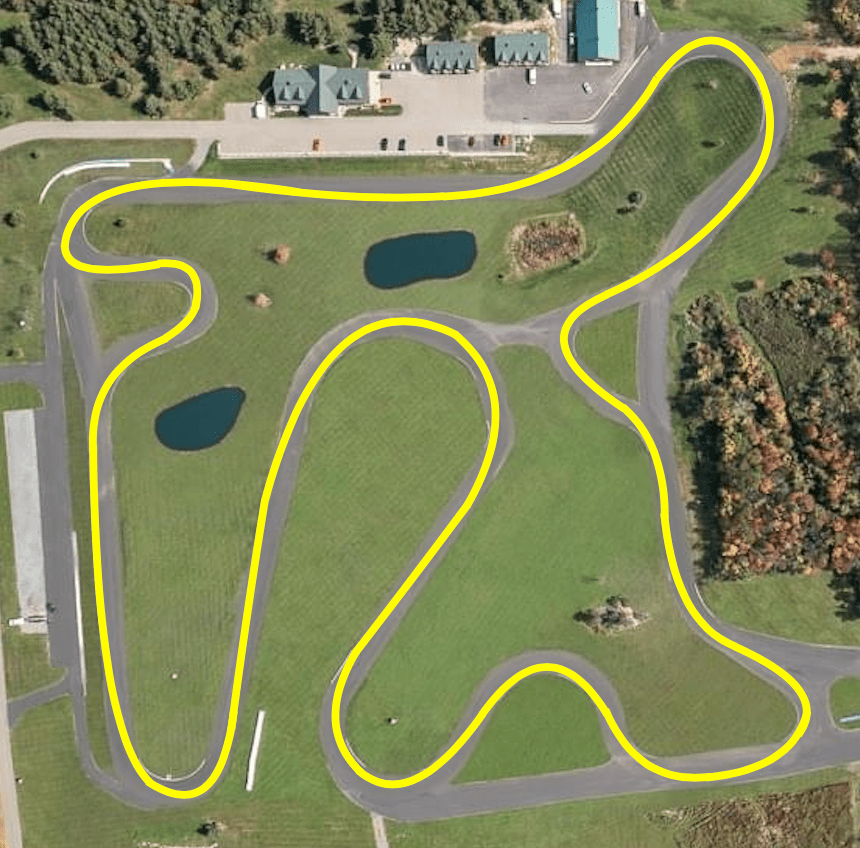
The track is Pineview Run’s short course, and on the driving line, this is just shy of a mile long. Most race tracks are going to be double the size, so keep that in mind when I talk about time deltas.

Pineview Run short course.

The car is my Veloster N, completely stock except for the base model’s roof extension, rather than the Veloster N’s spoiler. I removed the spoiler for scanning purposes, and it wouldn’t change any of the results here. Because it was late in the season, I’d put the my track tires in the basement, and so the car was on Linglong Crosswind all-season tires. I don’t believe this affected anything in the test, but it would be interesting to see the results on a proper track tire. Maybe next year.

The drivers

Let’s meet the drivers:

  • Green – Dan is a novice driver who has done a couple HPDE weekends, as well as a couple Track Night in America events. He’s recently been signed off for solo driving, and after looking at his data and watching him drive, I can confirm he was ready to graduate. His threshold braking is pretty good, and he has acceptable inputs and awareness. Dan also has a Veloster N, and so it was easy for him to get in my car and go quickly. The track, however, is all new to him, and so it took him a few sessions to throw in a hot lap. In the data, Dan has the green lines because, well, he’s green.
  • Red – Jack is an advanced level driver who races in Champcar. He’s an aggressive driver, and so I’m giving him the red colored lines in the data, to signify the red mist. Well, it’s not really red mist, it’s just a driving style that’s reminiscent of a couple other teammates, Ben and Danny. All three of them break traction early in the corner, and then make multiple fast steering corrections to optimize grip, trajectory, and acceleration out of the corner. This style looks aggressive (and exhausting) on video, because it requires many quick inputs, but it’s actually a very calculated and effective way to go fast. Jack has also never been to this track before, and he’s also never driven a FWD car on track, either.
  • Blue – I’m the blue lines on the speed trace, because blue signifies cool. Not because I’m a cool cat, but because I drive with a cool head and have a smooth and economical driving style. I admit that the aggressive drivers I’ve mentioned (Ben, Danny, and Jack) are all a bit faster than I am over the course of one lap, but during an endurance race stint, my style is much less abusive on the car, tires, and driver. Because of that, I get into less trouble than anyone I know (3 black flags in 11 years/26 races, and only one was my fault; pat-pat). My big advantage versus the other two drivers here is that I know the track well, because I literally wrote the book on it.

So now we know who the drivers are, we can ask these questions:

  • How much does driving experience affect lap times? If we compare the Green and Red drivers, we’ll see that the advanced driver goes three seconds faster than the novice. This is mainly down to three factors, which I’ll explore below.
  • How much does track familiarity affect lap times? For this we’ll compare the Red and Blue drivers, and see that track knowledge (and car familiarity) makes a difference of 1.35 seconds.

Novice vs advanced

The first thing we’ll take a look at is how a novice (green) and advanced (red) driver approach a track that’s completely new to them. I’ve put three callouts on speed trace.

Novice = Green; Red = Advanced

A – Novice drivers are taught to brake in a straight line, and so the speed trace shows straight lines on deceleration. As drivers progress in skill, they learn to release the brakes while they turn in. This is called trailbraking, and results in a speed trace that has a “hockey stick” shape. You can see this at point A. Trailbraking picks up a small amount of time in the braking zone, but more importantly, it allows the car to be pointed down track earlier, so the driver can get on the gas earlier.

B – Another trait of advanced drivers is that they “back up the corner.” This means that braking and turning are done earlier, which allows them to get on the gas earlier. On the speed trace, I’ve drawn green and red vertical arrows that show the point where the driver has committed to full throttle. In most corners, you’ll notice that the advanced driver is to the left of the novice driver (backed up). The best example of this is at the 2200′ mark, where the advanced driver is at full throttle 100′ earlier than the novice driver; that’s over 7 car lengths earlier! The result of this is that the advanced driver gains 6/10ths of a second before the next braking zone.

C – Another telltale sign of an advanced driver is a higher minimum speed, or vMin. I’ve drawn two horizontal arrows here, and in this spot the advanced driver is going 5.5 mph faster than the novice driver, at the slowest point in the corner. If you think about it, this is really an 11 mph difference, because the novice driver slows down 5.5 mph more, and then has to accelerate 5.5 mph more just to get back to where the advanced driver started. Novice students are taught to throw away corner speed for the sake of safety (“in slow, out fast”), but advanced drivers know to keep their minimum speed as high as possible.

Finally, it’s worth noting that the advanced driver not only had never driven a FWD car on track, but he only drove one 15-minute session. On the other hand, the novice driver owns the same car and did four sessions. This shows just how much skill and experience level matter. But before we move on, let me point out this novice driver is better than most novices, given the amount of track time he has. Put a first-time track driver in the car, and my novice is going to put six seconds between them, easily.

Advanced knowledge vs advanced

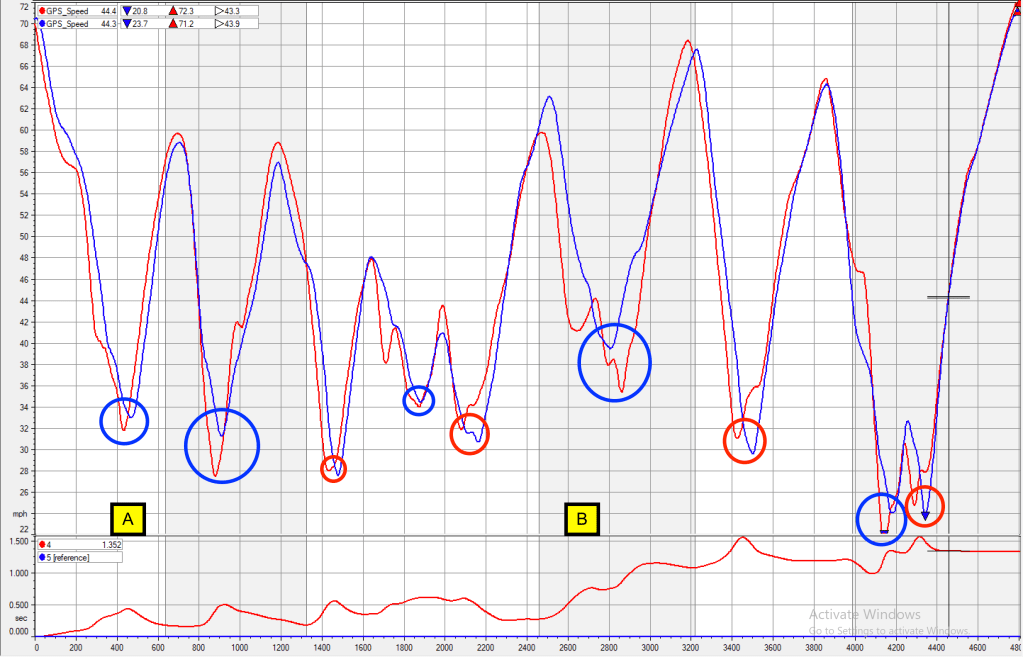
Next let’s take a look at how two advanced drivers go at it. As mentioned earlier, Jack (red) is probably a little faster than I am, but I have car knowledge (my car), and track knowledge (my country club).

There isn’t really that much difference between us. I have a slight advantage going into Turn 2, and hold that while we trade corners back and forth. Going into and out of the Turn 11 (2500′-3000′) is where I gain all my time. With a couple more sessions to figure out that corner, Jack would be a couple tenths off me. Take a look:

Youth and skill (red) vs old age and treachery (blue)

A – I’ve put a color-coded circle around each corner indicating which driver had the higher vMin. I have five to Jack’s four, but two of my corners are considerably higher.

B- Jack brakes too early, too deep, and gets on the gas 50′ later than I do. He loses about a second going into and out of The Knuckle. There’s more difference between us in this one corner than the rest of the track combined.

It’s really just that one corner that makes a difference, and it reminds me of another person who is faster than me everywhere but Pineview: my identical twin, Ian. You might know him from You Suck at Racing (blog | book). One reason he’s the fastest on the team is he’s always the fastest through the corner that matters the most. What we’re seeing here is the exact opposite, which is that if you blow an important corner, you blew the lap.

There is one other wrinkle here, which is that Jack was in the passenger seat on my run, but he did his runs without a passenger. Jack is about my size and build (5’11”, 180cm), and I would have gone a bit faster without 180 lbs of ballast. But I’m just grasping at straws here, and with more track time, Jack would eventually surpass me.

Conclusions

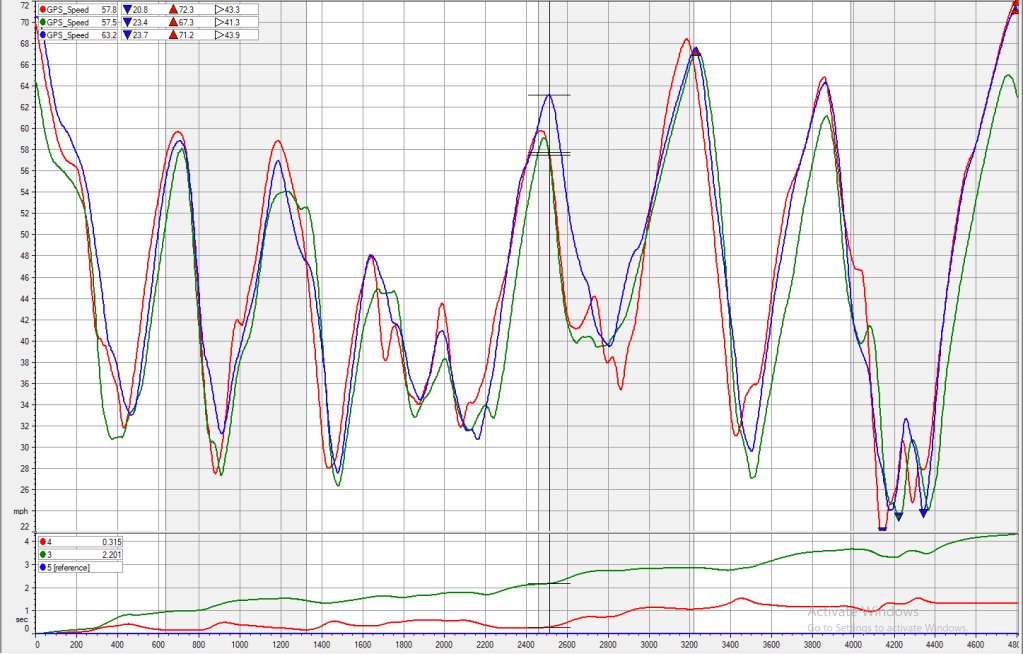
In the end, there’s a difference of over four seconds between the three of us, and this on a track that’s only a mile long. On most tracks, it’s safe to say the delta might be 8-9 seconds. Of all the mods you can do to your car, driver mod is the most important mod. And as you can see from the data, you bring that with you, to unfamiliar cars, and to tracks you’ve never driven.

All drivers compared.