I’ve had a tow hitch on just about every car I’ve owned, even my Mini and Miata. I’ve never towed anything with my Miata, but I have a cargo carrier I use for taking an extra set of tires to the race track.
The tow hitch also makes a convenient jacking point for the rear of the car, and I thought I might one day use it as the base for a quick-release diffuser.
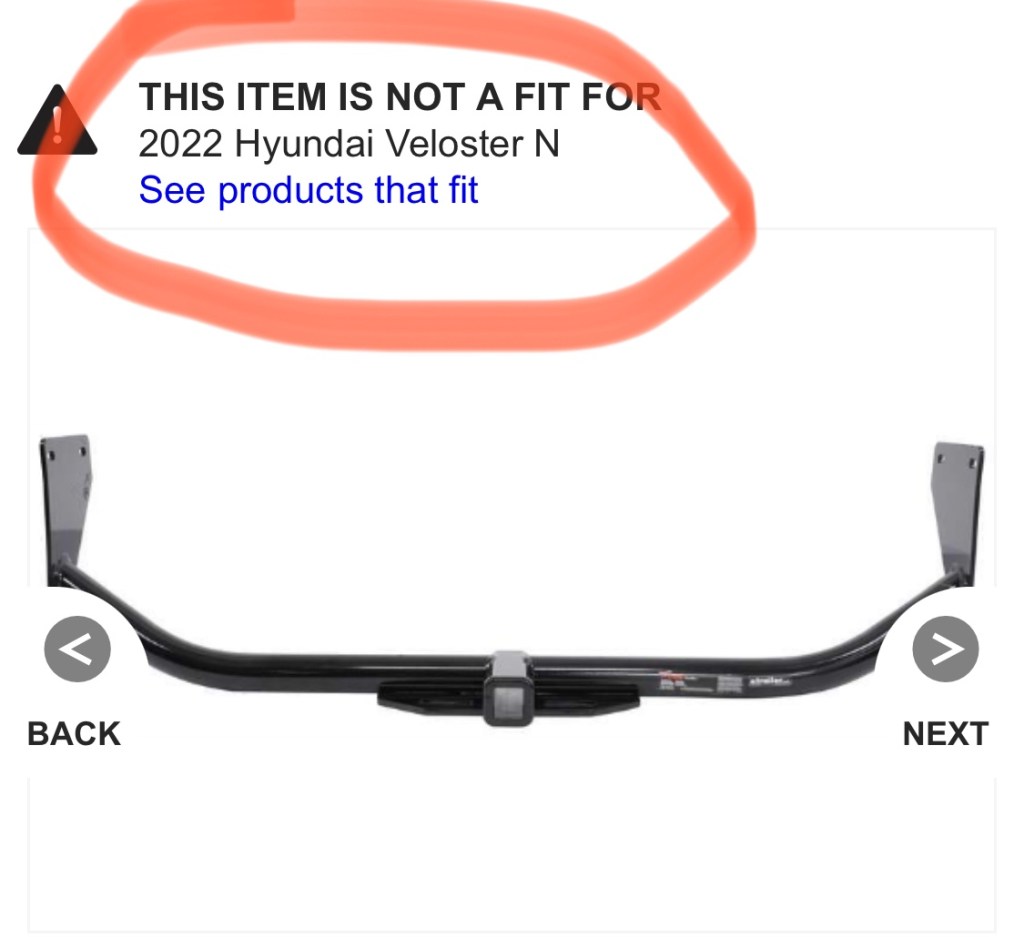
So naturally I ordered a tow hitch for my Veloster. I got the Curt model from eTrailer, and in my stupidity, didn’t realize it was for the non-N versions of the car. FML.
Completely missing the obvious.
The tow hitch sat on the shelf for a couple months while I pondered whether to return it or modify it. I saw a post on the Veloster N forum, where someone modified the Curt hitch to fit, and so I thought I might try to do that.
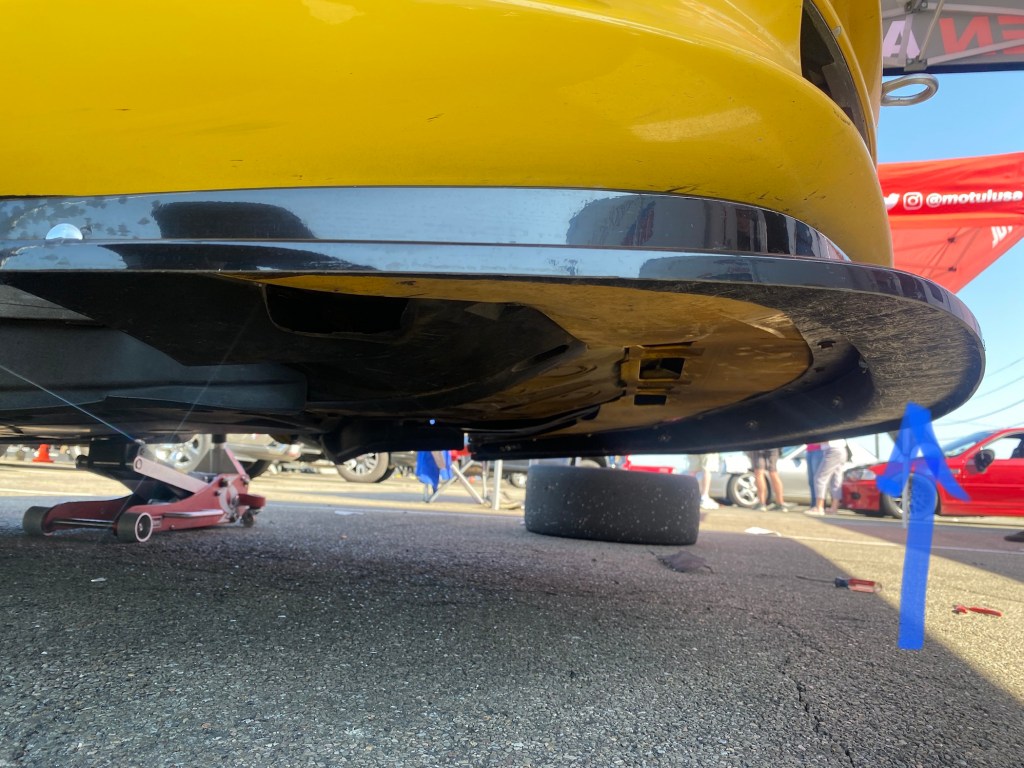
Yesterday was Father’s Day, and I had the day to myself to mess around, so I went after it. The first thing I did was remove the faux rear diffuser. I thought this would make access a lot easier, and it did, but it wasn’t the easiest thing to remove. Then I dropped the exhaust off the three rubber connectors, and test fit the hitch.
Fitting the tow hitch is easy by using a floor jack to raise it in position, then attaching the four supplied bolts. There was some body putty on my frame, which I had to scrape off before the ends would go into place.
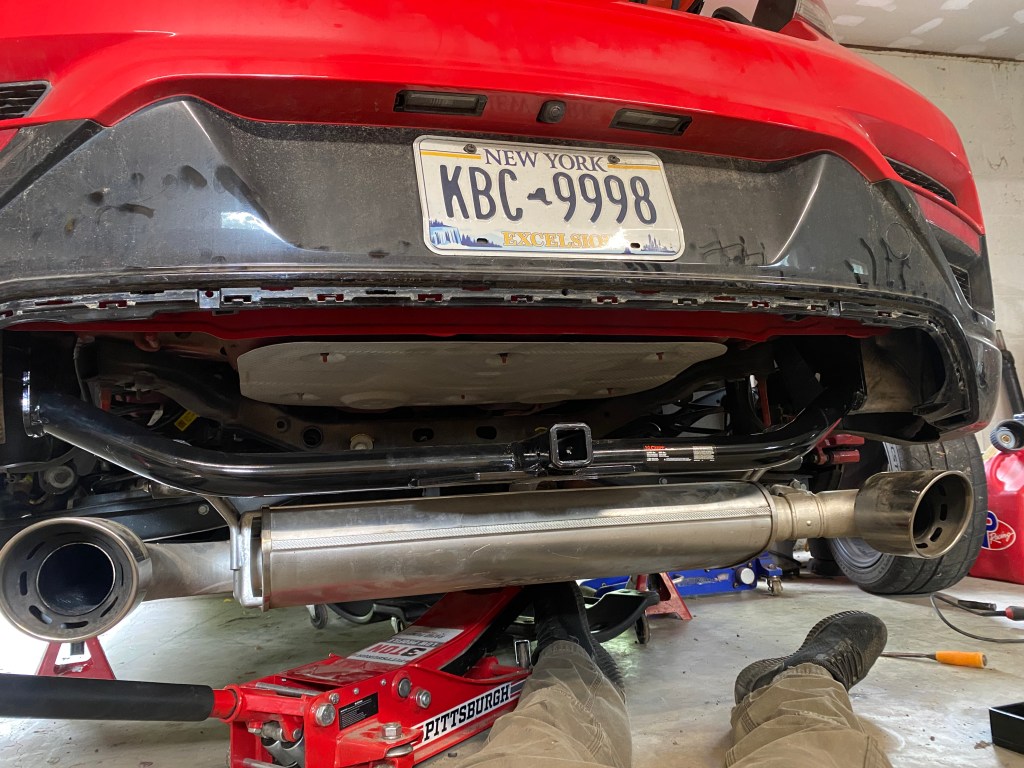
Bolted up as intended, the hitch sits quite low. When hitches are this low, they can ground out going up a driveway, and the height is generally too low most trailers with tongue jacks, and even some bike racks. More significantly, the hitch is also directly in the way of the muffler.
Tow hitch mounts quite low. Also, muffler is directly in the way.
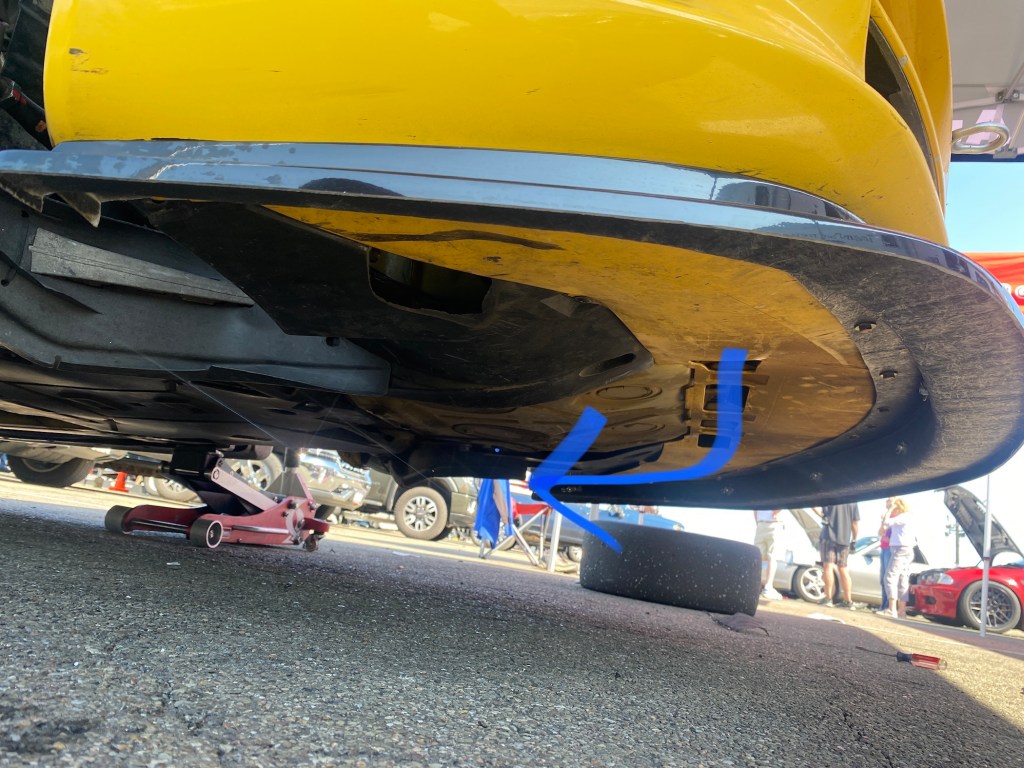
I had a few different ideas on how to modify the hitch, including making a new one using the existing side plates. But after measuring some more, I reasoned it might actually fit if the hitch went above the exhaust.
I cut 3.5” out of the side mounting plates and tack welded it together, and then test fitted it. So close! The muffler just barely made contact with the hitch.
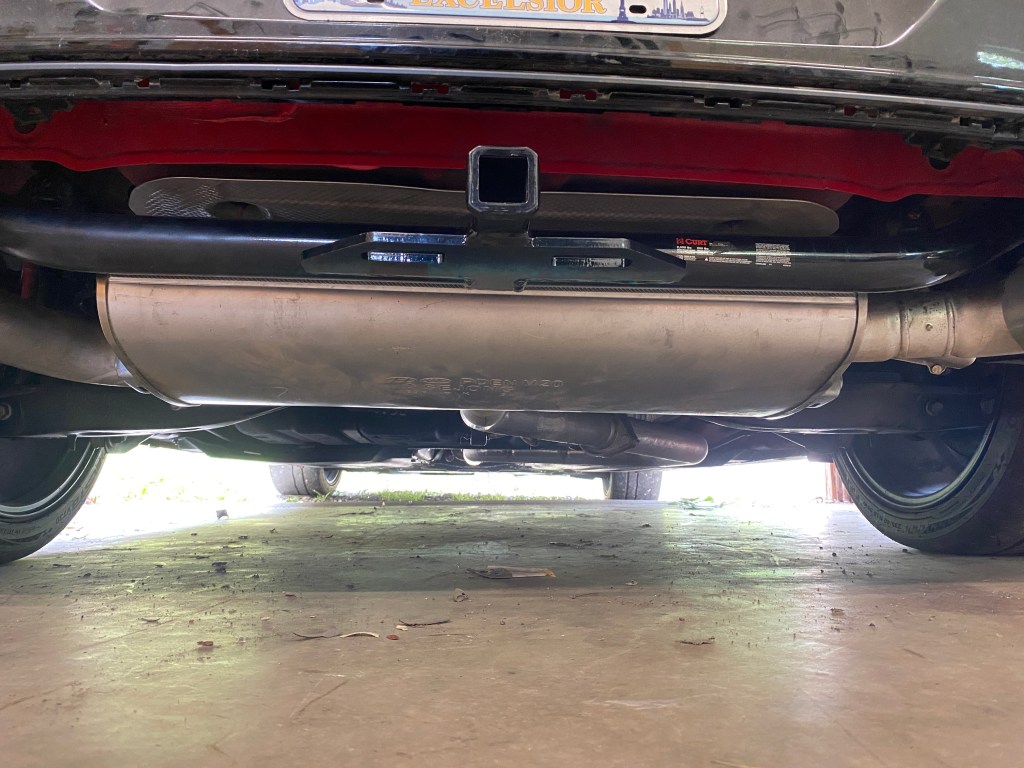
I cut off the tack welds with an angle grinder and moved the entire hitch portion half an inch rearward. Then I test fit it again and found it fit quite nicely. But I had mis-aligned the plates a couple degrees and the bolt holes were not lined up perfectly.
Moving the assembly rearward 1/2” gives the muffler plenty of room.
I could have widened the mounting holes, but instead cut the tack welds off one side, re-angled the end plate, and tacked it together again. Third time is the charm, right? Right. This time it fit like a glove, and so I removed it one last time, welded it all up, and spray painted the grinds and welds.
This sounds like a lot of work, and it was. Cutting and welding the mounting plates is a 20-30 minute job, but the trial and error part took hours. But probably the most time consuming part is removing the diffuser, which mounts with a bunch of annoying plastic tabs.
Fits perfectly, barely visible, and no fake diffuser. My original plan was to copy what this guy did, but note how much lower his tow hitch sits. I like mine better.
It would have been pretty easy to cut a square hole so that the trailer hitch protrudes through the bodywork. But I decided not to put the faux diffuser back on. I don’t like fake aero to begin with, and I actually think it looks way better this way. (Please don’t ask me what a cut bumper is worth for drag reduction!)
I’m not sure I’ll tow anything with the VN (the manual says not to), but now I can use my cargo carrier for race tires. I also got a hitch mounted bike rack.
Side note, the Harbor Freight hitch-mounted two-bike rack is a very well thought out design and a bargain at double the price. If you get a short hitch extender, you won’t need to pull the pin and swing the rack down; it’ll clear the hatch lid easily, so you can get to things in the trunk.
My twin brother wrote an article on You Suck at Racing about tire grip, and I’m going to steal some of that content to explore how tire grip and aero are related.
Braking, cornering, accelerating: everything depends on grip. Understanding how rubber tires create and lose grip is therefore fundamental. Let’s start with some theoretical laws of friction.
Amonton’s First Law: The force of friction is directly proportional to the applied load. If this law is true, then a 4000 lb car should stop in the same distance as a 2000 lb car. It weighs twice as much, but it also experiences twice as much friction, so theoretically, the weight of the car doesn’t matter.
Amonton’s Second Law: The force of friction is independent of the area of contact. This means that it doesn’t matter how wide your tires are. Skinny or fat, they have the same amount of grip. And grooves wouldn’t matter either.
Coulomb’s Law of Friction: Friction is independent of velocity. Which means you should have the same amount of grip at all speeds.
Finally, static friction is always greater than kinetic friction.
You might not believe these laws, because you’ve experienced that tires don’t really follow these laws of friction.
If weight doesn’t matter, then why do lightweight cars like Miatas out-handle bigger cars?
If tire width doesn’t matter, then why are wider tires faster? And by the same logic, given the same amount of rubber area, why are slicks faster than a tire with grooves?
If static friction is always greater than sliding friction, why is it faster to have slip angle through a corner?
Four important graphs
In order to understand how tires work, you have to understand the following four graphs. Introductory physics assumes that the coefficient of friction, Mu (μ), is a constant, and that may be true for a block sliding against a table top, but when it comes to tires, μ is not a constant.
Tires generate grip from molecular adhesion, mechanical keying, and hysteresis, and those factors are based on a combination of variables. In each of the graphs below, the coefficient of friction, Mu (μ), changes due to load, temperature, speed, and slip angle:
Graph A shows μ as a function of load (weight). If doubling weight doubled grip, then the line would be flat. But when you double the amount of weight on a tire, there are diminishing returns. When cornering heavily, the outside tires experience more load, and because of that, heavier cars lose more grip than light cars.
Graph B shows μ as a function of temperature. Every tire has an optimum temperature. Both cold and hot tires have less grip than one in the optimal range. If your tires are too wide, they may never get up to optimal temperature, and a narrower tire may heat up more favorably. For this reason, wider isn’t always better.
Tire Rack did a great test where they tested a bunch of wheel and tire widths. The fastest tire wasn’t the widest. And when they went to a wet track, the fastest lap was the narrowest tire.
One thing that contributes to heat is grooves. Squirming tread blocks are a major source of heat. As a result, grooved tires heat up more quickly than slicks. One reason for using slick tires is to spread the load better, but an even more important one is to prevent the rubber from overheating.
Graph C shows μ as a function of speed. The faster the car goes, the less time there is for keying; the ability for rubber to change shape and interact with the road. Under wet conditions, where adhesion no longer applies, grip is highly affected by speed.
Graph D shows μ as a function of slip angle. Every tire has an optimal slip angle. When a tire is twisted, which it always is to some degree, some parts of the contact patch are experiencing static friction while others are kinetic. This mixed state isn’t really addressed by any of the laws of friction, but it doesn’t make this any less real.
Ian made a drawing of what is happening between the road and the surface of your tire, which can help you further understand how tires grip.
Visualizing grip
The following image shows the surface of the road as a jagged green line on the bottom. (If the road surface was perfectly smooth, then the line would be horizontal. But because asphalt has imperfections with peaks and valleys, the road surface is represented as a jagged line.)
Panel A represents a tire (squiggly line) at rest, pressing into the surface of the road (jagged line).
Panel B is what happens when you add load: the rubber goes deeper into the surface, creating more grip. But there’s only so far you can push the rubber in. This is why doubling the load on a tire doesn’t double its grip. Panel B could also be softer rubber or hotter rubber. In both cases, the rubber conforms more easily to the surface, and with more contact, you get more grip.
Panel C shows what happens at high speed. The rubber doesn’t have as much time to change shape, so it doesn’t deliver as much grip from keying.
Panel D shows what happens when a tire overheats. The rubber comes apart, providing less contact with the surface. If the rubber gets hot enough, it may liquify or sublimate, creating a slippery layer between the surfaces.
This visual model isn’t perfect, as it doesn’t give why slip angle matters so much. But hopefully it helps you visualize the interface between your tires and the road, and why some factors add grip, and other factors take it away.
Aero and tires
So that’s how rubber grips the road, but there are other dynamic factors at play here, namely the aerodynamics of the vehicle.
Most cars without aero lift at speed, because the curved surface of the top of the car is longer than the bottom. In other words, cars are shaped like airplane wings, and like wings, they generate lift. The higher the air speed, the less traction there is.
Most cars have a coefficient of lift of around 0.3. Cars with a lot of curvature, like a fastback, have more lift than a three-box sedan or hatchback. By nature of their shape, most cars generate more lift over the rear tires than the front tires.
Cars also generate lift when in yaw, so if your car is pitched slightly sideways in a corner, it has even less traction. Nissan did some tests on this and found there is a fairly linear relationship between yaw angle and lift, and so the more sideways you get, the more the car lifts.
This means as you corner faster and faster, your rear tires have less and less rear grip. You already saw in graph C and panel C that tires have less grip at speed because they have less time for keying. So if you combine the keying losses with the lift and yaw losses, you get a car that’s lost a lot of grip on the rear tires.
And this is why it’s so important for race cars to have spoilers and/or wings.
Aero and lap times
To put some numbers on it, let’s take a look at a few NASA classes at Watkins Glen.
NASA Spec3 is a class for stock-bodied (no aero) E36 BMWs on Toyo RR tires measuring around 14.5 lbs/hp. The Spec3 lap record is 2:13.6.
NASA also has the ST5, class, which is a similar lbs/hp ratio to Spec3, but allows a splitter and wing. The ST5 record is 4.3 seconds faster: 2:09.27.
NASA also has a time trial class, TT5. TT5 and ST5 are the same formula, but the ST5 cars are racing wheel to wheel, whereas the TT5 cars are in a time trial situation with less traffic. Therefore, the TT5 laps are usually faster, but in this case, a surprising two seconds faster: 2:07.202.
If you compare the Spec3 lap record to ST5/TT5, can see that aero (splitter and wing) are worth about 4-6 seconds at Watkins Glen. Let’s call it 5 seconds for simplicity. This isn’t a difference in tire grip, as most cars are on Toyo RRs, but some cars are on Maxxis RC1 for the same lbs/hp (or Hoosiers at a significant penalty to lbs/hp).
Let’s take a look at where the difference is. On the front and back straights, there isn’t a huge difference in top speed, so the cars are pretty similar in lbs/hp. In Turn 7, where aero doesn’t make much difference, the minimum corner speeds (vMin) are pretty similar, and so we’re looking at cars with equal grip, as well. But take a look at Turn 10, the aero cars are going about 10 mph faster!
Lap
Front
Back
T7
T10
Spec3
2:13.6
121
126
62
87
ST5
2:09.3
118
1277
63
96
TT5
2:07.2
123
128
62
98
Now I’m making some pretty big assumptions on driver skill and track conditions being equal. So I’ll do some simulations in OptimumLap, and see if the computer world agrees with the real world.
I’ll start with the Spec3 car using drag and lift values of .44 and 0.3 which is probably in the right area. With these values I get a lap time of 2:13.82 which is pretty close to the Spec3 lap record. I’ll then add a splitter and wing to bring the Cd to .47 and Cl to -0.8 which are pretty fair values for the added aero. Doing only these aero mods on exactly the same car, I get a 2:08.84 lap, which is right in the middle of the 5-second delta we saw in the real world.
So that’s a pretty good verification of aero being worth about 5 seconds. So next I want to take a look at Turn 10 and see how much aero helps here, and if there’s really a 10 mph delta.
Turn 10 Watkins Glen
For the OptimumLap simulations, I’ll use four cars instead of two cars to get more granularity. I’ve given them the same tires with 1.2g of lateral grip, but different aero packages.
No aero – This is the Spec3 car with a coefficient of lift of 0.30, and is represented by the red line.
Zero lift – This car has some minor aero like a spoiler, which cancels out lift, and so the Cl is zero. This is represented by the orange line.
Mild aero – This is the kind of lift and drag you’d see from a spoiler and airdam done professionally (NASCAR level). This is represented by the blue line.
Good aero – This is a car with a splitter and wing, and is represented by the green line.
I’ll examine the grip in the middle of Turn 10, at the 16000′ mark from the start/finish line. This is not quite the minimum speed in the corner, but shows a high lateral load and is as good a place as any to look at G forces. There are a lot of spikes in the graph (like you’d see in Aim Solo data), so imagine it’s more of a smooth arc.
Lateral Gs in Turn 10 on the same tire.
Starting at the bottom of the graph, notice that the car represented by the red line is pulling only 1.14 Gs. Recall that I gave all the tires the same 1.2g of grip, but because of aerodynamic lift, they are losing traction at speed. This is a normal situation for a street car or spec racer with no aero. What the simulation doesn’t show is that most of the grip is lost on the rear tires.
The orange line is a car with a spoiler, which mostly cancels out lift. Lateral Gs are very close to the the static 1.2g value.
The blue line has more than 1.29g grip because tire load is increased with downforce.
The green line is even more dramatic, with 1.4G grip. This is significantly more grip than the car with no aero.
You might be wondering how an increase in lateral Gs plays out in speed through the corner, which is the next graph. I’ve chosen the same 16000′ spot on track to measure the speed, and you can see it’s a difference of almost 10 mph between fastest and slowest.
Turn 10 is a very fast corner, and you’d see a smaller delta on a slower corner, but this is still pretty remarkable. By increasing the load on the tires, tire grip went from 1.14 to 1.4 Gs, and the car with good aero went about 10 mph faster in the middle of the corner.
Downforce and tire wear
Most people imagine that aerodynamic downforce will make your tires wear out faster. More grip = more wear, right? No. Oddly, downforce makes tires last longer.
Tires wear by abrasion; from sliding or spinning. Have you ever flat spotted a tire? Then you know that sliding a tire can wear it out in a couple seconds! Aero increases the load on the tire, giving you more grip, which makes it less likely to spin or lock up.
Aerodynamic downforce also loads the tires more equally. When cornering, the outside tires get loaded more, as a normal byproduct of mechanical grip. However, aero loads are based only on air, and is balanced across the car, left to right, helping to balance the car better.
One could even imagine an active aero device that would split the wing in half and only load the inside tires. Or rudders or vanes that help the car turn using air alone, and use the tires even less.
But let’s jump back from fantasy land… in reality, you get more aerodynamic downforce from rear aero than front aero, and this helps a lot in braking zones, increasing rear load and rear grip. The same is true in acceleration, and more rear grip reduces tire wear (on rear wheel drive cars).
Another way aero increases tire life is when you drive under the limit of the tire. For example, take Turn 10 at Watkins Glen again. Miatas can usually go through at full speed or with a slight lift on entry, and that’s because there isn’t much of a straight between Turn 9 and Turn 10 and Miatas are dog slow. If you’re going through at 85 mph without aero and on the limit of traction, you’ll go through it with aero at the same speed, but well under the limit, and you’ll wear the tires less.
The uphill esses are another place where a Miata is flat out while cornering. You can’t ever reach the limit of lateral grip because the car can’t accelerate fast enough to get there. So you slip less and use less tire.
Now this isn’t going to be true at every race track, most of the time when you have a higher limit, you fuggin use all of it. But sometimes there’s a corner or two where aero now puts you under the limit, and in a long endurance race, this can be the difference between changing tires mid race, or simply saving money. The point being, aerodynamic downforce can make your tires last longer if it keeps your car from sliding.
A good real-world example is the 2000-2002 Corvette SCCA cars, which went from a 315 rear tire in 2000 to a 275 tire in 2001. To increase grip, a rear wing was added in 2001, but it wasn’t enough and tires would only last about 4 laps before starting to go off. After optimizing the aero in a wind tunnel to create more downforce, the same tires in 2002 would last an entire race.
Aerodynamic balance
At this point I’ve only looked at how aerodynamic downforce affects grip and longevity due to increased tire load. But there are other aero factors at play that are important.
Earlier in this way too long blog post, I by mentioned that cars without aero lose rear grip from lift and yaw. In truth, the car loses both front and rear grip, but it loses more rear grip. As a consequence, as the car goes faster, it transitions more and more to oversteer. Most people find this an unsettling situation.
Personally, I don’t mind if a car oversteers at low speed, in fact, I like it. But if it does that at high speed, it scares the shit out of me. Ideally, I like a car that rotates easily at low speed and then transitions to understeer at high speed. This is ridiculously easy to do: add a big wing, and then tune the amount of understeer by adding or removing wing angle.
This is the magic of dynamically balancing the load on your tires using downforce. It’s so easy, and it’s so tunable. However, rear wings and end plates also increase stability by increasing the static margin.
Static margin is the distance between the center of gravity and the center of pressure. Anything that adds rear drag increases the static margin, sort of like streamers on a kite tail. In addition, horizontal areas on the back off your car, like big end plates, shark fins, or even bodywork like a hatchback or station wagon, increases the static margin through sideways resistance to air.
A greater static margin makes the car harder to turn, but also makes the car more stable. When a car goes over the limit of grip, the driver must make steering corrections. Cars that have a higher static margin require fewer steering corrections to bring the car back into line, which is easier on the driver. This also ends up being easier on the tires, and can make the car faster, if a bit less exciting to drive.
Conclusions
Tire grip is arguably the most important factor on a race car. Understanding how tires make grip is therefore one of the most important things a racing driver needs to know. Aerodynamic downforce can greatly influence the balance and grip of the tires at different speeds, and can be used for tuning the car’s handling and ultimately make the car turn faster lap times, and/or stay on track for a longer duration.
I saw a car last week with some of the worst front-end aero I’ve ever seen. No, this wasn’t a crapcan shitbox at a 24 Hours of Lemons race, it was a Porsche 911 GT3 at Watkins Glen.
The car didn’t come from the factory this way, these were user-modifed alterations. The mechanic who services the car does the aero, but he clearly doesn’t understand the fundamentals of how air moves around a car. The owner also doesn’t know anything about aero, and so he trusts the mechanic.
The first thing I notice about the car is it has canards… but doesn’t have underbody aero or a diffuser. Canards are useful for spinning a vortex on the side of the car, which helps the underbody aero work better by sealing the sides, so that air doesn’t intrude underneath. But this car has no underbody aero.
So I asked the mechanic why he put canards on his customer’s car, and he said because it’s been known to fix understeer on BMWs. Wait, what?
What BMWs are we talking about? Unless we’re talking about a half-million dollar 50-year old BMW M1, it’s going to have the engine in the front, and so it won’t have nearly the same weight distribution as a rear-engined 911, and so the baseline aero would be totally different. The standard formula is to balance aero with chassis aero, and on a 911 that means more rear downforce, not more front.
I’m curious if these BMWs were understeering at slow speed or high speed or both? If it’s at slow speed, this isn’t a problem you can fix with aero. If only at high speed, there’s a much easier fix.
There are so many ways to fix understeer on BMWs (or any car) I find it surprising that fitting canards is the preferred method. I wonder if it was the canard manufacturer who started this trend?
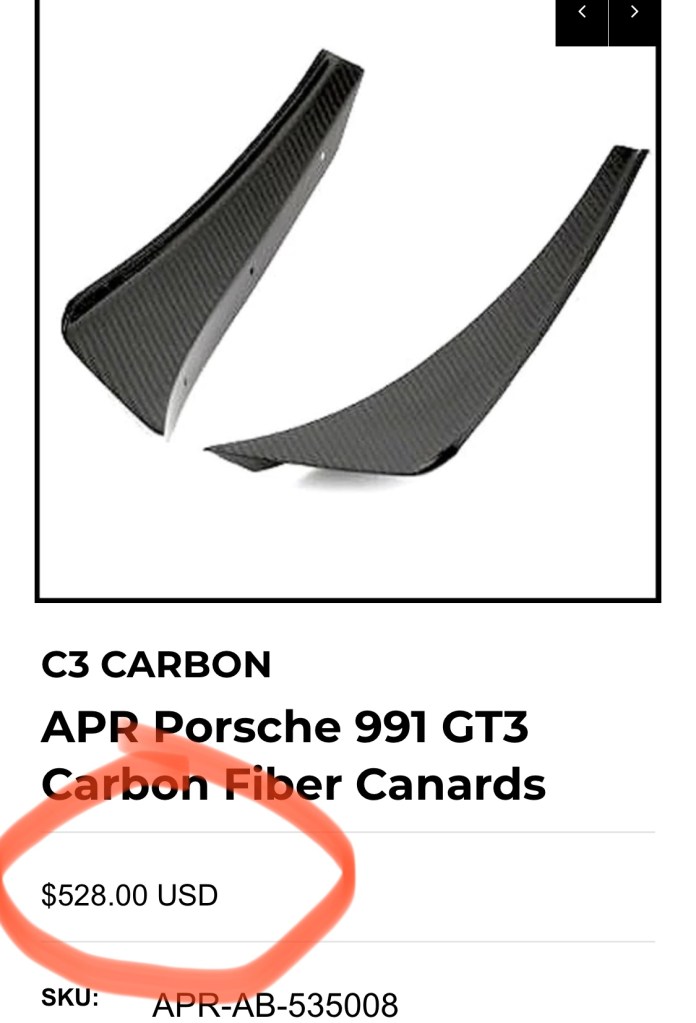
This particular 911 GT3 has only has one canard per side, which is also highly suspect, because a pair on each side is more effective at creating a vortex. If you look at a proper race car that is designed to use canards, they are mounted two to a side, one on top of the other.
I’ll take four of these, please!
Anyway, the jump from “fixes BMWs” to “fixes GT3s,” is more of a leap of faith than sound reasoning. I must admit that the simplicity and universality of this solution is very Occam’s Razor, and in this manner I fully support it.
Except for this one thing: canards don’t make a lot of front downforce because they don’t have an airfoil shape. Wings create downforce from pressure on the top side, and suction underneath, and the suction side does the most work. Wings are also highly efficient with a lift/drag ratio of 10:1 or greater. Canards are super draggy and have a L/D of 3:1 or worse (Katz).
Because canards aren’t a proper airfoil, only the pressure side of the canard creates downforce, the air on the back side just detaches and causes drag. Also, there isn’t much planform area, and being so narrow, a disproportionate amount of that area is in the boundary layer, which is stagnant. So whatever downforce they make isn’t much. You could get the same front grip without the drag penalty by putting a 20 pound sack of potatoes in the frunk.
So if canards are truly fixing understeer on BMWs, it’s not by creating front downforce, it’s by the vortex they create. This propagates downstream as turbulence and reduces the effectiveness of the rear wing. That’s right, you didn’t fix understeer by adding a bunch of front grip, but by reducing rear grip. It seems pretty obvious to me, but I guess I’ll mention it for the canard crowd: adjusting the wing for less angle is a much better way to reduce rear downforce at speed. And as a consequence, it also reduces drag.
Anyway I wrapped up that conversation about canards and it left me wondering if the mechanic knew anything about aerodynamics. What I noticed next made me certain that he didn’t. He completely removed the front undertray.
The undertray is essential; it reduces drag, aids in cooling, and most importantly, it’s what provides the front end downforce! Well, no wonder the car understeered, you took away all the suction and gave it a bunch of front end lift!
I looked under the car and right away I noticed a sharp edge where air will separate. After detaching from the front lip, the air then has to rise an inch or so to stay attached to the underside, and it can’t change direction so quickly, so it remains detached, creating drag.
Air detaches at the front lip.
The next thing I see are a trio of holes under the car where air exits the radiator. Guess what? All that air going through the radiator now creates drag and lift underneath the car!
Air exits the radiator and goes under the car….
One thing that surprised me was that the car comes from the factory with splitter diffusers. Well played, Porsche, well played. These diffusers help air expand, which accelerates the air in front of them, creating more downforce. Unfortunately on this car, there’s no undertray, so the splitter diffusers accelerate the air over a dirty, detached surface. I mean, there’s even a hole in it.
Splitter diffusers from the factory doing absolutely nothing for downforce in this sorry state.
Fixing this
I could fix this car’s front aero and it would go a couple seconds faster at Watkins Glen. As I mentioned at the end of The Dunning-Kruger of Car Aerodynamics, aero is largely the following principles: attached flows, changing the direction of air, maximizing suction, managing tire wakes, and manipulating vortices. What did I mean by that?
Starting at the front, I’d put a piece of Meranti BS6566 under that front lip. I’d cut it to fit snug and round the underside of the front lip, so air stays attached.
I’d then hinge the undertray at about half distance and slant it upwards to join with the splitter diffusers. By angling the entire rear half of the undertray, it would force the air to change direction and expand. This is essentially a diffuser running across the full width of the car. This will maximize suction in front of that area, and make a shit ton of downforce.
I want to keep all that suction in there, but there’s a jet of air that squirts sideways from the front tires and shoots directly into the low pressure area. As the tire rolls forward, it compresses the air underneath, and when combined with the velocity of air hitting the tire, you get a phenomenon called tire squirt.
To minimize that effect, I’d use a trio of strakes (similar to canards) to spin a vortex and smash it sideways into into the face of the tire. Vortices take energy to spin, and so this takes away energy in the air hitting the tire, which reduces tire squirt. The vortex spins outboard which aids extraction from underneath, increasing suction.
The top side of the splitter has exposed ends doing nothing. I wrote about that in Your Splitter Sucks, and rather than using something like an air fence, I’d either make vertical spats in front of the tires to create more local downforce on top of the splitter blade, or add just a simple piece of angle aluminum to kick air up and out and create more suction underneath.
Then I’d vent the fenders, first by pulling the back edge away to create a gap. You’ll recall that the car already has splitter diffusers dumping behind the wheels, and the venting is necessary to allow the air from the wheel wells to escape. This helps the splitter create more downforce.
I’d also put a vent on top of each fender, The purpose is similar to the vent behind the wheel, but with the added benefit of extracting air upwards. Air moving upwards pushes the car downwards.
There’s already a vent on the top of the bumper behind the radiator, and I’d tilt the radiator forward, and duct and extract the air upwards. Apparently later model GT3s have this style extractor vent from the factory. Sending air upwards instead of underneath the car makes downforce instead of lift.
The extractor vents on the fenders and the radiator would both get a wicker on the front edge. This holds local pressure on the upwind side, and locates a higher stagnation point on the downwind side. This change in pressure and change in direction creates more downforce.
There are probably a few smaller things, but these modifications would cover most of the front end. Oh, and the first thing I’d do is remove the fucking canards.
For the few dozen of you who subscribe to the blog, let me update you on some of the things that have been happening in my life, and how that’s going to affect this site and future content.
I bought a Veloster N for what I thought were pretty good and mature reasons. I took the car to Watkins Glen for Grid Life, but I didn’t really get a chance to open it up in the monsoon conditions. An NC Miata would have been a better choice (if you don’t get that joke, it’s a boat reference).
Then I drove the VN out to Detroit to see my buddy Chris Gailey, and in preparation for that, I built a bunch of aero parts for testing. No plan survives the enemy, and my Veloster didn’t survive one lap.
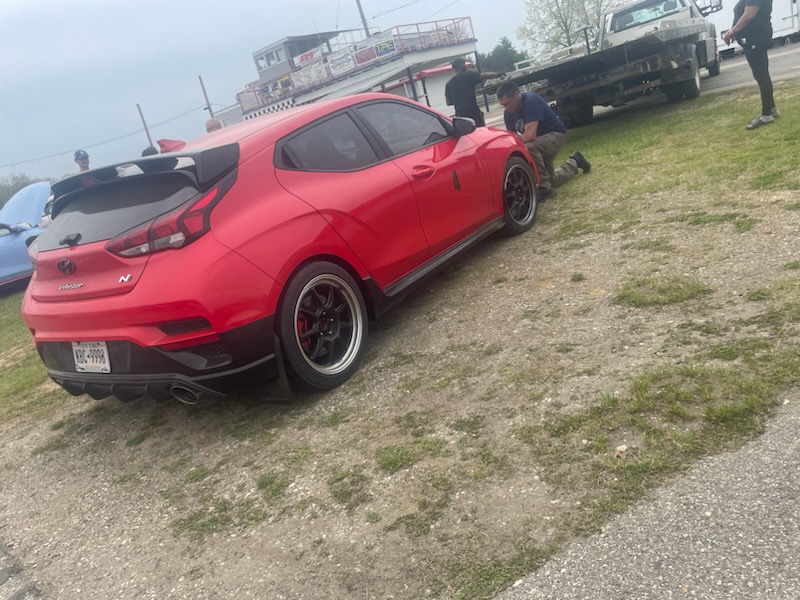
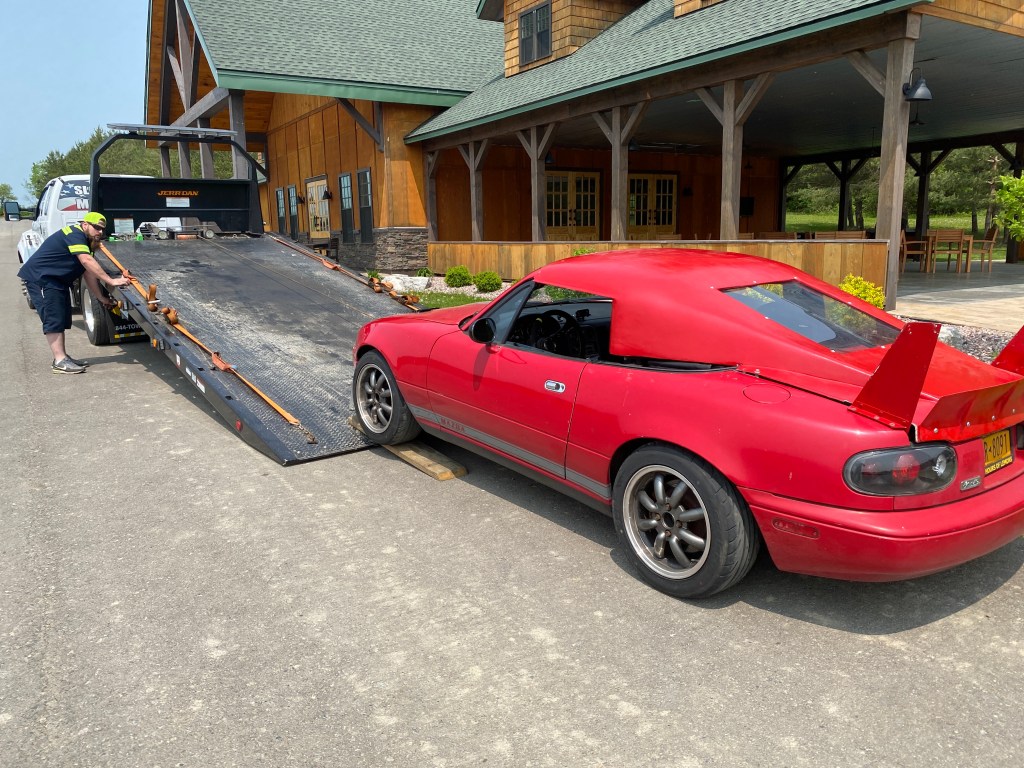
I accelerated out of T2 at Waterford and heard a loud noise, which then got louder, kind of like an exhaust gasket getting blown out. I’d recently replaced the straight pipe with OEM, so I thought maybe this was a gasket issue. But then the car lost power, and then died as I entered the pits.
We took off the undertray and found oil; it didn’t look good. A warning came up on the screen, I touched that, and it called Hyundai service. They said they’d pick up the car and take it to the Hyundai dealership, Glassman Hyundai in Southfield.
Sad face emoji
While waiting for the tow truck driver to arrive (high as a kite), I let Chris’s son have my track day. The good folks at Summer Track Days allowed Griffin to drive in my place, and I let Griffin borrow my helmet. Unbeknownst to me, Griffin let his buddy borrow my helmet so he could ride shotgun. Welp, the passenger got sick, couldn’t get my helmet off in time, and threw up all over the inside of my lid. No good deed goes unpunished.
We rented a Jeep Grand Cherokee, possibly the worst car I’ve ever driven, and drove 500 miles home to the smell of stale cigarettes. People who smoke in rental cars should have their lungs ripped out. Fuck you.
The people at Glassman Hyundai were awesome, especially Ralph, and kept in touch with me. The good news: the motor will be replaced under warranty. The bad news: N motors are on “international backorder status.” I’m pretty much expecting October.
I had some track days coming up, so I dusted off my 1.6 Miata, which recently had HLAs serviced and new valve springs. I spent a bunch of time on new aero for that, including fitting my fastback to it.
Same shit, different day
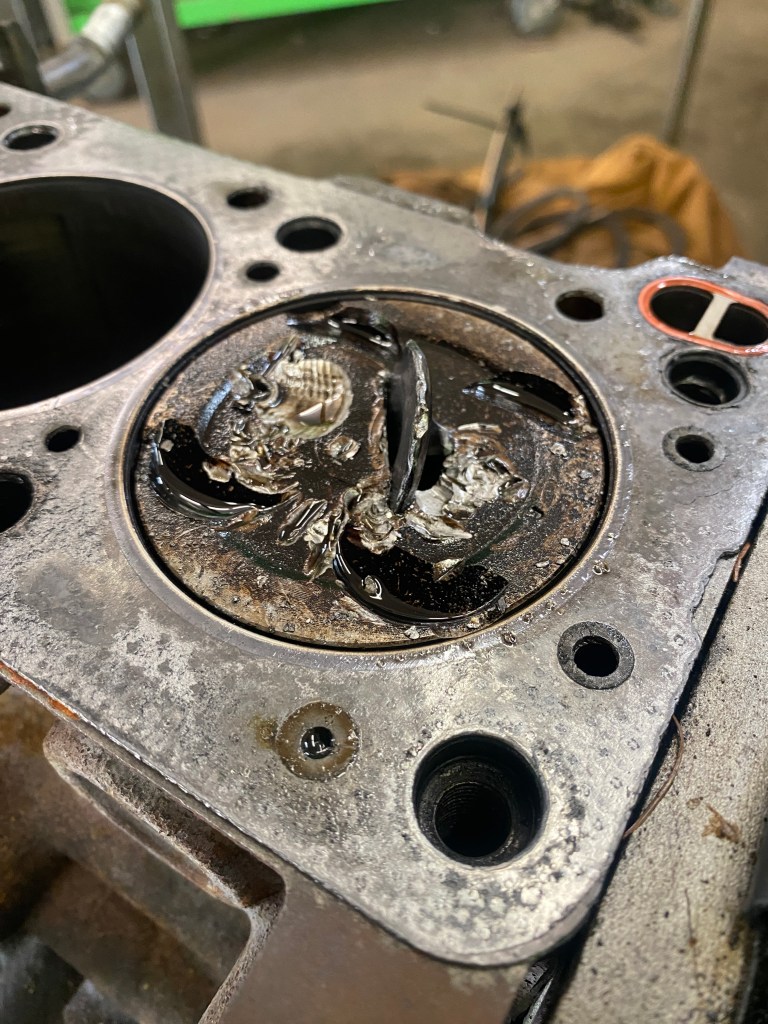
Then I took it up to Pineview, and it dropped a valve in the first session.
So now I’ve got three broken cars and four broken engines (my race car’s engines are also currently apart) and I have nothing to drive for the PCA event coming in a few days. So I figure I’ll find a 1.6 engine, throw it in there stock, and at least I can drive something for two days at Watkins Glen.
I found a 1.6 a few hours away for $750, and tried to trace back the ownership. It was apparently Dieter’s engine once upon a time, and I get his assurances that it’s decent. So I buy the engine, take it over the Shade Tree, and have them install it. Except the engine is rusted on the inside and worthless. WTF?
Well, apparently Dieter had two engines, this one isn’t the one he was talking about. This engine used to be Stefan’s, and he pulled it out of a junkyard car and sold it before checking into it. Fucking boat anchor, that’s all it’s good for.
So now I’ve got five broken engines and no car, so I figure I’ll go to the PCA event and just do data coaching. That didn’t really work out great due to some scheduling mishaps (the classroom sessions were double booked with my data sessions), and then just a lack of people wanting to do data. So I didn’t get a chance to use my vMin coaching tools or show the slide deck I worked so hard on.
So I sat in the stands with Josh and watched turn 10 for a bit. In an entire session (20+ minutes), four people hit the rumble strip on exit. I’d say 90% of the cars left a car width or more on the exit of the turn. A good number of cars exited turn 10 in the middle of the track. Did I mention this was the advanced run group? Maybe data coaching isn’t that important.
All of this has kind of reframed what I want to do with my life. I’ve spent 12 years racing and being a prisoner of this hobby. And it isn’t just the racing I got into, there’s the instructing, data coaching, racing rules, Pineview bullshit, etc. And of course all of the aerodynamic crap: theory, building, testing, simulations, and eventually writing it down here.
I’m not sure what comes next, but I’m due a break from the chaos. One thing I’ve decided for sure is I’m no longer owning a racing team or any Miatas. I’m selling or giving away everything Miata related. It’s been a great journey, but that part of the journey has come to an end.
As soon as I’d made that decision, I felt better. My wife simply said “It’s about fucking time!”
I’m still going to write; I have a lot of unfinished drafts and some really good ones coming up. I’m still going to race, but it’ll be as an arrive-and-drive. I’m still going to track my Veloster and do a bunch of aero experiments, but it’s going to be a while before I get back to it. The future is undefined, but looks brighter already.
Just today Ralph from Hyundai sent me a little movie – the new engine is in, the car is running, and it’s ready to be picked up. Hallefuckinglujah.
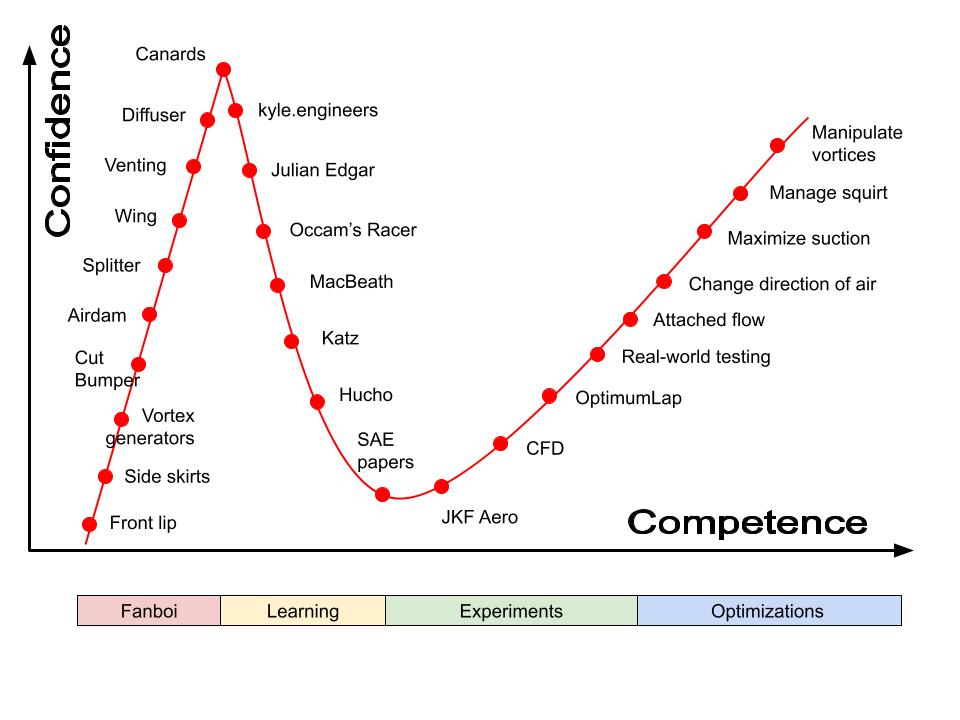
My brother recently wrote a blog post on the Driving Progression, which is a Dunning-Kruger of performance driving. I thought it would be fun to do the same thing for aerodynamics.
If you don’t know what the Dunning-Kruger effect is, it’s that people with very little knowledge have a lot of confidence. They’ll freely share the benefit of their inexperience with everyone. As they gain knowledge, they start to realize they don’t know anything, and lose confidence, eventually reaching a low point of “I don’t know shit.” After hitting rock bottom, an increase in knowledge steadily rebuilds confidence to the point that they master the topic.
The D-K effect is not about being stupid, it’s about not knowing any better. That’s certainly how I started my journey through aerodynamics, and it’s probably similar to how other people got started.
I’ve identified four general stages of the D-K effect, which I’m calling Fanboi, Learning, Experiments, and Optimization.
Fanboi – Buying aero parts for looks, drag reduction, or blind trust.
Learning – The apple of knowledge brings despair.
Experiments– Tools and experiments to expand knowledge.
Optimizations – Applying aerodynamic principles to any object with good results.
Fanboi
The first phase of aerodynamics is largely acquiring parts without understanding their specific use.
Appearance – Many people buy aero parts because they look cool. Most dealer options like a front lip, side skirts, or spoiler are early on the upward slope.
Drag reduction – People easily grasp the concept of drag reduction, and not knowing any better, it defines the next level of purchases or DIY projects.
Blind trust – At this point a person has bought a wing or spoiler and some other aero that has good results (I dropped 3 seconds with a wing!), and now they think more aero is better and buy it all, whether or not it’s designed well or would be useful on their car.
You can ask a fanboi why they have this aero part, or how it works, and you’ll get a reply that has nothing to do with personal aero knowledge and everything to do with blind trust in the manufacturer. Businesses have a vested interest in parting you with your money, are they really the people you should trust on this matter?
Some people never get past the Fanboi phase, and good for them, ignorance is bliss. But some of them watch a video or read a book, or god forbid they find this website, and then they fall down a very deep hole into despair.
Learning
The next phase begins when a person does actual research into aerodynamics, and thus begins a slippery slope down Dunning-Kruger’s backside. Often YouTube is their first inkling that things don’t work exactly the way they’d hoped. For example, maybe they saw Kyle Forster’s video on how wings don’t work with convertibles. Or they watch Julian Edgar read yet another bedtime story from his book.
Some people might stumble onto my Occam’s Racer website, and if you’re a regular reader, you know I do a lot of debunking and peeking behind the curtain. Other notable stops on the way to the pit of despair include Competition Car Aerodynamics, by MacBeath and the more challenging Race Car Aerodynamics, by Katz.
From there you might dig deeper into to the grandfather of texts, Hucho’s Aerodynamics of Road Vehicles, or hit the lowest point, SAE papers and peer-reviewed university studies. At this point aerodynamics, or should I say, fluid dynamics, is so full of numbers, equations, and nerd stuff that you feel you know shit-all of nothing.
Experiments
Further knowledge comes through experimentation. Just as you were once a fool to trust aerodynamics manufacturers, you’d be a fool to trust anything you read or see on YouTube. So this next phase is where you get hands-on, experimenting to see the result.
Personally I jumped right into Airfoil Tools, OptimumLap, and other free resources, then DIY’d my own projects. A more sensible approach, and one I took later, is to enroll in Kyle Forster’s (JKF Aero) online course on aerodynamics.
Most of us aren’t going to have the means to get into CFD, and so Kyle does that for you, performing the experiments you’d do, and doing a nose-to-tail breakdown of different cars in CFD. If you are serious about aero, there’s no better use of your time or money.
It’s worth noting that Kyle uses OptimumLap in his course, since it’s a great way to get instant validation on whether something works or doesn’t, and how it plays out on different race tracks. I was already using the program for years before taking Kyle’s course, and it being FREE, everyone who is serious about aero or validating any other modifications to their car should use it.
The final stop in the Experiments stage is oddly where I started: real-world testing. That could mean going to a wind tunnel, or in my case, hiring a professional to make Watkins Glen into our own personal wind tunnel. And with that hard data, one comes to certain realizations about aero, and it turns out that it’s not that difficult after all.
Optimizations
Once you reach this level of understanding, you realize it’s not about the parts, but by applying certain principles. You are either optimizing the car for a particular rule set, or in the absence or racing rules, to handling characteristics, efficiency, a particular race track, or other factors.
The principles go something like this:
Attached flow – You want to keep air attached along surfaces. A thicker and turbulent boundary layer is better than detached. Streamlined objects have rounded leading edges and break cleanly at the trailing edge.
Change the directionof air – If you aren’t changing the direction of airflow, you aren’t doing dick. Most often you want to send air upwards, creating an opposing force: downforce. You don’t want to change direction too much or air detaches, causing drag and destroying downforce.
Maximize suction – Pressure is good, suction is better. Maximize suction and minimize losses to the underside of splitters, underbody, and wings.
Manage tires – Tires are draggy, disruptive to airflow, and create a jet of air as they roll forward on the ground. Manage tire drag and squirt to mitigate losses.
Manipulate vortices – Vortices are usually thought of in terms of loss and wasted energy, but you can manipulate vortices to create air fences, delay flow separation, reduce energy on the face of the tire, etc. At the bleeding edge of performance, like F1, it seems like most of the effort is spent managing and manipulating vortices.
Conclusion
There is nothing wrong with being on the early, upward slope of the Dunning-Kruger graph. Choosing aero parts because you like the way they look, or because you support a particular manufacturer, or because they work and you don’t care why, is a happy place to be. This covers the 90% usecase.
In reflection, I can’t think of a compelling reason to get into early aerodynamic texts or plunge into SAE papers, they can be too much. Instead, leave that shit to me, I’ll translate it for the masses and make it fun to read (I won’t say “dumb it down” because y’all are smart or you wouldn’t be here).
But if you really want to get into aerodynamics because you’re developing something for the last 10% of performance, or because you need a competitive edge, then I’d start with the JKF aero course. You’ll definitely be making your own aero parts, because the aftermarket doesn’t support the kinds of things you’ll be doing, so plan on investing in tools and materials.
This is a worthy journey, but all-consuming, and requires sacrifices. Have fun with it.
This year I’m teaming up with Chris White and Josh Herbert to offer data coaching at Watkins Glen International, for events organized by Niagara PCA. Other dates and tracks are TBD, get in touch with us if you’d like us to bring our data program to your event.
Data coaching is using GPS and car telemetry data to understand what the driver is doing in minute detail, and suggest ways to improve speed, consistency, and safety. Data coaching has benefits to students, coaches, and HPDE organizations.
For students, data coaching is an individualized, actionable improvement plan, using the best information possible. Every student has unique strengths and weaknesses, and data coaching pinpoints exactly what the student needs to work on.
To driving instructors, data coaching is a way to teach more than one student per day. As a right-seat instructor, I can only focus on one student at a time, but as a data coach, I can coach several people per day, and follow up with them afterwards.
For HPDE organizations, data coaching is an effective way to reinforce the curriculum. If you want to see if the student is releasing the brakes gradually, or following a prescribed racing line, or anything else you are teaching in class or on track, it’s as simple as looking at the data.
Data is not only useful as a coaching tool, but as a snapshot from a point in time. For example, if you suspect that your car is down on power compared to a previous date, you can look back at the data and see if your longitudinal acceleration has changed. Likewise, you might change parts on your car, and by comparing with previous points in time, you can quantify the differences each part makes.
Who is data coaching for?
Novice drivers don’t need data; they need to listen to their instructor. In rare cases a highly analytical student might learn primarily through seeing graphs and numbers, but for the 95% case, data is not a useful learning tool at the novice level.
Intermediate drivers absolutely need data coaching. Most HPDE organizations only have enough instructors for novice drivers, so there’s very little in-car instruction or coaching after the novice level. As a result, intermediate drivers often plateau for a long time using only the skills they learned as a novice.
Advanced drivers are in one of three camps: 1) those who understand that data is essential, 2) those who have never tried it, and 3) those who don’t want to know how bad they suck. For the first group, you might book a data coaching session with one of us as a second opinion, but you’re probably already on the right track. The second group is why we have this program! We’ll provide the hardware, software, and know-how to make you a better driver. If you’re in the third group, we have a new program to help break the ice: vMin coaching.
vMin coaching
The largest hurdle to data coaching isn’t the hardware, the software, or the ability to read the data. It’s “I don’t want to know how bad I suck.” I’m not being flippant, these are the exact words I hear all the time.
Listen, we all suck at driving. Every one of us has some corner we can’t get our head around or are afraid of. For me, it’s Turn 6 at Watkins Glen. I had a racing incident there with another car (my fault), and I still pussyfoot my way into and out of that corner. If I’m being completely honest, I also underdrive the bus stop and T11. “Hello, my name is Mario and I suck at driving.”
What’s also normal is that you have one or more corners you’re really good at. I have a lot of confidence in T7. You probably also have corners that you’re really good at, too. But is that a good corner, or do you just think so? And by the same measure, are the corners you suck at really that bad?
So you don’t want anyone to know how bad you suck, but you want to find out which corners you need to work on. You can do that by looking (privately) at your minimum corner speeds.
The importance of vMin
Pretty much everyone knows who Ross Bentley is, and I’d wager a good percentage of us have read Ultimate Speed Secrets. Aside from publishing books and teaching classes, Ross also had a subscription series called Speed Secrets Weekly, which was a weekly email of driving advice. On his 500th and final installment of Speed Secrets Weekly, Ross Bentley chose to save the best for last, and focus on what is arguably the most important aspect of performance driving: minimum corner speed.
Minimum corner speed, often abbreviated vMin, is the lowest speed you achieve in a corner. Why did Ross choose to write about vMin in his final SSW?
Min corner speed is one of the best measures of driver experience: Intermediate drivers throw away speed to optimize late braking; Advanced drivers hoard min speed like it’s gold.
Raising your min speed is often the easiest way to go faster.
Earlier I wrote that intermediate drivers need data coaching. The primary reason is because they place too much importance on late threshold braking. Brakes are not just for slowing the car – brakes are for adding front grip, changing weight balance, turning the car, and above all, setting the ideal minimum speed for each corner.
If your vMin is too low, you can’t make it up by driving harder: applying throttle early in the corner results in oversteer or understeer. If your vMin is too high, you’ll have to roll off the throttle mid corner, or be later to full throttle. If your vMin is just right, the car is easy to turn and your car corners effortlessly. So how do we find the minimum corner speed for each corner?
Estimating vMin in every corner
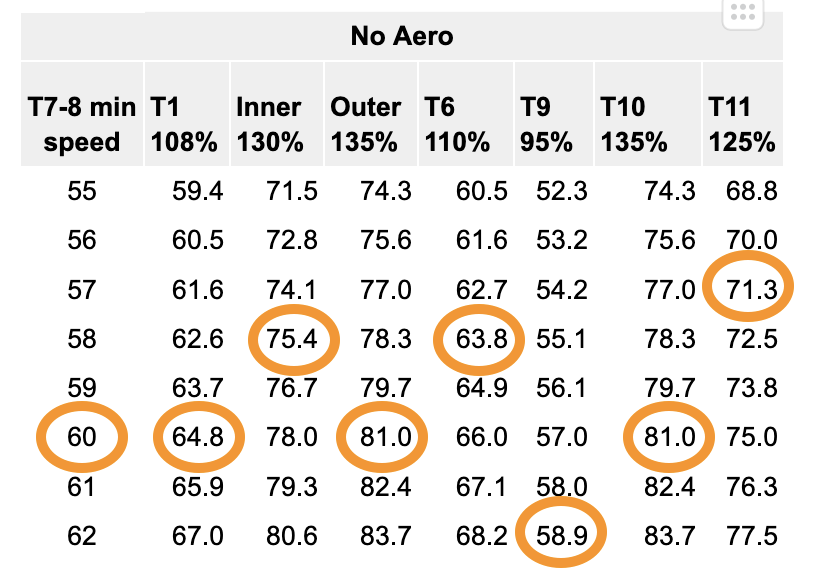
At Watkins Glen, you can estimate your vMin in every corner by looking at turns 7 and 8. The vMin in these corners are usually within 1 mph of each other, and you can use the greater of the two vMin values to determine your min speed in every other corner. For example, Turn 1 is typically 108% faster than Turns 7 and 8. Turn 10 is about 135% faster. It doesn’t matter if you’re on R-comps or all-season tires, it’s the same ratio.
To data coach yourself, I’ll give you a lookup table, and you’ll start by circling your vMin in each corner. Then read from left to right across from T7-8 and you’ll probably see that most corners are in the same row. However, some corners will be above that line – those are corners you can improve on. In the example below, this person could raise their vMin in the bus stop, T6, and T11.
You might have noticed that the table says “No Aero” at the top. Tire compound doesn’t change the ratio between the speeds in each corner, but downforce does. So I’ve created different lookup charts for cars with no aero, and varying levels of downforce.
You might be wondering how I got all this data. A lot of it comes from looking at professional drivers on YouTube. That’s right, you don’t need a fancy data gathering devices to log vMin. A phone app or video camera showing the MPH is enough to get the min speed. Of course I also backed this up with lots of Aim Solo data from veteran drivers. I put all this data into a spreadsheet and averaged the values and came up with the ratios for each corner. It was surprisingly consistent.
If you want to coach yourself on vMin I’ll be offering a classroom lecture once per day. I’ll explain the concept in more detail and hand out the the lookup tables and a cheat sheet of strategies (mostly coming from Ross Bentley) that will help raise your vMin. You can choose to share that with other people, or keep the data private.
By working on your min corner speed, you can see huge gains in terminal speed. It won’t surprise me when one of you tells me that a 1 mph increase in vMin gave you 3-5 MPH at the end of a straight. Once you see how important data is as a feedback mechanism, some of you may want to go deeper into one-on-one data coaching.
One-on-one data coaching
If you schedule a one-on-one data session with me, Chris, or Josh, this is how a typical data coaching day goes.
First we’ll give you an AIM Solo and mount it securely in your car so that you can reach the power button and see the display. We have suction cup mounts and rollbar mounts, or can use any 1″ RAM style mount that’s already in your car.
In the first session, just drive as you normally would. We need to make sure the unit is functioning 100% correctly, and get some baseline laps. We also want to make sure you can see the delta timer, if you choose to use that.
Delta timer
If you’ve never used a delta timer, you’re in for a treat. Any decent motorsports data logger (or phone-based lap timer) can be set for predictive or delta time.
In predictive mode, the main display shows the lap time that the Aim Solo thinks you’ll do if you continue at this pace. I don’t like this setting, because lap times are not something we need to focus on – there’s too much importance put on this metric, and it’s too granular to be useful.
I much prefer the delta timer mode, in which the display shows a + or – sign with the amount of seconds that is different from your best effort at that particular point on track. So, if you roll through T1 at Watkins sGlen and glance at the delta timer going up to the esses and see -00.55, you’ll know that whatever you did in T1 this time was a lot better than before. You can use the delta timer to try different lines and techniques and get immediate feedback on whether it was a good idea and execution… or not.
The delta timer is a distraction, so don’t look at it unless you have clear track around you and you’ve unwound the steering wheel. But once you’ve gotten the hang of looking at deltas, it can be difficult to drive without that feedback.
Race studio analysis
After a couple track sessions, bring the unit back so we can download and review the data. The first thing we’ll do is load your best lap into Race Studio and look at the speed trace. The shape of the speed trace shows where you brake and how hard, where you get on the gas, and how smooth you are.
Next we’ll load up some more laps to see how consistently you’re driving. Consistency isn’t necessarily the goal here, because it’s good to experiment with lines, braking points, etc. But if you’re repeatedly doing something good or bad, it’s worth noting.
Next we might look at all your laps and split them into sectors. Analyzing sector times is a great way to stitch together different laps. In a crowded run group, it can be difficult to get a clean lap, and by using sectors, we can estimate what your runs would look like, even on a crowded day.
There are a lot of other things we can look at during our 1:1 sessions. Most of it will depend on what we see in the data, which tells us what you need to work on.
Advanced data coaching
There’s a limited amount of coaching we can accomplish in one day, but once we have your data, we can do follow-up sessions afterwards.
Comparisons – Similar car and tires, different drivers. What can you learn from other people? What can you teach us?
Lat and Long G – Are you braking and cornering at the limit?
Friction circle – How well are you blending inputs?
Areas for improvement – Backing up the corner, compromise corners, racing line, etc.
One of the great things about data coaching is that it keeps you engaged between events. So instead of going home and not thinking about driving until your next event, you can make a plan for what you’ll do on your next DE. Using data feels like it shortens the time between events, and makes you faster in the interim.
Computer simulations
Another thing we can do with advanced data analysis is to create a computer model of your car and simulate your car on track in the virtual world. This allows us to change the tires, aero, weight, power, etc, and see what potential benefit this provides.
For example, I see a lot of people focusing on weight reduction. If you could remove 100 lbs of weight, what will that do? Well, I can tell you exactly (or rather the computer can tell you). And that goes for adding power, decreasing drag, increasing downforce, switching to softer tires, and many other variables.
Like advanced data coaching, this is a service we’d have to do in a follow-up session. But it all starts with getting the data.
Get signed up!
If you want data coaching at Watkins Glen, sign up for one of the Niagara PCA events. The vMin coaching is free, and the 1:1 data coaching is a modest $50.
I attended my first Grid Life event this weekend at Watkins Glen International. It was probably the best motorsports event I’ve ever attended. T.J. Lathrop has a blog called the RISING EDGE, and did a great job describing what’s different and better about about Grid Life, so go read that for the overview.
I can sum up my feelings about Grid Life with this: It’s what I’m doing in the future. Here are some additional random thoughts I had on the weekend.
HPDE coaching
Most of the festival events were held Friday on Saturday, with Sunday reserved mostly for HPDE. I pestered the Grid Life staff enough that they allowed me to be an HPDE instructor at this event, and it was a different experience. There’s no in-car instruction for novices. Yes, you read that correctly. Instead, the instructors are assigned three students (ish) and we coach them actively between sessions.
The coaches are assigned different areas on the track, and we keenly observe and report over radios what’s happening. We then get our flock together and go over the finer points.
And that probably works really well for some students. For some students who need someone in the car with them, this may not work out as well. But I will say that the novice group was very well behaved on track, and I don’t think this is any worse than any other kind of novice instruction, it’s just different.
I definitely talked more to my students than I normally would. The conversations starts well before the event, so we get to know our students and most importantly, make sure their cars are track-ready.
In fact one of my students came over to my race barn and I got to pre-tech his Miata. I also showed him some hardtops and wings I’ve built, because in this strange world of coincidences, Lucien is a reader of this blog, and is one of a few who have bought me a coffee! I’m going to do him one better and eat at his family restaurant, Le Garmin Cafe, when I go to Lime Rock later this year. Lucien, it was great to meet you, come back later and let’s aero your Miata!
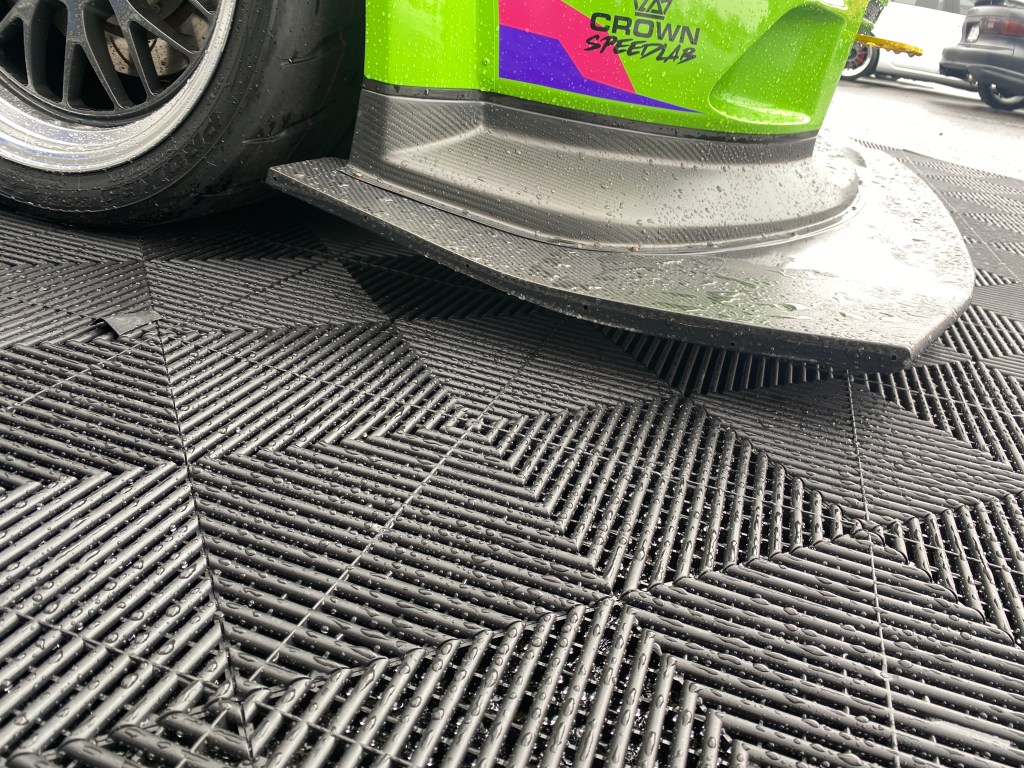
Aero
I’ll admit it: I spent too much of the event admiring or criticizing other people’s aero. Mostly criticizing.
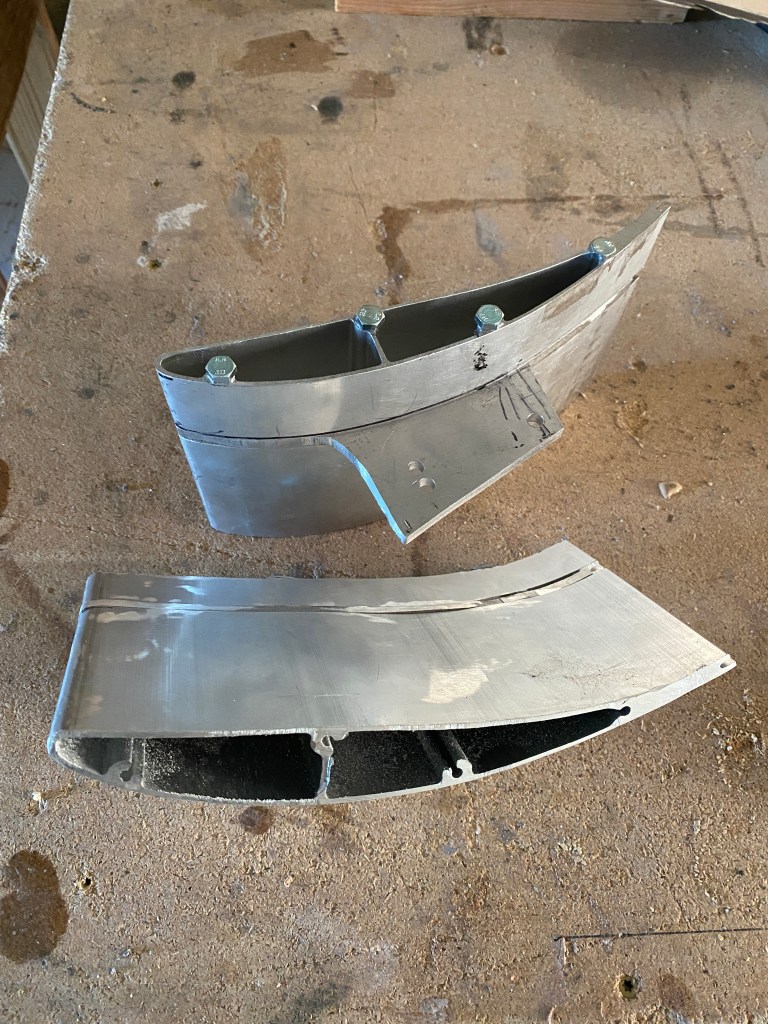
But let’s start with the admiration. There were three pro-level time attack cars in the Toyo tent, and they were doing things I’ve only thought about.
Splitter cross section is an airfoil shape.
Such as using a wing-like profile for the shape of the splitter. And also, instead of using splitter diffusers, kicking the entire rear edge of the diffuser.
No need for splitter diffusers, the entire rear edge kicks up.
There was a lot of other cool shit, but I didn’t take enough pictures, and some of that stuff should remain a secret anyway. Now I’ll get on with being critical about other people’s aero.
TCR wing
I’m like the kid who says the emperor has no clothes. I’m a nobody; I have nothing to lose by telling it like it is. So I’ll just say it: the TCR wing looks like a piece of shit.
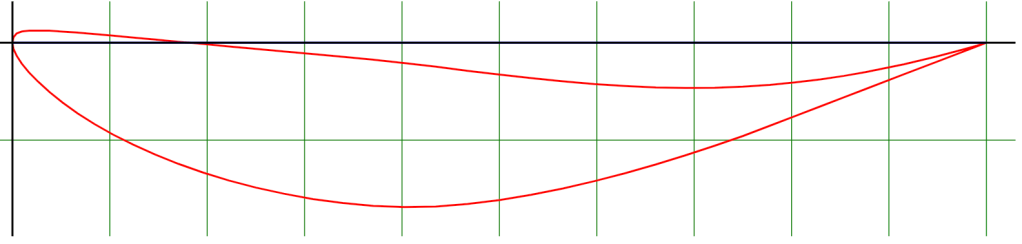
After some research, I found that this is the BE 183-176 airfoil, which is designed specifically for motorsports. To my eye, it’s got way too much camber. Just looking at how much it kicks in the rear I’m like, how does air stay attached to the bottom?
My buddy Josh Herbert was looking at the underside and pointed out that the rain had left water stains that was just like flow-vis paint. And sure enough, we could see that the air was clearly separating at the rear third of the wing!
Aside from the amount of camber it has, it’s also very thick. Airfoils generally gain downforce with thickness, and at around 12% that trend reverses. The TCR wing is 18% thick (as related to the chord of the wing), and you can see that thickness especially when viewing the wing head on. One driver complained of excessive drag when mounting the wing higher than spec, and I can see why – it’s a fucking brick.
Given the number of really good wings out there, I wouldn’t buy a TCR wing unless I was racing TCR. Full stop.
Build one yourself.
But some people have no choice. The TCR wing is a homologated part; every TCR car must use it. One of the stipulations is that the wings must be mounted such that no part of the wing, and that includes the wing mounts and endplates, can be higher than the roof. This means the wing itself is underneath the roofline, and that doesn’t help a wing perform well, especially since most of the cars are hatchbacks.
But it got me to thinking: this could be the reason the TCR wing is shaped the way it is, because of how low it must be mounted (per the rules). As such, perhaps it behaves mostly as a spoiler, meaning the pressure side of the wing (the top) is doing the work?
Now this kind of makes sense for the underside as well. Because the only way air is going to stay attached to that kind of bottom curvature is if the air is being accelerated into it. This is what happens when you run a second element wing, the top element is at an extreme angle, and air stays attached via acceleration through a convergent gap. Perhaps by mounting the wing below the roofline, the roof is itself acting as the main element (bottom) wing in a makeshift dual-element wing setup?
Possibly. This is all conjecture, since I don’t have a TCR wing to play with. I’ll try and get one and test it just for the science of it. I have the coordinates and could make one, but apparently they aren’t that expensive, and are manufactured and distributed by Volkswagen. Leave it to the people that fucked our asses with diesel-gate to bugger a racing series with a wing that stinks of shit.
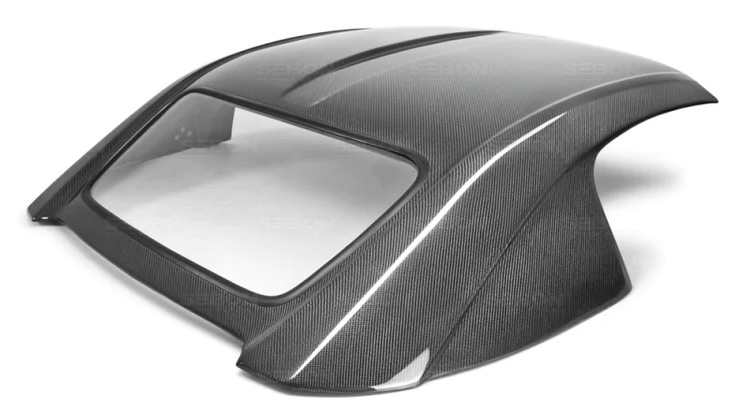
S2000 hardtop
The Honda S2000 is a popular car in both GLTC and Club TR. In the past I haven’t paid much attention to the not-Miata, but there were more of them than actual Miatas at Grid Life.
I believe that every S2000 I saw had a hard top. Some had a replica OEM hardtop, but most were Seibon or maybe Mugen, I can’t tell the difference.
Most S2Ks had a hardtop sorta like this.
I did put an angle meter on the rear window and found it was 30 degrees. This is something I’ve written about before, that the absolute worst angle for the rear window (the backlight angle) is 30 degrees. Drag, turbulence, and separation, oh my!
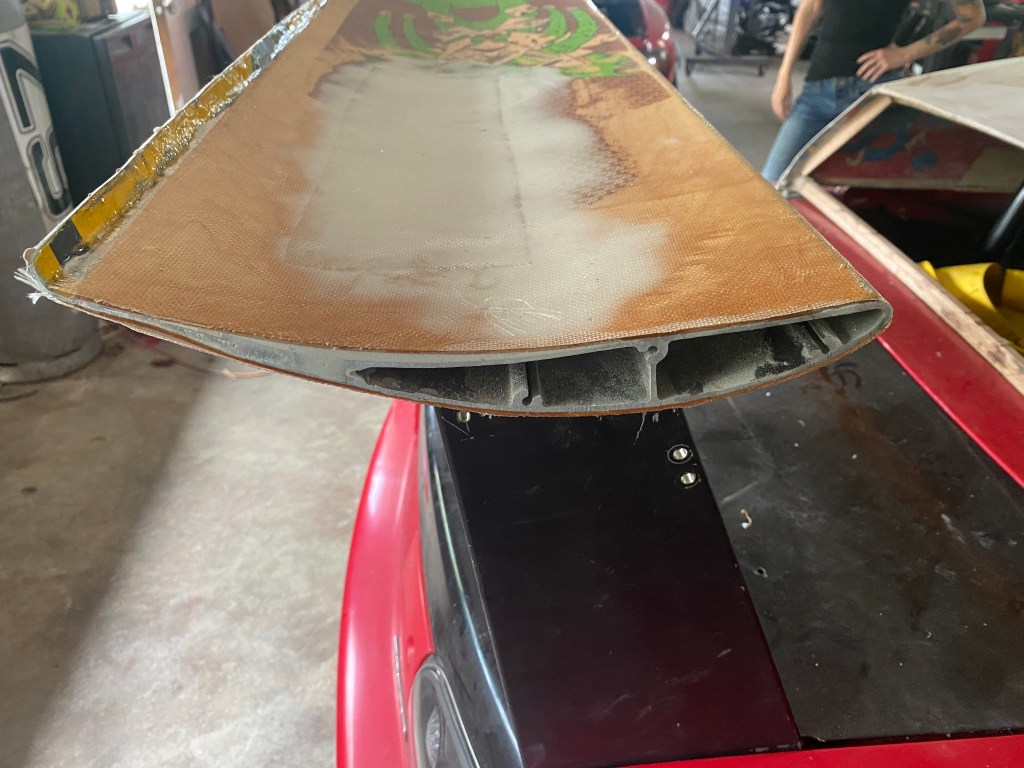
Obviously a fastback would be a lot better, but I didn’t see anyone doing this. On my Miata, my DIY fastback was 15% less drag, and also helped my wing make 30% more downforce. You’d think with the high-dollar builds and level of effort in these cars that someone would figure out a fastback. But no.
I need a S2000 in my garage for a couple weeks so I can fab one. Get in touch with me if you want one, it’s one of those “for science” projects I’d like to do one day.
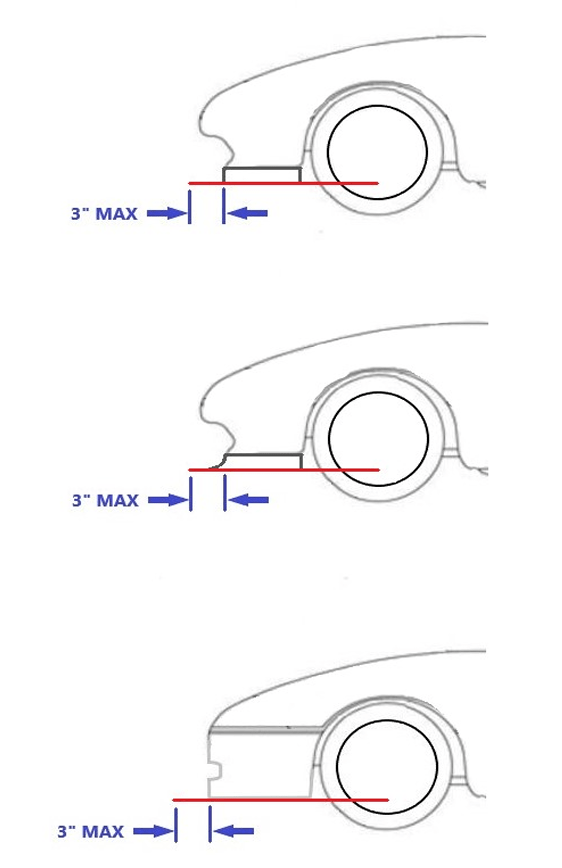
GLTC Aero
Grid Life Touring Cup made some minor changes to the aero rules for 2023. Splitter length is the same 3″ as before, and they still don’t allow splitter diffusers, or winglets, scoops, ducts, etc. on the blade. Splitters are now measured from the innermost vertical part of the front fascia, which has made some of them even shorter.
With these limitations, splitters aren’t going to make a lot of downforce. There are obvious and less obvious ways to work around that, but I didn’t see many people exploiting hardly any gains. In fact, I saw a lot of people running an airdam without a splitter.
This is a curious pacakge, because most of these airdam-only cars also use a rear wing. It makes for a rear-biased aero solution (gaining more rear downforce than front), which is something I don’t mind, but most people seem to hate understeer and prefer a balanced aero package.
On my own car, I measured a 3.5″ splitter extension at 38 points of front downforce (-0.38 Cl) and 1 point of drag reduction (-.01 Cd). Mathematically, I still believe a 3″ splitter is worth the 3% penalty to lbs/hp. And I’d do some clever shit I didn’t see anyone else doing and make that 3% work like compound interest.
The 2023 rules also added an in-between rear wing to the two existing sizes:
Free – Any rear wing or spoiler under 250 square inches is free. You can conveniently buy a 135cm aluminum wing on eBay for about $60 that is 249.8 square inches or DIY yourself a spoiler. Both of these will be superior to no rear aero, and why not, it’s free.
1% – Any wing between 250 and 500 square inches incurs a 1% penalty to lbs/hp. Many people use a 54” 9 Lives Racing wing, but a 59” APR GTC200 wing also comes in under 500. Personally, I would build a body-width wing and match the chord so that the total was 499 square inches (Miata 64″ x 7.8″).
3% – Any wing over 500 square inches, but less than 701 inches, is legal and incurs a hefty 3% penalty. With the recent 499-wing option, I can see people might not be as interested in the 701-wing, but there’s another stipulation that is you can run a splitter and any wing for 4%. And that’s probably what I would do.
This makes for some interesting choices:
An airdam and small 1” spoiler is the combination with the most power and least drag.
An airdam and medium wing take a 1% penalty in power, but would have significantly more downforce.
An airdam, splitter, and big wing makes the most downforce, but would have a 4% penalty to power.
On my car, which isn’t near the 12.5 lbs/hp ratio power cap, I’d choose the full-aero option. But I could see cars that have to detune or add ballast taking either of the other two options. Which is an acceptable choice, so I can beat them.
That’s all I can remember to talk about, and a wrap on my first Grid Life event. I’m going to continue to pester the organizers to include me in whatever capacity they can use me in, because this is an awesome series and it feels like the future. I’m preparing my Miata for GLTC, and my Veloster for time attack. Yeah, I’m a fucking fanboi now.
I’m going to aero the shit out of Veloster N. This will require serious head scratching at first, and then some DIY fabrication, followed by a lot of testing at low- and high-speed tracks. I expect this process to take the entire summer, with alternating gains and setbacks along the way. But I’ll eventually nail a satisfactory aero package, it’s just going to be a process to get there. So let’s start with the head scratching.
First the stats: I figure my VN weighs about 3250 lbs with me in it, and has about 64% of its weight on the front tires (2080 lbs). The rule of thumb is that aero balance should match chassis balance, and that means a 64/36 split on aerodynamic downforce. This should preserve the car’s natural handling characteristics at all speeds. As a practical matter, this means going after as much front downforce as possible, and balancing that with about half as much in the rear.
I want to figure out what that will do for the total grip of the car. I’ll start with a body that has 0.3 coefficient of lift, and assume that’s evenly distributed (in reality, it’s mostly in the rear, but I’m just doing some rough figuring here). I’ll estimate a splitter gives about 40 points of front downforce (that’s -0.4 Cl) and balance that with 20 points in the rear. That’s not much rear downforce, and I could achieve that with a very small wing, or more likely a spoiler.
Splitter and spoiler add downforce while keeping similar chassis balance.
I want to see what this aero package will do for downforce and grip at different speeds, so I’ll do some rough calculations based on tire grip being proportionate to weight (it isn’t exactly, but these are rough calculations).
MPH
Front DF
Rear DF
Front weight
Rear weight
Front aero balance
Total grip
0
0.0
0.0
2080
1170
64.0%
100.0%
40
20.0
10.0
2100
1180
64.0%
100.9%
60
41.0
20.5
2121
1191
64.0%
101.9%
80
74.0
37.0
2154
1207
64.1%
103.4%
100
117.0
58.5
2197
1229
64.1%
105.3%
120
170.0
85.0
2250
1255
64.2%
107.7%
135
212.0
106.0
2292
1276
64.2%
109.6%
Aero balance same as chassis balance
The results show that the car will gain grip at speed and that the chassis balance will stay pretty much the same. In a 80 mph corner, this would give about 3.4% more grip, which is great.
But I don’t subscribe to the theory that I should balance the aero the same as the chassis. I’ve implemented exactly the opposite of that on my brothers Yaris race car, and had great results. Let’s see how that works out mathematically.
Dynamic rear aero balance
I like a FWD car that is loose in slow corners and tight in fast corners. This makes the car easy to turn in hairpins, neutral in the majority of corners, and stable in high speed kinks. This handling magic isn’t difficult to do, just set up the car to oversteer and use a big wing to shift aerodynamic balance rearward at speed.
There are numerous ways to get a FWD car to rotate easier.
Reduce front roll couple – Softer front springs and/or softer front sway bar; Harder rear springs and/or stiffer rear sway bar.
Tire grip – Reduce front tire pressure or use wider front tires or a softer tire compound. Or increase rear tire pressure, narrower rear tires, reduce rear, use harder tires.
Add rake – Make the car lower in the front or higher in the rear.
Alignment – There are numerous ways to use camber and toe to increase front grip and/or reduce rear grip.
So assuming that I can get the car handling the way I like it in low-speed corners, let’s see what happens when I spec a properly sized wing. In this scenario, I’m going to add twice as much downforce on the rear as the front, and this is about what a typical splitter and wing setup will do.
Wing makes a lot more downforce and shifts balance rearward at speed.
Just like before, I want to see how much grip the car has at different speeds. More importantly, I want to see the aero balance of the car, how much weight moves rearward, and how quickly it shifts.
MPH
Front DF
Rear DF
Front weight
Rear weight
Front aero balance
Total grip
0
0.0
0.0
2080
1170
64.0%
100.0%
40
20.0
40.0
2100
1210
63.4%
102.2%
60
41.0
82.0
2121
1252
62.9%
104.5%
80
74.0
148.0
2154
1318
62.0%
108.1%
100
117.0
234.0
2197
1404
61.0%
112.8%
120
170.0
340.0
2250
1510
59.8%
118.6%
135
212.0
424.0
2292
1594
59.0%
123.2%
Rear-biased downforce.
What the math says is that the aero balance will change about 2% between slow corners and fast corners. That’s like putting 200 lbs of luggage in the trunk, and you’d think that would be noticeable. But the weight shift doesn’t happen that suddenly, and for most corners, I doubt I could feel the difference. In an 80 mph corner, total grip has gone up to 8.1% with the wing, which is a lot better than with the spoiler. But can I use all that grip, or will the car just push like crazy?
Hopefully it works out like this:
In slow corners, the car rotates easily; there should be no noticeable change in rear grip or front aero balance.
In medium-speed corners (80 mph), aero balance should shift about 2% to the rear. This is where I want the car to feel neutral.
In fast corners, aero balance should shift about 3% rearward. I’d like the front tires to be pushing a bit, although I doubt a 1% increase will do that. Maybe I need a bigger wing for that to happen.
At top speed, aero balance should shift about 5% to the rear. I won’t be cornering at this speed, but moving weight, drag, and the center of pressure rearward should help stability when braking.
Now that’s a lot of shoulds, and I don’t usually go in for this kind of rampant speculation. But FWD hatchback aero is mostly unfamiliar territory, and I want to explore the numbers before I build anything. Also, nerding out on this shit is fun.
No splitter, just a wing?
Splitters are a pain in the ass on a street car. In order to make downforce, they need to be close to the ground, and since they also protrude forward, they run aground. The fact is, splitters are just not practical for a daily driver.
So what about using all of this previous conjecture (set up a car to rotate in slow corners and move aero balance rearwards at speed) and applying it to a street car? Could this be as simple as not using a splitter and simply adding a smaller rear wing?
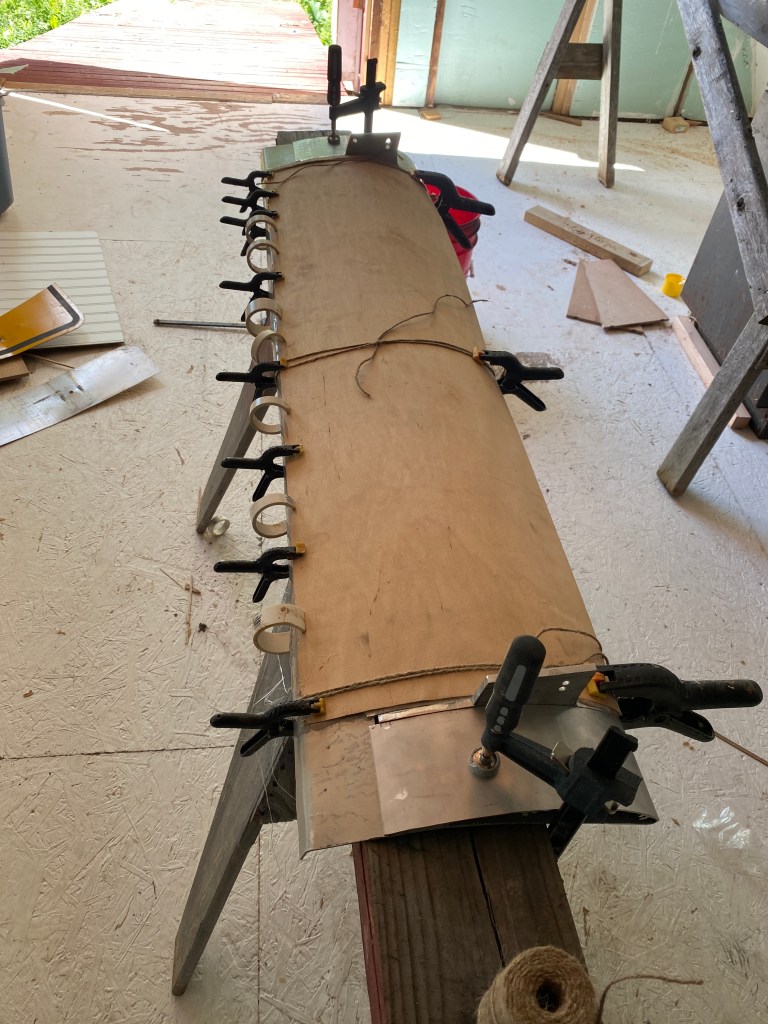
Yeah, it should be. In fact my first project is a DIY spoiler and small wing that attach on the same brackets. I’ll test them back-to-back vs the OEM wing/spoiler and see how they perform.
I was hoping to do my first real-world test this weekend at Grid Life, but it’s going to be wet, and I’m behind schedule on DIY projects. Not a huge loss, I have a lot of dates at WGI this year, and I can do the high-speed testing at the end of May.
Before that I’ve got a track day at Waterford, and I should be able to bring some rear aero options. It’ll be interesting to see if a small amount of rear downforce alone helps at a small track.
I’ve been looking into aftermarket wings for Velosters and thought I’d do a quick review. None of them are super interesting to me, so I’ll do a follow-up article when I make my custom wing.
I’ll start with the OEM wing. It doesn’t have an airfoil shape, the trailing edge is rounded, and there’s no camber to speak of. I doubt it creates much suction underneath, and so it’s not fair to call this a wing. If it’s not a wing, it’s also not a spoiler, as air certainly goes underneath it. If you filled in the gap it would be more effective at creating downforce, but it would also have more drag, which would be a lousy tradeoff on a street car.
Style over substance, but somewhat effective.
But I’m not saying the OEM wing is useless. Most hatchacks create rear lift due to the curvature of the roof, and the Veloster N has about 10 degrees of downward slope in the rear, which is fairly extreme. By flattening out the air at the rear with the “wing”, Hyundai reduced rear lift.
In addition, adding some drag and rear surface area (end plates) moves the center of pressure rearwards. This creates a greater static margin (the distance between the center of gravity and the center of pressure), which makes the car more stable at high speed.
There is more styling than substance here, but at least the Veloster doesn’t have a shit ton of fake vents (ahem, Civic Type R).
On a wing and a prayer
Some aftermarket companies have used the OEM wing as a starting point, which makes sense if you’re trying to sell a product. It would be a lot more expensive to sell a wing complete with a new roof extension, third brake light and window washer nozzle. But while starting with the OEM wing as a base is easier, it results in major compromises. Take a gander and see what I mean.
First, this TIE Fighter wing. It’s shaped similarly to the OEM one, but looks like it has more topside camber. Nevermind that it’s the bottom that needs camber. It’s hard to tell if this is a proper airfoil shape, and the end plates are hella stupid. (Usage: The adjective hella is properly used only to modify the word stupid, and then only in relation to people who use hella in a sentence. Example: Dude that wing is hella tight! – No, you’re hella stupid.)
Vader called, wants his ship back.
One thing they did do correctly was make it taller. Wings create downforce via suction, and you need space below the wing for the low pressure region to form. And on that note….
The ADRO V2 wing is a better TIE Fighter. Looking at the underside, it appears to have an airfoil shape, it has a bit of a kick to the topside, and the trailing edges are sharper. They’ve added some height to the middle of the wing, but for some reason not on the sides, which certainly won’t help. Overall, I bet it performs marginally better, but for $1400? Meh and fuck no, all at once.
Shape meant to confuse and distract the enemy?
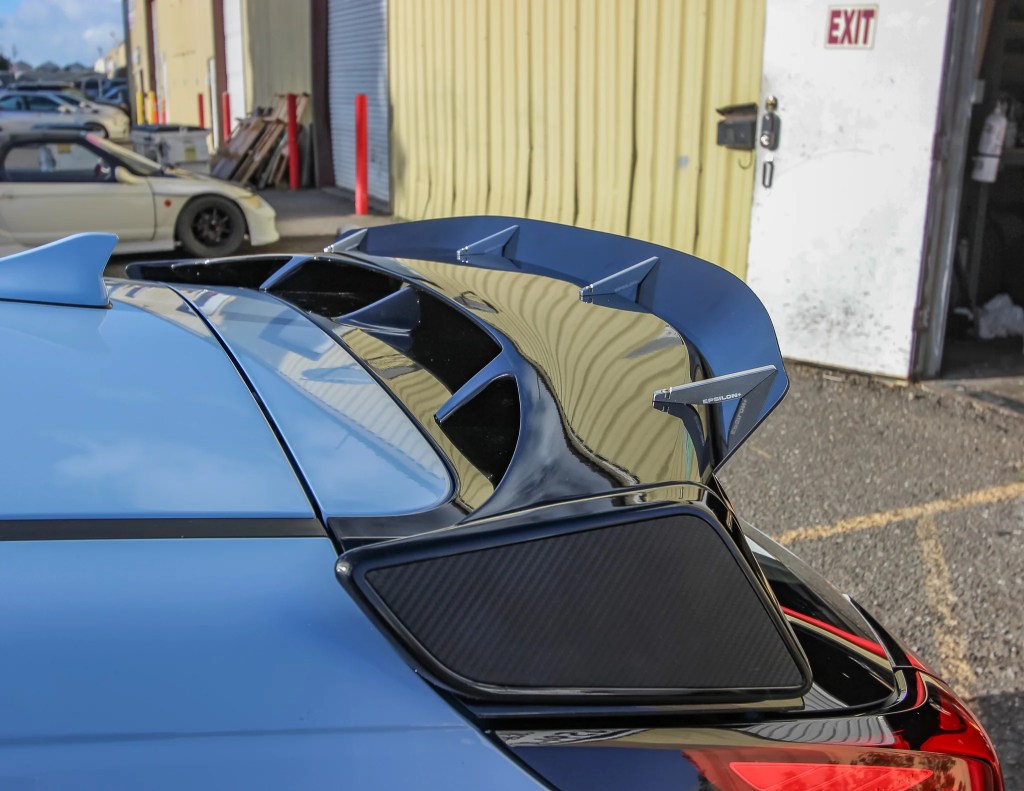
Next up is the EPSILON+ spoiler extension. At $220, this is the cheapest aftermarket way to make something useful out of the OEM wing (or whatever you call it). There will be some drag increase, but the tradeoff in downforce is worthwhile (for track use). This is also the only OEM option that doesn’t look hella stupid.
EPSILON+ (isn’t that ZETA?) extension.
Clean sheet designs
All of those options started with the OEM wing and had multiple concessions as a result. With a clean sheet of paper, and the roof extension from the base model, what kind of wing could you mount?
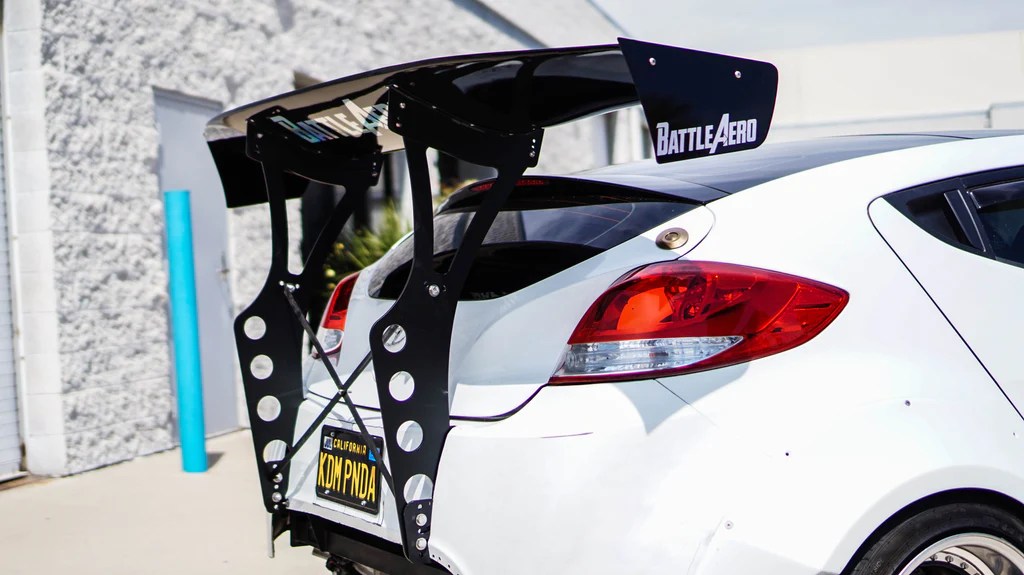
The first wing I found was on a first-generation Veloster. The wing mounts are quite nice, attaching to the hatchback door so that you can still get at things inside the trunk. The main problem is that the wing is mounted too close to the roof, and so there’s no room for the low-pressure zone below the wing to form. As such, this is mostly a spoiler in function.
OG Veloster with endplates that are cut out where the low pressure zone is. Like… why?
The other problem here is that this is a 3D wing, but it doesn’t match the profile of the roofline. The whole point of a 3D wing is to make it so that air going down the middle of the car is at the same angle of attack as the outsides of the car (free stream, zero degrees). This 3D wing doesn’t match the roofline very well; the center section isn’t large enough.
I will say that the wing mounts look decent, and I plan to build something similar.
Better end plates, but otherwise same shit, different day.
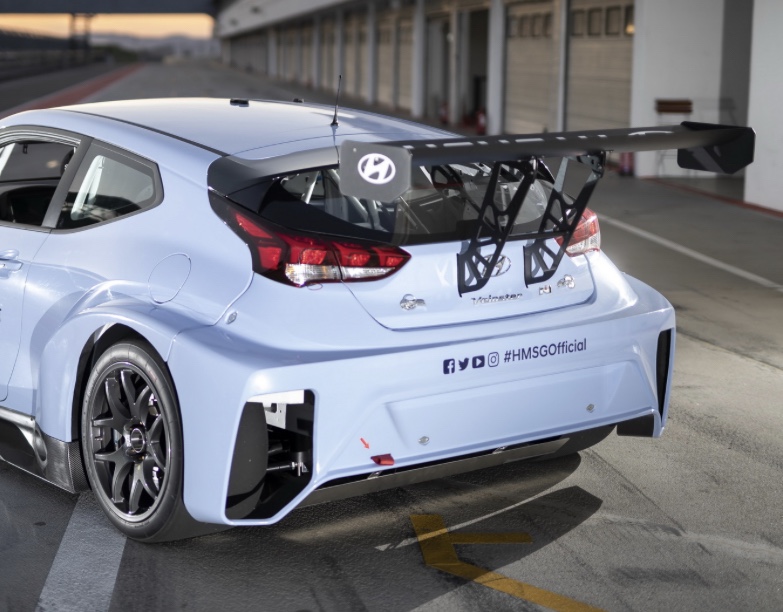
On the subject of wing mounts, what the fuck is up with chassis mounts on a hatchback? Maybe I’m missing something here, but is there any way to get into the trunk of a hatchback with chassis mounts?
Chassis mount boggles the mind.
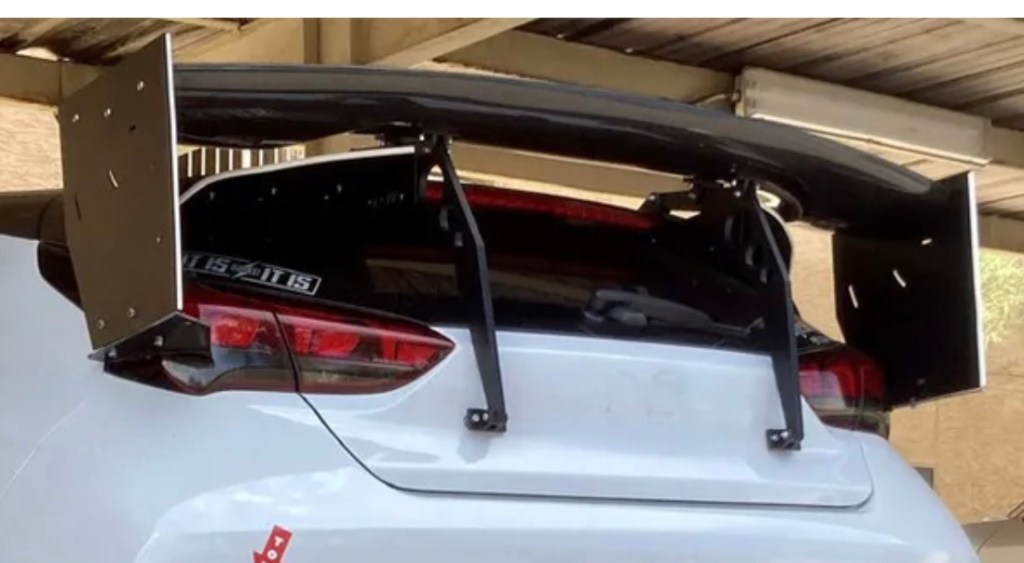
Next is a proper wing with proper mounts, and it ought to be, because it’s off a TCR Veloster. Two things jump out at me right away: 1) It’s set back quite a ways, 2) how did they get the wing to not sway back and forth with those mounts?
TCR wing is proper
First let’s talk setback distance. Increasing setback distance results in more space underneath the wing, and so there’s plenty of room for the low pressure zone to form. On the other hand, the further back you mount the wing, the more leverage it has, which reduces front downforce. Maybe that’s the point of it, to move the F/R balance further rearward?
The mounts themselves only attach at two points, and therefore must have some sturdy backing plates inside, because I can’t see how those are going to keep the wing from swaying back and forth on quick transitions. It’s a TCR car, so I’m sure they have that shit down solid, but I don’t think I’m going to make mine like that.
Next I should be reviewing a 9 Lives Racing wing, but they don’t have one for the Veloster. I’ll have to correct that on my own time. (Meanwhile, I often say 9 Lives Racing “wing”. This is like a litmus test for annoying; anyone who corrects me with “wáng” is a fanboi poseur.)
Next is a wing by CF Style. Mok Racing will be importing these from Korea, and they look like the best option to me. The wing appears to be a proper airfoil shape, and the only nit I have to pick is the lack of a Gurney flap.
Now a Gurney flap isn’t always necessary, the effect is pretty much the same as increasing wing angle. But if you’re cranked all the way up to 10 and you need just a little more, then a Gurney flap is how you get to 11. So some provision for that would be nice to see, as it doesn’t look like a simple piece of angle aluminum will fit that contoured trailing edge very easily.
The wing is mostly a 2D shape, which is fine considering the wing doesn’t stick out into free stream air, or at least not far enough to require twisting the ends down. I don’t have the dimensions or pricing on the wing, but will fill that in when those arrive.
CF Style is an oxymoron, this is function-first design.
If you look at the wing mounts, they appear to be as short as you can make such a thing, and so probably very stiff and light. The setback distance isn’t as far as the TCR, but that may be preferable for most of us, who don’t want to shift aero balance too far to the rear. All said, this wing package is a 98 out of 100, and if I was looking to buy one rather than make one, I’d buy this one.
I look at airfoils a lot, comparing different shapes at various speeds and angles of attack. It’s a nerdy and pointless exercise, because Miatas are limited by front downforce; trying to get the most out of the rear is rarely necessary.
Of the commercially available wings, 9 Lives Racing’s extruded aluminum wing is the best bang for the buck, and nobody is going to feel bad about that purchase. The Big Wang is built apocalypse-strong, and you could probably run a front wing as a bumper. With that strength comes weight, and that’s the only nit I have to pick.
At .2 lbs per inch, a Miata-sized 64” wing weighs 13.2 lbs, and when you add wing mount and end plates it’s close to 20. This isn’t all that much weight considering the benefit you get, so what am I fussing about?
It’s where the weight is. Put that weight down low in the center of the car, and it wouldn’t matter. But put that weight at roof height, at the far end of the car, and that hurts fast changes of direction.
Try this: Imagine running around your yard like it was an autocross track, holding a broom out in front of you. Now do that again with the broom held close to your chest. Much easier! Mass centralization is important for fast changes of direction, and weight at the polar ends of the car, or high up, is bad.
I race a time trials series at Pineview Run, which is a very tight road course with 15 turns in one mile. It’s a bit like an autocross course, but with elevation and camber changes. With so many fast changes of direction, I’ve had better results with a spoiler than a wing. Mathematically, the wing is making more downforce and I should have more grip than when using the spoiler. But the stopwatch doesn’t lie, and I believe the reason for that is entirely the weight and location of the wing.
So I got to thinking about it, and I figured I could build a lighter wing. I’d also make it narrower, which would help a little for mass centralization. But I’d need to increase the chord to so that it had similar overall downforce.
I started with the 9 Lives Racing “Mini Wangs“, which are cutoffs from their factory. I traced the 9LR wing profile onto two pieces of 1/4” aluminum plate, and cut them out on a band saw. I then drilled one side of the Mini Wangs and tapped them for a M6 bolt, and drilled through the other. Next I simply bolted them together. These would serve as my wing supports, as well as the support for my end plates. No welding, easy peasy, and someone could easily do the same upside down and make a swan neck mount.
Wing supports
Next I took a strip of 48″ of aluminum (street sign) and bent an angle on it. This made a 2.5″ extension that I wedged into the 9LR Gurney flap slot. (I had to cut the vertical part of the slot off.) This would act as both the Gurney flap and the chord extension. I used the extension/flap to join the two “book ends” I’d made, and added a center support using another 9LR Mini Wang. For the nose of the wing, I used 1/2″ aluminum tubing, fastened into the bookends and center mini wang.
Next I took a skateboard laminate (single ply of maple that bends easily and takes epoxy well, and I happen to have a lot of these around because my buddy Jason owns Comet Skateboards) and epoxied it over the underside of the wing. I strapped the whole thing down with clamps and let it cure.
Gluing and clamping the bottom
Then I flipped the wing over, added some supports on the inside, and glued another skateboard laminate to the top. I then fiberglassed the whole thing with 6 oz fabric.
9LR wing with 125% chord.
The end result is a 9LR wing with more chord. Ideally I would have made it slightly thicker (to preserve the same shape airfoil), but cut me some slack here; I’m literally gluing a skateboard deck and a street sign to scrap metal.
All told this wing cost me about $70 in materials and a few evenings of labor. But I have a lot of experience with fiberglass and weird shit laying around (like Comet skateboard laminates, street signs, microballoons, etc.), and someone else buying all the materials and having less experience would double the cost and effort.
One Louder
I was trying to come up with a name for the wing. It measures over 11”, which reminded me of the quote from Spinal Tap, “this one goes to 11.” So I’m calling it the Marshall wing, after the guitar amp.
The Marshall has 9% less area than the typical 64″ 9LR you’d put on a Miata, and should have about the same amount of downforce as a 58” 9LR wing. I used a 60” wing on my fastback Miata, so that’s in the same ballpark.
However, at 48″ wide, the ends of the wing are not in free-stream air, and the close proximity of the wing stands and end plates is going to cause more drag and probably some loss in downforce to turbulence. My guess is that behind a standard Miata hardtop, this wing will make 15% less downforce than a regular 9LR wing. Mounted behind my fastback, it’ll be fine.
The important part is that the Marshall weighs just 7 lbs, including the beefy 1/4” wing mounts. This is about half of what a 64″ 9LR wing weighs, and that was the point of this project.
End Plates
If you’ve read my article on DIY end plates, you know that end plates are about the least important thing you can optimize on your car. A good rule of thumb is to make the end plate rectangular, and about as deep as the chord.
I made these end plates from a 10 MPH street sign. I started with a rectangular shape that would leave a number 10 on one side, and the initials MPH on the other. I rounded the bottom corners so I won’t cut my head open reaching for a tool under the car. I made a relief cut on the top to bleed some high pressure air on top of the wing and reduce drag, and then made a cut on the top back corner to lessen the vortex there.
But the real reason I chose this end plate shape is simply to preserve the serif on the number 1. This is how much I care about end plate design these days, I’m letting the sign graphics dictate the shape.
Single wing end plate only goes to 10.
Double Wing – Marshall Stack
My single-element Marshall wing should work for high speed tracks where a reduction in drag might be useful, but I really made this for Pineview Run, where the average cornering speed is in the 40s. For that speed, I could use maybe even more chord and more camber. The easiest way to do this is to stack a second element onto the existing wing. That’s right, I’m calling this the Marshall Stack!
I have a couple made-in-China wings kicking around my shop. I’ve modified the bottom profile to fill in gaps and add roundness, and it’s now a custom profile. I went looking for a similar profile on Airfoil Tools, and the closest I can find is the WORTMANN FX 72-MS-150B shown here at zero degrees. I reviewed that wing in a previous article, no need to go into the details here.
Wortman FX72
Gurney Flap and End Plates
I want to put a Gurney flap on the upper blade. On airplane wings, the standard formula for Gurney flap height is 1-3% of the chord, but on cars you typically see 5% and even up to 10%. The MIC wing has a 5.6″ chord and 5% of that is .28″ which is close enough that I’ll call it 1/4″.
I can adjust the main and secondary wing angles, so I don’t think it’s necessary to have a removable Gurney flap, so I riveted 1/4″ angle aluminum to the top of the wing and called it done.
You may recall that the main wing already has a Gurney flap, it is in fact an integral part of the entire wing structure! But can you use a multi-element wing with Gurney flaps on both wings? Yes. I’ve read a couple scientific papers (1, 2) on the subject, and it definitely creates more lift, but it’s finicky.
There is risk of turbulence and flow separation at the main wing’s Gurney flap, and this appears mostly dependent on the size of the convergent gap between the wings. Which is also dependent on the size of the Gurney flap. To quote Catalano “The use of Gurney flap at the trailing edge of the main element is highly dependent on the gap and overlap optimization.”
To hedge my bets I did two things: First I reduced the size of the main wing Gurney flap to 2% of the chord (about 1/4″); Next I drilled two sets of adjustment holes in the end plates, one to create a smaller convergent gap, and one for a larger gap. I can now adjust the gap size vertically and see which works better.
The secondary wing is supported entirely by the end plates. I made some new ones from street signs following MacBeath’s pressure plot of a double wing.
This image from MacBeath’s Competition Car Aerodynamics. I hope he’s OK with me using it because I always include a link to buy his book. Do it.
To cover the low pressure zone, you can see that the end plate doesn’t need to be extend aft of the upper wing. Most of the low pressure (suction) zone is low and in front of the main wing. My rule of thumb is to make end plates as deep as the chord of the wing, but when I mocked them up, it just looked stupid. I know that larger end plates would probably perform better, but sometimes you have to make concessions for appearances.
MacBeath and others have suggested 2nd element angles of between 20-40 degrees, and so I drilled three holes to allow 10-degree increments on the upper wing.
Triple Stack?
Using another MIC-wing and street-sign end plates, I added a third wing on top. I tested it at Pineview and it worked even better than the double stack. But it looks so fucking ridic I’m embarrassed to be seen with it in public.
But this construction method proved strong and light, and my next project is a 3D wing for my Veloster N. Subscribe to the blog if you want an update when that happens.