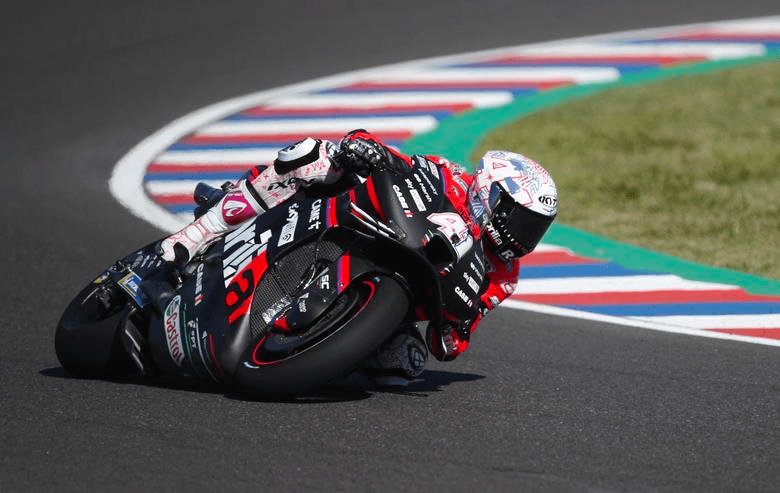
This is a departure from my usual articles on Miata aerodynamics and DIY, to pay tribute to a MotoGP rider I’ve been following for several years, Aleix Espargaró.
I first became an Aleix Espargaró fan in 2014. I was only dimly aware of his accomplishments before that time, but it was his teaming up with Colin Edwards that brought Aleix into focus.
You see, I was really a Colin Edwards fan, starting way back in his AMA days. But it was his 2002 World Superbike title that made him a legend. Troy Bayliss had won the first six races, and won another five straight later in the year. In order to win the title, Colin had to win the last nine races in a row! Against all odds, against a dominant Ducati-Bayliss pairing, Colin did it.
So when Colin moved to MotoGP, I followed closely. His career had its ups and downs (nothing more down than catching fire on the Aprilia Cube), and it wasn’t always easy to be the biggest fan of a racer who never won a MotoGP race. From 2003-2014, Colin got a dozen podiums, but not a single win.
In 2014 Colin was towards the end of his career and moved to Forward racing, and was getting regularly beaten by his teammate. When that kind of thing happens, you either hate on them for making your idol look bad (ahem, Jorge Lorenzo), or you begin to respect them. I was on the fence of how I felt about Aleix Espargaró.
It was Colin’s support of Aleix that did it for me. First, loaning him his backup bike when Aleix had stacked both of his, and then a single word from Colin, when he tweeted: “Aleix!” after the Spaniard’s stunning pole position. Seeing Colin’s approval of his teammate, I began to follow Aleix. Of his many underdog accomplishments in 2014, his battle with Danny Pedrosa at Assen was the most memorable.
Since 2014 I’ve been rooting for Aleix, and it was a lot like rooting for Colin. No wins in MotoGP, year after year. Underperforming bikes, then a factory Suzuki, then moving to Aprilia, it’s been a rocky road.
Many people have questioned why Aleix still had a ride, seeing as he’d never won a race, and you can count the number of podiums he’s had on one hand, without using all your fingers. The fact is, it’s really hard to evaluate a rider who’s not on top-notch machinery, or is developing a new bike.
What most people don’t know is that Aleix has outscored every teammate he’s ever had: Mikka Kalio, Axel Pons, Randy De Puniet, Colin Edwards, Scott Redding, Maverick Vinales, Andrea Iannone, and Bradley Smith. Maverick outscored Aleix in their second season at Suzuki together, and so they are 1-1, but Aleix has the upper hand against everyone else he’s been teamed with, on identical machinery, some of them World Champions.
When you beat your teammates, they don’t stick around for long, and it’s been a revolving door next to Aleix, with very little consistency or support developing the Aprilia. He’s not one to badmouth a teammate. I can recall many times he’s come to the defense of his partner, spoken highly of their progress, and supported them retraining their rides. But despite Aleix’s excellent record against teammates, he was still winless.
After beating Jimmy Conors in 1980, Vitas Gerulaitis famously quipped “Nobody beats Vitas Gerulaitis 17 times in a row.” That is perhaps the most famous quote in tennis. Yeah? How about getting beaten 199 times in a row?
Last Sunday, on Aleix’s 200th MotoGP start, he got pole position, set the fastest lap, and won his first GP race. Motorsports is full of great stories, and the comebacks are the best. Colin Edwards in 2002, Nicky Hayden in 2006, and now let’s add Aleix Espargaró in 2022. Let’s not get ahead of ourselves, because it’s a long season, with the closest field in history, but three races in, he leads the world championship.
As a MotoGP fan, I went from pulling for Colin to Aleix, from one winless rider to another. I’ve spent 19 years supporting the underdog, and my poor wife has had to endure listening to me rooting for the winless for way too long. That’s over now.
I feel like this wasn’t just a win for Aleix, but for everyone still trying to get that first magic first. I’m not alone in recognizing Aleix’s amazing accomplishment. Sports fans across the globe have wished Aleix congratulations. As legendary commentator Nick Harris put it, “There has never been a more popular winner in the 74-year history of Grand Prix racing.”
If you haven’t read my previous post on Low Speed Wings, I came up with the following design parameters for low-speed:
Massive chord – Wings don’t perform well at low Reynolds numbers. At the speeds cars travel, the larger the chord, the more efficient a wing is.
High lift at low Re – I’ve chosen the Selig 1223 RTL airfoil because it has the highest lift. Drag is of no consequence at low speed, and so I can set the wing to maximum angle of 15 degrees.
Mass centralization – I’m designing this wing for low speed race tracks which are all about quick changes of direction. If you think about it, wings are located in the worst possible position for this; high, wide, and at the polar end of the car. Increasing the chord and making the wing narrower goes hand in hand toward mass centralization.
Size — I’ll mount the wing by screwing into the ends, and with wing stands in the trunk gutter, that’s a wing that measures 41″ long. I’d like to keep the size under 700 square inches, so that’s a maximum of 16.5″ chord.
Getting the wing profile
Start on the Selig 1223 RTL page and click Send to Plotter.
Change the Chord to 406mm; this is 16″.
Set the pitch to -10 degrees. This is optional, but I like to see a wing with some realistic rake to it.
Select the checkbox for Reverse so you can see the wing right side up. Optionally select Camber line.
Click Plot.
Click Download PDF file.
Print it out.
Making the wing
I put the airfoil printout on a piece of plywood and cut it out on a band saw, then replicated that a few more times. If I end up building more, I’d do them all on a router and save myself a bunch of time, but the bandsaw is ok for jobs like this.
I assembled the forms, which are called ribs in airplane construction, and made a couple cross pieces, which are called spars or stringers. The front is a wood dowel screwed into the end ribs. I epoxied all of this together.
Old school airplane wing construction.
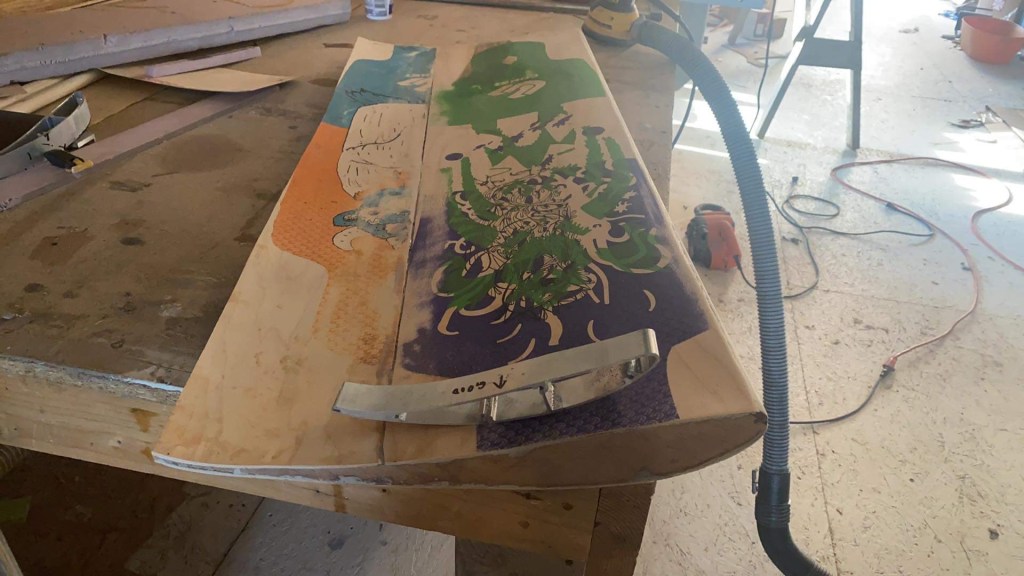
I then covered the frame with a thin layer of plywood. I used a single laminate of maple, but any veneer would do. Heck, cardboard might work, this is just to give it shape and hold the glass.
Getting ready to glass it. 9LR “Big Wang” looking not so big by comparison.
Then I glassed the whole thing with 6oz fabric. I made some mistakes. One is I thought it would be clever to fill the void inside with expanding foam. Well, that really swelled up inside and broke through the plywood, which I had to patch with fiberglass. I made some other small detail mistakes, and if make another, it will be easier and lighter.
Even with some silly mistakes the wing is light. I weighed the wing before fiberglassing and it was exactly 5 lbs. After glassing, filling, and fixing mistakes it weighed a little over 6 lbs. Thats 40% of the weight of an aluminum wing with the same plan area.
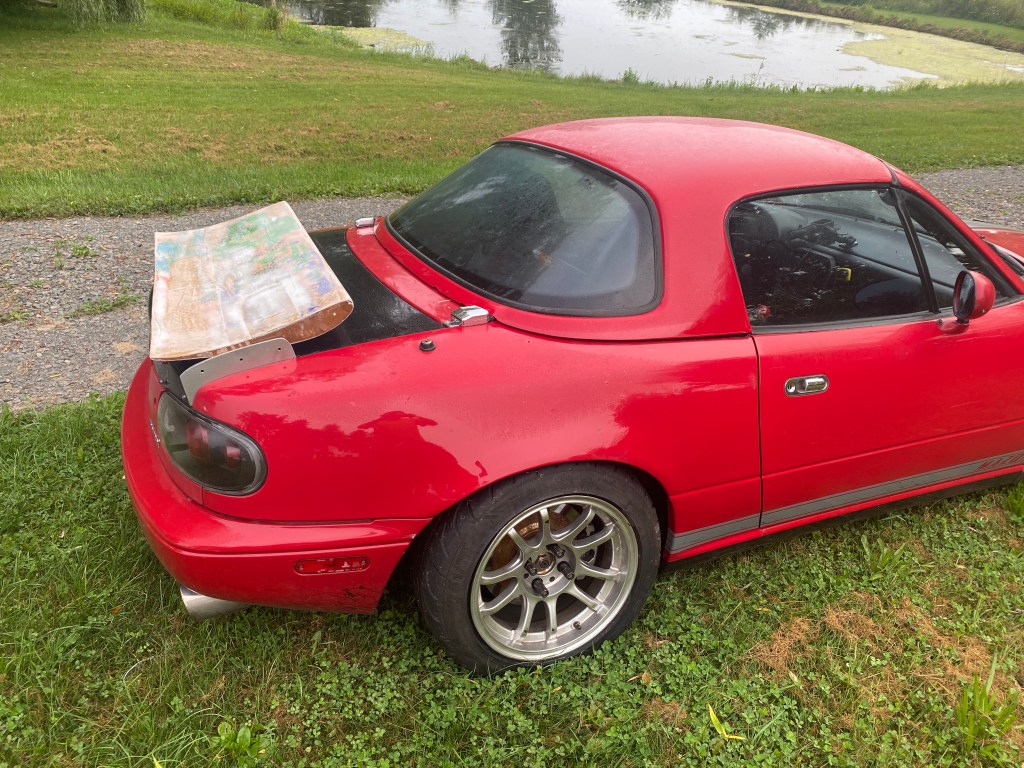
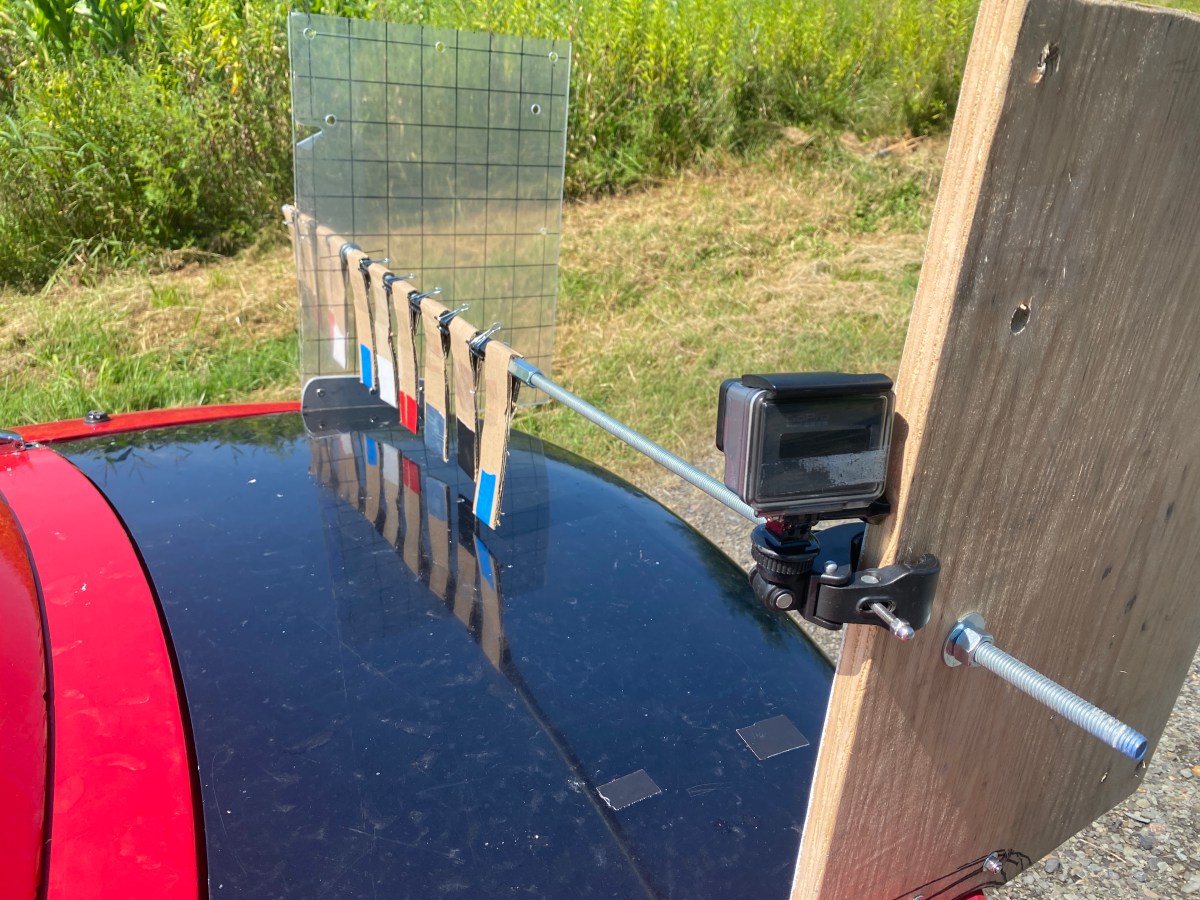
For perspective, this is what it looks like sitting on my trunk. (Those short aluminum uprights are so that I can remove my wing stands and install my airflow visualizer tool.)
End plates
A wing this big should ideally have enormous end plates, but I wanted to keep them under 144 square inches, because some racing rules regulate to that size. I had some scrap street signs 18” wide, so to simplify things, I used that as the main dimension. I set the top of the end plate level with the camber of the wing, to make setting wing angle easier.
For the bottom shape, if I’d made the end plates rectangular, they’d be 8” deep. Instead I put a slight angle on the bottom edge to put more area at the front of the wing, where there’s more negative pressure, and so they are 9.5” at the forward edge and 6.5” at the rear. I rounded the corners to avoid cuts, and they measure somewhere under 144 square inches now.
Street sign end plates are fun.
My local scrap yard sells aluminum street signs for $1 per pound. Most street signs are made out of .064” aluminum, which weighs .9 lbs per square foot. And so the end plates, which are also the wing mounts, add 1.8 lbs to the wing and represent $2 worth of material.
The wing is held up by the end plates, so these need to be super strong. So I screwed them into the sides of the wing with five screws on each side and epoxied them on for good measure.
Gurney flap
All wings should have Gurney flaps, especially low-speed wings. On airplanes the guideline for height is is 1-3% of the chord, with low heights offering better efficiency and taller heights making more lift. On cars you often see larger wickers, and 5-10% is not uncommon.
I bought a piece of angle aluminum which is 3/4″ on one side and 1/2″ on the other. This means I can reverse the wicker, to use either height (which corresponds to roughly 5% and 3% chord). I installed it with screws through the top, since the pressure side of the wing doesn’t matter much.
I found some data on Gurney flaps on the Selig S1223 wing, and you can see they are quite effective.
Flap height
Cl
None
2.25
1.04%
2.36
1.56%
2.34
2.08%
2.43
3.12%
2.46
4.17%
2.52
Gurney flap height as a percentage of chord and coefficient of lift (Cl).
Finishing details
The total dimensions are 41″ x 16″, or 656 square inches. It weighs 9.2 lbs with end plates and Gurney flap, ready to bolt up. It cost me all of $40 in materials, and probably 8 hours building it, but some of that time was fixing mistakes. I decided to leave it unfinished rather than paint it. I can see all the mistakes I made, and this will serve as a reminder of how not to do it next time.
The end result is a very narrow wing, with an absurdly large chord. It’s definitely unusual looking! So how does it work?
Mike and Alyssa are like WTF, and Chris is just “I’m fuggin outta here”.
Testing
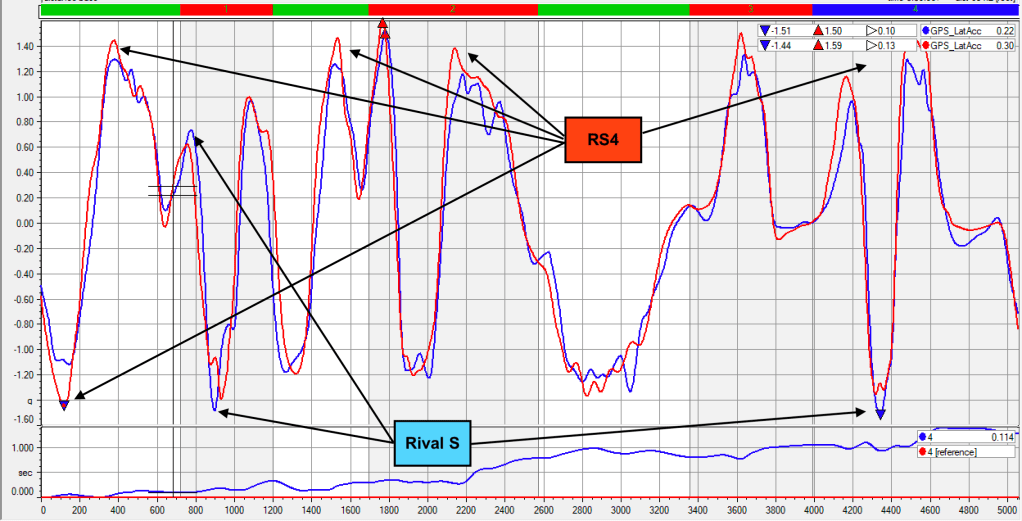
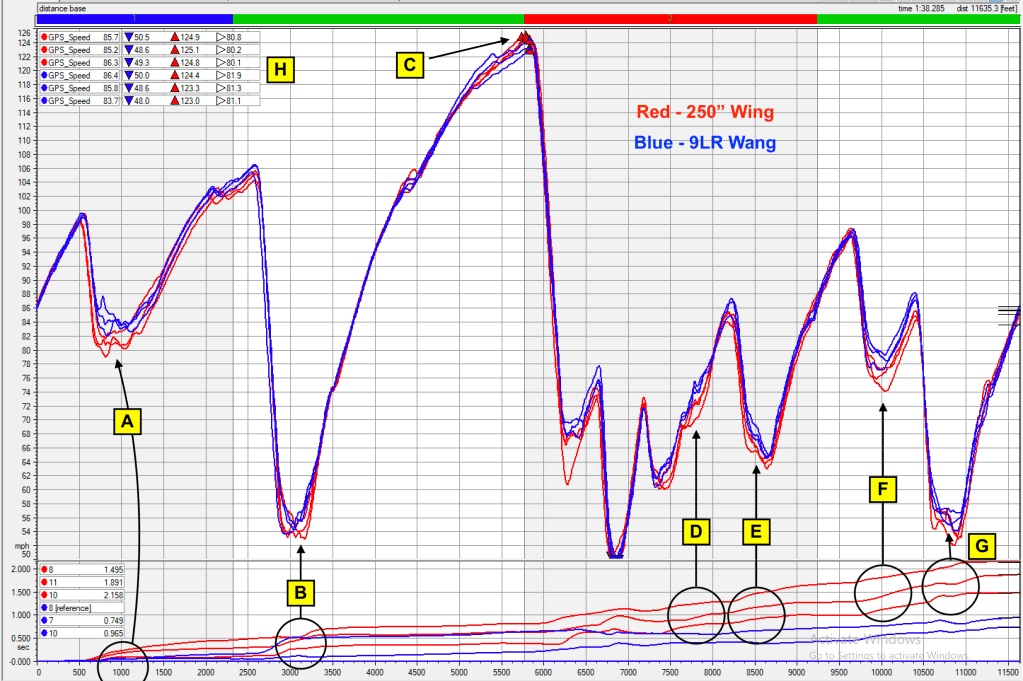
To test the wing I had my teammate Alyssa Merril A/B test this versus a 64″ 9 Lives Racing wing at New York Safety Track. This was the same day she, Mike, and Chris set Miata track records. Alyssa went .3 seconds faster on the 9 Lives Racing wing, noting that the high speed sections gave more confidence. After digging into the data, the wings were actually very evenly matched except for the fast esses here:
There’s half a second difference at this one corner.
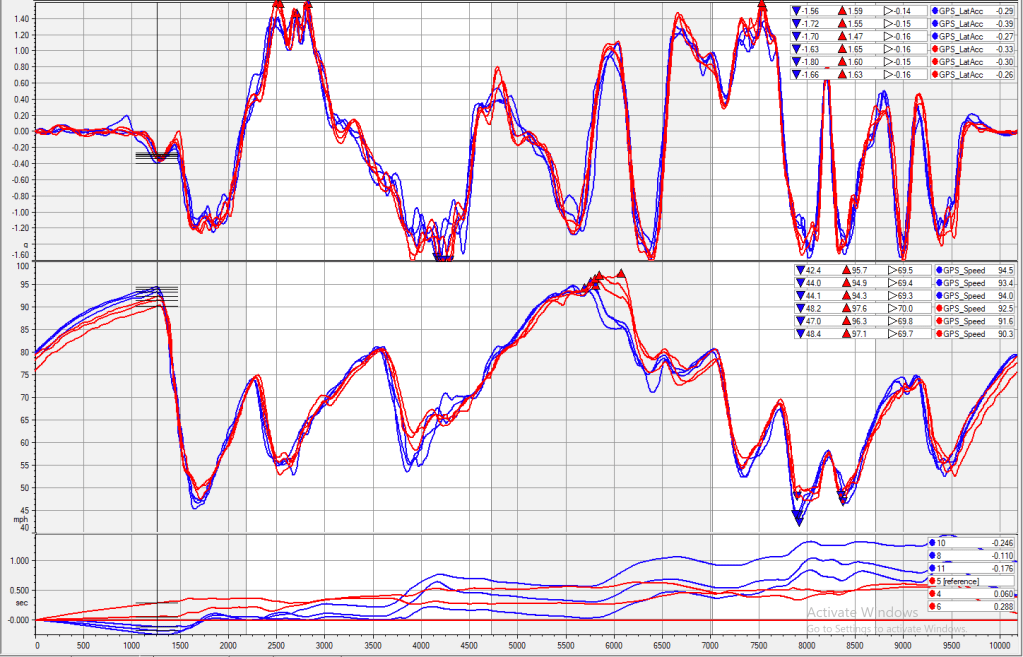
Here’s data from sessions 30 minutes apart, and so fairly similar track conditions. I chose the three fastest laps for each wing, since there was some traffic and other noise in the data. Lateral Gs on top, and the typical speed trace and time graphs on the bottom.
Lateral Gs, speed, time: Selig blue, 9LR red
The Selig wing had less drag and consistently went to a higher top speed than the 9 Lives wing. Not expected.
The low speed corners, where the Selig was supposed to work better, actually show slower min speeds. Not expected.
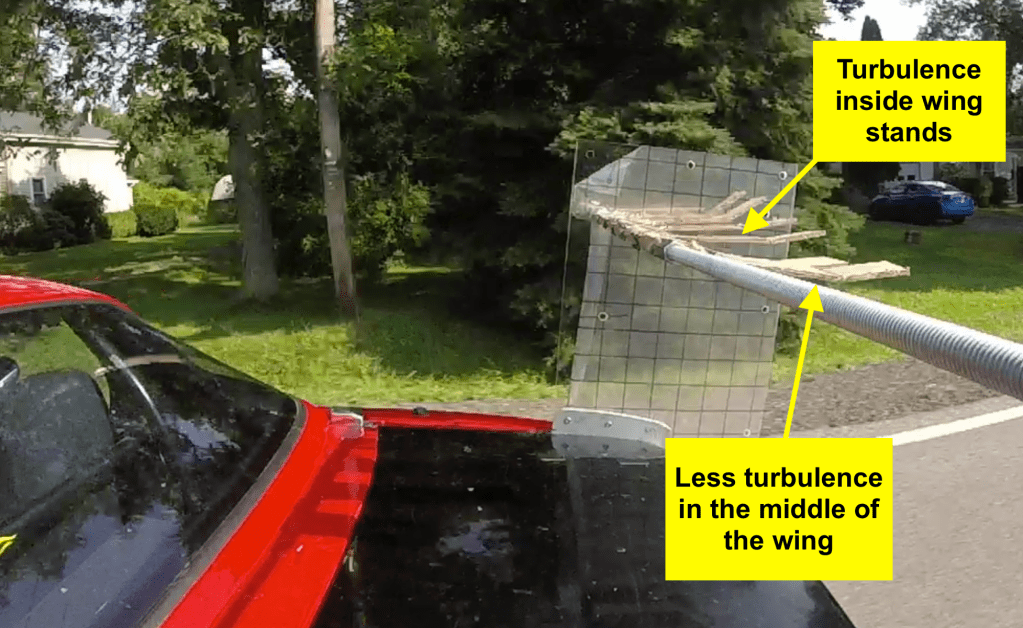
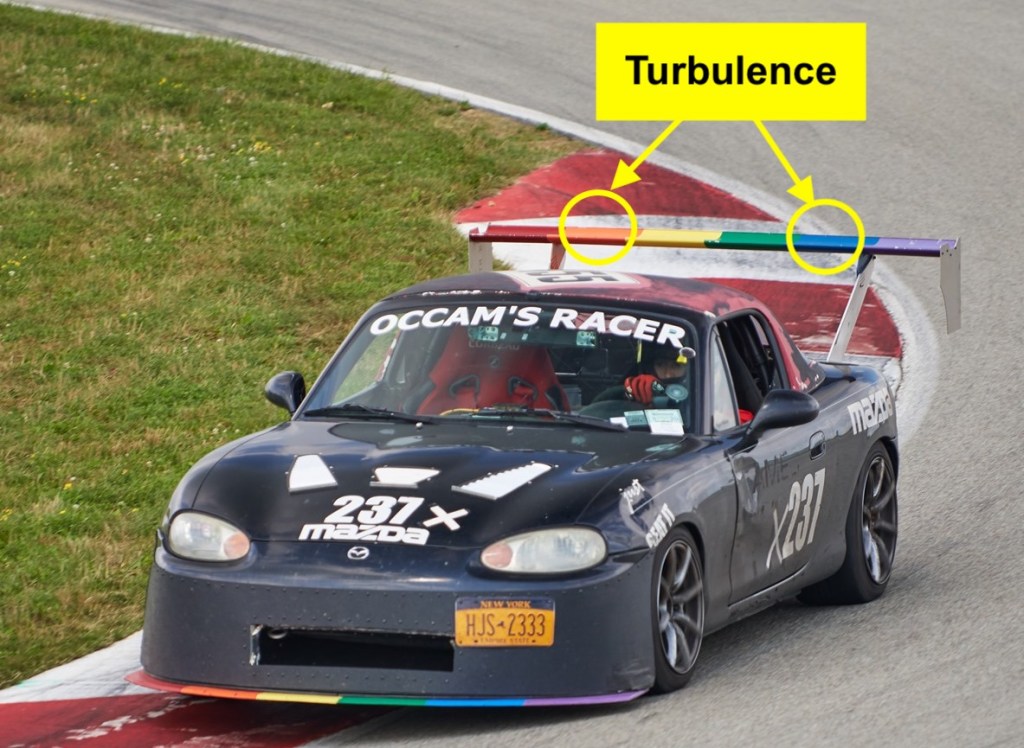
So the low-speed wing is actually a low-drag wing? That’s what it looks like. Aero often throws you curve balls, this one is going to take some more investigation. From the wing visualizer tests I did, I know that the Selig wing isn’t benefiting from the undisturbed air at the ends of the wings, and so basically all the air hitting the S1223 is turbulent, and with a standard Miata hardtop roof shape, a wider wing works better. I have a new hardtop that’s designed to reduce turbulence and feed the middle of the wing, but more on that some other time.
My brother and I are working on a blog post that compares SCCA Enduro Nationals to all of the other endurance racing organizations, and we’ll publish that on You Suck at Racing sometime in the near future. But I wanted to specifically talk about Miatas, and where they fit into SCCA’s new enduro ruleset.
Classing Rules
The SCCA classing rules are based on your car engine’s displacement, which determines its initial class, fuel capacity, tire width, and race weight. There are four classes, E1 to E4:
E1
E2
E3
E4
Displacement (liters)
6.2
4.5
2.9
1.9
Fuel (gallons)
20
17
15
14
Tire (width )
295
255
245
225
Classing by displacement
Your car takes additional modifiers to its displacement for the following:
Drivetrain – A turbo doubles your displacement, and there are other minor modifiers for transmissions, etc. However, engine swaps and tuning is free.
Weight – Car weight may adjust the figured displacement up or down .5 liters. If your car is unusually heavy, it will get more displacement; if it’s too light, it gets less.
Suspension – Adjustable suspension, either valving or height, adds .5 liters displacement. If you have modified suspension pickup points, add 1 liter. I guess that means you take 1.5 liters if you have both, ouch.
Aero – A splitter or wing adds .25 liters displacement each. Aero is a somewhat grey area, I go into that in more detail.
There’s a Microsoft Excel spreadsheet/calculator to make things easier (download), but you should probably also read the full PDF. The rules are really quite simple once you wrap your head around the fact that it all revolves around displacement. I’ll go into some more details on these, as it relates to Miatas.
Excel calculator (wheel widths in the rules are wider than in the calculator)
Engine
Engine tuning is unlimited, which means a Spec Miata with a stock 1.8 engine is classed the same as a hot-rodded NB2 with cams and ITBs putting out 180 hp. Likewise, engine swaps are open. The rationale is because a more powerful engine burns more fuel, which requires more pit stops, and since fuel tank size is limited, this should make the cars even on speed over the course of a 6-8 hour race. Ahem. If you say so.
Turbos double the displacement, so a 1.4 Fiata is evaluated at 2.8 liters, a 1.6 turbo becomes a 3.2 liter engine, and a Mazdaspeed Miata is 3.6 liters.
Rotary engines are a 250% modifier. Thus, a 1.3 liter RX8 comes in at 3.25 liters and 3250 lbs. That’s a bit unjust for the 238 hp the engine puts out. I would have used the same modifier for both turbo and rotary, which would make the 1.3 into a 2.6, and a race weight of 2600 lbs, which is a lot more realistic than 3250 lbs.
For a Miata, the smart money is on the highest output, lowest displacement, normally aspirated, non-rotary engine you can swap in.
Weight
A car’s minimum weight (which is with a full fuel tank but without the driver) is based on the engine displacement, plus any drivetrain modifications at a rate of 1 lb./cc. In other words, if you have a 2.5 liter car, your race weight is 2500 lbs. There’s a minimum weight cap at 2,000 lbs, so all OE-engine Miatas (1600cc to 2000cc) are going to start at one ton.
Most Miata endurance racers are heavier than 2000 lbs, and so you’ll get some points back for being over the weight limit. You get .1 liter back, for every 50 lbs over the weight, to a maximum of .5 liters. For example, if your Miata weighs 2200 lbs (full tank, no driver), you’ll get .1 liter per 50 lbs, or a total of .4 liters back. Your 1.8 Miata is now a 1.4 liter Miata.
Aerodynamics
Aero also adds to your displacement, you must add .25 liters for a splitter or a wing (each). If you read further into the aero sections, there are some grey areas and unknowns. Section 3 states “The following aerodynamic modifications may be subject to modifiers in the class table” and then lists definitions for airdam, splitter, and wing. Let’s take a look at Section 3 in more detail:
a. Front Air Dam/Spoiler
An air dam is defined as such:
i. Shall be mounted to the body and may not protrude more than the thickness of the material (0.5” limit) beyond the overall outline of the body when viewed from above, perpendicular to the ground, or aft of the forward most part of the front fender opening.
ii. Openings are permitted for the purposes of ducting air to the brakes, cooler(s) and radiator(s).
iii. An undertray may be added. The undertray may close out the area from the leading edge of the bodywork (including the spoiler/air dam) back to the forward most part of the front fender wheel opening.
I understand what an airdam is, what I don’t understand is why they bother to define it? I can’t find a displacement modifier anywhere in the rules or the Excel calculator, which leads me to believe airdams are free. But if that’s the case, why dedicate a section to it and say that airdams “may be subject to modifiers in the class table”?
Many racing rules allow for some variance in angle of the airdam, but SCCA Enduro rules do not. You can’t use your 4.5-degree NASA-legal 9 Lives Racing angled airdam in the SCCA Enduro Nationals.
b. Splitter
The splitter rules seem pretty straightforward, and apparently allow “underbite” style splitters for free.
i. A splitter (horizontal, single plane aerodynamic device attached to the lower front of the vehicle, protruding forward) may be added to divert air and produce downforce through vertical pressure differential.
ii. Splitters shall have no vertical deviations and may protrude three (3) inches from the forward points of the front bumper, and be no wider than the outside edge of the front wheels when pointed straight.
Note that a splitter is defined slightly differently in the general rules, but you have to dig to find it. Within section 1.1, Classes; sub-section C, National Class Table; sub-sub-section 5, Adjustments; sub-sub-sub-section C, Aerodynamic: “Front splitter extending beyond the front bumper as viewed from above: Add 0.25L.” If I’m reading this correctly, then this picture below is not a splitter.
Doesn’t extend beyond the bumper as viewed from above = not a splitter.
c. Rear Wings
Wings are limited to a single-element, 720 square inches. Wings must be completely contained between the rear axle center line, the sides of the vehicle and rear‐most point of the rear bumper as viewed from above. The height of a the wing varies by body type. On a Miata, the wing may not be higher than windshield or hardtop, whichever is higher.
Missing aero???
The intention of the rules is to allow people to build the cars they want, but by not mentioning various popular aero items, it’s confusing. Are they free or are they outright illegal? Where do the following items go?
Spoiler – A spoiler and a wing are not the same thing. Is a spoiler free, or does it count as a rear wing?
Canards and vortex generators – Mostly worthless, but some people use them. If your car has them, what happens?
Underbody – Side skirts, flat bottom, diffuser… are they illegal? If they are legal, is there a maximum size?
Classing Miatas
OK, now that you know the basics of the rules (and gaps in them), let’s class some Miatas.
Because the E3 and E4 classes have a maximum displacement that ends in .9 (1.9 liters and 2.9 liters), and because coilovers and aero are each .5 liters, you’ll see that a that an engine that is a multiple of .5 liters gets screwed (1.5, 2.0, 2.5). It’s better to have an engine with 1.4, 1.9, or 2.4 liters.
1.8 Spec Miata – Class E4
Your average 1.8 Spec Miata weighs about 2200 without the driver. The SCCA Enduro rules have a minimum 2000 lb weight, which means the car is 200 lbs overweight, and so it gets some displacement back. The formula for that is .1 liter for every 50 lbs, and so you get back .4 liters of displacement (2200 lb car – 2000 lb displacement min weight). The car is now evaluated at 1.4 liters (1.8 original – .4 for weight).
You also have to figure in the displacement modifier for shocks. Spec Miata shocks are height adjustable, and so they add .5 liters of displacement. Add that up, 1.4 liters + .5 liters = 1.9 liters. A 1.8 Spec Miata makes it into Class E4 like it was meant for it. (As long as it weighs 2200 lbs or more.)
1.6 Miata with a wing- Class E4
If you start with a 1.6 Miata, you can add a wing. Let’s start the car at 2250 lbs. This could mean adding ballast, but you’re allowed up to 250 lbs, of which only part of that would be necessary. At 2250 lbs, you’d get back the maximum displacement of .5 liters, which brings the car down to 1.1 liters of displacement (1.6 – .5 = 1.1). Now add coilovers (.5) and a wing or splitter (.25) and you’re at 1.85 liters. Personally, I’d take a wing over a splitter. But if spoilers are free, then that might sway things towards a splitter and a spoiler, rather than a wing. The only way you can use coilovers, a wing, and a splitter on a 1.6 Miata is by using non-adjustable shocks, and if you’re going to do that, start with a 1.8.
Aero 1.8 – Class E4
I’m a sucker for aero. If I was going to enter my NA8 endurance racer in the E4 class, I’d fit non-adjustable shocks so I could go all in with aero and use a splitter and wing. I think aero is worth more than the Spec Miata suspension I have on my car right now, maybe if I had Xidas I’d feel differently? I’d get the car to weight in at 2200 lbs, which would get back .4 liters of displacement. To this I’d add the aero, putting the car at 1.9 liters of displacement, right at the class limit.
Unfortunately I wouldn’t be able to use my fastback: “Aftermarket hardtops are permitted, but may not change the aerodynamic profile of the vehicle.” Every other endurance racing series allows fastbacks. Maybe I won’t race with these guys after all.
NC – Class E4 or E3
E4 – NC Miatas are 2 liters, and thus 2000 lbs, but are probably going to weigh more than 2250 lbs, and so they’d come in at 1.5 liters adjusted for weight. No NC will be on adjustable shocks, because that would put it over 1.9 liters, but one could use a splitter or a wing.
E3 – Class E3 cuts off at 2.9 liters, and so a NC could use coilovers and either a splitter or a wing, but not both. This is not a very compelling car.
NC with 2.5 swap – E3 or E2
E3 – The class is based on 2.9 liters, and so a NC with a 2.5 swap starts at 2500 lbs and can’t use coilovers unless it adds weight. Using the standard formula means you have to add 50 lbs. So, 2550 lbs (without driver) and 190 hp-ish without aero. That’s OK, but there are better options.
E2 – If you put aero and coilovers on it, you could run it in E2. This would be 3.5 liters, and you could then remove 250 lbs to get the maximum benefit (car weighs 2250 lbs) and be at 4.0 liters. This is under the 4.5 liter ceiling, and underperforming in that class.
ND – Class E4 or E3
E4 – NDs also start at 2 liters and the same 2000 lbs, but if you pared one down to 2050 lbs, it would come in at exactly 1.9 liters adjusted displacement. That’s a car without aero or adjustable suspension, but at that weight, it could be a hugely fun car to drive. At 2125 lb lbs, you could add either a wing or a splitter, but no ND in class E4 can use adjustable suspension, or both a wing and splitter, as that would be over 1.9 liters.
E3 – Class E3 cuts off at 2.9 liters, and so ND Miatas can use coilovers and one aero item, but can’t use both a wing and splitter.
K24 Miata – Class E3 or E2
E3 – A much better swap than a 2.5 is .1 liters less, for 2.4, it just fits the classing formula better. If you have a 2.4 liter K-swapped Miata, your minimum weight is 2400 lbs, which would put you into the E3 class right away (meaning a larger 15 gallon fuel tank and 245 tires). The E3 class is capped a 2.9 liters, and so you’d have .5 liters of displacement to “spend”. Likely choices would be coilovers or aero, but you can’t take both.
E2 – You could also add the full aero kit to coilovers and go into the E2 class. In this case you have .5 liters to spend on weight reduction, and the car could weigh 2150 lbs. That’s a car that sounds like a lot of fun, but it’s .6 liters under the displacement limit.
Turbo 1.6 Miata – Class E2
Forced induction doubles the displacement, and so this would put the car at 3.2 liters, way under the weight value of 3200 lbs (recall that race weight is the same as displacement CCs). That means you’d have to take .5 liters for a weight penalty, bringing the car up to 3.7 liters. Add coilovers and a wing and the car is at 4.45 liters, just barely making it into class E2, which tops out at 4.5 liters. That means you can’t use both a wing and a splitter, you have to choose. Or use a splitter and spoiler, if the spoiler is free. But is it?
Turbo 1.8 Miata – Class E2 or E1
E2 – Displacement doubled puts the car at 3.6 liters, and at the 3300 lb max weight limit. Add in the .5 liters for being grossly underweight, and you’re at 4.1 liters. This doesn’t leave you with enough points for coilovers, but you can choose a splitter or a wing. Compared to the normally aspirated builds, this one’s a loser.
E1 – A particularly bad option is to put a full aero car with coilovers into E1. Your car would be at 5.1 liters with coilovers and aero, a full 1.1 liters under the class limit, with nowhere to go. You get 20 gallon fuel tank (where would you put it?) and 295 tires. Good luck with that.
Conclusions
The SCCA Enduro Nationals rules aren’t finalized yet, and things like maximum stint time and minimum pit stop time are as yet undefined. They are missing some aero definitions as well. The first race is in March, and teams need to prepare, so I hope they finalize this soon.
While the classing system is untested, it looks fair (at least within each class), and the rules are at least easier to understand than the SCCA autocross rules (370 pages) or the SCCA road racing rules (1000 pages). Of course all rules need some adjusting after a season, but these seem like an OK start. As an avid endurance racer, it’s great to see more options.
As it goes for Miatas, NA/NB cars have some interesting options in E4. NC Miatas are not particularly good choices. An ND with aero and shocks looks like it would be a solid contender in E3.
Personally, I wished the SCCA allowed convertibles with altered rooflines (fastbacks, shooting brakes, etc) like every other endurance racing series does (as do sprint racing series like GLTC, NASA ST/TT, EMRA, etc.). I could throw my street hardtop on my racecar, and fit non-adjustable suspension, but since I’m already racing in other series, why would I change my car fit into the SCCA’s rulebook? The answer is, I wouldn’t.
I’ve been doing car stuff for a bit over 10 years now, and I’ve been thinking about what I would consider the Ultimate Track Day. If I rented a race track for a day, how would I run it?
Briefly, it looks like this:
Open passing – Point-by recommended, but optional.
Lap-time-based run groups – It’s fun to dice with cars of similar speed.
Skills and drills – One run group dedicated to drills.
Competition – All-day time trial leaderboard. No prizes, just for fun.
Schedule – A schedule that’s easy to remember, and has session times that works for both short time attacks and longer endurance runs.
Freebies – Food and drink all day, event photos, and some kind of giveaway. All that should be free.
Cheap – I want all my friends to come, even the cheap-ass ones.
I’ll explain some of this in more detail below, but if this already sounds like something you’re interested in, mark your calendars for Tuesday July 5th at New York Safety Track. I’ll send out a registration form and open up payment sometime in the Spring.
Since writing this blog post, I’ve made a bunch of changes. Specifically, my track day on July 5th won’t have a skills and drills session, nor will it have a time trial. Let’s keep things as simple as possible.
Open passing
I started endurance racing after one HPDE. I’d never heard of a point-by before, and was competing with open passing (or rather, being passed) from the start. After 20-something endurance races in AER, Champcar, Lucky Dog, and Lemons, I’ve found open passing to be quite safe.
On the contrary, I haven’t found point-by passing to be safer. Many students are confused by which way to point, most of them don’t execute the point in a timely manner, and it all takes away concentration from what really matters. The student in the following car then has to make a late pass, offline, and with too much speed. Then there’s a situation where there’s a train of cars because the point-by rules state only one car at a time.
From what I’ve seen, point-by passing is not safer than open passing, it doesn’t teach you track awareness, and isn’t really connected to the real world (racing) in any way. Still, some people who are used to doing point-bys are probably safe doing them, and I’d have one run group for that. But in the other run groups, a point is a courtesy, and it’s fuggin optional.
Time-based run groups
One of the most fun days I’ve ever had was when we had our three track cars together at Thunderhill. Three friends in cars of nearly equal performance, swapping cars back and forth: Toyota MR2 AW11, NA8 Miata, and BMW E30 (320e chipped). I can recall similar times endurance racing where me and another car hooked up for a long stint, dicing through traffic, and it’s those memories that stick with me the most. So that’s why I would split run groups by lap time, not driver ability.
At NYST, I’d have two run groups with open passing, split on a lap time, say 1:45. Faster than 1:45, go in the fast group, 1:45 and slower, go in the slow group. I’m not 100% sure I’d use 1:45, I’d balance the run groups based on who’s attending, but that’s the gist of it.
But wait, open passing, and grouping by lap time, what does that mean for novices?
No novice group
I’m all for educating novices; I’m a Motorsports Safety Foundation Level 2 certified instructor. But if I’m running my own track day, I’m not adding formal education to it. There are many driving schools and HPDEs that make a business out of up-leveling novice drivers, and I would require people to go to those before attending my event. For example, go to the Doghouse Track Days event on June 6th and 7th and learn how to drive at NYST.
Now let me backpedal a little bit, because I might take a novice if they bring their own coach. Say their buddy is also signing up for the event, has done NYST a number of times, and will right-seat the novice. Yeah, I could see OK-ing a novice under those circumstances. Or if the person was especially skilled through autocross or whatever, and had been to NYST before. That level of novice might be OK on a case-by-case basis (and not in the open passing groups). But I’m not taking someone green, who had never been to NYST.
Which is not to say that my event isn’t educational. Everyone has something to learn, and I’ve been meaning to get some friends to right-seat coach me (help me out Josh, Alyssa). There are also skills I’m working on (left-foot braking), that I don’t want to do in the heat of a fast session.
Skills and drills
I’m not going to have any formalized education for my event, it’s just too complicated this time around.
I’ve attended a few driving and riding schools, and what separates them from HPDE is doing drills: At the Keith Code Superbike school, we did full sessions of “4th gear no brakes”; At the Evolve GT school we did almost an entire day on trailbraking; At Skip Barber, we did a wet skid pad and also raced through a timed course trying to keep a tennis ball from sliding off a lunch tray on the hood of the car.
I’ve learned how to play many songs on the guitar by isolating parts of the song, repeating them slowly note by note, and then putting the whole thing together. What’s missing from driver education is the process most people use for learning anything: slow it down and repeat individual parts of it over and over again, then assemble the whole.
But does anyone do this at a HPDE? No. Part of this is because it would cause traffic jams and upset people who are just trying to have fun. But if you want to learn, you need to practice skills by doing drills. In many cases that means slowing down, doing the same thing over and over again.
So, there’s going to be one run group dedicated to skills and drills. You could run in this group all day, but also anyone in any other run group would be able to jump in this group at any time. It might get a bit crowded, but this one is slow, with repetition, one note at a time.
Competition
I’ve decided not to do a time trial at NYST. It’s not really a good venue for pushing cars to the limit, and I’m not in that business anyway.
I wouldn’t host a track day with wheel-to-wheel racing, that’s insane (wait, is it???). But an informal time trial makes sense. Bring your own timing device (Aim Solo, phone app, etc), log your time on the leaderboard, and gloat. No prizes, no sessions dedicated to it, just record a fast lap sometime during the day, on your honor.
I’d do the classing using a modified version of the rules I invented for the Pineview Challenge Cup. The formula is basically lbs / hp / grip, but I’ve factored torque into the power side of the equation, and aero into the grip side. I’m still running simulations to balance the classes at NYST, so more on that another time, but it will be eight classes, for a more granular measurement.
Schedule
How many times have you been to an event where you’re constantly looking at the schedule saying “When do I go out again? Oh yeah 11:27, how could I forget?” I’d make the schedule easier to remember, and also make it fit both short runs (which is good for the informal Time Trial competition), and longer runs to get me in shape for endurance racing.
Typical NYST member days use four 15-minute sessions per hour, and I’d start the day on that same schedule. Admittedly, these are short runs, but it’s easy to remember since you go out at the same time every hour.
I’d also borrow from Chin Track Days and use their “happy hour” at the end of the day, which is an open track for 60 minutes. It sounds insane, but by the end of the day, most people are tired, some cars aren’t running, and the pace has cooled down.
Photos
I’ve paid for event photos maybe a dozen times in my life. One of the photos is huge, printed on aluminum, and cost me $500, but mostly I get a snapshot here or there. But really, event photos should be free. Memories are part of what makes a great event. Peter Levins will be shooting the photos and video, and everyone will get full access.
Food and drink
I’m a big eater, or rather, I’m annoyed when I pay a lot and get a small portion. I also get annoyed when the food sucks. I’ll offer free food and drinks all day. Sandwiches, awesome sides, some deserts and fruit, and that kind of thing. As much as you want.
Cheap-ish
Most track days are $250-350, and I consider that a fair value. But since I rented out NYST on a weekday (it’s a company holiday on my calendar), the rate was low enough that I can charge $175 per car. That includes food, drinks, event photos, raffle, etc. Fuck yeah, I’d hit that.
Thoughts?
Well, that’s how I imagine it going. Do you have ideas of your own to add? Great, rent the track out for yourself! No, I’m kidding, really I’d like to hear some feedback. Would you do something differently? Would you add some other programs or features? What would you have in your Ultimate Track Day?
Resources
I’ll update the following info as it gets closer to the date:
If I was going to pick one tire to use for everything, I’d use the Hankook RS4. It’s not the fastest, but it’s fast enough, decent in the rain, has great feedback, lasts forever, and is available in three 15” Miata sizes. The 195 is really a 205 width, and a good choice for Miatas on stock power and skinny wheels. The 225 is an ideal choice for most upgraded Miatas on 8-9″ wheels. The 245 is good for tight courses and for more powerful cars on 9-10″ wheels. This is my favorite tire and I see no reason to do HPDEs or endurance race on anything else.
And yet… I keep buying different tires! Some of this is wanderlust, to just see what else is out there. Some of this is bargain hunting: I got Yokohama S.Drives on closeout and was out the door for $200 mounted and balanced; I bought 225 Maxxis RC1s on closeout for $108 each, with free shipping; I’ve bought Douglas all-season tires for $36 for sliding around and training. And then I’ll stumble across cheap take-off slicks that are priced so well that I don’t have a choice.
Tire testing is a hobby, but also something of a responsibility. I wrote the rules for the Pineview Challenge Cup, and I rank every tire individually. Some of that ranking comes from online tire reviews, but a lot comes from my personal testing. The primary way I evaluate tires is to look at the lateral Gs in Turn 2 at Pineview Run, a long right hander.
Turn 2 for tire testing
I export the data to a CSV file, and then average the lateral Gs through 200 feet of that corner. This removes the peaks and valleys from the 10hz GPS data, and also idiosyncrasies of driving style and line, and gives me a solid number I can use to compare to other tires.
Tires that I have personally tested and have the lateral G data for are the following: Achilles ATR Sport 2, BFG Rival 1.5 S, Bridgestone RE71R, Champiro SX2, Continental ECS, Douglas all-season, Dunlop DZ102, Falken 615K+ and RT660, Hankook RS4 and Z214, Hoosier A7, R7, and SM7, Maxxis RC1 and VR1, Nexen N’Fera Sur4G, Nitto NT01, Pirelli PZero PZ4, Toyo RR, and Yokohama S.Drive. I’m sure I’m forgetting some, but you get the idea. I often put one of my Aim Solos in other people’s cars, and the list of tires that I have data for, but didn’t personally drive, is about twice that many.
I don’t know of anyone else who has such an extensive database of tire grip, but then I wouldn’t expect to! It takes a lot of time, money, and effort to gather and collate this data, so this is the kind of thing one keeps to themselves. Or at least it’s not something that’s shared with other people without some means of compensation.
Tire Test: Accelera 651 Sport
I recently tested the Accelera 651 Sport, and I’m not shy about sharing this data, because it’s not a competition tire. Most of the people using this tire are drifting, and even though the treadwear carries a 200 UTQG rating, this is a mid-300 TW tire, grip wise. The tread pattern also has three center grooves, which is something you see on 300 TW tires and not 200.
I’ve raced on the 651 Sport previously, but in a Honda minivan, in a 24 Hours of Lemons race. That car is brutal on front tires, and we destroyed them quickly; I didn’t feel it was a fair test of this tire. You can read that report over here, but the gist of it is that the 651s were fast in a straight line, but lacked cornering grip compared to the N Fera Sur4G.
The reason I hadn’t previously tested the 651s on a Miata is because Accelera only made them in a 195 width. Given that these tires run narrow to begin with, I wasn’t interested. But starting this summer Accelera started offering the two most popular Miata sizes: 205/50-15 and 225/45-15. I ordered a set of 225s as soon as I’d heard about them.
I had the tires mounted at Shade Tree Auto, my favorite car mechanics in Ithaca. Jack, the owner, races in Champcar, and his team regularly kicks my team’s ass, and so I know that he knows what he’s doing. Jack did my alignment at the same time, and when he was finished called me to report something very strange going on. The car pulled to the right on acceleration. He knew it wasn’t the alignment, and suspect diff bushings, a worn out Torsen, or something else in the drivetrain.
I picked up the car, drove it home, and noticed the same thing. On the gas, and on the brakes, the car would veer to the right. At 80 mph and on the gas, the car felt unsafe.
I really didn’t want to take my rear end apart, but I had to see what was going on. When I pulled the tires off, I set them up against the wall instead of stacking them on top of each other, as usual. I don’t know why I even looked, but I noticed they were different heights. Two of the tires were about 1/4” taller than two others, weird. I installed two of the tires with the tread facing backwards, so that I could get the same size diameters on the front and rear, and viola, the on-throttle steering returned to neutral!
I got two tires flipped on the rim so that my tread pattern is all going the same way now, and now as long as I run the larger ones on the rear (or front), the car tracks perfectly. I contacted the tire importer Tire Streets to tell them about this, and they rectified the situation with a new set of tires. They didn’t have the 225s in stock, so I got 205s instead, but in the 100 TW compound instead of 200. A+ for customer service, even if it did take several pictures and measurements before they believed me. The replacement tires are in a heated basement waiting for next year and another tire test.
I had no idea that 1/4” in diameter would have this kind of effect. I posted about this on the HPDRE group on Facebook and found that other people have had similar problems with different brands of tires, even well known name brands! FWIW, three of the tires all had the same date codes, one was different, but two of them measured undersized.
If I can pass along this one piece of knowledge – measure the diameter of your tires – and keep someone else from disassembling their car looking for answers, then my work is done here.
When mounted on 15×8 wheels, a stack of four 225 Acceleras measured exactly the same height as a stack of 225 Maxxis RC1s. The 651s I drove on the minivan were narrower by comparison, and so perhaps new Accelera sizing is more in line with other tires now?
My initial plan was to use these tires in a Lemons race, but that plan when to shit, quite literally. My first chance to test the tires was at the final Pineview Challenge Cup race. I hadn’t driven in 14 weeks because of Lyme disease, and was still not feeling 100%, but I figured that getting back on track might kickstart my system.
My first few laps with the tires were tentative, and I initially thought the 651s might be similar to all-seasons. But I think it was just cobwebs, since I got better and better as the day went on. The time trial race is just three laps per session, one warm up, and then two hot laps.
In my first run I barely broke a 1:20. My second run I did a low 19, and started feeling more myself. In the final run I did a 1:18.6, and that felt like a pretty good lap. I initially set the tires to 28 psi cold, but after checking the pyrometer, added 4 psi all around to bring the center of the tire up, and that helped lap times as well.
The tires felt really good, with great audible feedback and predictable breakaway. They are a little vague on turn in, but are responsive to mid-corner steering and throttle inputs. I was a little disappointed in the lap times, being 1 second off the time I set using Continental ExtremeContact Sport (ECS). But like I said, I’ve been out practice for a bit, and I’m comparing to a different day, with different conditions.
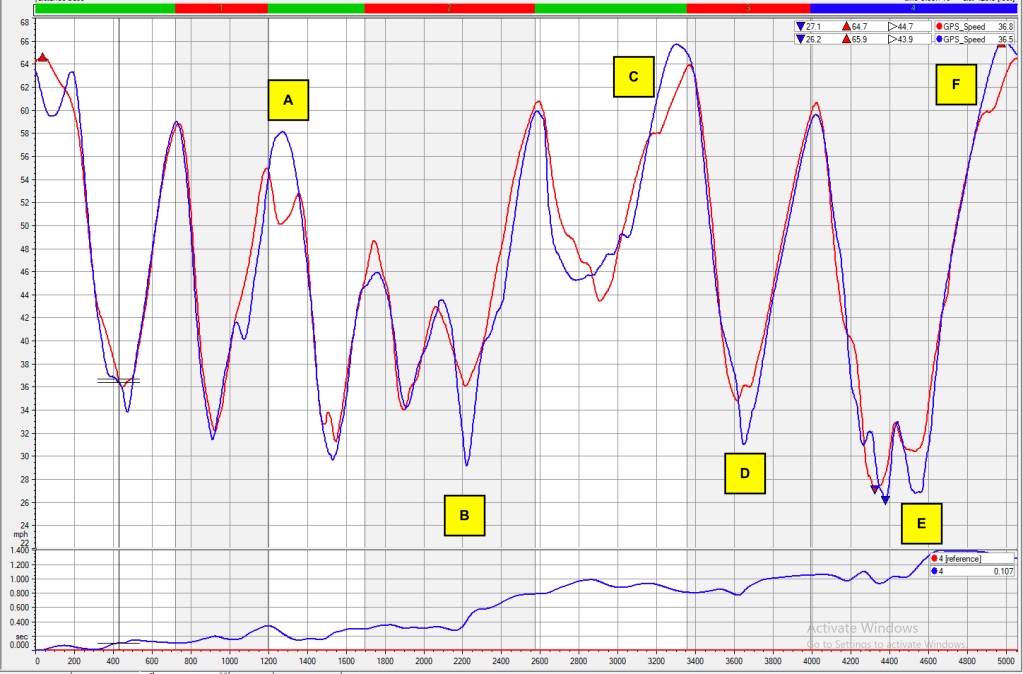
So let’s look at the data. The following image is lateral Gs comparing four laps on Conti ECS (red) vs four laps on Accelera 651 Sport (blue).
Lateral Gs – 651 (blue) vs ECS (red)
A – This is Turn 2, where I do most of my lateral G data gathering. If I went by peak lateral Gs, then the 651s would win, and this is why I average the Gs over 200′ of distance
B – This is a right/left going down the hill, and it’s not a peak G corner, but it’s a good measure of driver confidence. On average, the ECS are giving me a bit more confidence.
C – This is T11, also called the Knuckle, a long left hander. You can see red and blue overlap quite a bit here, and lateral Gs are just about the same.
D – This is the Blind Hairpin, a cambered 180 with a downhill braking zone that requires a lot of turn-in confidence. In this section, the Conti ECS has more grip.
F – This is the S-trap, a super tight right-left switchback that loads the tires a lot. Again, a very slight advantage to the ECS.
Now this wasn’t a back-to-back comparison; track conditions were different both days. The wheels were different as well. The 205/50-15 Contis were mounted on 15×6.5 wheels, while the 225/40-15 Acceleras were mounted on 15x8s. If the Conti was available in a 225, and it was on a 8″ wheel, I think the Conti would be a clear winner, but as it is, there’s not much to choose between them.
While I haven’t tested the Accelera 651 Sport for longevity, they are so similar to the Conti ECS I bet they are the same in that way as well. Like the ECS and many other 300 TW tires, the 651s have three center grooves, and I would guess they make a good rain tire.
All in all, I think the Accelera 651 Sport is a solid alternative to the Continental ECS, Firestone Firehawk Indy 500, Michelin Pilot SuperSport, PS4S, and other 300-340 TW tires. The 651s are a step above the older 300 TW summer tires like Yokohama S.Drives, which Miata people generally liked.
Accelera should really be rating these as 300TW. Compared to other 200TW tires, the 651 Sports are at least a second per mile slower than even a mid-range 200TW, like the RS4. Against a A052, it’s not even close. If Accelera stamped the 651 Sport as a 300TW, and the Sport Xtra as a 200TW, nobody would bat an eye, and people might actually start racing competitively on them. At the same time, they should change the tread pattern on the Xtras, there should be only two center grooves for a larger contact patch and less tread squirm.
Until those updates are made (never?), I guess it all comes down to this: for those situations when I don’t care about lap times, and just want a playful and responsive tire with great feedback, I would be happy to drive these tires all the time. I’ll even go on board to say they are my second favorite tire right now.
Accelera tires are imported by Tire Streets, and have a unique 30-day money-back guarantee. They are priced well, and are a bargain in the larger sizes. I plan to use up this set as a dual-duty tire, and then mount the Accelera 651 Sport Xtra tires I got in exchange. These carry a 100 UTQG rating, but based on the 200 TW 651 Sport being more like a 300 TW, I’m betting the Sport Xtra 100 TW is more like an actual 200 TW. But I’ll only know that after I flog them through Turn 2.
On Sept 14th 2021, three Miatas set lap records. If you don’t know New York Safety Track (NYST), it’s two miles of undulating asphalt near Oneonta, New York. Despite the name, I wouldn’t call it the safest track; there are trees, tire walls, and not quite enough runoff before you encounter them. This weekend (9/21) they had their annual roman candle war, where people run around holding fireworks in their hands and shooting them at each other. The teams are shirts vs skins; I’m not making this up. Ahem, “safety track.”
But as tracks go, it’s a good measure of a car’s performance and a driver’s skill. A track like Watkins Glen is more about car performance than driver skill, and a track like Pineview Run is more about the driver than the car. But NYST strikes a balance, treating cars and drivers fairly equally, and I’d say it’s similar to a track like Mid Ohio in that respect. Average minimum corner speeds at NYST are in the low 60s, and there’s a long and uphill front straight, which doubles as an airstrip for small planes.
18 turns, one long straight, lots of elevation.
This HPDE event was organized by Doghouse Track Days, which is a group of Porsche instructors from the Niagara region who wanted to do something different than the typical PCA event. They started their own HPDE organization and have succeeded in creating a fun atmosphere, with lots of track time, and a great price point. I will be going to more track days with these guys in the future, and I hope they bring their party to more race tracks.
The conditions on Sept 14th were cool and wet in the morning, cloudy initially, but clearing throughout the day. An 8-9 mph tail wind down the front straight would turn into a head wind down the back straight and help dry the track out. With a maximum of 70 degrees all day, these were ideal conditions. Record setting conditions, if you will.
Lap record classes
The overall lap record at NYST is a 1:27.81 held by Mark Petronis in a C5 Z06 with aero. You can read about that here, and watch his humorous vlog here. Mark says it wasn’t a perfect lap, and the data says there’s a 1:26 in it.
Well, that’s the overall lap record, and Miatas will never be in that discussion, but there are other records for the taking. In official racing, you have different classes (Spec Miata, NASA TT5, Gridlife Club TR, etc.), but there are no “official classes” for HPDE. Generally, people say “fastest Miata” or “fastest street tire”or some other unofficial classification.
<rant>As a category, “Fastest street tire” is bullshit. The 200 TW autocross wars have ruined the entire concept of what a street tire is, and it’s ruining endurance racing as well. The fact is that A052s are faster than Toyo RR, Maxxis RC1 and many other slick or treaded tires in the 40-100 TW range. Anyone on Yoks should be put in the slicks category, which is what Gridlife does. If we’re going to standardize on a street tire, let’s standardize on Hankook RS4s. They don’t fall off drastically in a 20-minute session, last five times longer than A052s, and embody what a 200 TW street tire is all about </rant>.
So if there are no official classes for HPDE lap records, chassis and engine generations are at least a good place to start. Miata classes that make sense to me are the following:
ND – I’d put ND1 and ND2 in the same category. But since there’s no easy upgrade path from ND1 to ND2, maybe they belong in different categories.
NC – All NCs in the same class. MZR 2.2-2.5 swaps would go into a different category.
BP – I’d put all the 1.8s into one group. The 1994-95 made a couple less hp than the 1996-97 , but many of these are on standalone ECUs now that they are 25 years old. You can also bolt up the later heads and intake manifolds to the NA8 bottom ends, so there’s not that much difference between a modified NA8 and a NB2.
B6 – Compared to the 1.8s, the 1.6 has 15% less displacement, but more importantly, there’s no easy button for improving the intake manifold (square top, Skunk2) or port geometry (NB head). Selfishly, I have a 1.6 and the only way I’ll ever set a lap record is being in a class without 1.8s.
Forced induction – Each one of the above “classes” should have its own FI class. Or maybe by by transmission, since the strength of that’s often the limiting factor. I wouldn’t distinguish between superchargers and turbochargers, it’s all a mistake forced induction to me.
Engine swaps – This is a pretty broad category, and a good way to split these up might be by number of cylinders: normally aspirated swaps of 4 cylinder, 6 cylinder, and 8 cylinder.
Kit car – I wouldn’t put Exocet, Catfish, or other Miata-based kit cars into the same classes as any of the above. I don’t really think of these as Miatas any longer.
Open – Turbo V8 Exocet anyone? Anyone?
That’s a lot of Miata record classes, and after writing it all down, it’s kind of stupid. There really should be a better way to standardize and rank the performance of Miatas, or really any car, based on a universal performance index. I’m working on that, but let’s save that discussion for another time.
On this day, the lap records were set for fastest normally aspirated BP, fastest forced induction BP, and fastest Miata overall. Who done what?
Alyssa Merrill, N/A-BP – 1:37.908
Alyssa has a 1999 Miata with a few bolt ons, the engine probably makes 120 hp at the wheels. The aero package is good, with a DIY splitter, 3D-printed splitter ramps, and a 9 Lives Racing wing without a Gurney flap. None of that explains how she can go under 1:38 on Hoosier R7s. See for yourself.
As impressive as that lap is, she also did a 1:41.834 on RS4s. Going under 1:42 on an honest-to-god street tire (not a Super 200), in a street-legal NB1 still using the stock ECU… fucking unbelievable.
Chris Safranski, FI-BP – 1:36.540
Chris and I might have met once before; he was the head mechanic on a team that was pitted next to us at the Lucky Dog 24 hour race at Buttonwillow in January 2018 . At that race, our Yaris ended up beating their Civic, but it was a pretty close race, and it’s a shame we didn’t start our friendship back then.
Chris has gone through just about every iteration of forced induction, from a M45 supercharger to his current turbo setup. It makes about 250 horsepower and has proven to be reliable over many seasons of tracking and instructing. His aero setup is a little different with a carbon wing and a homemade splitter that pivots upwards when it hits things, but otherwise it’s standard trackable Miata fare.
Chris is an instructor, but did his laps in the crowded Advanced group. He would have had more clean laps and a faster lap time in the Instructor group. Nevertheless, a record FI BP lap on this fine day.
Michael Giurintano, V8 Miata – 1:35.0
Michael’s car was originally an NA with an automatic transmission. He scrapped the driveline, gutted the tub, caged it, and swapped in a LS3. You can imagine it’s not easy to corral 400-plus horses in a small chassis, and so he’s got a homemade carbon fibre splitter and 9 Lives Racing wing to help high-speed stability.
Like most of us, Mike is not a professional driver, and he’s still learning. I’d expect him to drop another second next year, but for 2021, this is an impressive lap time, and the overall fastest Miata ever at NYST!
Fastest Miata at NYST in 2021.
Data
I got Lyme disease back in June, and I haven’t driven since, so I’m transitioning more into a role as track support and data nerd. I have a couple Aim Solos and I had them in both Alyssa’s and Mike’s cars. Chris has his own Solo, and so I was able to get data from all three cars. Chris had a different Start/Finish line set, but I was able to change this in Race Studio with Modify > Beacon Shift.
When I look at theoretical best laps in Race Studio, I throw out the first lap. I don’t know why, but it sometimes gives unrealistically low sector times. After that, I construct a map with five or more sectors, but usually less than nine. The point is to group the compromise corners together and divide the track into portions that are clearly doable in real life.
My 7-sector map. I don’t know why Race Studio numbers some of them and not others.
Alyssa
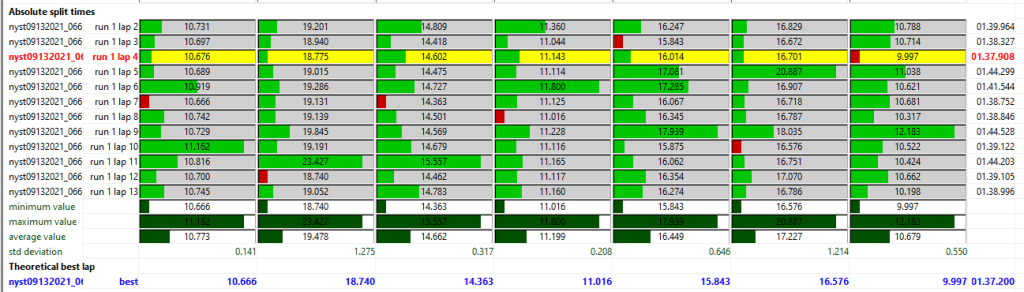
Alyssa’s record lap only had one sector that was her fastest; her theoretical best lap was 7/10ths faster, for a 1:37.200. I know Alyssa would beat herself up for that, but I’ve looked at a lot of other drivers, and a delta under 1 second is lapping consistently.
Chris
Chris’s Aim file included all of his laps together, and so I’m not going to show you all his laps and histograms, it’s just too large for the page. Stitched together, his best sectors showed that he could have done a 1:35.228.
That’s a difference of 1.3 seconds, but Chris didn’t get a lot of clean laps, and was often stuck in traffic. It’s actually somewhat humorous (and frustrating for him) how many slow sectors he had stuck behind people in the Advanced group.
It’s also worth noting that Chris was on Toyo RRs, and the others were on Hoosiers. The lateral-Gs show the Toyos are at a slight disadvantage, but it’s honestly less than I would have thought. Suddenly RRs are on the shopping list!
Mike
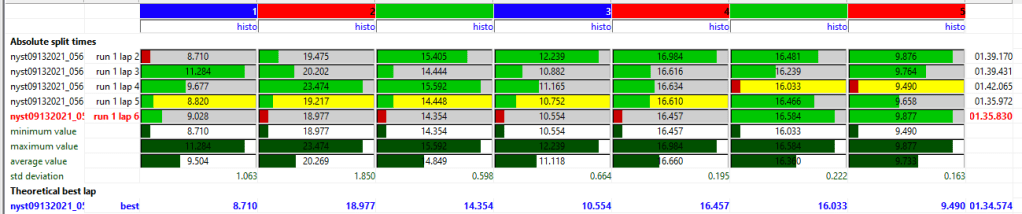
When I put the Aim in Mike’s car I asked him which side he wanted it on, and in hindsight, I shouldn’t have asked. It was out of reach once he was strapped in, and he didn’t turn it on for his record run. However, I got data from an earlier session that included a 1:35.830, and that’s still damn fast.
In the histogram you can see that he had good rhythm in the middle of the 1:35.830 lap, but botched the last two sectors. Putting it together he could have done a 1:34.574, one and a quarter seconds better.
Mike
Comparisons
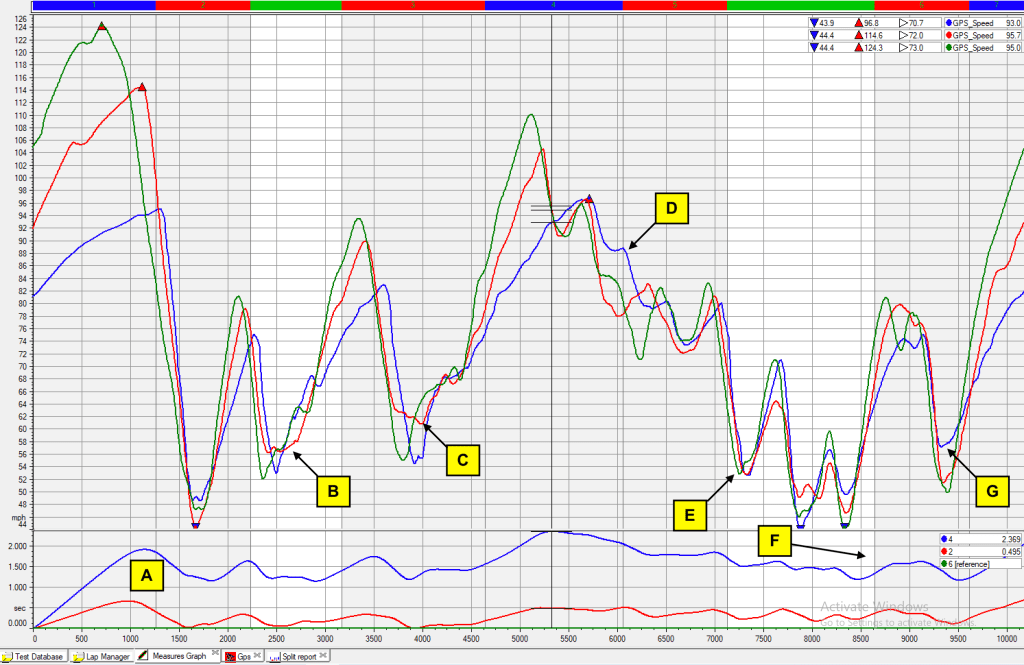
Here’s all three drivers compared on speed/distance and time/distance. Alyssa is blue, Chris is red, Mike is green.
All three drivers.
A – Alyssa and Chris are both excellent on the brakes, going immediately from full throttle to threshold braking. Notice the sharp peaks and steep the slopes. This is an area Mike (green) can work on. Everyone reaches min speed at about the same spot on track at 1660′.
B – Chris takes a different line, and has a higher minimum speed. However, this doesn’t translate into a better lap time because he’s later to full throttle. The end result is everyone is pretty equal in this corner.
C – Chris’s line (red) has a hockey stick shape, indicating blending inputs, or trailbraking. If you watch his video, it looks like he’s scrubbing speed with wheel angle and yaw, rather than brakes. But whether through the hands or the feet, this is excellent work.
D – We should put Alyssa’s name on the esses, she owns them. I looked at her data on RS4s and she’s faster here on street tires than everyone else on slicks.
E – Mike backs up T12 very well, gets his braking and turning done early, and is accelerating earlier. This is how to drive a powerful car.
F – Despite what looks like overbraking into T13, Alyssa continues to gain time in the autocross section (not the official name, that’s what I call it). The trend in this flat section is all downward for the blue line.
G – Alyssa has a 6-7 mph min speed advantage over Chris and Mike in the final corner. They gobble her up on the front straight, just the same.
Driving line.
I don’t want to sound too much like Alyssa’s cheerleader, because it’s easier to drive a low-powered car to higher limits, and it’s not surprising that a turbo Miata and V8 Miata have more variance in the time deltas. But this was great driving by all three of them, and I challenge you, or anyone, to beat them. In the end, that’s what records are for: breaking. Who’s next?
A wing that is set up properly doesn’t add a lot of drag. My real-world testing showed that my 9 Lives Racing 60″ wing set at 4.4 degrees AOA and roof height added .03 to the coefficient of drag (Cd) of my Miata, no matter if it was an open top, OEM hardtop, or fastback.
On a Miata with an OEM hardtop, adding a wing accounts for an increase of 6.25% drag, which is slightly more than the two mirrors combined (see Where Drag Comes from on a Miata). That’s nothing compared to the benefits of a wing, and yet wing drag and wing efficiency are a constant source of conversation and consternation. There are much better things to concentrate on, like the lift/drag ratio of the entire vehicle. Let’s get into it.
The effect of changing wing angle
If you want to go faster around a track, then downforce outweighs drag reduction. Every. Fucking. Time. And yet people make purchasing decisions based on which wing has less drag than another. Or they adjust wing angle for more efficiency rather than more downforce. Going after efficiency only makes you go slower, and I’ll prove it to you with a few simulations.
For the simulations I’ll use a Miata with round numbers: 2400 lbs, 120 hp, 1.2g, Cd .45 (plus wing), Cl 0 (plus wing). This represents the average Miata with bolt-ons running on 100 TW R-comps or Super 200 tires. The Cl and Cd values will change with each configuration, as I adjust wing angle. I’ll simulate a 9 Lives Racing wing, using their published CFD data for wing angles of 0, 5, and 10 degrees. Many wings operate in a similar window, and so this is mostly a generic wing choice. I’ll run the make-believe car around Mid Ohio, which has both fast and slow sections, and is about average for a race track. (I’ll also simulate the car at 75 hp, but more on that later.)
Here’s how it shakes out:
Wing angle 0, 5, and 10 degrees at 120hp, and then reduced to 75 hp.
In the table above, the 10-degree setting wins with a 1:40.75 lap (100.75 seconds). It’s only a little faster than the 5-degree setting, but both of them beat the zero-degree wing by a fair margin.
Does the most efficient setting ever work? In a straight line, yes. And even in this simulation, the zero degree setting has the highest top speed. On an oval track zero degrees would probably work well, but on a typical race track, maximum efficiency never wins.
Take a look at the last three columns where I reduced power to 75 hp. This is like a Miata running on three cylinders. In this detuned state, the 5-degree angle wins over 10 degrees, but just barely. Meaning, if your car has 75 hp, then you can babble on about optimizing your wing angle for less drag. Everyone else STFU.
Wing maximum efficiency is baloney
Given that the most efficient wing angle was the slowest, it begs the question: does wing efficiency matter? As a static number of “maximum efficiency”, no. At a certain coefficient of lift, a tiny bit.
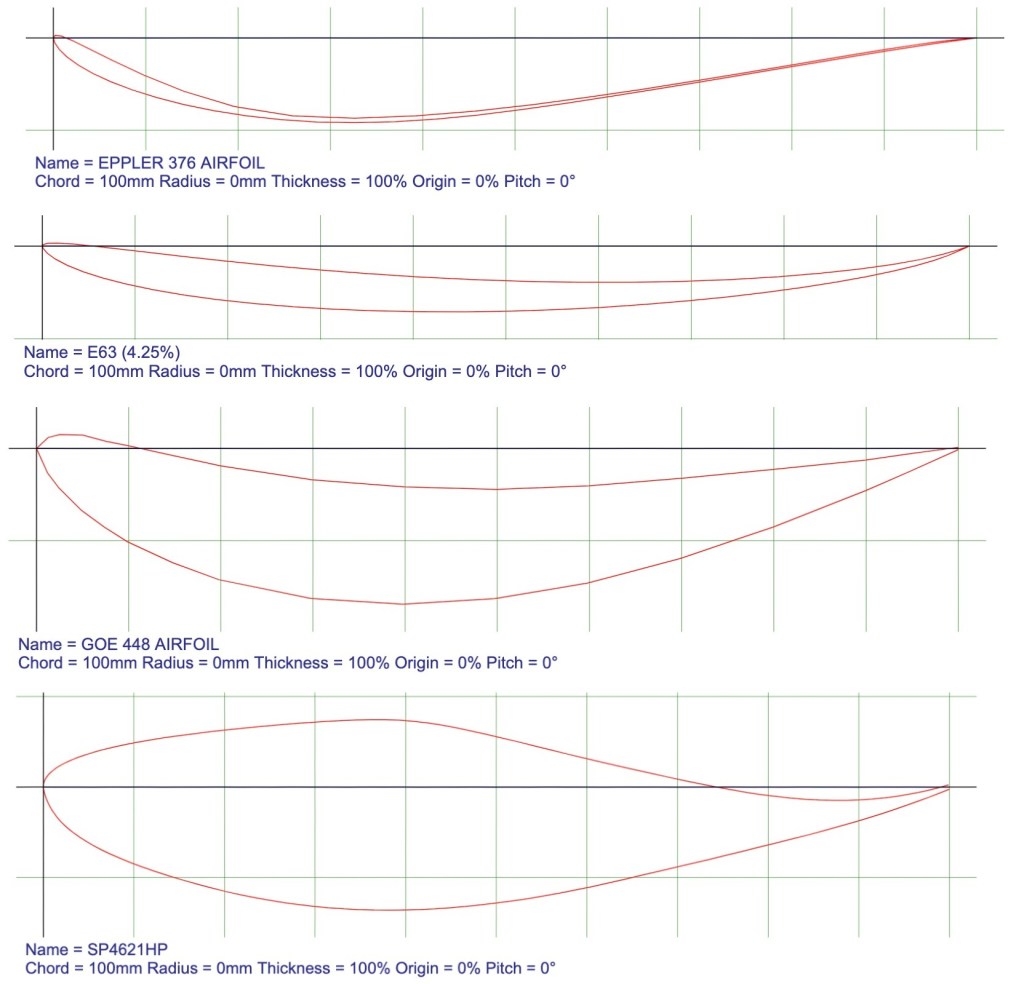
You can research this yourself on Airfoil Tools, or read the article I wrote Car Wings Examined. The gist of that blog post was that there are different wings for different uses. Of the 1638 airfoils in the Airfoil Tools database, there is no single wing that is the most efficient at all speeds. I used the site’s search feature to find the most efficient wing, and each of the wings below is the “most efficient wing” at a different Reynolds numbers (which you can think of as different speeds, or different size wings, or both).
Which is the most efficient airfoil? All of them.
Consumers who believe that a wing that has a 17:1 lift/drag ratio is going to be better than a wing with a 12:1 ratio (or whatever) is a victim of marketing, bad assumptions, and lack of knowledge. The airfoil that has the highest maximum efficiency won’t make the most downforce when set at a high angle. Likewise, the airfoil with the most total downforce is probably not very efficient at low angles.
To sum it up, as it relates to car racing, an airfoil’s maximum efficiency is total bullshit.
I’ll tell you what’s to blame for this: advertising. Wing manufacturers like to compare dick sizes and somehow wing efficiency became their ruler. Touting their higher “17:1 lift/drag ratio” gives them a chubby. Every wing manufacturer seems to do this, and so I understand having to keep up with the Jones’s, but it’s still utter and complete nonsense as it relates to the only thing that matters – lap times.
It would be better if wing manufacturers stopped competing with useless information and told us the maximum coefficient of lift, what angle of attack that occurs at, and the lift/drag ratio at that point. That’s the data we need to make purchasing decisions.
Aerodynamic efficiency of the vehicle
I previously mentioned that a wing added .03 drag to the vehicle, for a total of .48 Cd. That might or might not seem significant to you, so let me put this another way: the wing is responsible for 1/16th of the drag of the entire vehicle. If you read my post on Where Does Drag Come From, you’ll see that reducing drag on any other part of the car is going to return larger gains. Optimizing for wing drag is a waste of time.
In the OptimumLap output (the spreadsheet image above), notice the Aero Efficiency field, the fourth row from the bottom. Aero Efficiency is a measurement of the total lift/drag ratio of the vehicle, and this increases with wing angle. Now wait a goddamn minute; increasing wing angle makes the wing less efficient, right? Correct. You have to think of aero as a system, and a wing is just part of that system. A wing doesn’t add a lot of drag to the entire vehicle no matter what you do, but can add a lot of downforce at a much higher rate.
A Miata with the wing set at the highest-downforce least-efficient wing angle (without stalling) gives the entire vehicle the most efficient lift/drag ratio. If you care about aerodynamic efficiency, care only about this.
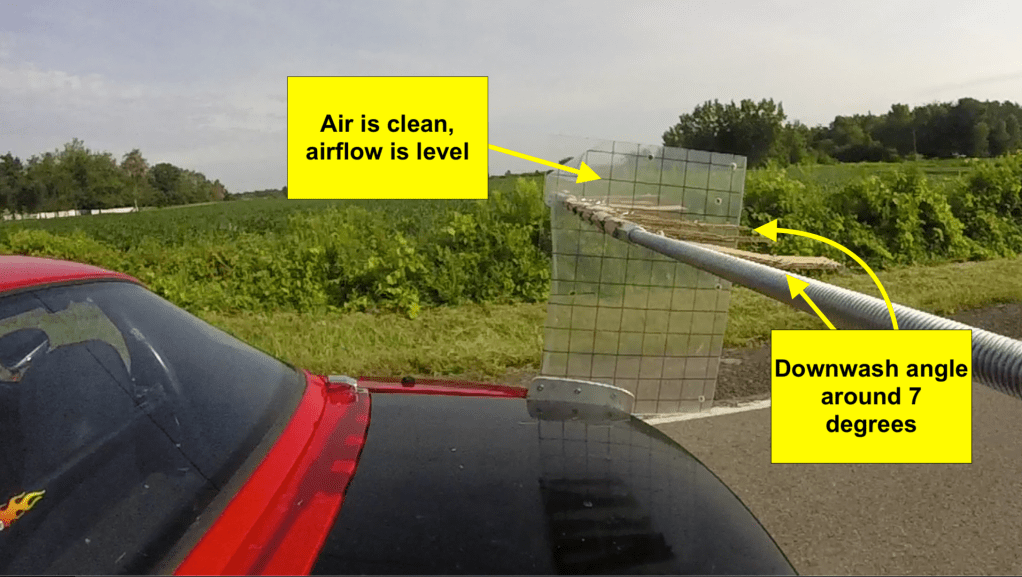
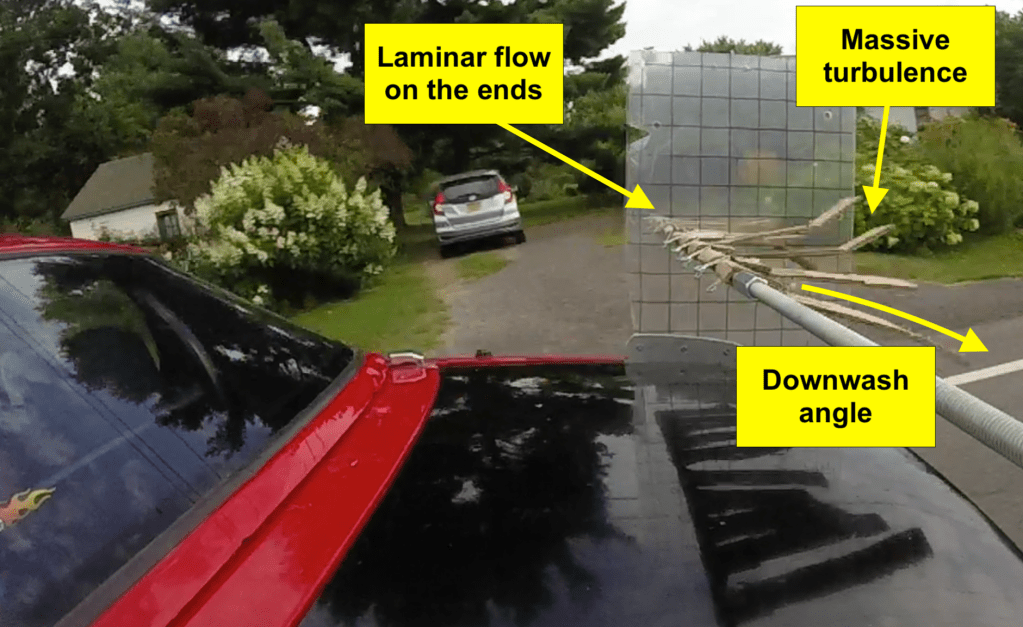
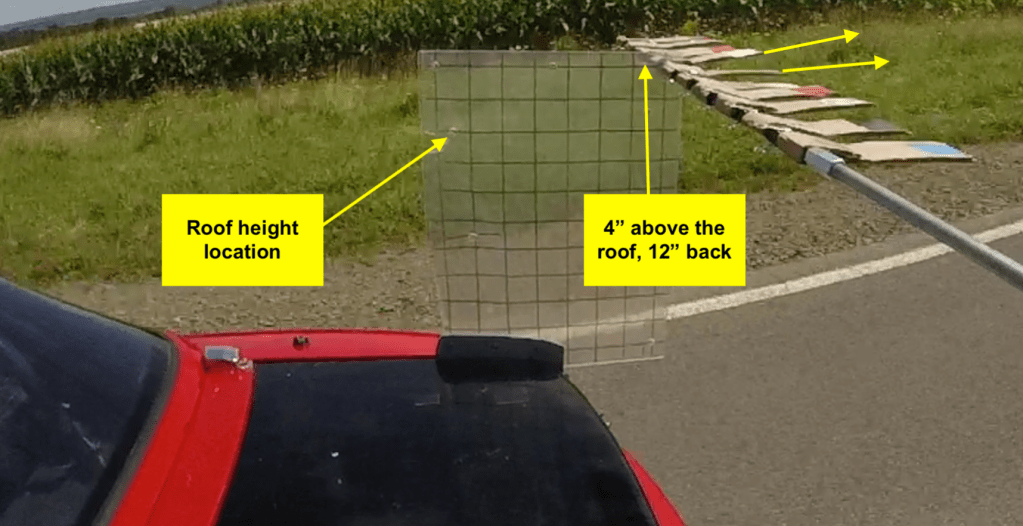
But don’t misunderstand this I’m saying and set your wing to 10 degrees! You have to take into account the downdraft angle of air induced by the roofline shape, which changes depending on the height of the wing, and changes across the length of the wing as well. You can read about that in my post on Visualizing Airflow, but at roof height on a Miata, the downdraft angle is an average of about 5 degrees (5 degrees in the center, 7 degrees at the wing stands, and zero at the ends). When I say the wing is most efficient at 10 degrees, that’s free stream air. On a Miata, the best you can do with the average car wing is 5 degrees. Unless you can get the wing higher, where there’s less change in the angle of the air coming over the roof, or you’re using a wing that can operate at a higher angle of attack.
The fact is that different airfoils work better at different angles of attack. Most of the wings I’ve reviewed in Car Wings Examined have a range of about zero to 10 degrees before stalling, but some work up to 15 degrees. I typically cite 9LR wings for examples because a) awesome, b) tested it, c) have not found anything better. I’m making some wings myself, but I don’t think there’s going to be a marked improvement in the shape. I’m just going after more chord and I like DIY projects.
When drag matters
I oversimplified to exaggerate a point, and there are some outside cases where wing drag matters. Certainly anywhere top speed is more important than cornering speed, such as land-speed records. An oval track is another area where wing drag reduction could be beneficial over downforce. But I haven’t seen Miatas setting land-speed records or racing oval tracks, and for normal racetracks where Miatas race, there are very few situations where wing drag matters. The only time it does is with low powered vehicles (under 75 hp) and the following corner cases.
Endurance racing
I’ve run a lot of endurance racing simulations in OptimumLap, and downforce wins over drag 99% of the time. This is true even when fuel consumption forces you to take an extra pit stop over the course of a day. However, there are some cases where you can optimize your fuel consumption and lap times using a lower-drag lower-downforce configuration, and ultimately complete more laps.
That one in a hundred times is always the result of one fewer fuel stop. If you’re racing in AER, with 90 minute stints and 3 minute pit stops, then this will never work. If you’re racing in 24 Hours of Lemons (where stint time is unregulated), and can do a two-driver change the first day, it can work. For Lucky Dog and Champcar where there are 2-hour stints and 5-minute pit windows, you have to be right on the cusp of a 1:55 stint time, and then wing drag matters. Although a single full-course yellow incident during a stint would have the same effect.
Watkins Glen
At Watkins Glen, in a Miata with less than 100 hp, drag matters. I’ll spare you the data, but I ran the simulations and the 5-degree and 10-degree wing angle came out to exactly the same lap time for a Miata with 100 hp. Both of these beat the most efficient wing setting by half a second. When I increased the power above 100 hp, the high-downforce setting won every time. Ergo, if you have less than 100 hp, then drag matters, at this track and similar tracks. At most any other track, wing drag doesn’t matter, go for maximum downforce.
Speaking of Watkins Glen, I’ve never been to an endurance race there when the track wasn’t under full-course yellow for less than 45 minutes. Someone always hits a wall (not pointing fingers, one time it was me), and this brings out the pace car and many laps under caution going 40 mph. This usually happens three or four times in a 8- to 9-hour day. In these situations you save a lot of gas, and optimizing your wing for more efficiency would just slow you down when the track goes green.
Bad wings and bad setup
I tested a cheap 53″ double wing at Watkins Glen, and it had almost as much downforce as my 60″ 9 Lives wing, but a shit ton more drag. A shit ton in technical terms is 300% more drag than the single wing, and this changed the total vehicle Cd from .48 to .55. Even worse, the rear-biased drag lifted the front of the car, and so the front lost .2 Cl downforce! In this case, wing drag absolutely matters.
It’s worth noting that OptimumLap simulations predicted the car would go faster with the double wing than without it, and so even a crappy, draggy, $70 wing is better than no wing at all.
A similar situation would occur if you set a single element wing with too much angle, and put the wing into a stall condition. This is often the result of setting the wing angle without accounting for the downwash angle of the roof.
Going after maximum wing downforce may produce a slower car. If reducing wing angle makes the car go faster, then either the wing was set too high (stalling) or the car understeered so much that it ruined the balance of traction between front and rear tires.
An understeering car can be fixed in a number of ways, the easiest is adding chassis rake (raising the rear of the car, or lowering the front). According to Supermiata alignment settings, Miatas are sensitive to chassis rake and this can be an easy way to adjust balance. Another way is to reduce the front roll couple by increasing rear spring rate or sway bar thickness, or decreasing those in the front.
Aerodynamic balance is really a topic unto itself, and I’ll get into that in the future. But if you don’t care about lap times, and you’re just having fun in HPDE, play with wing angle and aero balance. Less angle means less rear grip, and many people enjoy a bit of oversteer, even if the car has slower lap times and is less stable at high speed.
Finally, if you’ve set your wing up correctly, you can ignore wing drag and efficiency as variables of any consequence. The only thing that matters is the aerodynamic efficiency of the entire vehicle. The benefits of downforce far outweigh the penalties of drag, and as a whole, the vehicle will have the highest aerodynamic efficiency with the wing set at the highest, least efficient angle. The next time I hear someone talk about reducing wing drag, or how efficient their wing is, I’m going to punch them in the dick point them to this article.
The biggest mystery of last year is when Stefan Napp of Napp Motorsports brought his K24-swapped Miata to Pineview Run and we both went faster in my car than his. I had mentioned this in my driving other people’s cars writeup, but didn’t dig into it.
Stefan’s car is the stuff of dreams. Very wet dreams: K24Z3 motor, DIY Bilsteins, BFG Rival 1.5 S tires, Enkei RPF1s. Is there a better specification for a normally aspirated Miata? No. Well OK, a K24A2 is better than a K24Z3, but that’s nitpicking. (I originally wrote that his car was on Xidas, but stand corrected.)
Sweet dreams are made of this.
On the other hand, My 1.6 Miata is much more pedestrian. At 2/3 the displacement and no VTEC, the B6ZE is no powerhouse, but as engines go, it’s a sweetheart. I’ve written about this ad nauseam (1, 2, 3): it has all the bolt ons, 264 cams, and a standalone ECU. Most importantly, this was all tuned by the high wizard Rick Gifford.
The shocks are Tein Street Advance, which are a constant source of embarrassment. I mean, the spring rates (392/336 lbs) don’t even appear to be made for a Miata, I know, I know! And finally, the car is on Hankook RS4 tires, which are a step below Rival S and other Super 200s.
My car from later in the year when I added the splitter lip and taller spoiler.
Given the different specifications of the two cars, you’d think Stefan’s car would walk all over mine. Comparatively, my car is a dog, but every dog has its day, and on this day, we both went faster in the 1.6 than the 2.4. How is this possible? Let’s look at the data.
Stefan
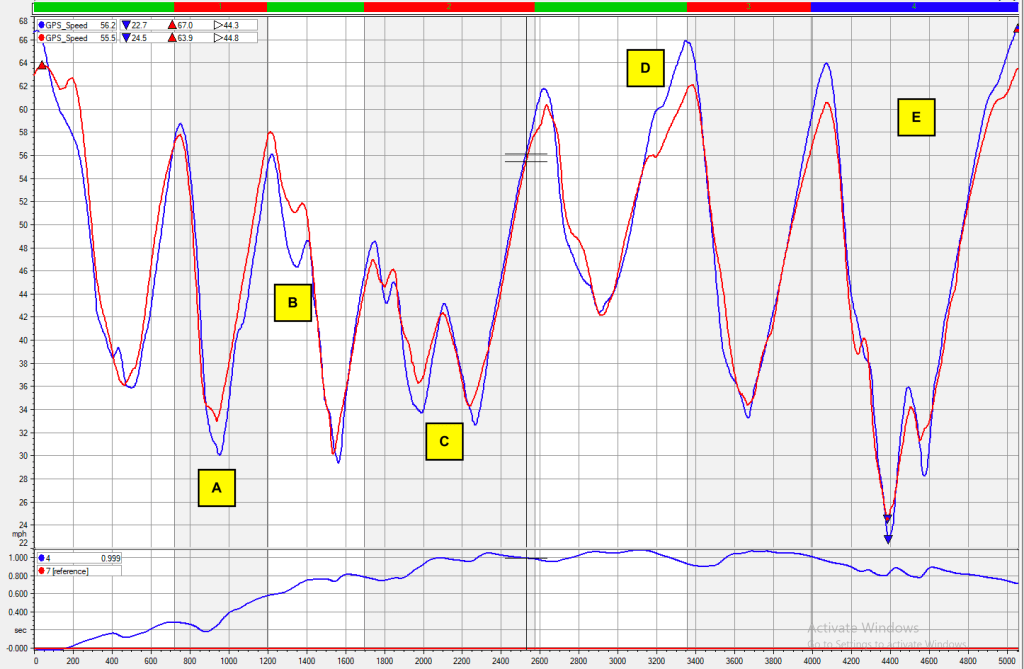
First is Stefan driving my NA6 (red) and his K24 (blue). I’ve marked some points of interest, but the most telling is the time/distance graph that shows he’s 1.3 seconds faster in the slower car.
A – Up to this point Stefan is driving both cars pretty equally, but he shuts off going down the hill in my car. It’s a sketchy off-camber spot, and this isn’t his car, so that’s normal.
B – Stefan makes a mistake and brakes too deep at the top of the hill and loses a lot of time on the entry to T11 (Knuckle). Notice the acceleration slope of the blue line. The K24 can really get out of the hole, except that this time the hole was too deep.
C – Stefan takes a long time to shift my NA6 from 2nd to 3rd gear, that’s the dip you see in the red line at the top. Earlier in the corner he took different lines, but they averaged out.
D – Braking too deep loses a little time. What’s interesting here is that I expected to see a much stronger acceleration slope on the blue line. This section is uphill, the NA6 is wheezing, and the K24 should be reeling it in, and isn’t.
E – Stefan loses a chunk of time by slowing too much before the final right hander. Again I’m wondering why the acceleration slope isn’t steeper out of T15, and while the K24 gets to a higher top speed, it’s not that much higher.
Some of the differences you see on the speed trace are the result of him taking different lines. This is a new track for Stefan, and it’s good to see him experimenting.
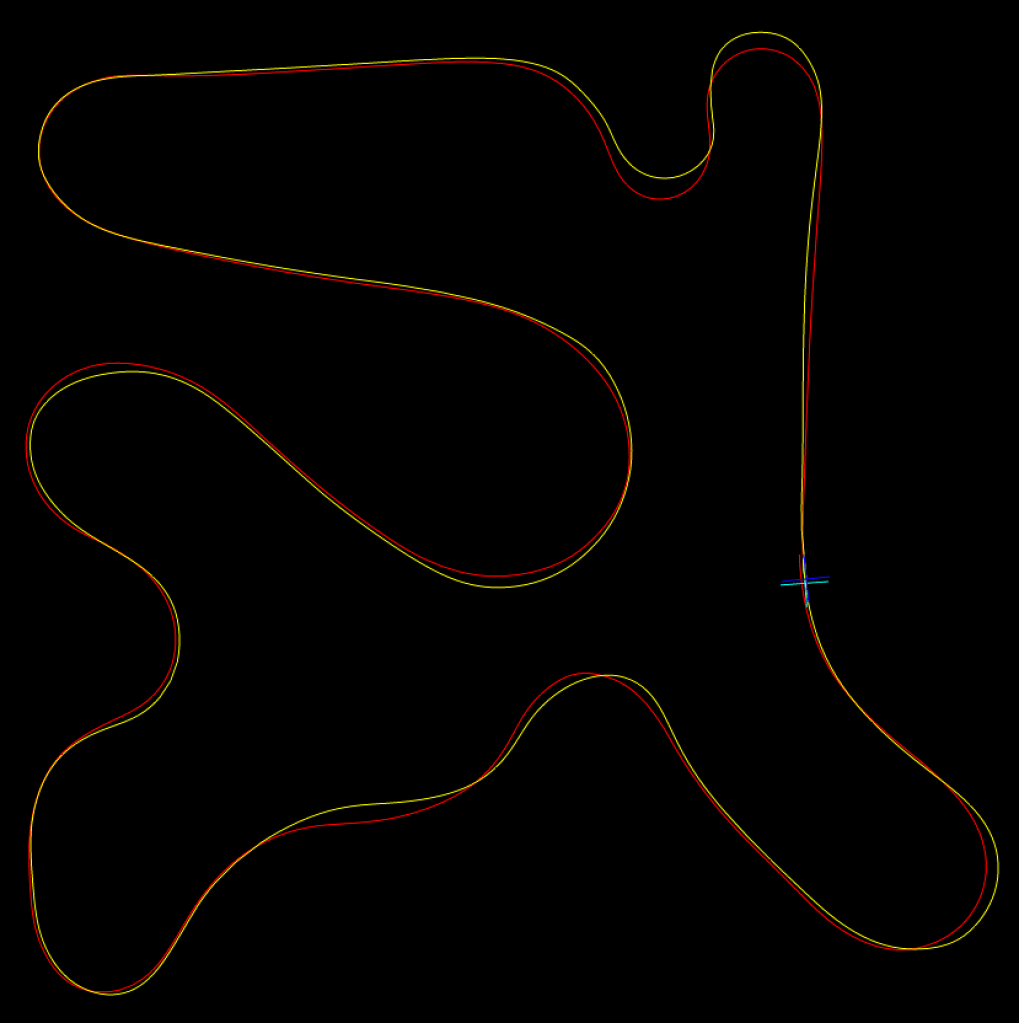
NA6 red, K24 yellow (blue doesn’t show up well)
I will say that this man can drive! Both Stefan and Dylan were instantly up to speed on an unfamiliar track, and while they would benefit from learning the layout better, they were on the limit of traction from the get-go. Could they go faster? Yes. Could they drive harder? I think not. Check it out in their video.
Theoretical best laps
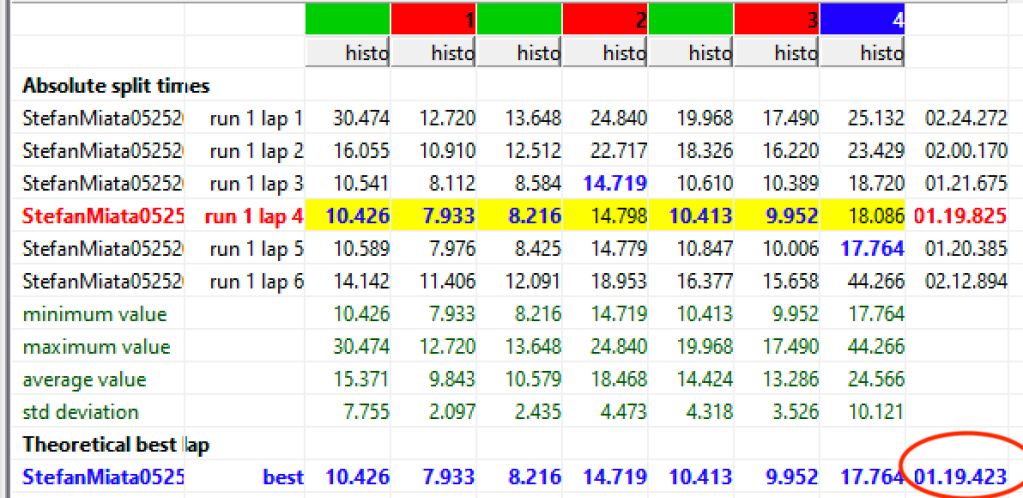
The previous data was from the best lap in each session, but we saw that Stefan made a couple mistakes and was still experimenting with line. So maybe if we stitched together his best sectors, the K24 would be faster? Indeed, it looks like he could have gone .4 seconds faster, and do a 1:19.423.
Stefan’s theoretical best in the K24.
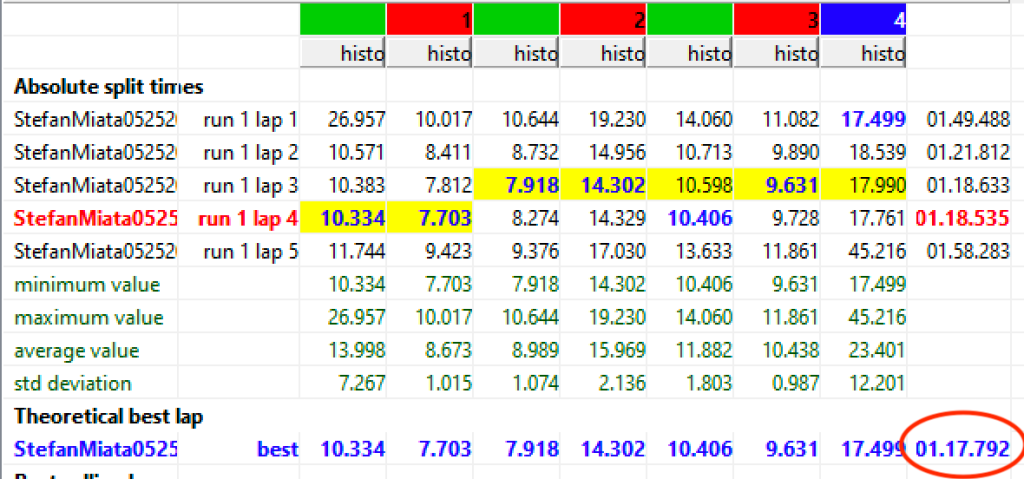
Next let’s see his theoretical best in my NA6, and he could have done a 1:17.792. Now this is flatly astonishing, because you’d expect more variability in the car with more power, and more consistent times from the anemic engine. But instead of .4 seconds, he could have dropped .8 seconds in my car. Now the delta between the cars is 1.63 seconds in favor of the 1.6.
I don’t think we’ve unravelled this mystery at all, if anything, it’s even more convoluted. Let’s see how a driver who knows the track did in both cars.
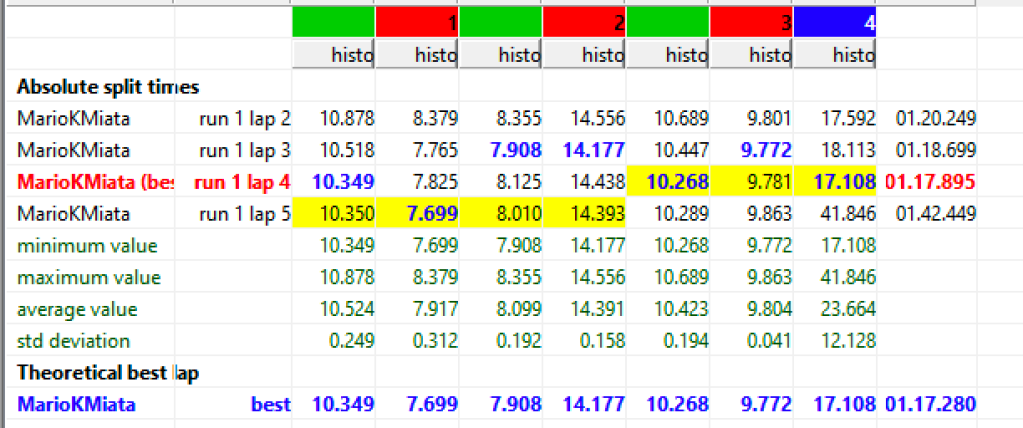
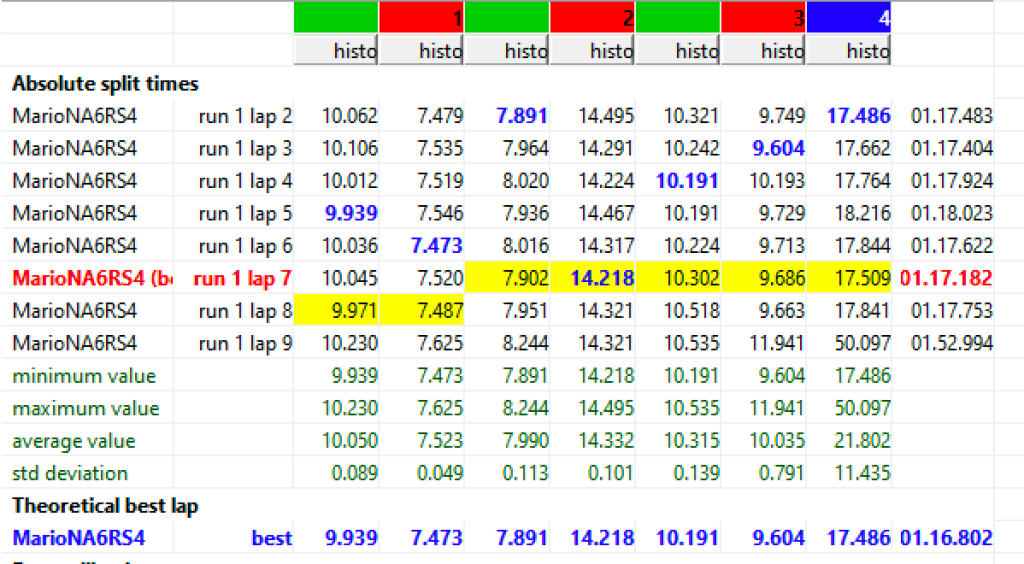
Mario
I’ll use the same colors, red is my NA6, blue is Stefan’s K24. I know the track better than Stefan (in fact I wrote the book on it, literally), and go about 1.5 seconds faster than Stefan did in his car. The freaky part is I go another .7 second faster in my car.
A – The biggest difference comes from going through the Crick, Turns 3-5. I get the car turned in earlier and this helps my min speed through the corner and down the hill.
B – I roll off going down the hill. This is not my car, on a sketchy part of the track, so I’m slower on the blue line. Recall that Stefan did the exact same thing in my car. We’re kind to each other than way.
C – Another big time delta is in the uphill esses where I can maintain a higher min speed.
D – Here’s where I finally see the K24 dominance, top speed just before braking into the Blind Hairpin. This happens again before braking into T13.
E – Notice the top speed advantage of the K24 on the front straight, this gains some time back at the very end of the lap.
Theoretical best laps
This is the same deal as before, stitching together the best sectors to see what my potential best lap time is in each car. I use a 7-sector map because this is about as granular as I can make it without getting unrealistic times that could never be duplicated in real life.
K24 best 1:17.280
My best theoretical lap in Stefan’s car would be .615 seconds faster, for a 1:17.280. That’s better, but still doesn’t match the time I did in my car. I’m more comfortable driving my own janky hardware at the limit, and I could have gone .38 seconds faster, for a 1:16.802. See below.
NA6 best 1:16.802
That’s more like the data I expected, with the slower car having less of a delta in theoretical best than the more powerful car. But once again, I did not expect to go faster in the slower car.
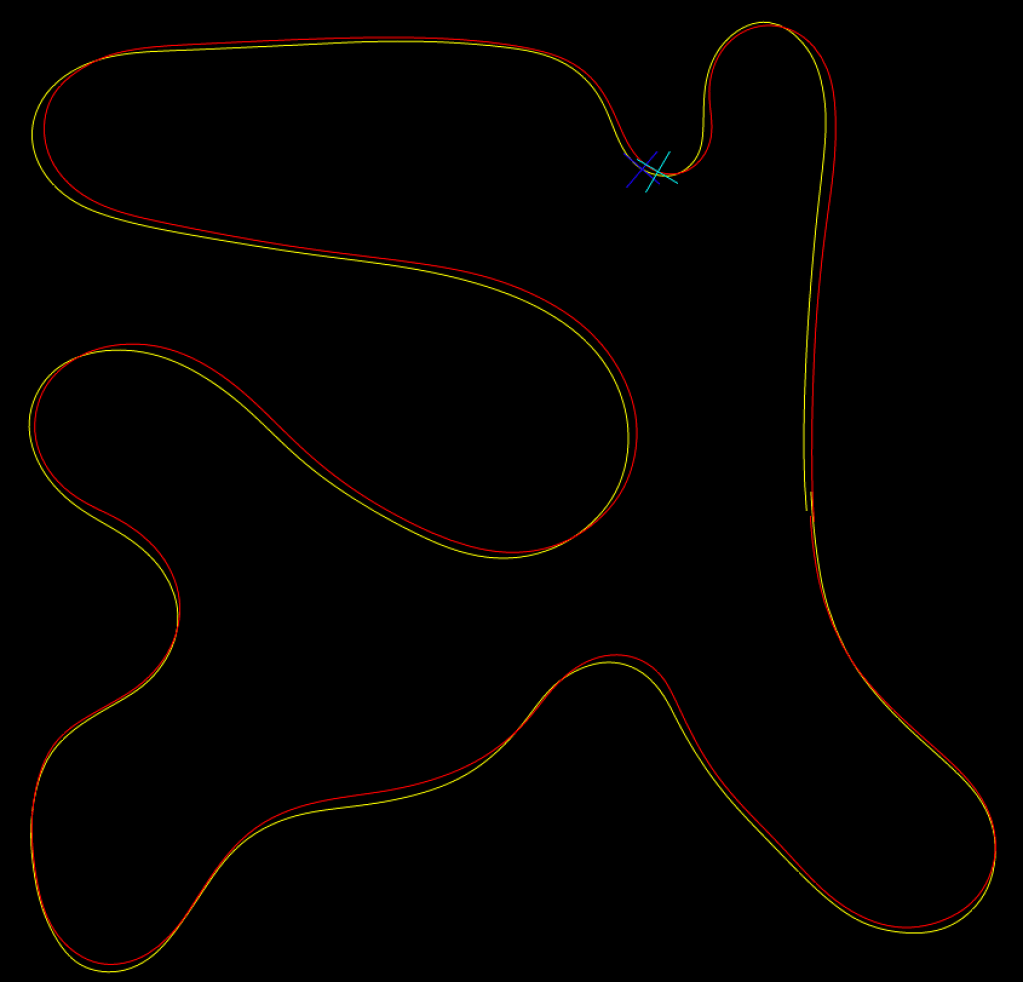
In the GPS trace you can see I drive a slightly different line in his car. Some of that is me being inconsistent, the other part is I drive a powerful car differently, and I’m sure you would, too.
Conclusions?
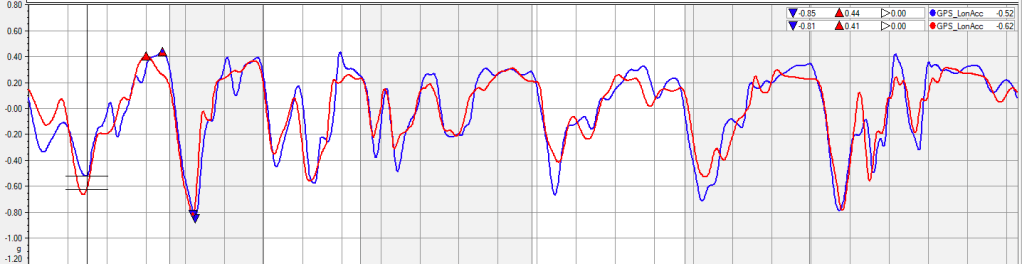
Driving Stefan’s car back-to-back with my own, the K24 felt amazing: flat torque, instant push, and then a top-end rush. What’s weird is that I’m not seeing that at all in the data! If I look at the longitudinal Gs, the K24 maxes out at .44g, and the B6 at .41g. I’d have expected more out of the K and less out of the B.
Longitudinal Gs, NA6 red, K24 blue.
The VTEC hit comes really late, especially at this track, with this gearing. Right when you feel the VTEC kick in, you have to get on the brakes; it’s both annoying and a disappointment because you really want to ride that wave. And this may be partly why the min speeds are lower in T4, T12, and T13, because the VTEC caught both of us off balance and forced us deeper into the corner on the brakes. However, this doesn’t explain the difference in min speed in the esses.
Weight could be a factor here, especially in the fast transitions. While the cast-iron block of the B6ZE weighs more than the K24, the brackets and other associated hardware for the motor swap may have added some weight. Stefan’s car also has a soft top under the hardtop, but that should be about the same weight as my rollbar, which his car didn’t have. And my car has a tow hitch. In any case, the weights should be pretty close, and I’d guess there isn’t more than 50 lbs between them.
Both cars started out with 6” ring gears and have been upgraded with 7” Torsens. I believe both cars had the same 4:1 final drive ratio at the time. And both cars had manual racks and no ABS. Even Steven, all the way around.
What about lateral grip then? Rivals are supposed to be stickier than RS4s, but the data shows them having slightly less lateral grip. In left turns, the Rivals were about the same or better, but in right turns (which there are more of), the RS4s had more grip. RS4s FTW! (I’m punching the air as I write this.)
Which tire has more lateral grip?
This left/right imbalance could be because of sub-optimal alignment on Stefan’s car. I didn’t use a pyrometer on that day (I wasn’t officially car testing, I was just a helping hand), so I don’t know if the alignment or tire pressures were correct. And then perhaps his suspension was set up poorly, and mine was better. But seriously, I have to think that Bilsteins on their worst setting are better than Teins on their best.
Personally, I have a lot of time driving RS4s, and I can drive them at the limit easily. I had a harder time with the Rivals. Factor that into my lap times.
And for sure some of this mystery is the track itself. Pineview Run is like an autocross, but with massive elevation and camber changes. Top speed is around 70 mph in a Miata, and average corner speed is in the low 40s.
At any other track, the K24 would have had a chance to stretch its legs and run away. However, Pineview Run continues to be a riddle, wrapped in a mystery, inside an enigma. High-powered cars are hamstrung here, front-wheel drive cars are hobbled at the knees, and aero doesn’t have a leg to stand on. To that point, both cars had R-package front lips and rear spoilers. My spoiler was an inch taller, but otherwise the cars had identical aero at that time.
If I had to guess what’s going on, it has to do with drivability. There are so many low-speed corners connected to each other that throttle modulation becomes perhaps the most important factor. This is not simply for accelerating out of the corner, but for balancing the chassis for optimal grip. I saw this when driving other cars that had abrupt power deliveries, and they were always slower than expected, sometimes much slower. Which is not to say that the K24 had an abrupt delivery at all, but it didn’t have that partial throttle crispness and exactness that my NA6 has. And it’s hard to get out of shape when you have no torque!
Dylan’s NB2-swapped NA was there on the same day, and it was even better in this regard. But his car was shod with Yokohama S-Drives, and so no direct comparison can be made there. I’ve said this before and I’ll say it again: this was the best normally aspirated Miata engine I’ve ever driven. Stefan can assemble the same spec engine for you at a reasonable price, and if I wasn’t so far down the path of 1.6 absurdity, I’d have him build me one.
Well that was in the before time, and in the present day both of the Napp Motorsports cars are ruined have turbos. My car has evolved slightly with a unicorn 4.625:1 final drive and better aero. Both cars are diverging from each other, but perhaps one day we can do another test at Pineview using the same tires, and shed some more light on this subject. Or the 1.6 will win again and extinguish the lights completely.
As air moves over the top of a car, it follows the contour of the roof, changing in shape and direction. Most car wings are a 2D design, meaning they have the same shape across the entire wing, and thus aren’t optimized for a curving roofline. Ergo, at various points along the wing, the effective angle of the wing changes.
The easiest solution is to get the wing as high as you can, into the cleanest air. Many racing series limit wings to roof height, and even if you’re allowed to get it higher than that, there are practical limits to how high you can brace that much weight, and the ill handling that results from it.
Ideally, a wing should follow the shape of air as it goes over the car’s roof, and so 3D wings make a lot of sense. However, 3D wings have a complex shape, and thus aren’t easy to build. And they’d have a different ideal shape for every car, and maybe even on the same car at different heights.
Finally, for any wing, you need to know where to set it for the best lift/drag ratio, or the most downforce, and for sure you want to avoid too much angle, which will make the wing stall. Many wing manufacturers publish CFD data, but how does that relate to what’s happening on your car? I wanted to find out.
Airflow visualizer
To investigate the shape of air as it comes over the roof, I’ve created what I call an airflow visualizer. It’s basically a metal rod suspended where a wing would be, with small pivoting airfoils that move into the position of least drag. With this visualizer I can measure the angle of air as it across the back of the car. This allows me to discover the ideal wing shape at any position behind any roof.
9 Lives Mini Wangs rotate into position of least drag.
To build the airfoil visualizer I used all-thread so that I could attach it to wing stands of any width, and placed 9 Lives Racing “mini wangs” at intervals using binder clips so I could slide them around anywhere. I placed the last airfoil at body width, which would be a 64″ wing on this car. Given that car roofs are symmetrical, I only put airfoils on half the wing, and mounted a camera on the other side to capture what happens at speed.
My airflow visualizer has two end plates, one is wood, the other a clear acrylic. The all-thread rod goes through the end plates and I can mount the visualizer anywhere I want by drilling a couple more 1/2″ holes. On the clear side I put 2″ grid lines for measurement, and so that I could see the angle of apparent wind. The grid lines are at a 7 degree downward angle, which was a mistake, but turned out to be a happy accident.
Now I thought this was a great idea at the time, but because of the mass of the mini wings, I had to go very fast before they would pivot, and their inertia meant they also swung when I hit bumps in the road. In the end, this brilliant idea didn’t give me a clear picture of the airflow.
I then switched to using yarn in place of the wings, but that didn’t work great either, too much amplitude. I needed to dampen the signal as it were, so I taped 2″ wide strips of cardboard around the all-thread, which was a lot better. This was such a cheap and easy solution that I’m regretting cutting up all those mini wings now.
Two runs: roof height, then 8″.
In the next section, I’ll explain what I’m seeing in the video. (If you see something different, drop me a note in the comments.)
Roof-height
In the following video still, I’m doing about 20 mph and all the cardboard telltales are going straight back without any up or down movement. The telltales at the end of the wing are level with the road, and the ones in the middle of the wing are level with the black lines on the acrylic plate. So this means there’s about a 7 degree downwash angle on the sides of the roof, and what looks like 5 degrees in the center.
Wing mounted at roof height.
As I picked up speed, the telltales stayed at the same angle, so it doesn’t look like downwash angle changes much with speed. However, the telltales that are next to the acrylic plate started oscillating up and down like crazy, the result of turbulence. The middle of the “wing” shows some increased turbulence at speed, but nothing so extreme.
Angle of air doesn’t change, but turbulence goes way up half way between the middle and ends.
I’m guilty of confirmation bias; I like predicting results and then finding out they are true. I predicted nothing like this, and I liked that even better! Well, let’s see what happens when I lower the wing to half the height.
Lower height
The lower mounting location replicates a wing at 8″ high. The telltales at the end are just higher than the grid lines on the clear end plate, so it looks like a few degrees negative. I expected to see them at zero degrees, but perhaps there’s some interaction with the sides of the car or the road at this height? Whatever the case, something is creating a slight downwash angle.
Visualizer mounted in the low position at about 40 mph.
In the middle of the car, the downwash angle is greater, maybe 15 degrees, and as speed increases, so does the angle. If you watch the video, it looks like that the air near the trunk is pulling the center foil downward at speed. As you move from the center to the sides, the angle changes a bit. And again there’s a shocking amount of turbulence on the three telltales near the wing stand. You can see this in the video: at about 20 mph, all of the cardboard goes straight back, but by 40 mph, the telltales near the mounts are flapping up and down like crazy.
Re-tests
The cardboard strips have a bend in them at the end, and I wondered what would happen if I cut this flexible section off. I did that and re-tested both heights and much of the turbulence went away. That dampened the signal too much! It occurs to me that if I started that way, I never would have discovered the turbulence.
I then moved the airflow visualizer 4″ higher and 12″ further back. Theoretically the air should be a little cleaner here, with less change in angle across the wing.
4″ up and 12″ back.
The downwash angle flattened out a little bit. Look at the two telltales on either side of the acrylic plate, that’s where the angle is the greatest. In the middle of the wing, the downwash angle is little bit less.
I then kept the hight the same and moved the visualizer 6″ forward. So this splits the difference between the first run and the last. It was pretty similar, and so I’m not sure moving the wing rearward further than this has much benefit. In fact you lose downforce and create front end lift by moving a wing too far rearward.
4″ up and 6″ back
I then retested at roof height and forward, and here you can see the 7 degree downwash angle on the telltale that’s inside the wing stand (level with grid lines), and the one on the outside is level with the ground. The telltale that’s in the exact middle of the roof appears to have slightly less angle.
Re-test at roof height.
Early conclusions
My testing is far from over, but I can draw some early conclusions.
For a 2D wing, get the wing as high as your rules allow, but within reason. At some point the extra weight and moment of inertia will be detrimental to fast changes of direction; a tall, wide, heavy wing at the polar end of the car is the antithesis of mass centralization. In addition, a higher wing causes front end lift because it has more leverage to rotate the entire car around the rear axle. All of this is to say that from from the wing’s perspective, it wants to be as high as possible, but from a handling perspective, lower is better. Somewhere around roof height is a good rule of thumb. This is not groundbreaking knowledge, I think most people do this already.
If you mount your wing at roof height, do you need a 3D wing? No. I’ve done the calculations for a 5-degrees offset, and there are very minor gains: 5% max downforce and 10% average gain in efficiency (entirely drag related), which is completely irrelevant at practical racing speeds. At 7 degrees, it wouldn’t be that much different.
It’s worth noting that with the wing 4″ higher than the roof, the downwash angle flattened out slightly. I would imagine there’s less turbulence at that height as well, but I couldn’t tell because I’d cut the telltales shorter before I tested that. In any case, if your rules allow you to place a wing above roof height, there’s some small benefit.
If you are limited in height to say 6″ below the roofline (SCCA Super Touring), then a 3D wing might be a better option. On a Miata, at this height, the change in angle between the ends of the wing and the middle is 10-15 degrees and this would likely cause a 2D wing to stall somewhere along the length. This of course depends on the roofline shape, and a car with less curvature in the canopy (E30, etc.) would be fine with a 2D wing.
The wing stands are 41″ apart, and so if I was designing a 3D wing for a Miata I would make the center section about 41″ wide, and put the outsides at a steeper angle. My guess is that the wing stands themselves are affecting this, by guiding the air along them, and that the center section that has more downwash angle is in reality a bit narrower than 41″.
If you have a 3D wing, I wouldn’t mount it at roof height unless the offset between the ends and middle is 7 degrees or less. All of the 3D wings I’ve seen have 10-15 degrees offset, and it’s likely that part of the wing will stall if mounted at roof height. You can find out the ideal placement of a 3D wing by making your own airflow visualizer, but lacking that, I would find pictures of wind tunnel streamlines for your car and measure them.
In fact I could have gotten pretty close using the following image from a wind tunnel test. However, it wouldn’t have told me the width of the center section that’s at a steeper angle, nor the massive turbulence hitting the inside third of the wing.
Maybe I didn’t need to make the airflow visualizer?
The cause? My guess is that air is wrapping around the sides of canopy, add it must detach in this region. This makes a lot of sense, because air doesn’t like to change direction at more than 12 degree or so, and needs help in the form of strakes, vanes, and other tricks to do so. This is true whether we’re talking about air going over a roof, under a diffuser, or around the sides of the canopy. The Miata’s hardtop wraps around too abruptly on the sides, and air can’t stay attached. The result is downstream turbulence hitting the wing.
And that’s probably the biggest discovery in all of this, which is that there could be enormous gains in feeding the wing cleaner air. The OEM Miata hardtop looks cute, and it functionally covers the hole where the soft top used to be, but probably 25% of the wing area experiences turbulence that decreases downforce and increases drag.
Changes to roofline shape, adding guide vanes, a spoiler, and perhaps even vortex generators on the sides of the canopy could be tricks that decrease flow separation in this area, and make a wing perform better. A 3D wing is not the answer to this problem, it would experience the same turbulence in this location, or perhaps more, being mounted lower.
Location of turbulence.
The following photo is from a wind tunnel test of six generations of Corvettes, this one an early hardtop version that’s similar to a Miata hardtop in shape. You can see the turbulence and separation along the side of the canopy. If you watch the video, you can see the flow stays attached down the middle of the car; it’s the air trying to wrap around the sides of the canopy that’s the problem.
Now that I’ve built the tool, there are a number of tests I still want to do.
New telltales – The sensitivity of the winglets plays a big part in visualizing what’s happening, and I have some ideas that are better than strips of cardboard. Ideally I’d measure the angle, amplitude and frequency using a potentiometer.
Spoiler – You don’t see many people using a spoiler and a wing, because racing rules seldom allow that, but a spoiler might be useful to change the shape of air before it hits the turbulent portion of the wing. Yes the spoiler is behind the canopy, but it could build up a local high pressure region in front that might help in some mysterious way. Anyway, probably can’t make it worse.
Custom top – I have three custom tops I’ve built (fastback, shooting brake, coupe), and I’ll update this post when I test them. But knowing what I know now, I have an idea for a new roof that has the specific task of feeding the wing clean and level air.
Different cars – I can clamp the airfoil visualizer to any set of wing stands and change the width using the all-thread rod. With that I can measure the airflow on any car, at any height. Maybe I’ll create a database of “wind shapes” for different vehicles?
Wing stands – My airflow visualizer is basically two enormous wing stands, and perhaps this is affecting the telltales that are immediately next to them. I’ll mount the airflow visualizer to standard wing mounts and see if there’s any change.
Open top – In my aero tests at Watkins Glen, an open top reduced the wing’s downforce by 2.5x. At the time I didn’t know if this was turbulence or a change in wing angle, but at this point I’m leaning towards turbulence. On second thought, I probably won’t bother testing the airflow visualizer with an open top, because anyone using a wing and open top needs more help than I can give them.
After cutting the cardboard shorter and coloring the telltales for better visualization.
Justin Lee of Miatahubs recently asked me what I would do for a Gridlife Touring Cup (GLTC) wing that measures no more than 250 square inches. This sent me down a rabbit hole of possibilities, and to consider all their aero rules and options.
GLTC Wing Rules
Racing rules change all the time, and aero rules even more, but let’s take a look at the current rules.
A rear aero device, oem or aftermarket is allowed. If the surface area is above 250in2 up to 701in2 (chord × length) the adjustment must be taken.
Only one aerodynamic element such as a wing or spoiler is allowed. The only exception to this is OEM hatchback spoilers which are utilized to mount wing brackets, are not considered an aero device. For example, a dual element wing is illegal, a single element wing with a trunk mounted spoiler is illegal, a single element wing mounted to the oem hatchback spoiler is legal.
Entire assembly (including endplates, and wing mounts) may not extend more than 5” past the most rearward part of the rear bumper when looking from above. There are no height restrictions.
Each wing endplate is unrestricted, however, should not exist in space that causes potential contact to cars during close quarters racing. Wings causing potential or actual contact problems will be asked to be removed.
Gurney flaps are allowed. Active aero is not allowed.
In the first bullet it says, “the adjustment must be taken.” The adjustment is a 3% hit to the lbs/hp ratio. GLTC is based on 12.5 lbs/hp, and if your car is 2500 lbs and 200 hp, then a wing costs you 6 hp or 75 lbs. That’s not a very large penalty for aero, and if I was racing GLTC, my first instinct would be to use a 700 square inch wing. That’s 9″ x 77″ or 12″ x 58″, and fairly large.
You can also run a wing that’s under 250 square inches for free. Well that’s interesting. I don’t know why they chose 250 square inches, perhaps some sedans with wings (Integra-R, WRX STi, etc) measure in under that size? In any case, that’s a pretty small wing and one wonders if it will do anything. Let’s find out.
250 sq-in Wing Options
I have a 53.1″ wing that measures 4.7″ chord, which calculates to 249 square inches. It just barely squeaks under 250, perfect. Originally the wing was flat on the bottom, but I modified the bottom so it’s curved.
Cheap wing with modified bottom profile.
It now looks like a bit like a Wortman FX72 airfoil or a GOE-525. I’ll explore that in Airfoil tools and set realistic Reynolds numbers (realistic car speeds) and see how it performs.
fx72150b-il at 120% thickness, -5 degrees, upside down, and reversed.
Notice first in the Cl v Alpha (angle of attack) chart, the wing makes the most downforce at around 10 degrees. There isn’t much difference in Cl (downforce) between the 200k and 500k Re lines, and so the wing is generating downforce, despite the low speed.
Reynolds numbers 200k and 500k with Ncrit 5.
Below that chart in the Cd v Alpha, you can see that the drag really spikes up after 10 degrees. Lift and drag are combined in the Cl/Cd v Alpha, and you can see the wing is most efficient at around 5 degrees, but I’d go for more downforce and aim for 8 degrees. Downwash from roofline shape would come into play here, and so I’d probably set the wing to about 3 degrees and then play with the AOA from there.
Notice also in the Cl/Cd v Alpha chart the difference between the 200k and 500k Reynolds numbers. At low speed (or small chord), the wing is about 60% as efficient. If I included 1 million Re, the wing would be about 2x more efficient than 200k. In other words, a bigger wing would be more efficient.
All in all, this is a good wing profile for low Re, and there aren’t many wings that have a max Cl above 2.0 at 500k. A custom wing built specifically for this purpose would have more chord and camber, but wouldn’t give that much more downforce at these speeds. Anyway, for a $50 wing modified with a pine baseboard glued to the bottom, this is not so bad.
To optimize the wing I made oversized end plates, added a 1/4″ Gurney flap (5% of the chord) to both the wing and the end plates. I sent the wing to Justin for testing. He sent me back a pic, and it looks good, but I wonder how it’ll work? He’s racing GLTC this weekend, and I’ll look at the data after the race and report back.
250 sq-in wing doesn’t look half bad on Justin’s car.
Calculating Downforce
I previously wrote a post on a simplified way to calculate downforce, and I’ll use that same calculation here: (mph*1.47)^2 * .00119 * sq-ft.
I won’t make you go through that, so I’ve done the calculations and listed downforce for three speeds: 50 mph, 62 mph and 82 mph. These speeds are specific to Mid-Ohio, where Gridlife will be racing.
50 mph is about the min speed through the slow turns: T2, T5, and T12.
62 mph is the average minimum cornering speed of all corners combined.
82 mph is the min speed in T1, the fastest corner.
Let’s see how the no-points 250 sq-in wing stacks up against Justin’s 67″ 9LR wing, in downforce.
MPH
250 sq-in wing
623 sq-in wing
50 mph
11 lbs
28 lbs
62 mph
17 lbs
42 lbs
82 mph
30 lbs
73 lbs
Downforce at cornering speeds
The standard 67″ 9LR wing is making almost the same downforce at 50 mph as the little wing does at max cornering speed. In addition, the larger wing would be more efficient at these speeds because of the larger chord, which brings the Reynolds number up to a more useful range. Before you write me and say that I have this backwards, please go look at data for wings at low Re. At low speed, a larger chord is more efficient.
250 sq-in wing (brown) and 625 sq-in wing (blue) at the same speed. Clearly the larger wing is more efficient at all angles of attack.
Downforce increases grip relative to the weight of the car, so a lighter car gets more out of a 250 sq-in wing than a heavier car. Justin’s car is pretty light, and I wouldn’t even bother with a small wing like this on something 3000 pounds or heavier.
But a free wing is free, and it adds a not insignificant 30 lbs of downforce in T1, which is about 1.2% more grip on a car that weighs 2500 lbs. That could be useful, but through the slower corners, the downforce is negligible, while causing drag on every straight. Still, T1 is important, and extra rear grip would be useful when braking from high speed into China Beach.
Spoiler
Another free option is a 250 square inch spoiler. I wrote a whole article on Miata Spoilers, but to recap it, spoilers are effective at three things.
Changing the shape of air as it passes over the car. This can reduce drag and cancel lift.
Creating a high-pressure zone on the rear deck lid. Pressure is akin to weight, and that means downforce.
Moving the center of pressure rearward, which usually makes a car more stable.
I’m a fan of spoilers, I like the way they look, I have data that prove they work, and they are cheap and easy to DIY. If you made one 8″ tall by 41″ long, with a semi-circular shape on each end, that would be 250.26 square inches. Shape the bottom center portion so it follows the cambered trunk line and it would be less than 250″. It could be made adjustable for angle, but for simplicity, I’d set it at 70 degrees.
Simple spoiler might work better
A spoiler of this size should have a coefficient of lift around -.45, which is pretty significant. (This is according data from MacBeath’s book, Competition Car Downforce, and also corroborated in my spoiler testing.) In the 250 sq-in size, I’m guessing a free spoiler might be faster than a free wing.
You might be thinking, wings are more efficient than spoilers, how could a spoiler be faster? Because wings are designed to fly fast, and that’s when they are efficient. At low speeds, or with a small chord (which is the same thing), wings have more drag, less lift, and in this size, might be slower. I tested a 9 Lives wing vs a 7” spoiler at Pineview Run, which is a very low speed track. The spoiler was .5 seconds faster in redundant tests. I’ll have to test both the 250 wing and spoiler at a faster track, just to close this loop.
Splitter
Gridlife allows a splitter up to 3″ in front of the bumper. This is a bit on the small side, especially considering the 701 sq-in wing allowance. Most racing rules allow a longer splitter, but whatever. I tested my car with a 4″ splitter and it dropped Cd by .01 (a splitter is less drag) and increased downforce by .38 Cl (win, win). So I’ll estimate that a 3″ splitter will be worth .007 drag reduction and a .30 delta to downforce. I’ll use this later in simulations.
The GLTC splitter rules are pretty well written, and say that if you have a bumper or undertray or anything that acts as a splitter, they’re going to call it a splitter. This is a recent rules addendum: “Any upper horizontal surface that is non-OEM and exposed to airflow will be classified as a splitter regardless of protrusion from or location in the front fascia. Example: Flat section floor in front of radiator.”
Simulations
I’ll run some simulations based on GLTC rules. For the cars with aero, I’ll penalize 3% for a wing, and another 3% for a splitter. That penalty can occur through reducing power or adding weight. If you read my previous article on the subject, then you know adding weight is theoretically faster, but I’ll do one simulation with the same weight and detune the car for less power.
Here are the 6 different builds:
No aero: This is the baseline build at 12.5 lbs/hp. NC Miata, 6 speed, 4.1.final drive. I made the Cl about zero to simply calculations on my end, but in reality there would be some positive lift.(Cl 0.001, Cd .45, 197 hp, 2463 lbs.)
GLTC wing: This is the 250 sq-in wing only. It’s free aero, it should go faster. I’m guessing on the drag and lift values. (Cl .2, Cd .46, 197 hp, 2463 lbs. )
GLTC wing, splitter: Add a 3″ splitter to the above. Car pushes a bit already, so this should balance the car better. Notice the increase in weight to offset the 3% aero penalty. (Cl .5, Cd .453, 197 hp, 2537 lbs.)
67″ 9LR wing: Remove the wing and splitter, replace with Justin’s 9LR wing. I can’t simulate aero balance, but the car might push in this configuration. (Cl .6, Cd .49, 197 hp, 2537 lbs.)
67″ 9LR wing, splitter: Now add a splitter and get the car to be more neutral. Bigger weight penalty running two aero items. (Cl .9, Cd .483, 197 hp, 2611 lbs.)
67″ 9LR wing, splitter, detuned: This is the same configuration as above, but instead of adding weight, I’ve removed power. So the car weighs the same as configuration 1, but has 11 hp less. It’s the same power/weight ratio as #5. (Cl .9, Cd .483, 186 hp, 2463 lbs.)
Vehicle
1. No aero
2. GLTC wing
3. GLTC wing, splitter
4. 9LR wing
5. 9LR wing, splitter
6. 9LR wing, splitter, detune
Lap time
1:37.35
1:37.87
1:36.32
1:36.36
1:35.93
1:36.03
Min Speed
47.96
48.19
48.52
48.63
48.94
49
Max Speed
121.89
121.31
120.63
119
118.35
117.15
Max Lat G
1.25
1.29
1.34
1.37
1.42
1.43
Max Accel
0.4
0.41
0.41
0.42
0.42
0.42
Max Decel
-1.41
-1.49
-1.59
-1.63
-1.7
-1.71
Lbs
2463
2463
2537
2537
2611
2463
Hp
197
197
197
197
197
186
Cd
0.45
0.46
0.45
0.49
0.48
0.48
Cl
0
0.2
0.5
0.6
0.9
0.9
Aero Efficiency
0
0.43
1.1
1.22
1.86
1.86
Simulations
The fastest configuration is #5, the big wing and splitter, with added weight. It’s .1 seconds faster than #6, which has the same power/weight ratio, but is lighter. And that’s expected, because you need power to overcome drag, and that power results in a 1.2 mph top speed advantage. Notice, however, that the lighter car has slightly more grip, 1.46g vs 1.45g, and so OptimumLap figures that part correctly.
In addition, Gridlife allows the 2611 lb car to use a wider tire than the 2463 lb car, and so the heavier car would have wider rubber as well. Finally, if you win a GLTC race they add 150 lbs to your car. That’s a larger penalty to a lighter car than a heavier one. If you can exploit the rules, lighter is not always faster!
Configuration #3 is interesting, with the splitter and GLTC-250 wing, it beats the no-aero car by over 1 second. In the real world, it might have good aero balance and be a good choice overall. Hard to say without real-world testing tho. Oh hey, Justin did that.
Results
Justin tested both configurations of wings at Gridlife, and you can watch the Gridlife live broadcast and find him. He had to add 75 lbs of ballast to use the bigger wing to make the race weight, and so this is a great real-world A/B test. Justin sent me the data, and I’ve marked the points of interest on the speed trace. The 250″ wing is red, the 9LR wing is blue, and I’m using three laps from each to normalize the data. Let’s jump into it.
Mid-Ohio speed trace.
Exhibit A – This is Turn 1, a fast left hander. The bigger wing has more downforce and grip, which translates into a higher corner speed, and that pays dividends on the next straight. Despite having more drag, the bigger wing is faster all the way down to the Keyhole.
Exhibit B – Turn 2 is a slow and long right hander. The small wing is making about 11 lbs of downforce here (probably less considering the low Reynolds number), which is negligible. The 9 Lives wing is making 2.5 times more downforce, and while this is only about 1.1% more grip, it’s significant because of the long straight coming up.
Exhibit C – You’d think the smaller wing would have a higher top speed, and on average, it does. The difference is just over 1 mph, 124.83 vs 123.56 mph.
Exhibit D – Through the esses, the area under the curve is greater with the bigger wing, meaning more grip. If you look at the time graph on the bottom, the esses are a big chunk of the time difference.
Exhibit E – The entry of Turn 9 requires confidence, and Justin is able to trail brake better through here. Notice the hockey stick shape is the same for blue and red, but the blue is done at significantly higher speed. That extra confidence in corner entry means a higher min speed, and he’s faster through Thunder Valley.
Exhibit F – In low-speed corners, the blue and red lines are close together. The faster the corner, the more they diverge. Simply put, the higher the speed, the more the big wing is at an advantage. You can see this clearly in T1, and again here in T11.
Exhibit G – The final corner is a low speed carousel where the little wing can’t do shit, and the big wing can. If you ever think to yourself 1% more grip is nothing, think again.
Exhibit H – The table in the upper left corner shows peak values for speeds. I should really do one of these for lateral Gs, because that’s where the real difference lies, but the results are so obvious I’m not going to add another graph.
Final Conclusions
Real-world testing confirms that a large wing with a 3% penalty to lbs/hp is faster than a smaller wing in the “free” 250 sq-in size. Simulations predicted that the big wing would be about a half second faster, while in the real-world, it was a difference of about 1.25 seconds. Justin reported that the bigger wing gave him MUCH more confidence, and that’s probably where the extra time came from.
Certainly there’s some noise in the data, but Justin is a really consistent driver. I looked at 11 laps from each wing and calculated theoretical best laps from a four-sector map, and the data was virtually the same. So while the numbers might be off a bit here and there, the trend is clear.
Is there a legitimate usecase for a smaller wing? Possibly. There’s been some chatter online postulating that a 250 sq-in wing on a very light car, or perhaps using a fastback, would somehow be better. Those things would add more grip, but think about it for a minute… a lighter car, or a Miata with a fastback would get even more out of a larger wing! If anything, the gap would increase and show that the larger wing was even better than the small wing.
It’s also worth noting that we’re comparing a 250 sq in wing with a 67″ 9LR wing which is only 87% of the area of the 701 square inches allowed in the rules. If we were comparing the rules limits of 250 vs 701, you’d see an even bigger gap.
However, there’s something compelling about getting something for nothing. If you don’t have aero now, and you can’t/won’t add ballast or detune your car, then a free spoiler or wing is going to be faster than nothing. With a clean sheet of paper I’d choose a different wing profile optimized for high lift at low Reynolds numbers (Selig 1223 RTL), make it 40″ x 6.25″ to maximize chord at 250 sq-in, add oversized end plates with Gurney flaps and slats and what not, get the wing high up and centered over the rear wheels as much as possible, and then brace myself for disappointment.
As a side note, it’s kind of neat to see that simulations predicted a 1:36.36 lap time, and Justin did a 1:36.872. OptimumLap can’t factor in things like elevation changes and camber, so I usually have to create a “fudge factor” by baselining off Spec Miata lap times and then I change the surface grip in the simulator to get more accurate predictions. With the Mid Ohio map, this wasn’t necessary.
That’s fast company, nice job Justin!
Appendix
I ran several more simulations on a lightweight NB Miata to see what happens to power, weight, and aero using variables I didn’t use before. New variables include stock aero, weight changes, spoiler, and fastback.
One interesting matchup is that if you use the standard hardtop, a spoiler beats the small wing by a quarter second. If you use a fastback, the small wing beats the spoiler by three-quarters of a second.
Car
WHP
Weight
Lbs/Hp
Cd
Cl
Lap
HT stock
170
2104
12.375
0.45
0.3
99.33
HT stock (2251#)
182
2251
12.375
0.45
0.3
99.06
HT stock (2601#)
210
2601
12.375
0.45
0.3
98.59
HT spoiler
170
2104
12.375
0.5
-0.15
98.09
HT spoiler, splitter
165
2104
12.75
0.493
-0.45
97.29
HT 250-wing
170
2104
12.375
0.46
0
98.34
HT 250-wing, splitter
165
2104
12.75
0.45
-0.3
97.49
HT 701-wing
165
2104
12.75
0.49
-0.6
96.76
HT 701-wing, splitter
160
2100
13.125
0.483
-0.9
96.00
FB
170
2104
12.375
0.38
0.34
98.92
FB, spoiler
170
2104
12.375
0.43
-0.07
97.89
FB, spoiler, splitter
165
2104
12.75
0.423
-0.37
97.06
FB, 250-wing
170
2104
12.375
0.39
-0.15
97.35
FB, 250-wing, splitter
165
2104
12.75
0.38
-0.475
96.40
Various configurations using hardtop (HT) and fastback (FB).