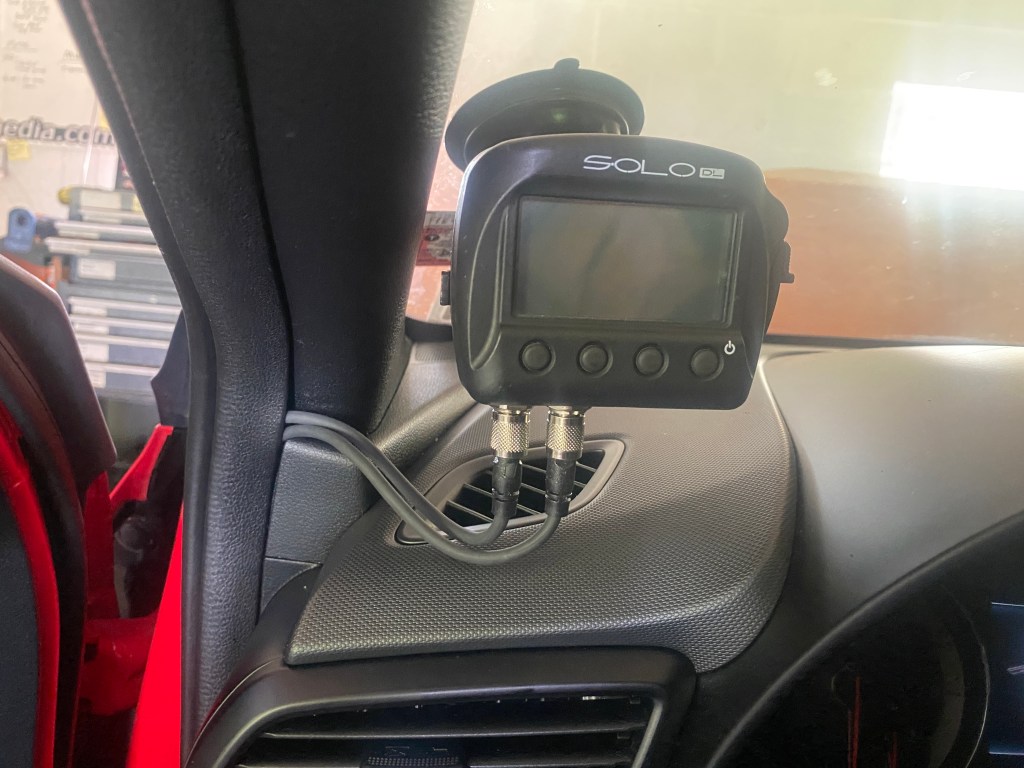
I recently got an older AiM Smarty Cam, and it came with an AiM Solo DL and GPS-08 external antenna. There are a lot of AiM products and it’s confusing to know how to put them together, so I contacted Peter Krause who patiently walked me through what I’d need.
It’s really easy for the Veloster, or really any other car with OBD2. The 7-pin port on the Solo DL connects to the car’s OBD2 port. A 5-pin male to male cable goes between the Solo DL and the Smarty Cam’s EXT port. That’s it. Or rather, if I had any of the cables, then that would be it.
The camera’s 4-pin GPS port isn’t used in this configuration, and so I’ll be getting rid of the GPS-08 antenna, which will more than pay for the cables. These are widely available; I paid about $50 each.
In this configuration, the Smarty Cam gets power and GPS info for speed and lap timing, as well as the trigger to turn on and recharge from the Solo DL. The Solo DL in turn gets its power and extra channel information from the car’s OBD2. So essentially the car powers both devices, and you don’t need any other cables. Sweet.
I’ll also need to load the latest track maps into both devices. This means downloading the latest version of Race Studio 2 and uploading the track maps into the Solo DL. And then downloading the latest version of Race Studio 3 and uploading the track maps to the Smarty Cam. Weird, but OK.
With all that done, I should be able to get quite a lot of extra information, in addition to the GPS data I’m use to.
Extra channels I’ll get from the car’s OBD2.
I like my AiM Solo mounted on the windshield, as far left and low as I can put it. Most road courses go clockwise, and so the Solo is out of view for the majority of corners. I’m addicted to the delta timer, and this is a way to impose limits on screen time.
Tucked the wires into the gutter.
Running the wires was easy and oddly fulfilling. I pulled the rubber moulding away from the door jamb and tucked the wires into the slot below. The wires need to go in and out of this slot, so I used extant gaps in the interior panels for that. Going aft, I ran the wires back towards the seat belt anchor and popped them out under the driver’s seat and under both seat rails. The wires then go up to the camera.
I had a lot of ideas on how to mount the camera, and this is the one time Facebook read my mind and sent me the correct ad. There’s a product made specifically for cars called a Lapole, and it’s compatible with a lot of cameras, but doesn’t mention the Smarty Cam. I could probably adapt it to work, but at $100, I shouldn’t have to.
So I bought a heavy-duty adjustable spring-tension curtain rod for $20 and added a cam-lock mount with a 1/4-20 thread. This was one of those items I knew I had somewhere collecting dust, and it was going to take me 1 minute or 1 hour to find it. Thankfully just 1 minute.
Pole mount for the camera allows easy setup and height adjustment.
There’s a lot of tension on the spring-loaded pole, so I cut a piece of plywood on top to use as a clamping caul, so that I don’t ruin the headliner. I was less concerned with the floor and simply ran the pole down to the carpet.
The camera mount seems quite stable, and I’m chuffed it all came out so nicely. I’ll make some tethers next and find a better way to bring the wires up the pole, but good enough for a quick project. I haven’t taken any video yet, but I’ll update this post when I get it on track.
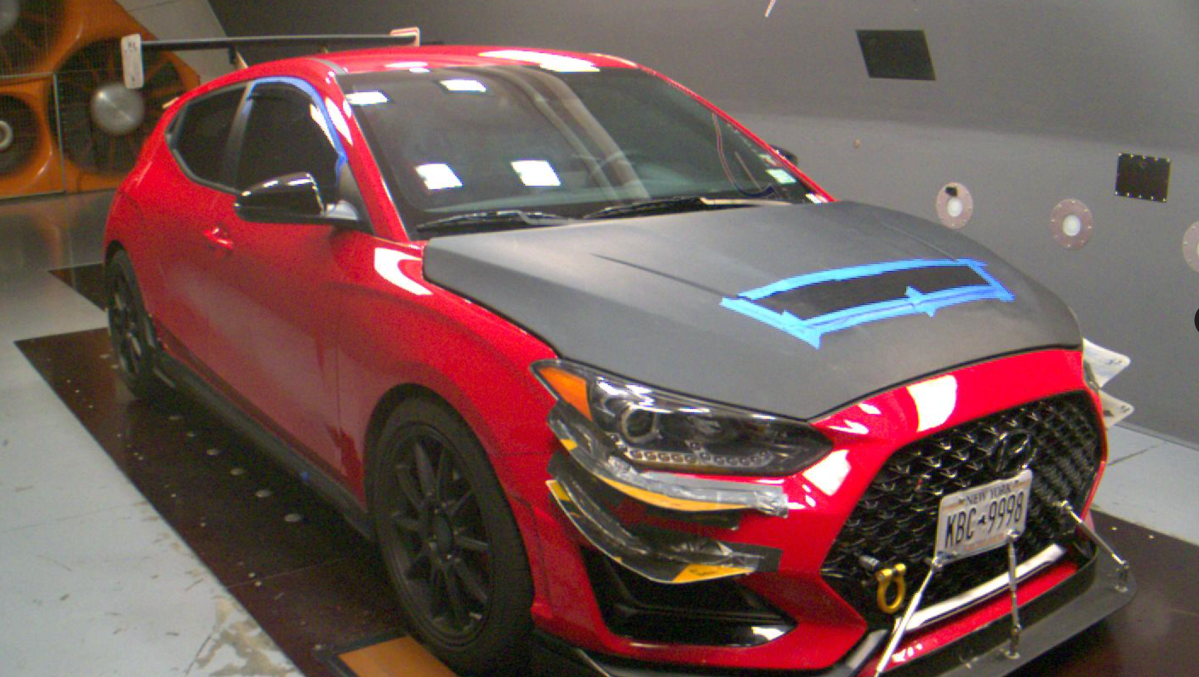
I was at the A2 wind tunnel on Monday, and as I expected, it was an incredible experience. At one point in the middle of the test I said “Geoff, is that doing anything?” To which he replied in frustration, “Hold on, I just started the test a second ago!” I was like an impatient kid… or maybe a drug addict, I had to have it NOW.
The tests take about 5 minutes to run. The fans operate at something like 640 hp, and spin up quickly, and all that air fiction inside the tunnel makes the garage area (where I was prepping the next parts) very toasty. Winter testing would be a more pleasant experience.
Back inside the control room, the results don’t populate in the spreadsheet right away. There are two sets of monitors, one for Geoff, one for the clients, and both have the data, video, and pictures for monitoring the action as it unfolds.
I was quite fortunate to have AJ Hartman accompany me to the test. He spun wrenches and analyzed data on the fly, and made suggestions on other tests to run. The biggest surprise of the test was one of his suggestions.
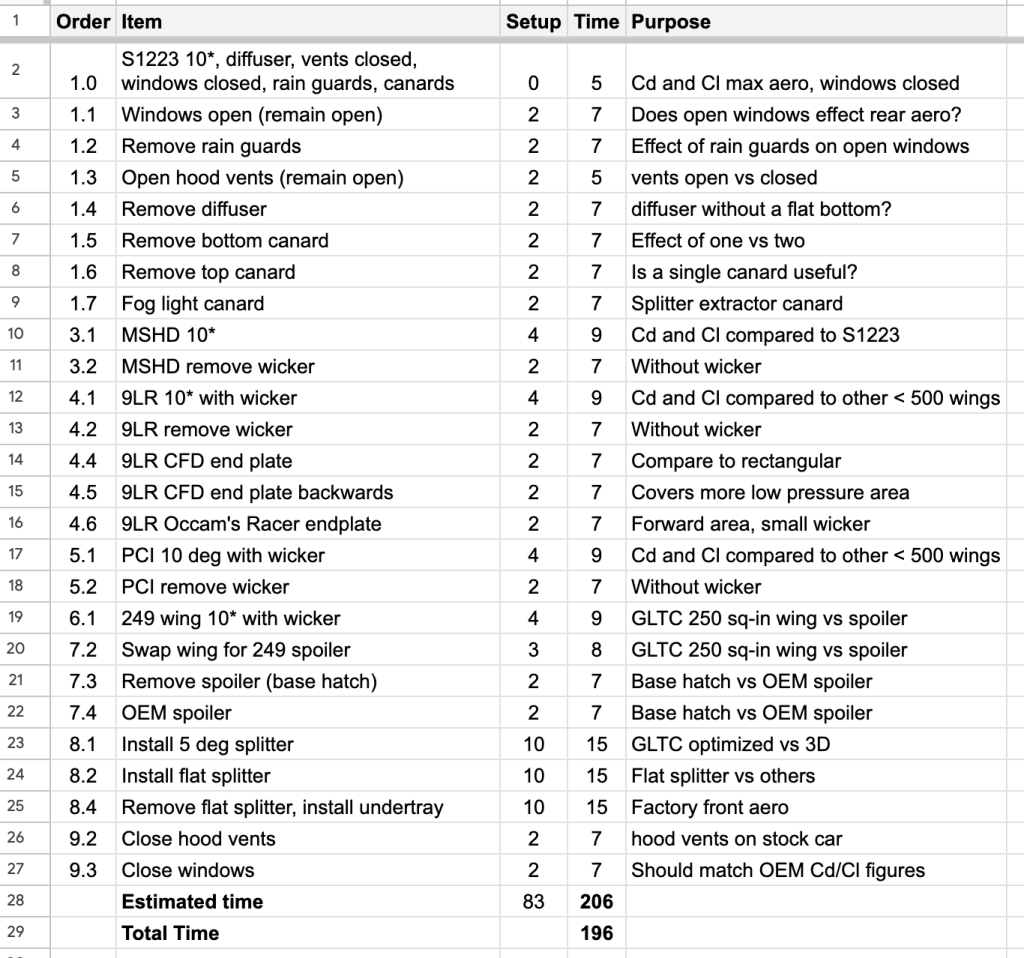
I started the test with all of the aero parts on the car, because removing parts is a lot easier than adding them. It went like this:
The full testing schedule, which we beat by 10 minutes.
There were some surprises, probably nothing more so than there were no unexpected delays. Driving down to the test, I fully expected the car to die, or parts to fly off in the tunnel, or anything else that would be catastrophic and absolutely normal in my life. However, we stayed ahead of schedule for the whole test, and did 26 runs in 3.25 hours. Finishing ahead of time saved me $125, so the planning and rushing around during the test was worth it.
Tests done and mistakes made
Before I went to the tunnel, I asked Geoff and AJ what were some common mistakes. One of the most common is taking time to analyze the data, which we didn’t do. And another was not bringing all the parts, or making all the adjustments during the test, and having to come back another time. Guilty.
For one, I should have tested more wing variables. I had all of the wings set to zero degrees, because the roofline goes down at about 10 degrees, and I was afraid if I added too much angle, that the wings would stall. But after looking at the results, I should have done more tests on wing height, setback distance, and angle. I also didn’t build all the parts I wanted to test, including barge boards, rounded B-pillars, front tire spats, air fences, and splitter diffusers.
In the previous post, I listed all of the things I was going to test, but I also got to throw in another test that was very, very important (thanks AJ). In all, I had many more wins than mistakes, and learned far more than I thought I would. I had some assumptions I was wrong about, and some I was right about, and an equal number of surprises that showed me just how fun this game really is.
Gotta love that Rain Prisk style spoiler.
Results
You’re probably wondering when and how I will release the results. I’ll likely host a webinar so that I can walk through the data, and then we can also do questions and answers. The latter would be a great way to find out what people want me to test next. Along with the webinar, I’ll release a data sheet explaining all of the results. It won’t be free or a cup of coffee, tho.
This test took a lot of preparation and parts building. It was a 22 hour drive round trip, plus a hotel, shitty road food, gas, wear and tear, etc. Some of the things I tested will absolutely make your car faster, and some of you are doing things that are making your car slower. Whatever this webinar and data sheet costs, it’ll be the best money you can spend on performance (with the exception of data coaching).
I think most people are busy racing right now and aren’t going to change their cars much, so I’ll do the webinar this winter, which gives people time to modify their cars for 2024. I will likely hit the wind tunnel one more time to fill in some of the gaps, and so waiting may also bring about some refinement of the data.
If you absolutely need to know the results before then, contact me and we can work out a fee for aero consultation. I’m not in this for the money, but I’m sure you understand that I’d like to break even on the cost of wind tunnel testing. And I don’t want you to share the data, because this shit is worth seconds per lap.
On Monday I’m going to the A2 Wind Tunnel in North Carolina. This will be my first trip to a wind tunnel, and I hope to get many questions answered. Like most things in life, I’m certain I’ll come home with twice as many questions as answers, and I’ll be making regular visits thereafter.
I’m your biggest fan.
The tunnel is a 10-hour drive, and expensive, so I want to be well prepared for the test, with lots of parts that come on and off quickly. But for sure I’ll need a second set of hands as well.
I asked around online to see if anyone could come help me, and while I got a few tentative offers, nothing solid. Then I messaged AJ Hartman for advice on how to not fuck up, and he said he will meet me there and help with parts swapping and data analysis! No. Fucking. Way. I had to dick punch myself to see if I was dreaming. Ouch; this is for realz.
There are so many things I’d like to test, but at $600 per hour, I’m already looking at a $2400 bill! Every minute I stand around or waste time is $10, so I have to be efficient about collecting data and do all the analysis at home.
So what am I testing?
Three splitters
Because touring cars are front limited in downforce, front aero is the most important thing you can do for performance. The more downforce you can get in front, the more you can add in the rear. It’s easy to add more rear downforce using greater wing angle, a bigger wing, a Gurney flap, etc. But getting more front downforce requires a lot of work.
Splitters are the easiest way to make front downforce, and many people add a splitter beneath the factory lip, or build an air dam. Racing rules often limit the length of the splitter lip, as well as how far rearwards it can go (front axle being normal).
But how effective is a splitter over the OEM undertray? That’s one of the things that I wanted to test out, and so I built a garden-variety splitter. Like 90% of the splitters I’ve seen, it’s dead flat, with sharp edges and no optimization. Kinda like your splitter.
Some racing rules allow flat splitters with some variance to the angle. This is smart, because adjusting the splitter height usually results in some small change in the angle of attack, and so “flat” would no longer apply. But what if you started with a warped piece of wood and attached that level to the ground (or slightly upward)?
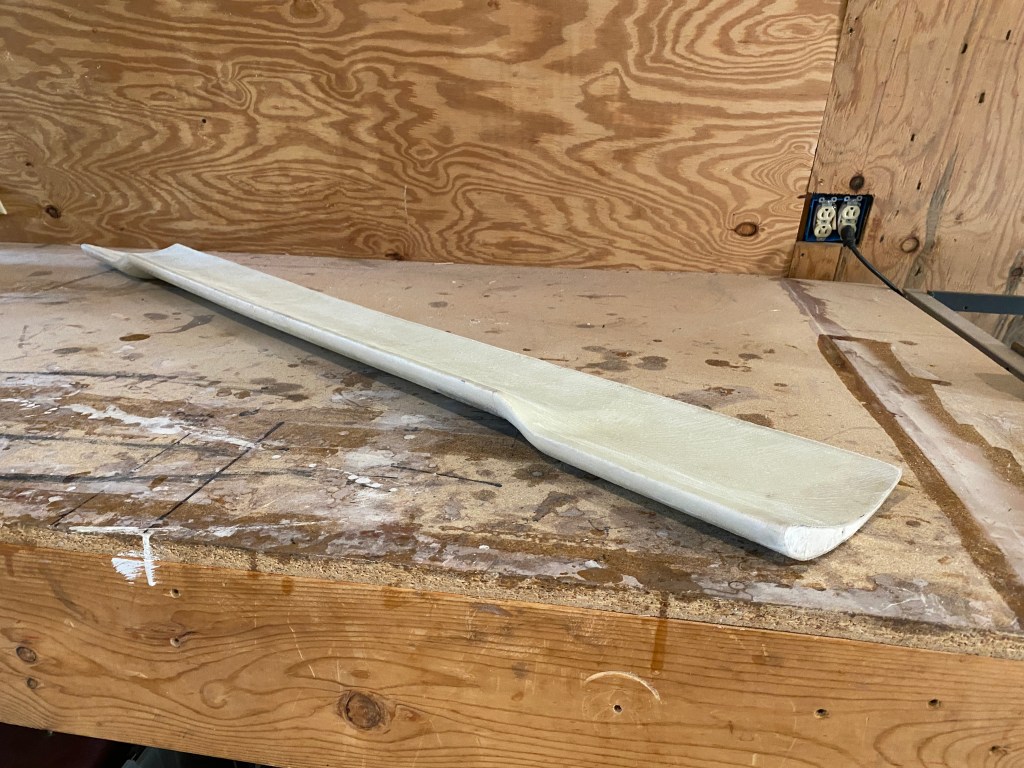
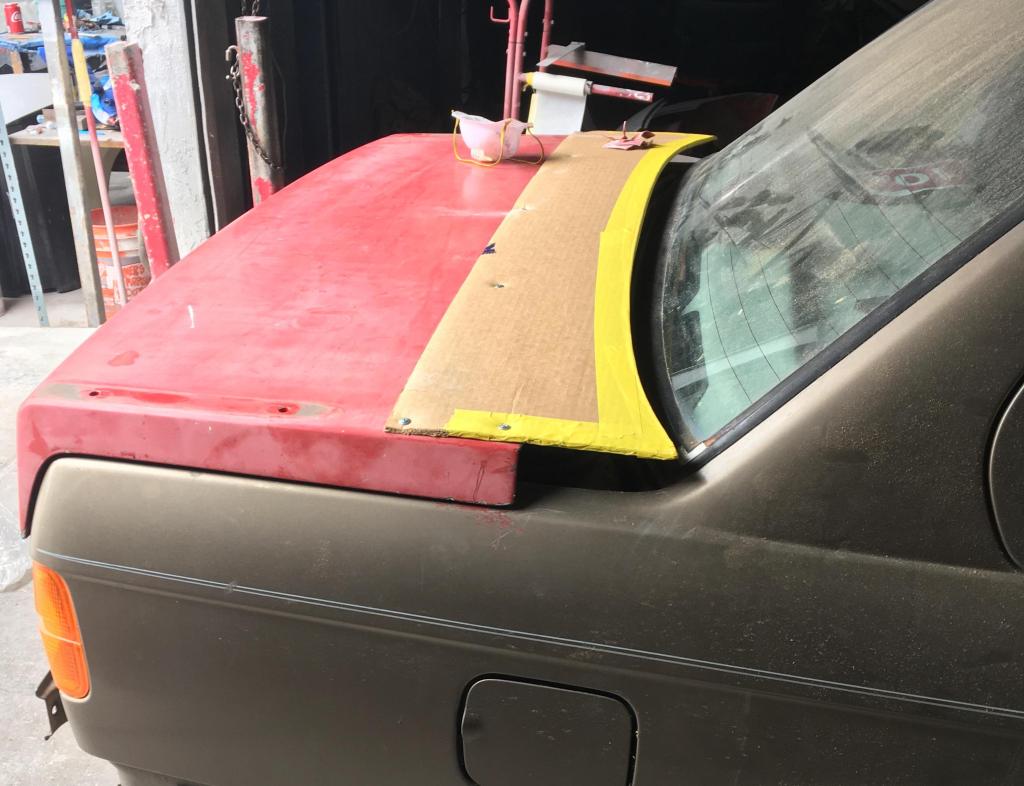
GLTC-legal splitter blade with 5-degree curve.
GLTC rules allow splitters +/- 5 degrees. SCCC Time Trials allows +3 degrees for and aft (which I’m taking to mean 6 degrees of curve, wink-wink). A bit of upwards slope in the rear should help diffuse some air, but how much will this improve performance. And what about rounding the front edge, chamfering the rear edge, how much does that help? Well I’m about to find out, because I built a splitter like that as well.
And then there’s my 3D splitter, it has 12 degrees of sweep upwards in the rear, strakes underneath, and other minor tricks.
My 3D splitter. I haven’t installed the pucks yet, just mocking up the position.
I’m not testing splitter length. I just have too many things to do and didn’t have time to make an adjustable length splitter. The splitters do not extend width-wise past the front fascia, and so I can’t test things like tire blockers, air curtains, end plates, and that kind of thing, either. I also don’t have fender vents or any proper sideways extraction from under the car, so none of the splitters are optimized for extraction.
However, all three of these splitters are the exact same dimensions, and so I’ll be able to test exactly what happens with flat, a mild curve, and an optimal curve.
Five wings and two spoilers
I just got through saying how much more important front aero is, and I’m testing twice as many rear aero options. I like wings, what can I say?
All the wings will be tested with and without a 1/2” Gurney flap. I also made sure all of them can use the same end plates, a rectangular street sign, as is my wont. I’ve brought some other end plates to test as well.
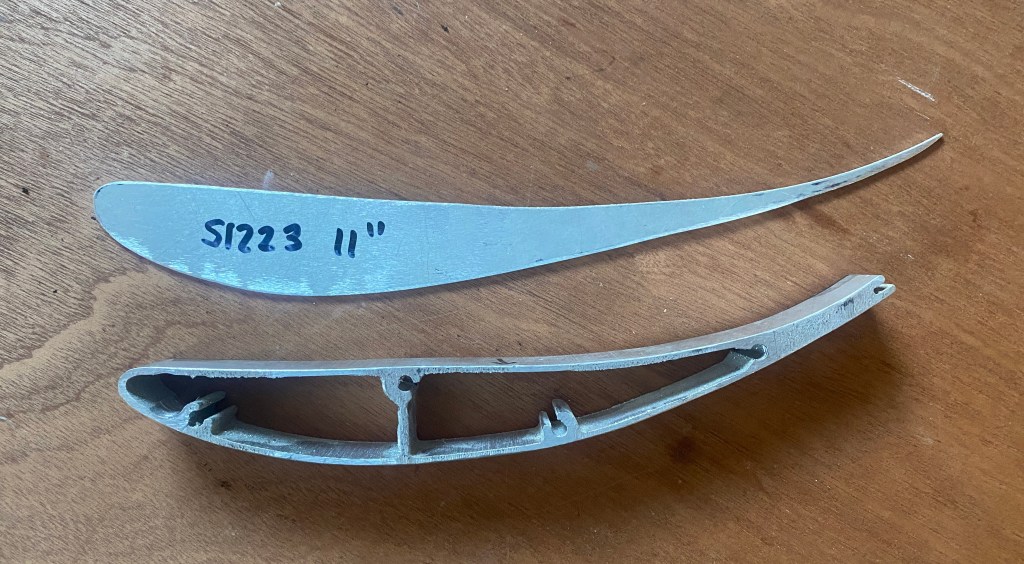
S1223 (586)
My Selig S1223 wing measures 53.3 x 11, or 586 square inches. This is probably the last wing I build based on an aviation airfoil. After finding Enrico Benzing’s wings and what the FSAE kids are doing with those and the MSHD airfoils, all my future wings will probably be car-specific designs.
I built this wing thinking it would be the primary wing on my Veloster. But data may prove otherwise.
Building my S1223 wing.
MSHD (495)
The MSHD airfoil looks a lot like a S1223 withe more camber. I built this wing using foam and fiberglass, it measures 63.5 x 7.8, or about 495 square inches. The 3D design is specifically for a Miata roofline, so there’s a center section that’s 6 degrees offset from the sides. That’s not ideal for the Veloster, but since this wing is wider than the others, it will benefit from twisting the ends down, even if the angle is isn’t exact for the Veloster.
MSHD 3D
I built this wing thinking it could be a sellable product, custom built to any roofline. But I have as much desire to do product support as I do to wash the dishes, and so like everything else I build, it’s for me or given away.
9 Lives Racing Big Wang (506)
9 Lives Racing has a great wing, it’s essentially Enrico Benzing’s Be 123-125 airfoil with a slight modification (thicker trailing edge to mount a Gurney flap). I expect it to be quite good, and it won’t surprise me if it’s best in the test. The one I’m bringing is 55”, and just over 500 square inches in area.
S1223 vs Be 123-125
I have lots of end plates for this wing, so I might test the vanilla rectangular plate vs the 9LR CFD vs one I designed. I don’t expect to see much difference, but I don’t mind being proven wrong.
Procar Innovations (484)
Procar Innovations has an aluminum wing that looks similar to a TCR wing, which is another Benzing wing, the Be 183-176. PCI shortened the chord and made the wing less aggressive, and in Benzing coordinates this is around 183-155 (18% thickness, 15 degrees of camber). It measures 55 x 8.8, or 484 square inches.
Thanks to Kevin Zhu and Jakob Boedenauer, I’ll be able to pick this one up down the street from the wind tunnel. They use this wing in GLTC, and so it’ll be really interesting to see how three similar sized wings stack up in the 500 square inch class.
PCI profile is a shorter and less aggressive TCR.
MIC 249 vs spoiler
This is a made in China wing that measures 53.3 x 4.6, or just under 250 square inches. If you race GLTC and want a wing in the “free” category, this is it. Justin Lee and I tested one vs a 9LR wing, and the small wing lost. But the story wasn’t over, because I didn’t test this size wing vs a spoiler of the same dimensions.
So I also made a 250 square inch spoiler, and I’ll finally be able to get the data on which is better in this size. It’ll also be interesting to see if a wing with half the area makes half the downforce.
OEM spoiler vs base
Another test I’ll run is the OEM spoiler vs the roof extension on the base model and Turbo R Spec. The OEM spoiler reportedly cancels lift, and measures out at about zero degrees across it. The R Spec roof kicks up a few degrees compared to the roofline but is still pointing downwards at around 5 degrees.
Diffuser
One of the things I’ve always wondered about is a diffuser without a flat bottom. I’ve seen videos, CFD from numerous manufactures, and countless track cars with a diffuser and no flat bottom.
So I made a diffuser just for this test. It installs into the hitch mount and is only wind-tunnel spec, meaning not really roadworthy. It’s as large as most rules allow, and has a few tricks that I’m not going to reveal just yet. If it works, maybe I’ll build a real one.
Figuring out how to mount it.
Hood vents
Veloster’s run hot, and so I got a spare hood with an extractor vent. I’m fairly certain this will help cooling, and I enlarged the vent further to increase the effect. I also built a cover for it so that I can A/B test not only the cooling properties, but the aerodynamic properties.
Hood vent with cover taped on.
I expect the hood vents will add a small amount of downforce and drag. After I test the temperature on track, I’ll do a full write up.
Canards
At the last minute (the morning after posting this article), I decided I needed to answer a question about canards. So I stumbled down to the barn at 4:30am and took a tracing I’d made and transferred that to an aluminum street sign.
I then cut tabs into the mounting side of the canard and alternately bent one up and one down. These would serve as temporary brackets so that I can tape them into place. This is wind-tunnel spec for sure, and if these work, I’ll need to make better ones that mount properly.
The canard design is pretty clever, in my opinion. On the top canard, I use a flat spot by the headlight to gain more surface area, increasing the high pressure side. On the bottom canard, I follow the lines of the air curtain vent, directing more air into the vent. I went for a fairly low angle of attack, hoping to avoid massive flow separations on the back side. We shall see….
Open windows
I’ve always wondered how open windows effects a car with and without aero, and so I’ll test the car with both open and closed windows with the full aero kit, and then again with no aero. I also brought rain guards to see if reducing the open window area will help.
Packing
To transport the parts I bought a 60” aluminum cargo carrier and a waterproof cargo bag, but I needn’t have. As I started loading all the large parts inside the hatch, I realized I could probably get everything inside. The people at the wind tunnel are going to laugh as I roll up like the Beverly Hillbillies, trunk packed to overflowing. Just one more reason to love the VN, so much junk in the trunk.
Most people enjoy the feeling of oversteer, it’s usually accompanied by a loud whoop and a “yeah,” “woooo,” “ha ha ha ha,” etc. It doesn’t matter if you’re on four wheels, two wheels, or no wheels, there is just something innately human that enjoys sliding sideways and yelling with glee.
Conversely, nobody likes the feeling of understeer, it often immediately evokes inward frustration rather than outward joy. Understeer is usually accompanied with words like “turn already,” “goddamnit,” “stop pushing,” “pig,” “fuck,” or more eloquently, “goddamnit, stop pushing and turn already you fucking pig!”
And yet, understeer is usually faster. Why?
Traction sensing is easier
You can brake later and accelerate earlier
Mistakes require fewer corrections
People suck at driving
Traction sensing
One reason understeer is faster for most drivers is that it’s easier to get to the limit of traction by pushing the front tires. Understeer is safe, and going over the limit doesn’t cause any drama. Conversely, exceeding the limits of rear traction can result in a spin.
You might even say that the reason most people find it easier to sense front traction is that most people are afraid of spinning. As much as I don’t want to admit it, I also fall into that camp.
My personal style of driving is to grip the steering wheel hard (probably too hard) and sense the feedback through the wheel. I don’t saw at the wheel, though, I’m very deliberate and economical with steering.
My style of driving requires a more geometric racing line, and returns a higher min speed. And while this may not be the fastest way to navigate a corner, I do so at the limit of traction. As Ross Bentley says, a person driving off the ideal line but on the limit of traction will be faster than a person driving the ideal line and driving under the limit.
Brakes and acceleration
A car that is unstable is easier to turn. Understeer is inherently more stable, which is exactly why it’s harder to turn. But this stability pays off in braking and acceleration.
An oversteering car can be difficult to control when threshold braking, and especially when trailbraking. It takes skill to keep the back from coming around. An understeering car is more stable, and allows later threshold braking and more aggressive trailbraking.
The same is true on acceleration; oversteer requires deft throttle modulation to keep from spinning, while understeer allows you to mash the gas as soon as the car is pointed correctly. In my experience, I get on the gas earlier with an oversteering car, but I get to full throttle earlier with an understeering car.
Mistake recovery
A good driver makes a lot of small mistakes and corrects them instantly. They are constantly losing and catching grip with skill and grace. A car that understeers is very easy to correct; if the car starts to lose traction, just wait until the car turns before adding more throttle. An oversteering car takes more skill to correct; sawing at the wheel and dancing on the pedals repeatedly until the car gets back into line.
An important factor here is the stability index of the car, which in layman’s terms is exactly what it sounds like, but in reality is so much math and calculations that it will make your head spin. Let’s not do math here and talk generalizations.
Mid-engine and rear-engine cars with a lot of weight on the rear tend to be very pointy, swapping ends if you are careless and lift the throttle. A car like this without modern traction control systems suffers no amateurs in the cockpit; you need skill to drive one quickly. Conversely, front engine cars tend to be much more forgiving. If you look around, how many people drift with mid- or rear-engine cars? Not many, because it’s much easier to control a car that doesn’t snap oversteer.
This isn’t just about mechanical stability and grip, but aerodynamic forces as well. Cars that have a lot of rear drag or lateral surface area (like a LeMans prototype shark fin) move the center of pressure rearwards. This in turn makes the car more stable at speed. The distance between the center of gravity and the center of pressure is called static margin, and cars with a greater static margin are more stable, and require fewer corrections to mistakes. They are also harder to turn, and so this is again an understeer vs oversteer situation, where more rear aero is easier to drive and typically faster.
People suck at driving
You can add all these factors together and conclude that understeer is faster simply because most people suck at driving. Driving a pointy car at the limit demands a lot of skill. Driving an understeering car is child’s play. That’s why virtually every car off the showroom floor comes with understeer from the factory.
Manufacturers know that people suck at driving. You’d go broke selling cars to people that requires the skill to regularly catch a spin. I’m an enthusiast and decent driver, but I’m no Max Verstappen, and I never will be (not in skill, nor in attitude; I would have sacrificed one win to let Perez take second in the Drivers Championship last year). I didn’t cut my teeth racing karts, or spend every waking moment being a douchebag racing cars.
Otherworldly drivers like Max can do things I’ll never be able to do, and driving an oversteering car faster than a understeering car is just not in my wheelhouse. I’m quite happy with my conservative, front-biased driving style. By using that style, and driving at the limit of front traction, I regularly beat the pants off people overdriving their cars under the limit.
Oversteer mythology
If understeer is faster for non-pro drivers, why do so many non-pro drivers believe that oversteer is faster?
If oversteer was faster, the 1000 hp drift missile at your track day would set FTD. But instead it’s a Miata with too much wing on scrub SM 7.5 tires.
If oversteer was faster, F1 cars would rotate through the majority of corners. But they don’t. You see more F1 cars push the front than the rear.
If oversteer was faster, people would put wider tires on the front than the rear. But they don’t. High powered cars run a staggered setup, or maybe square – but you won’t see a RWD car in a gorilla stance.
If oversteer was faster, you’d see cars with more front aero than rear. But most race cars are split about 1/3 front and 2/3 rear downforce.
If oversteer was faster, Spec Miatas would have more oversteer than a stock Miata. But SMs have a 63% front roll couple, compared to a stock Miata’s 59%.
If oversteer was faster… well, you get the idea. It ain’t.
If you think oversteer is faster than understeer, I want to see your data.
Driver 61
Driver 61 is a YouTube channel with great content. In one of his latest videos, he delves into understeer vs oversteer, and why Alonso loves understeer. He goes on to examine various drivers and what they prefer, and shows this list.
Oversteer drivers: Max Verstappen, Sebastian Vettel, Charles Leclerc, Michael Schumacher, Lando Norris, Ayrton Senna.
Understeer drivers: Lewis Hamilton, Fernando Alonso, Sergio Perez, Jenson Button, Nigel Mansel, Alain Prost.
Understeer vs oversteer at the F1 level.
It’s an illuminating video, and worth the watch. What’s interesting is that Driver 61 himself was originally an oversteer guy, and more recently has transition to an understeer guy. My twin brother Ian is the same, originally very rear happy, but transitioning more to understeer sadness.
Ian vs Mario
I wrote an article called Twin Studies, which is an in-depth analysis of my identical twin brother and I driving the same cars very differently. In that article we drive a NA and NB Miata, and a Veloster N, back to back.
Ian has an oversteer driving style, a la Verstappen and Schumacher. He holds the wheel lightly, thumbs on top, and pivots the car on entry. I have a more understeer style, like Alonso and Hamilton. I grip the wheel tighter, and sense traction through the front wheels.
Both styles are fast, but I know the track better, and so I was faster on this day. But not by much, and he might have eventually beat me. But he did transition more and more to my style of driving throughout the day ….
Notice how we grip the wheel.
Gran Turismo Test
In this article I’ve thrown a lot of theory around, so it’s time to get the gloves on and actually do some (virtual) driving. You should do this as well, it’s very illuminating data.
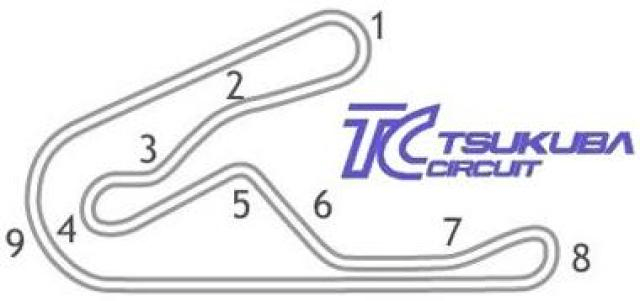
In Gran Turismo (or any other game where you can easily change front and rear grip), try out this experiment: get a Miata or similar RWD car with near 50/50 weight balance and mismatch the tires.
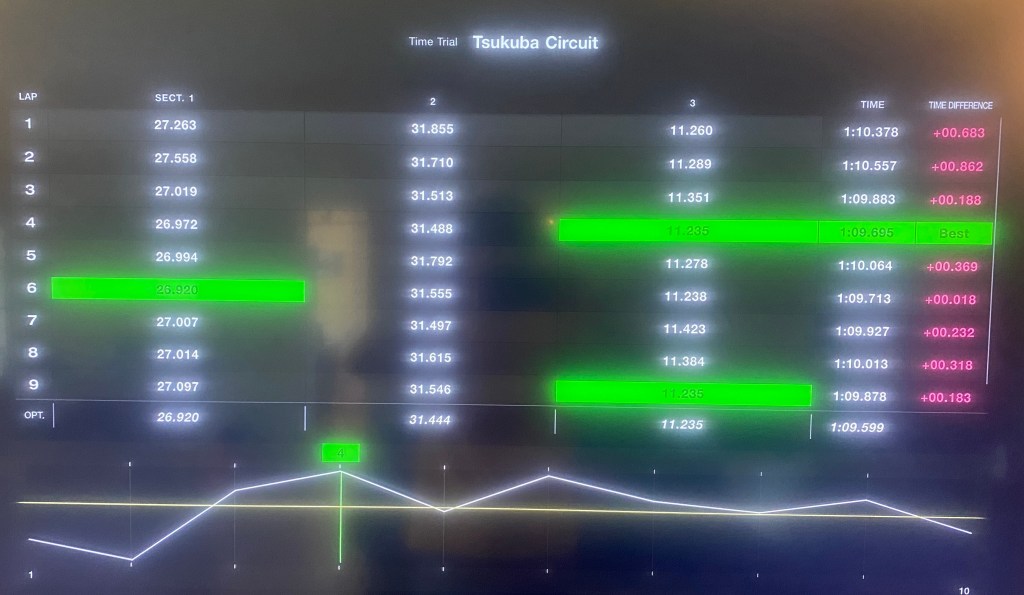
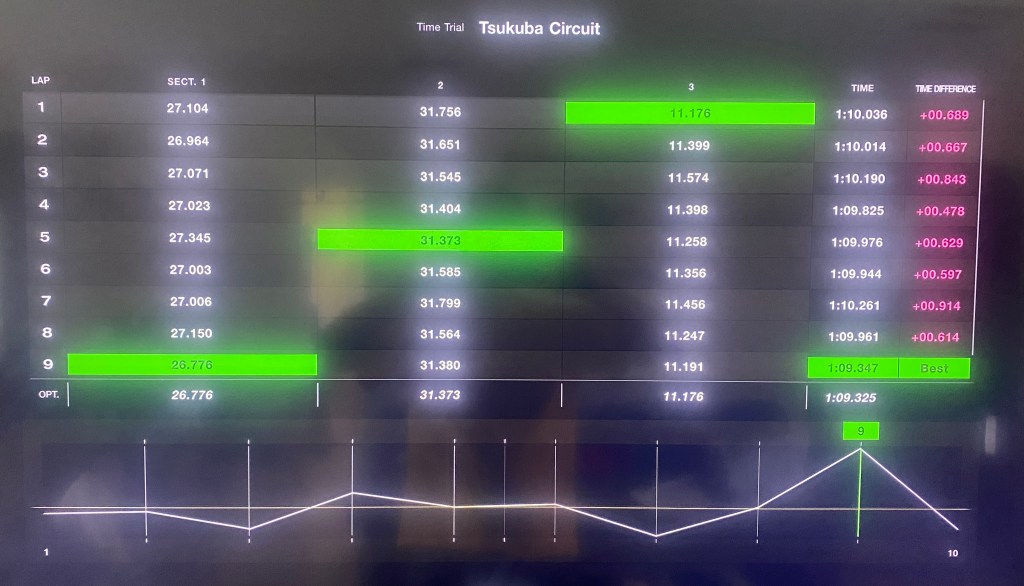
I used a bone stock ND Miata and put Sport Hard (SH) tires on the front and Sport Soft (SS) tires on the rear. Set up like this, the car understeered quite a bit. I ran ten laps at Tsukuba, then swapped the tires so that the car would now oversteer and did another 10 laps. In both cases, the car has the same amount of grip.
I started with the understeer setup and then switched to the oversteer. This gave the oversteer setup a bit of an advantage, because it’s been a while since I raced GT7 and I would have to hit my marks right away on the understeering car. I did OK, with a best lap of 1:09.695. What’s surprising is that my outlap, which isn’t shown in the lap summary, was a 1:10.3. Meaning that the understeering car was easy to get up to speed on immediately.
Understeer laps SH/SS.
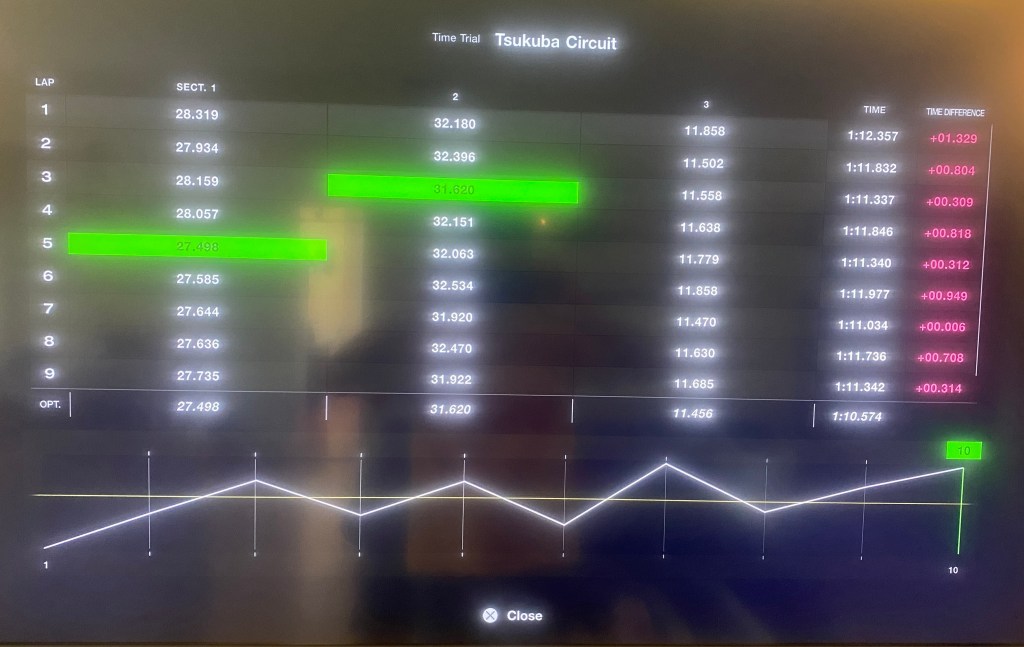
Next I swapped the tires and tried the oversteer setup. Whoah! Big difference. I almost spun twice on my outlap and barely managed a 1:13. Unlike the understeer setup, I needed to learn how to drive this. Eventually I figured it out and got down to a best lap of 1:11.028. It felt like quite an accomplishment to string together that many corners and catch the slides each time.
Oversteer laps SS/SH.
Then I put Sports Hard (SH) tires front and rear, just to see what would happen. This is using the worst tire on both ends, and isn’t really part of the oversteer-understeer experiment. But you can see that a balanced car is the fastest. Even with tires that have the least grip I did a 1:09.347.
Balanced traction (SH/SH).
Setup
Best Lap
Opt Lap
Avg Lap
Understeer (SH/SS)
1:09.695
1:09.599
1:10.012
Oversteer (SS/SH)
1:11.028
1:10.574
1:11.644
Neutral (SH/SH)
1:09.347
1:09.325
1:09.950
Lap times in Gran Turismo at Tsukuba.
But to get back to the two ends of the spectrum, the understeer setup went 1.3 seconds faster than the oversteer setup, and was 1.6 seconds faster on average. In both cases, the car had the same amount of grip, and so you can see that understeer is a lot faster. At least for this driver.
I also included the optimal lap time for each, and you can see that the understeering car’s best lap was about 1/10th of a second off the optimal lap. On the other hand, the oversteering car’s optimal lap was over half a second off. This shows how sloppy my best lap was, and how difficult it is to put together a clean lap in an oversteering car.
Driving impressions
The way to drive an understeering car fast is to make it oversteer on corner entry. In the tight hairpins, turns 1, 4, and 8, I found myself diving towards the apex on the brakes, releasing slowly, and sharpening my steering through the whole corner. I didn’t always brake traction on the rear and rotate the car, but I kept the weight on the nose for as long as I could. I did something similar in the 90-degree T5, but using lift-throttle oversteer to help turn the car, then got right back on the gas again.
Conversely, through T9 I used understeer to get to full throttle early. I ran it in tight until the front set, and then stood on the throttle to the exit, purposely pushing the front tires the whole way.
Tsukuba rocks.
I found that to drive the oversteering car quickly, I had to adopt a more “momentum” style of driving: lighter and longer braking, optimize mid-corner speed, and get on the gas early using maintenance throttle. Unlike the understeering car, which I could mash the accelerator as soon as the car was turned, on the oversteering car, feathering the gas was important.
With less grip on the rear, I needed to shift weight to balance traction, and so T5 was on throttle (lightly) the whole time. I also tried holding a taller gear, which helped keep the rear from stepping out, but I eventually figured out how to gradually get on the gas in the correct gear. I did a lot less trailbraking because the back would come around, so I rookied my way into straight-line braking and releasing the brakes quicker.
The other major difference in driving the two different tire setups was the number of steering corrections required. In the understeering car, if I went in too hot or misjudged my turn in, it was a simple matter of waiting for the car to turn before adding throttle. There was very little drama, if maybe a little cursing (“turn you pig,” kinda stuff).
On the other hand, the oversteering car was a fucking handful! I made more steering corrections in two corners than I did over an entire lap in the understeering car. It was a lot of work, but it was also more fun.
Finally, driving the balanced car was the most fun of all, and it was the fastest as well. I used some strategies from both styles of driving, and was finally able to drift all four wheels. For example, in T1 I trailbraked heavily, and in T5 I used LTO to turn the car, both understeering tactics. But I also found myself getting on the gas earlier and feathering the throttle out of most turns. The final turn was completely different: a four-wheel drift through the entire corner. You can really only do that with balanced traction.
Wet track
Next I made it rain in Japan and tried the same builds on a wet Tsukuba. This time I only did 5 laps though. No more shitty screen shots of my TV, just the data this time:
Setup
Best Lap
Opt Lap
Avg Lap
Understeer (SH/SS)
1:26.184
1:25.907
1:26.784
Oversteer (SS/SH)
1:27.452
1:27.072
1:28.317
Neutral (SH/SH)
1:28.021
1:27.110
1:28.705
Wet times in Gran Turismo at Tsukuba.
The delta between understeer and oversteer grew a little in the rain. I put down one good lap on the oversteer setup, but the the optimal lap was two seconds faster on the understeer setup, and so it had way more potential in it.
What’s interesting is that the SH/SH combo, which was the fastest in the dry, became the slowest in the wet! So when the track is wet, you’re better off with more traction at either end than you are with balanced traction and less grip.
Conclusion
If your car has criminal understeer, you want to fix that for sure, because you’ll go faster on a dry track with a balanced setup. To do that, check out Emil’s video on the subject:
But don’t make the mistake of going too far in the opposite direction and making a car that oversteers, because that’s even worse than understeer. The ideal setup is balanced traction, and with that, you’ll go fastest on a dry track, even with tires that have less grip. But if the track is wet, or there’s mixed conditions, you’d be smart to dial in some understeer.
Real-world testing?
My brother and I have been talking about doing this Gran Turismo tire test in the real world at Pineview. It’s easy to get an empty track session, and there are so many slow corners that we’ll spend the whole time breaking the tires loose. I just need to bring two sets of different tires and make this happen.
Unfortunately both of my Miatas are out of commission right now, but if I get one up and running this summer, I’ll fill this space with the Gran Turismo exercise done IRL. I might also be able to borrow a Miata and try this, and I’m planning to meet Emil Dogaru (from the video above) at Summit Point later this year and maybe do this test with him.
When I was racing Miatas, I had 32 wheels and tires. And probably another 8 tires unmounted. That was a lot of fucking tires.
Now that I’ve embarked on a new journey with a Veloster, it got me to thinking, how many wheels and tires do I need? One of the things that prompted this question was a steak knife.
Steak knife hole is no match for the tire sealant kit that comes with the VN.
The tires had 16k miles on them, and if you look closely at the pic, you can see some cracking in the first groove on the right. So it was time to replace these anyway.
As it happened, the first tire I needed turned out to be a spare. The tire inflator and bottle of sealant that comes with the Veloster didn’t do shit for the knife wound, and I wasn’t going to be stranded on the road with three passengers again.
There’s a cavity in the trunk designed for a space-saver spare, but because of the big brakes on the VN, a normal spare won’t do. I’ve heard that a 18”compact spare from a Hyundai Genesis will work, but I didn’t find any locally or on Row 52. So I ordered one from Modern Spare, which is an alloy spare tire that has a nice modern look.
Modern Spare makes a good looking alloy space-saver, but it’s expensive.
With that necessity out of the way, I can get to the burning question of how many more tires I need.
If I had unlimited space and funds, I’d probably have six sets of tires. 1) slicks, 2) rains, 3) super 200, 4) enduro 200, 5) One-lap tire 6) snows. But I don’t have that kind of space or money, and so three sets of tires will have to do.
Enduro 200
This is my favorite class of tire, with good performance and great longevity. Enduro 200s aren’t super finicky about camber or pressure, and any street car can use these with great effect.
I’ve raced or tracked on 615K, 651, Z2, NT05, Sur4G, R1R, RT660, A052, VR1, and more. For a long time the Falken 615/615K/615K+ was my favorite tire, but the faster and longer lasting Hankook RS4 is the best of the enduro 200s. It’s not a Super 200, nor is it great in the rain, but it has great feedback and lasts forever. In fact, they usually age out before I wear them out.
And yet I bought Kumho V730s instead. Part of this was because the RS4s were $100 more per tire, but the other part is that I trust Andy Hollis. In the world of motorsports tire testing, he is The Man. Andy says the V730 has a good blend of durability and grip, and is slightly faster than RS4s, which is exactly what I’m looking for.
I don’t know why they are so cheap in 235/40-18, compared to other sizes, but Amazon was recently selling them for $127 with free shipping. They are back up to full price now, but still cheaper than RT615K+.
One Lap tire
By this I don’t mean a one-lap wonder tire, like a RE71 RS or A052, but a One Lap of America tire. If you aren’t familiar with this race, it’s 4K miles of street driving with drag racing, skid pad, autocross, and track driving mixed in. Competitors are allowed one spare tire, but otherwise must use the same set of tires the entire time. Over 80% of the field uses the Michelin PilotSport 4S.
The PS4S is the top of the heap in the UHP category, which includes other great 300-340 TW summer tires like the Continental ExtremeContact Sport. Another tire in this category is the Veloster’s OEM tire, the Pirelli PZ4.
Compared to the PS4S, the PZ4 is a little quieter and has less rolling resistance, but is a touch slower on a race track. Some online reviews say the PZ4 is a better rain tire, but it’s hard to believe based on the PS4S being typically the best in that category.
Anyway, I’d driven the PZ4s at Pineview and did a 1:18 in a stock Veloster, and so I can verify it’s a decent tire with easy handling traits. It’s a couple seconds behind a 200 TW, but if it’s as good on a wet track that people say they are, I’ll be happy. I coach at Watkins Glen regularly and it always seems to rain at least part of the day there. Every. Fucking. Time.
Between the PS4S, ECS and PZ4, it was a difficult decision. But again my wallet made the choice, because I found the Pirellis for $150, half the price of the Michelins.
All-season
All-season tires suck at everything. Some people call them no-seasons. Apt.
But I need a set of cheap tires to put on my OEM wheels, so I don’t wear out my summer tires on the road. And while I don’t intend to drive the Veloster in the snow, I need a tire that works OK when it’s cold out.
When it comes to all-seasons, I go for the cheapest ones. I don’t drive fast on the street, and crap tires are more fun to hoon around Pineview on. I found 235/35-19 Crosswind tires for $65. I’ve never heard of Crosswind, but they have a lot of great online reviews and I got all four tires for the price of one premium 200 TW.
I don’t know if the 235 Crosswind is narrow for its size or if the 235 PZ4 runs wider than normal, but you can see there’s a big difference in the width of the tire.
How the tires stack up: 235/35-19 on 8” is the narrowest. Of the two 235/40-18 tires, the PZ4 are wider than the V730. Stacks have exactly 1 1/4” between each: 36 7/8”, 38 1/8”, 39 3/8”.
Wheels
The OEM wheels are 19×8 +55 and weigh 29 lbs. They look OK to my eye, but I don’t love them for the weight, or for the price of 19” tires. I have no use for them, other than shitty all-season tires.
The Veloster can’t fit wide aftermarket wheels, so most people choose a 18×8.5 wheel with a +45 offset. I believe a 18×9 +42 would fit with mild camber and fender rolling, but there are very few lightweight wheels in this size (Enkei PF01, Konig Rennform, Braid FF). I’m not a cone dodger, but I believe the D-Street folks are using 18×8 +50, which also seems like a good size for a dedicated snow tire.
Side note: The Veloster’s closest competition is the Civic Type R, which rides on 265 tires on 9.5” wheels. Most comparison tests have these two cars lapping very closely, but if you could put the Civic’s wheels and tires on the Veloster, I’m pretty sure the VN would be on top every time.
For my track tires, I bought 18×8.5 +43 Konig Countergrams from Fitment Industries. I always wanted these 9-spoke wheels on my Miata, and I like them a lot on my VN. At 18.7 lbs each, they remove 40 lbs of rotating mass.
Countergram is a good looking, lightweight wheel.
My One Lap PZ4 tires are on 18×8.5 +45 Motegi MR140 wheels I got from Phil’s Tire. They weigh under 19 lbs, and were a bargain at $165 shipped.
Spartan 10-spoke design at a great price.
This is now the second time I’ve mentioned One Lap of America. A seed has been planted.
This post is borderline inappropriate, and if it doesn’t get me cancelled, should probably classify me as a boomer. Enh.
The three-box sedans of my youth had well defined shapes, with a long hood, flat roofs, angled rear window, and flat trunk. These days cars have elongated shapes that blend together front to back.
If you compare a sedan from 20 years ago with a modern one, one design element most new cars share is a big butt. What I mean by that is, the trunks are much higher and wider. This shape brings the deck lid closer in height to the roofline, and when you blend those together, it’s creates a very efficient fastback shape.
Everyone is doing it, and you can’t tell where the roof ends and the trunk begins. The line between hatchback and sedan has blurred to insignificance. I can no longer tell a Honda Civic from a Chevy Malibu from a whatever.
Homogeneous evolution.
This isn’t surprising, because when performance is the driving factor, designs often gravitate towards function. I saw the same thing in skateboarding over the years. Shapes changed from skinny banana boards, then to pigs, then to fish, and now everything is a popsicle.
Skateboard shape evolution
To get back to the shape of cars, if you look at them from the side, most are shaped like airplane wings, meaning they have a cambered profile. As air moves over the top of the car, it creates lift. The more exaggerated the curve, the longer air stays attached, and more lift the car generates. As such, a low trunk lid keeps air attached longer, meaning less drag, but more lift.
On the other hand, a taller trunk (bigger butt) means a more gradual backlight angle, which reduces drag. In addition, air breaks away earlier on a taller trunk. Both of these factors improve performance.
Big butt genetics
Cars with big butts have evolved because they have advantages.
Less drag
Less lift
More trunk space
Fucking hot
Like many performance related genes, big butts have their roots in racing. Read any car magazine and you’ll eventually run into these cliches: “Win on Sunday, sell on Monday,” and “Racing improves the breed.”
Historically, NASCAR had great success partially because people could recognize the cars underneath. The bodywork followed the lines of factory cars (more so on the previous generations), and you could buy a semblance of one on Monday. There were of course many changes under the skin, but one of the key external differences NASCAR allowed was that you could raise the height of the trunk.
Similarly, BMW built the E30 M3 to go production racing, and one of the important elements in the design was to reduce rear-end lift. BMW accomplished this in a similar fashion by making the E30 M3 trunk 1.6″ higher than a E30 trunk.
A DIY E30 M3 trunk.
Big butts improved the racing breed, and that gene is now dominant in production cars as well. As this relates to the only car that matters, each generation of Miata has had a trunk that’s higher than the previous.
The first generation Miata had a flat ass, but she was just a kid back then, and it was normal for that age.
Cute.
The NB grew up a little, and got a lady lump in the middle of the trunk.
Line drawing shows where Mazda added curvature in the trunk.
The NC was like a Miata who went to college and put on the freshman 15: bigger everywhere.
Went to school and got a degree. All my friends call it the big D.
Now in her dirty-30s, the ND is slimmed down, with a butt that is higher, boat-tailed, and pert.
Fuck me dead, the ND looks good from this angle.
Get sprung
The first rule of a production car is that it needs to sell, and that’s based more on appearance than function. But the public has embraced that form follows function, and now big butts are the norm.
Here’s some pics from PornHub.
You other brothers can’t deny, baby got back.Backin’ that ass up.I bet there’s some junk in that trunk.Get that azz over here, bish. Whassup baaaabeeee?Choices, choices.I’d hit that.I think I’m going to faint.Oh c’mon now, that’s cheating!
Stock street car vs stock street car with aero… how much is aero worth in a lap time?
Aerodynamic downforce adds load relative to speed. The faster you go, the more downforce you get. But downforce is often accompanied by drag, and drag increases greatly at speed. The result is that aerodynamic downforce often gives you a faster lap time, but a lower top speed. In the end, it’s safe to say you’ll go faster by ignoring drag and going after as much downforce as possible.
But how much faster you go depends on the track. On a straight drag strip, you’d actually go slower. On a flat, circular track, you’d go a shit ton faster. Most tracks are a combination of straights and curves, and how much aero helps varies greatly on the layout.
To find out how much aerodynamic downforce is worth, I ran some simulations in OptimumLap. For the stock street car build I used Cd 0.39, Cl-0.1. For the aero version, I used Cd 0.43, Cl 1.1. This represents a lot of downforce, and something that is probably not achievable by the average person, but allows you to average the two extremes for most cars that land in between. These are reasonable values for drag and lift, and I’m just spitballing here anyway. So how much of an advantage is worth aero at different tracks?
Track
Aero
Willow Springs
105.4%
Mosport
104.7%
Lime Rock
104.6%
Thunderbolt
104.4%
Watkins Glen
104.1%
Palmer
103.7%
Summit Main
103.6%
Thunderhill 3 mile
103.5%
Road Atlanta
103.5%
Club Motorsports
103.5%
Waterford
103.3%
Mid-Ohio
103.3%
Thunderhill 2-mile
103.2%
NYST
102.9%
Gingerman
102.9%
VIR
102.8%
Thompson
102.7%
Canaan
102.6%
Laguna Seca
102.4%
PV extension
102.3%
SCCA Nats 2010
101.9%
PV original
101.7%
Aero advantage at different tracks, as a percentage of lap time.
There are some surprises here, notably VIR. I thought VIR would be an aero track, but it’s close to the bottom of the list. This is partially the result of two long straights where drag plays a role, but also some tighter corners where there isn’t much downforce.
I’m also surprised by Lime Rock and Thunderbolt. I don’t think of them as aero tracks, but they are. I don’t have a track map for Nelson Ledges, but it would be close to the top, and probably above Watkins Glen.
If I average all the tracks out, aero is about 3.3% faster. But this includes the autocross track from SCCA Solo Nationals in 2010, and Pineview Run’s long and short courses. These are not normal race tracks, and if we remove them, 3.5% is the mean, the median, and the mode.
I’ve often heard people say “Aero is worth 3 seconds per lap,” and that’s actually a really good rule of thumb. If you are doing a 1:30 lap time on a race track with a good mix of corners and straights, 3.5% faster comes out to exactly 3 seconds. But you can see that it really does depend on the track layout: how many fast corners, and the length of the straights.
Note: I can only run simulations on tracks I have in OptimumLap. If you want me to include your favorite track in some future article, sends me your 10-hz GPS data. It can be difficult to get an accurate map at full speed, so if you can drive on the racing line at half speed, it will result in the most accurate track map.
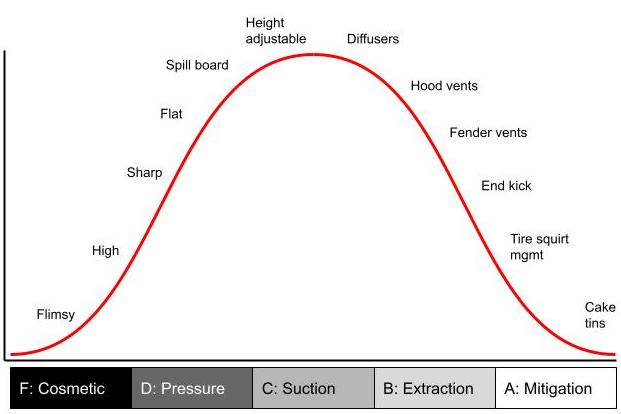
If I was to grade the average splitter I see on the average track car, I’d give it a D+. I know that grades are supposed to average out to a C, but the average person sucks at aero. I see better splitters on Miatas than other cars, and those generally fall in the C+ range.
Splitters on a bell curve.
Grade F: Flimsy splitters or front lips, usually bought on Amazon or eBay, but some reputable aero companies also produce shit. These look like splitters, but that’s where the similarity ends.
Grade D: A misunderstanding of how splitters work results in splitters that are optimized for the top surface, not the bottom. They are are often too high or too low, and universally have sharp leading edges and are flat. Most have splitters wider than the front fascia, but do nothing with the exposed ends. Some might have a spill board on the outer edge, which is at least something, but that does nothing for the underside.
Grade C: A splitter gains downforce through suction, which is achieved primarily through proximity to the ground and using diffusers and/or curvature to accelerate the air underneath. A splitter without height adjustment is like a wing without angle adjustment. A splitter without any diffusion is as useless as a flat wing.
Grade B: With great suction comes great responsibility. Because the air under the splitter is low pressure, everything around it is higher pressure and wants to get in there. You need to extract air using hood vents and fender vents, and kick air upwards and outwards wherever possible.
Grade A: At this point the splitter is making a lot of downforce, but there are still minor problems that occur around the wheels. Air hitting the rotating tires compresses and squirts out under the splitter, and air intrudes through the wheel spokes as well. Mitigating losses around the wheels and tires is the last frontier.
Grade A
Let me show you what a solid Grade-A splitter looks like. It’s not surprising that it’s on a Miata, because we do aero better. We have to; our cars suck. It’s also not surprising my teammate Alyssa Merrill made this. We bounce ideas back and forth, and while I think I’m pretty clever, she’s got a lot of great ideas of her own.
First, you have to use the right material. Alumalite is an automatic grade C, not because of the material properties, but every single person using Alumalite leaves a sharp leading edge. Despite the fact that Alumalite curves nicely, pretty much all of them are flat, as well.
Alyssa chose to use my favorite splitter material, Meranti BS6566 plywood. It’s very light (32 lbs/cu-ft), stiff, easy to work with, boil tested for delamination, and x-rayed for voids. It’s expensive, but you get what you pay for. She’s doubled the thickness of the lip to about an inch and done a good job of rounding the underside of the leading edge, so that air stays attached along the bottom surface.
Doubled lip stiffens the splitter and provides more thickness for rounding the leading edge.
The location of the radiator opening makes a difference to how the pressure side of the splitter functions, and has an effect on drag and cooling. I’ve seen a lot of radiator openings just barely off the splitter. When you put a hole there (for radiator or brake ducts), you lose the high pressure air bubble on top of the splitter, and with it, some of the downforce you’re trying to make. You might be thinking that a lower opening is better for cooling, but with the radiator opening down low, the air has to take a hard upward turn inside your radiator duct. Air can’t change directions at more than 12 degrees, and because the duct is much steeper than that, air separates from the surface of the duct causing drag and losing cooling efficiency.
Alyssa made the radiator opening as high as is practical while retaining the center bumper support. The higher opening holds a larger/taller high-pressure air bubble on top of the splitter, making more downforce. In addition, this provides a straighter route to the radiator, increasing cooling efficiency and decreasing drag.
Mocking up the radiator opening. You can’t get it any higher while retaining the center support.
All the air that goes through the radiator has to go someplace, and the worst place for that is under the car. The best place to send that air is upwards, because it creates downforce. Some people will use louvered hood vents, while others will use just a front wicker and a gaping hole behind. Louvers smooth the air over the hood, and result in less downstream losses on the wing. But since most cars are front-limited with respect to downforce, a gaping hole is a better solution for a track-only car. For a street car, louvers look better for sure.
Having a splitter without any height adjustment is akin to a rear wing without any angle adjustment. You see that kind of junk on OEM body kits, and you can do better. With a proper wing, tuning the high-speed handling of your car is as simple as changing wing angle.
It’s like that with splitters as well. Most of the downforce comes via interaction with the ground, so setting the height is critical. I’ve seen a lot of splitters that adjust for height initially, but then once you mount the airdam or fascia, the height is fixed. This is a C grade. At least there was some height adjustment at first, and that’s an acceptable situation if you can later modify it.
People getting a B grade with a fixed height splitter do so because they understand aero maps and have set their splitter height for maximum downforce, and thereafter do all of their adjustments via wing angle. But having both ends adjustable for downforce is obviously even better.
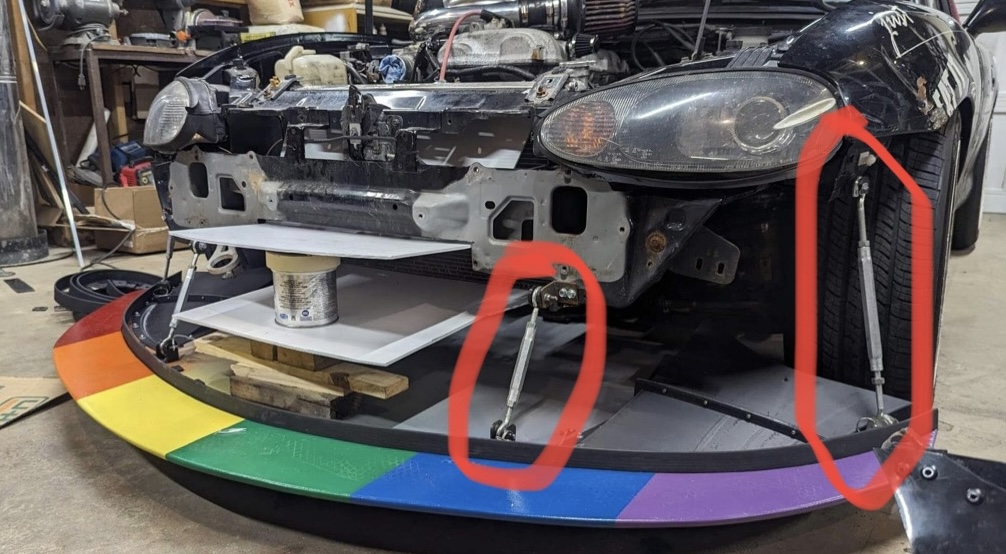
A-grade splitters are adjustable after the fact. Alyssa used turnbuckles to support the splitter, which are sturdy and make height adjustment a simple twist of the wrist. The turnbuckles are behind the airdam, which makes height adjustment more difficult, but it also completely hides them, for less drag. This is some trick shit.
Easy height adjustment with a twist.
What’s even more trick is that the turnbuckles fasten with pins, and so removing the splitter entirely is super easy. Just yank four pins and the splitter drops off the front.
Pins hold the splitter support rods for quick removal.
Another area to address is the width of the splitter, and what to do with the ends. Under most racing/TT rules, splitters can be the width of the car or the front tires. In most cases, this results in some unused material on the outside edge of the splitter.
You get a D for doing nothing with the exposed end. A flat splitter with a flat exposed end is just additional drag and an invitation to catch on something. You get a C for putting a spill board on the outside, because while this can reduce drag, there are so many better uses of that real estate. Higher grades are achieved by putting a vertical dam on the outside edge (front tire spat if you will), which builds local pressure on top of the blade, creating more downforce. Also, air spilling off that will direct air sideways, extracting air beneath the splitter, making more downforce.
Alyssa chose to do something similar, but pulled the bottom edge of the airdam outwards to meet the end of the splitter. This won’t make quite as much local pressure on top, but should be better at sideways extraction and have less drag. Hard to say which is better, both work.
Airdam meets splitter flush and kicks air sideways.
Let me address another huge mistake: flat splitters. Most people understand wings, and and flat splitters are like flat wings; meaningless. You need some curvature in the rear of the splitter to diffuse the air. When air expands behind a restriction, it accelerates the air in front of it, lowering the pressure. This suction is the purpose of a splitter.
Time attack cars often curve the entire rear of splitter blade upwards, essentially making a splitter diffuser the full width of the car. Miatas have historically used the rear subframe as mounting points for the back of the splitter, and the consequence of that is that Miata splitters are flat. To get suction, Miatas need to use splitter diffusers.
Splitter diffusers operate on the same principle as rear diffusers; they expand air in the tunnel. The diffuser itself doesn’t create the downforce, but it helps air expand and creates downforce in front of it.
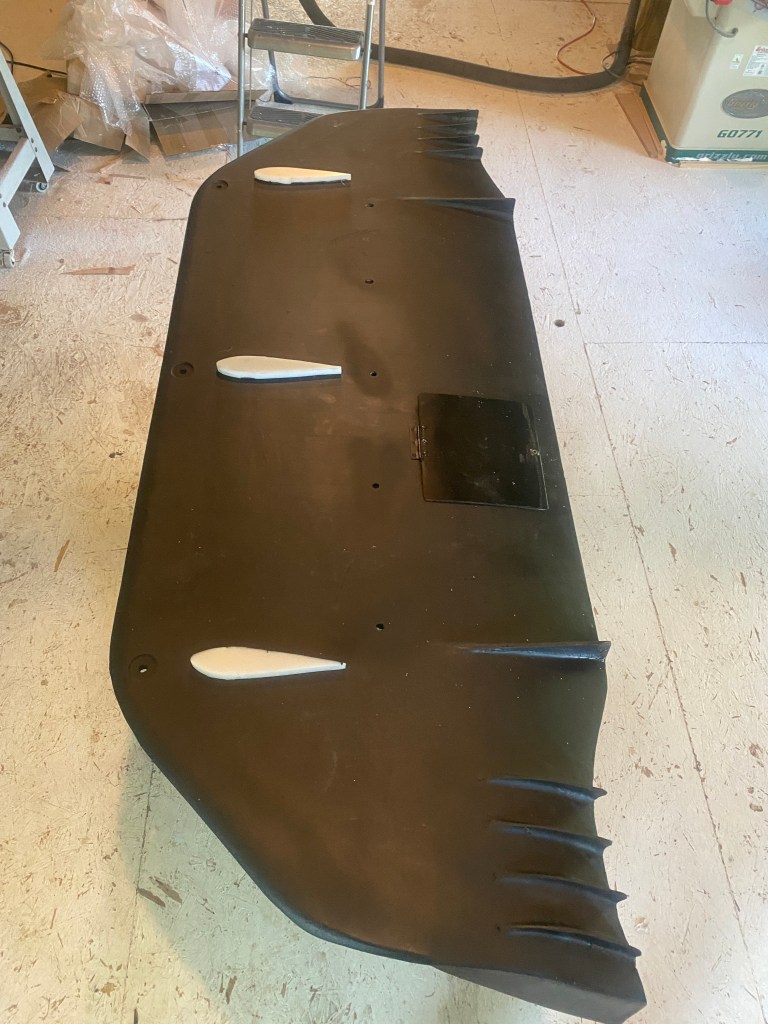
Alyssa and I are designing splitter diffusers and will make them for sale sometime this summer. Here’s your first sneak peak.
Big splitter diffusers and vortex strakes.
These splitter diffusers have one large tunnel that diffuses air inboard of the wheels. This is an area of loss to begin with, and also an easy place to extract air from. Most splitters diffusers have only the one main tunnel.
But you’ll notice our splitter diffuser has additional area outside the main diffuser, with strakes. The purpose of this area is to mitigate tire squirt. As a tire rolls forward, it compresses the high-velocity air underneath it, squirting air out the sides. Some of this air goes under the splitter, which decreases the suction and downforce. By adding a diffuser in this area, it slows the air down, hitting the tires with less velocity.
The strakes spin a vortex off the trailing edge. Because vortexes take energy to create, the air hitting the tire has less energy, which reduces the amount of tire squirt. The strakes are also angled just-so, to achieve the maximum amount of extraction from under the splitter and send it outboard, protecting the main tunnel of the splitter diffuser.
Recall that most of the air is dumped inside the wheel well. Air here is extracted via vents on top of the fender, and behind the wheel. By extracting air upwards, you create an opposing force downwards. And by sending air sideways, you mitigate losses from air intruding underneath. Fender vents are important to make the most out of splitter diffusers.
A+ splitter
There’s an old saying I think attributed to fighter aircraft: 90% of the cost is the last 10% of performance. The same applies to car aerodynamics. While this splitter is a solid A, to make this into an A+ requires a lot of labor and cost, for little return.
First, I’d cut out the center bumper support completely, it isn’t necessary for chassis rigidity, and I can fashion a custom bumper after ducting the radiator. Removing that center support allows a slightly higher radiator intake, with the benefits I already discussed. I’d put a 100mm radius on the edge of the radiator duct, and reduce the opening size slightly.
I’d also tilt the radiator forward to reduce the frontal area, and duct the radiator exit straight upwards through an extractor vent to create more downforce. You might call this more engine bay management than splitter improvement, but it’s all related to creating more front downforce, and goes hand-in-hand with designing the splitter and ducting.
I’d also make the splitter slightly wider. Alyssa’s car is for HPDEs and is unbound by racing rules, so an extra couple inches on the end isn’t a problem. With that extra space I’d place place a simple piece of angle aluminum. This end-wicker, if you will, holds pressure on top of the blade and locates a higher stagnation point behind. This pressure differential creates more downforce, and it’ll still kick air sideways for extraction.
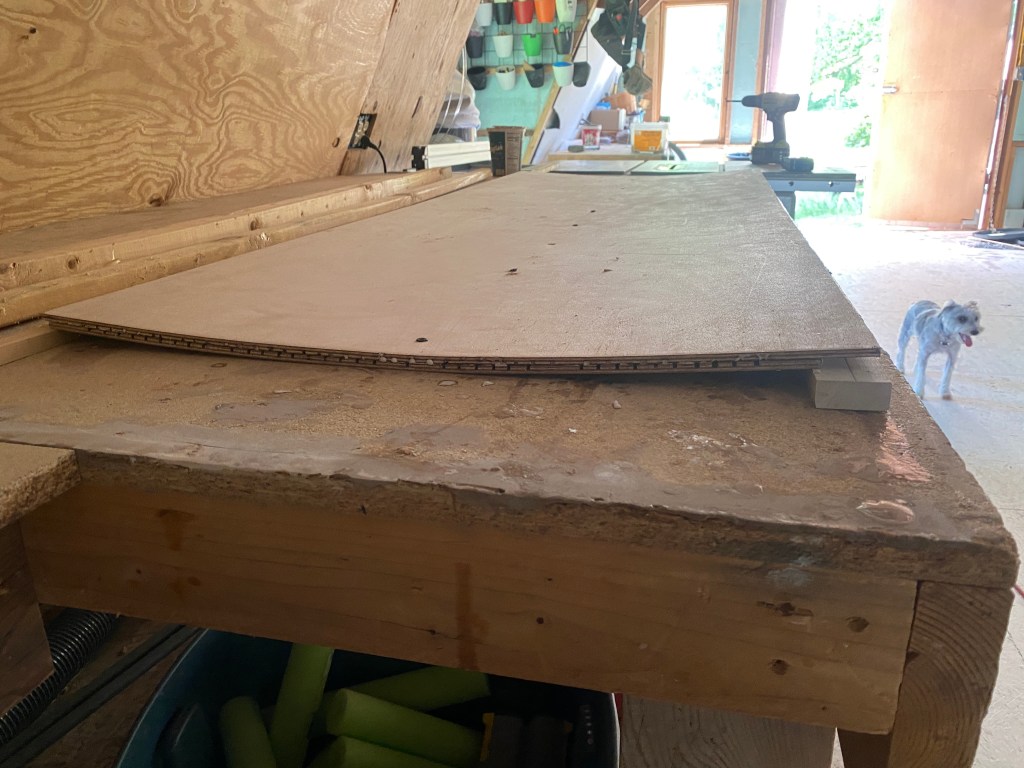
With a clean sheet, I’d also add curvature to the entire undertray. I’d laminate two pieces of 6mm plywood together, rather than using a single piece of 12mm. This would allow the rear edge to sweep upwards, creating more suction under the middle of the splitter blade.
The splitter I’m building for my Veloster has a full-width diffuser built in. The strakes show you how much angle there is. (That hole is a hinged door for oil filter access.)
Alyssa’s car doesn’t have a flat bottom, so it’s not a huge problem to diffuse some air into the center of the car. There will be some additional downstream drag due to local flow separations around the suspension bits, exhaust, transmission etc, but this is just a little bit of extra drag on things that were already creating drag to begin with.
I’d also put some height differential between the center and sides of the splitter. Remember early last year when all the F1 cars were porpoising? That was a cyclic gain and loss of downforce via ground effect, and it’s the natural consequence of trying to make as much downforce as possible, losing that downforce, and watching the car rebound on its springs. Once the car is back at a taller ride height, it again gains more downforce, repeating the cycle.
Many cars mitigate that effect by having a higher center tunnel, which gives two different heights of the splitter. This way if the lower part of the splitter goes under 1.5″ height, you don’t suddenly lose all of the downforce. The higher center portion also feeds the underside aero, which isn’t a factor on Alyssa’s car, which has neither a center tunnel nor a flat bottom.
So on her car I’d make the sides of the splitter slightly higher, rather than the middle. This will have the same effect of balancing ground effect losses, and will also protect the splitter blade, because the sides will ground out before the middle when cornering.
Finally, I might address some of the aerodynamic losses that come through the wheel spokes. By covering the bottom half of the wheel with caketin covers and spinning a vortex outboard, I’d reduce losses and redirect air down and out, with a minor gain in splitter suction.
But like I started with, modifying her splitter to go from A to A+ is a 90% effort for 10% gain situation. Addressing other parts of the car to the 90% threshold is time better spent.
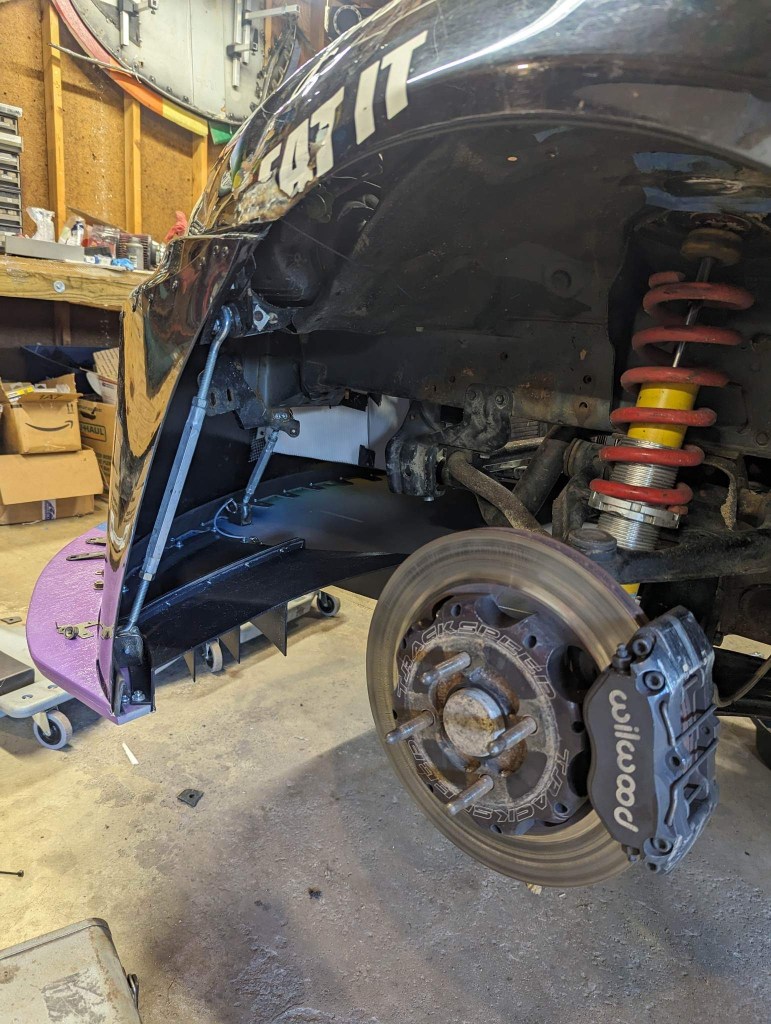
I’ve had a tow hitch on just about every car I’ve owned, even my Mini and Miata. I’ve never towed anything with my Miata, but I have a cargo carrier I use for taking an extra set of tires to the race track.
The tow hitch also makes a convenient jacking point for the rear of the car, and I thought I might one day use it as the base for a quick-release diffuser.
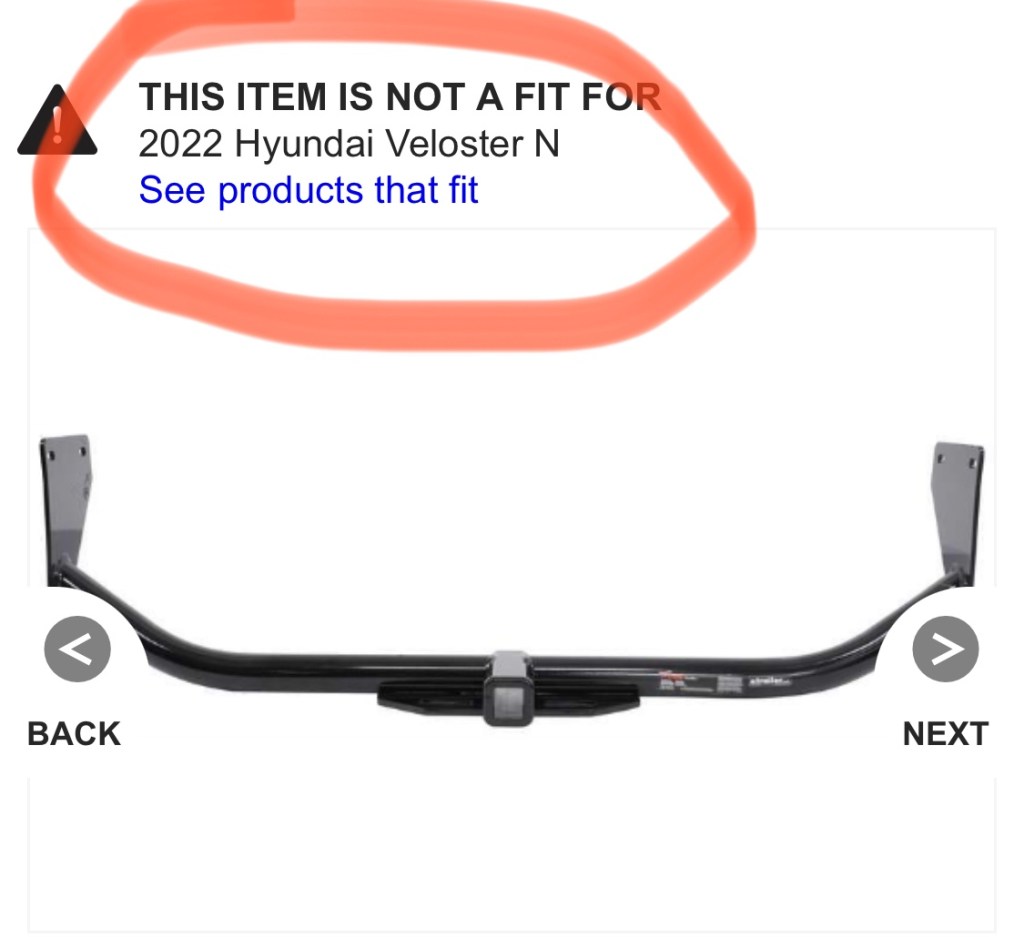
So naturally I ordered a tow hitch for my Veloster. I got the Curt model from eTrailer, and in my stupidity, didn’t realize it was for the non-N versions of the car. FML.
Completely missing the obvious.
The tow hitch sat on the shelf for a couple months while I pondered whether to return it or modify it. I saw a post on the Veloster N forum, where someone modified the Curt hitch to fit, and so I thought I might try to do that.
Yesterday was Father’s Day, and I had the day to myself to mess around, so I went after it. The first thing I did was remove the faux rear diffuser. I thought this would make access a lot easier, and it did, but it wasn’t the easiest thing to remove. Then I dropped the exhaust off the three rubber connectors, and test fit the hitch.
Fitting the tow hitch is easy by using a floor jack to raise it in position, then attaching the four supplied bolts. There was some body putty on my frame, which I had to scrape off before the ends would go into place.
Bolted up as intended, the hitch sits quite low. When hitches are this low, they can ground out going up a driveway, and the height is generally too low most trailers with tongue jacks, and even some bike racks. More significantly, the hitch is also directly in the way of the muffler.
Tow hitch mounts quite low. Also, muffler is directly in the way.
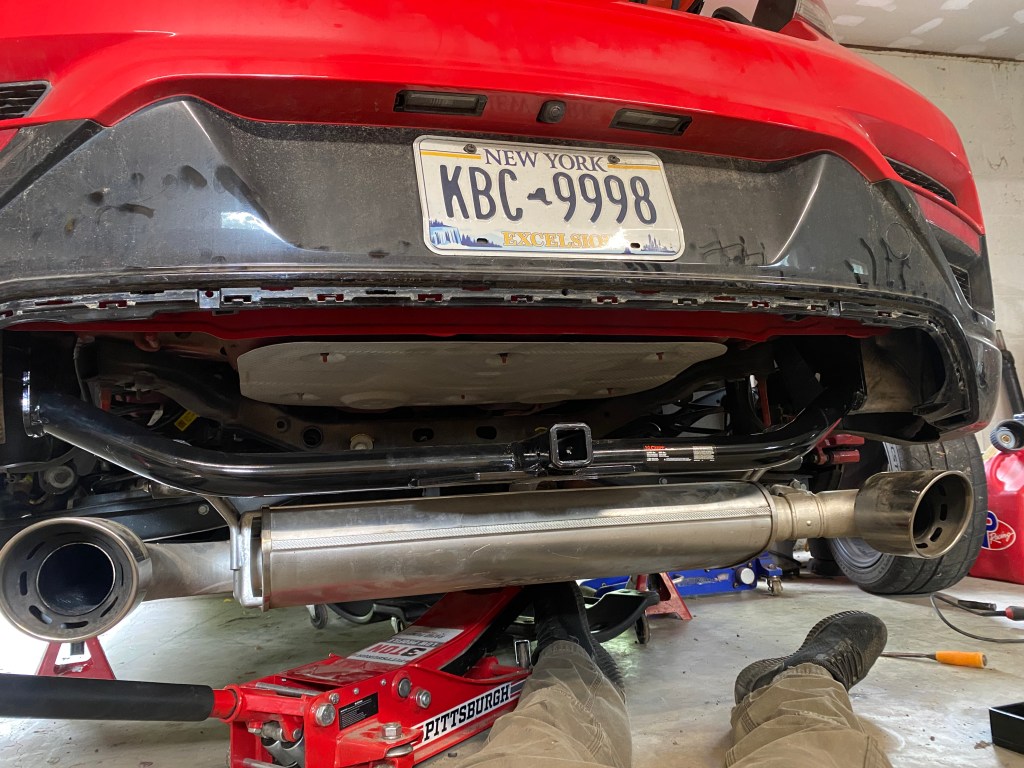
I had a few different ideas on how to modify the hitch, including making a new one using the existing side plates. But after measuring some more, I reasoned it might actually fit if the hitch went above the exhaust.
I cut 3.5” out of the side mounting plates and tack welded it together, and then test fitted it. So close! The muffler just barely made contact with the hitch.
I cut off the tack welds with an angle grinder and moved the entire hitch portion half an inch rearward. Then I test fit it again and found it fit quite nicely. But I had mis-aligned the plates a couple degrees and the bolt holes were not lined up perfectly.
Moving the assembly rearward 1/2” gives the muffler plenty of room.
I could have widened the mounting holes, but instead cut the tack welds off one side, re-angled the end plate, and tacked it together again. Third time is the charm, right? Right. This time it fit like a glove, and so I removed it one last time, welded it all up, and spray painted the grinds and welds.
This sounds like a lot of work, and it was. Cutting and welding the mounting plates is a 20-30 minute job, but the trial and error part took hours. But probably the most time consuming part is removing the diffuser, which mounts with a bunch of annoying plastic tabs.
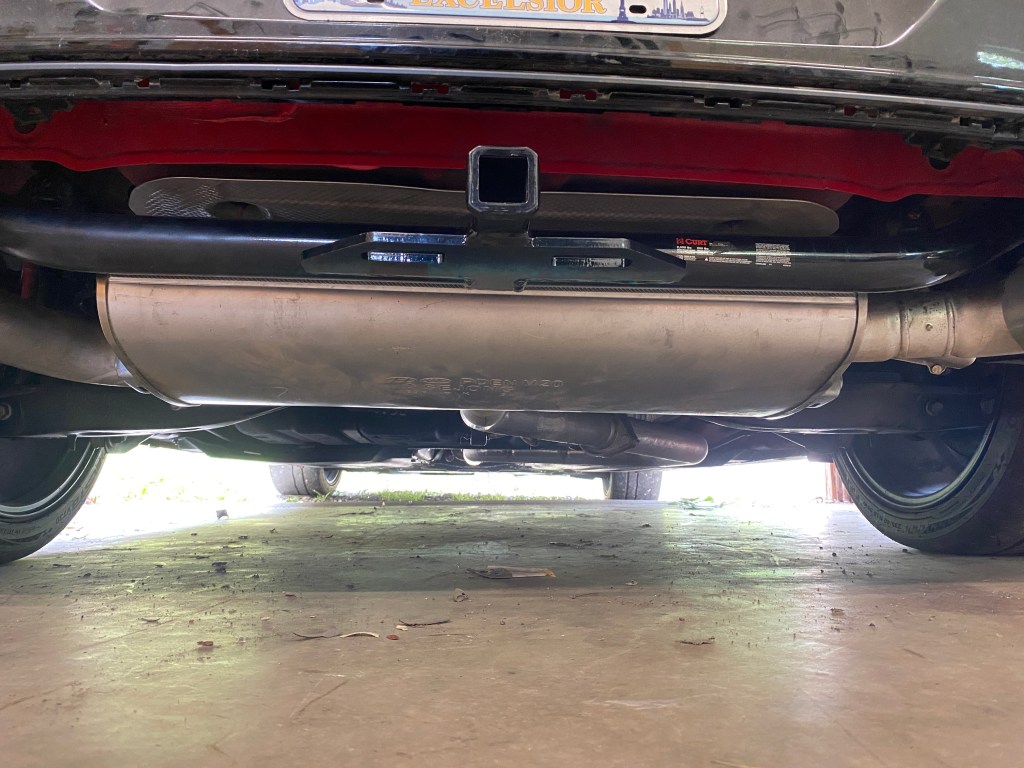
Fits perfectly, barely visible, and no fake diffuser. My original plan was to copy what this guy did, but note how much lower his tow hitch sits. I like mine better.
It would have been pretty easy to cut a square hole so that the trailer hitch protrudes through the bodywork. But I decided not to put the faux diffuser back on. I don’t like fake aero to begin with, and I actually think it looks way better this way. (Please don’t ask me what a cut bumper is worth for drag reduction!)
I’m not sure I’ll tow anything with the VN (the manual says not to), but now I can use my cargo carrier for race tires. I also got a hitch mounted bike rack.
Side note, the Harbor Freight hitch-mounted two-bike rack is a very well thought out design and a bargain at double the price. If you get a short hitch extender, you won’t need to pull the pin and swing the rack down; it’ll clear the hatch lid easily, so you can get to things in the trunk.
My twin brother wrote an article on You Suck at Racing about tire grip, and I’m going to steal some of that content to explore how tire grip and aero are related.
Braking, cornering, accelerating: everything depends on grip. Understanding how rubber tires create and lose grip is therefore fundamental. Let’s start with some theoretical laws of friction.
Amonton’s First Law: The force of friction is directly proportional to the applied load. If this law is true, then a 4000 lb car should stop in the same distance as a 2000 lb car. It weighs twice as much, but it also experiences twice as much friction, so theoretically, the weight of the car doesn’t matter.
Amonton’s Second Law: The force of friction is independent of the area of contact. This means that it doesn’t matter how wide your tires are. Skinny or fat, they have the same amount of grip. And grooves wouldn’t matter either.
Coulomb’s Law of Friction: Friction is independent of velocity. Which means you should have the same amount of grip at all speeds.
Finally, static friction is always greater than kinetic friction.
You might not believe these laws, because you’ve experienced that tires don’t really follow these laws of friction.
If weight doesn’t matter, then why do lightweight cars like Miatas out-handle bigger cars?
If tire width doesn’t matter, then why are wider tires faster? And by the same logic, given the same amount of rubber area, why are slicks faster than a tire with grooves?
If static friction is always greater than sliding friction, why is it faster to have slip angle through a corner?
Four important graphs
In order to understand how tires work, you have to understand the following four graphs. Introductory physics assumes that the coefficient of friction, Mu (μ), is a constant, and that may be true for a block sliding against a table top, but when it comes to tires, μ is not a constant.
Tires generate grip from molecular adhesion, mechanical keying, and hysteresis, and those factors are based on a combination of variables. In each of the graphs below, the coefficient of friction, Mu (μ), changes due to load, temperature, speed, and slip angle:
Graph A shows μ as a function of load (weight). If doubling weight doubled grip, then the line would be flat. But when you double the amount of weight on a tire, there are diminishing returns. When cornering heavily, the outside tires experience more load, and because of that, heavier cars lose more grip than light cars.
Graph B shows μ as a function of temperature. Every tire has an optimum temperature. Both cold and hot tires have less grip than one in the optimal range. If your tires are too wide, they may never get up to optimal temperature, and a narrower tire may heat up more favorably. For this reason, wider isn’t always better.
Tire Rack did a great test where they tested a bunch of wheel and tire widths. The fastest tire wasn’t the widest. And when they went to a wet track, the fastest lap was the narrowest tire.
One thing that contributes to heat is grooves. Squirming tread blocks are a major source of heat. As a result, grooved tires heat up more quickly than slicks. One reason for using slick tires is to spread the load better, but an even more important one is to prevent the rubber from overheating.
Graph C shows μ as a function of speed. The faster the car goes, the less time there is for keying; the ability for rubber to change shape and interact with the road. Under wet conditions, where adhesion no longer applies, grip is highly affected by speed.
Graph D shows μ as a function of slip angle. Every tire has an optimal slip angle. When a tire is twisted, which it always is to some degree, some parts of the contact patch are experiencing static friction while others are kinetic. This mixed state isn’t really addressed by any of the laws of friction, but it doesn’t make this any less real.
Ian made a drawing of what is happening between the road and the surface of your tire, which can help you further understand how tires grip.
Visualizing grip
The following image shows the surface of the road as a jagged green line on the bottom. (If the road surface was perfectly smooth, then the line would be horizontal. But because asphalt has imperfections with peaks and valleys, the road surface is represented as a jagged line.)
Panel A represents a tire (squiggly line) at rest, pressing into the surface of the road (jagged line).
Panel B is what happens when you add load: the rubber goes deeper into the surface, creating more grip. But there’s only so far you can push the rubber in. This is why doubling the load on a tire doesn’t double its grip. Panel B could also be softer rubber or hotter rubber. In both cases, the rubber conforms more easily to the surface, and with more contact, you get more grip.
Panel C shows what happens at high speed. The rubber doesn’t have as much time to change shape, so it doesn’t deliver as much grip from keying.
Panel D shows what happens when a tire overheats. The rubber comes apart, providing less contact with the surface. If the rubber gets hot enough, it may liquify or sublimate, creating a slippery layer between the surfaces.
This visual model isn’t perfect, as it doesn’t give why slip angle matters so much. But hopefully it helps you visualize the interface between your tires and the road, and why some factors add grip, and other factors take it away.
Aero and tires
So that’s how rubber grips the road, but there are other dynamic factors at play here, namely the aerodynamics of the vehicle.
Most cars without aero lift at speed, because the curved surface of the top of the car is longer than the bottom. In other words, cars are shaped like airplane wings, and like wings, they generate lift. The higher the air speed, the less traction there is.
Most cars have a coefficient of lift of around 0.3. Cars with a lot of curvature, like a fastback, have more lift than a three-box sedan or hatchback. By nature of their shape, most cars generate more lift over the rear tires than the front tires.
Cars also generate lift when in yaw, so if your car is pitched slightly sideways in a corner, it has even less traction. Nissan did some tests on this and found there is a fairly linear relationship between yaw angle and lift, and so the more sideways you get, the more the car lifts.
This means as you corner faster and faster, your rear tires have less and less rear grip. You already saw in graph C and panel C that tires have less grip at speed because they have less time for keying. So if you combine the keying losses with the lift and yaw losses, you get a car that’s lost a lot of grip on the rear tires.
And this is why it’s so important for race cars to have spoilers and/or wings.
Aero and lap times
To put some numbers on it, let’s take a look at a few NASA classes at Watkins Glen.
NASA Spec3 is a class for stock-bodied (no aero) E36 BMWs on Toyo RR tires measuring around 14.5 lbs/hp. The Spec3 lap record is 2:13.6.
NASA also has the ST5, class, which is a similar lbs/hp ratio to Spec3, but allows a splitter and wing. The ST5 record is 4.3 seconds faster: 2:09.27.
NASA also has a time trial class, TT5. TT5 and ST5 are the same formula, but the ST5 cars are racing wheel to wheel, whereas the TT5 cars are in a time trial situation with less traffic. Therefore, the TT5 laps are usually faster, but in this case, a surprising two seconds faster: 2:07.202.
If you compare the Spec3 lap record to ST5/TT5, can see that aero (splitter and wing) are worth about 4-6 seconds at Watkins Glen. Let’s call it 5 seconds for simplicity. This isn’t a difference in tire grip, as most cars are on Toyo RRs, but some cars are on Maxxis RC1 for the same lbs/hp (or Hoosiers at a significant penalty to lbs/hp).
Let’s take a look at where the difference is. On the front and back straights, there isn’t a huge difference in top speed, so the cars are pretty similar in lbs/hp. In Turn 7, where aero doesn’t make much difference, the minimum corner speeds (vMin) are pretty similar, and so we’re looking at cars with equal grip, as well. But take a look at Turn 10, the aero cars are going about 10 mph faster!
Lap
Front
Back
T7
T10
Spec3
2:13.6
121
126
62
87
ST5
2:09.3
118
1277
63
96
TT5
2:07.2
123
128
62
98
Now I’m making some pretty big assumptions on driver skill and track conditions being equal. So I’ll do some simulations in OptimumLap, and see if the computer world agrees with the real world.
I’ll start with the Spec3 car using drag and lift values of .44 and 0.3 which is probably in the right area. With these values I get a lap time of 2:13.82 which is pretty close to the Spec3 lap record. I’ll then add a splitter and wing to bring the Cd to .47 and Cl to -0.8 which are pretty fair values for the added aero. Doing only these aero mods on exactly the same car, I get a 2:08.84 lap, which is right in the middle of the 5-second delta we saw in the real world.
So that’s a pretty good verification of aero being worth about 5 seconds. So next I want to take a look at Turn 10 and see how much aero helps here, and if there’s really a 10 mph delta.
Turn 10 Watkins Glen
For the OptimumLap simulations, I’ll use four cars instead of two cars to get more granularity. I’ve given them the same tires with 1.2g of lateral grip, but different aero packages.
No aero – This is the Spec3 car with a coefficient of lift of 0.30, and is represented by the red line.
Zero lift – This car has some minor aero like a spoiler, which cancels out lift, and so the Cl is zero. This is represented by the orange line.
Mild aero – This is the kind of lift and drag you’d see from a spoiler and airdam done professionally (NASCAR level). This is represented by the blue line.
Good aero – This is a car with a splitter and wing, and is represented by the green line.
I’ll examine the grip in the middle of Turn 10, at the 16000′ mark from the start/finish line. This is not quite the minimum speed in the corner, but shows a high lateral load and is as good a place as any to look at G forces. There are a lot of spikes in the graph (like you’d see in Aim Solo data), so imagine it’s more of a smooth arc.
Lateral Gs in Turn 10 on the same tire.
Starting at the bottom of the graph, notice that the car represented by the red line is pulling only 1.14 Gs. Recall that I gave all the tires the same 1.2g of grip, but because of aerodynamic lift, they are losing traction at speed. This is a normal situation for a street car or spec racer with no aero. What the simulation doesn’t show is that most of the grip is lost on the rear tires.
The orange line is a car with a spoiler, which mostly cancels out lift. Lateral Gs are very close to the the static 1.2g value.
The blue line has more than 1.29g grip because tire load is increased with downforce.
The green line is even more dramatic, with 1.4G grip. This is significantly more grip than the car with no aero.
You might be wondering how an increase in lateral Gs plays out in speed through the corner, which is the next graph. I’ve chosen the same 16000′ spot on track to measure the speed, and you can see it’s a difference of almost 10 mph between fastest and slowest.
Turn 10 is a very fast corner, and you’d see a smaller delta on a slower corner, but this is still pretty remarkable. By increasing the load on the tires, tire grip went from 1.14 to 1.4 Gs, and the car with good aero went about 10 mph faster in the middle of the corner.
Downforce and tire wear
Most people imagine that aerodynamic downforce will make your tires wear out faster. More grip = more wear, right? No. Oddly, downforce makes tires last longer.
Tires wear by abrasion; from sliding or spinning. Have you ever flat spotted a tire? Then you know that sliding a tire can wear it out in a couple seconds! Aero increases the load on the tire, giving you more grip, which makes it less likely to spin or lock up.
Aerodynamic downforce also loads the tires more equally. When cornering, the outside tires get loaded more, as a normal byproduct of mechanical grip. However, aero loads are based only on air, and is balanced across the car, left to right, helping to balance the car better.
One could even imagine an active aero device that would split the wing in half and only load the inside tires. Or rudders or vanes that help the car turn using air alone, and use the tires even less.
But let’s jump back from fantasy land… in reality, you get more aerodynamic downforce from rear aero than front aero, and this helps a lot in braking zones, increasing rear load and rear grip. The same is true in acceleration, and more rear grip reduces tire wear (on rear wheel drive cars).
Another way aero increases tire life is when you drive under the limit of the tire. For example, take Turn 10 at Watkins Glen again. Miatas can usually go through at full speed or with a slight lift on entry, and that’s because there isn’t much of a straight between Turn 9 and Turn 10 and Miatas are dog slow. If you’re going through at 85 mph without aero and on the limit of traction, you’ll go through it with aero at the same speed, but well under the limit, and you’ll wear the tires less.
The uphill esses are another place where a Miata is flat out while cornering. You can’t ever reach the limit of lateral grip because the car can’t accelerate fast enough to get there. So you slip less and use less tire.
Now this isn’t going to be true at every race track, most of the time when you have a higher limit, you fuggin use all of it. But sometimes there’s a corner or two where aero now puts you under the limit, and in a long endurance race, this can be the difference between changing tires mid race, or simply saving money. The point being, aerodynamic downforce can make your tires last longer if it keeps your car from sliding.
A good real-world example is the 2000-2002 Corvette SCCA cars, which went from a 315 rear tire in 2000 to a 275 tire in 2001. To increase grip, a rear wing was added in 2001, but it wasn’t enough and tires would only last about 4 laps before starting to go off. After optimizing the aero in a wind tunnel to create more downforce, the same tires in 2002 would last an entire race.
Aerodynamic balance
At this point I’ve only looked at how aerodynamic downforce affects grip and longevity due to increased tire load. But there are other aero factors at play that are important.
Earlier in this way too long blog post, I by mentioned that cars without aero lose rear grip from lift and yaw. In truth, the car loses both front and rear grip, but it loses more rear grip. As a consequence, as the car goes faster, it transitions more and more to oversteer. Most people find this an unsettling situation.
Personally, I don’t mind if a car oversteers at low speed, in fact, I like it. But if it does that at high speed, it scares the shit out of me. Ideally, I like a car that rotates easily at low speed and then transitions to understeer at high speed. This is ridiculously easy to do: add a big wing, and then tune the amount of understeer by adding or removing wing angle.
This is the magic of dynamically balancing the load on your tires using downforce. It’s so easy, and it’s so tunable. However, rear wings and end plates also increase stability by increasing the static margin.
Static margin is the distance between the center of gravity and the center of pressure. Anything that adds rear drag increases the static margin, sort of like streamers on a kite tail. In addition, horizontal areas on the back off your car, like big end plates, shark fins, or even bodywork like a hatchback or station wagon, increases the static margin through sideways resistance to air.
A greater static margin makes the car harder to turn, but also makes the car more stable. When a car goes over the limit of grip, the driver must make steering corrections. Cars that have a higher static margin require fewer steering corrections to bring the car back into line, which is easier on the driver. This also ends up being easier on the tires, and can make the car faster, if a bit less exciting to drive.
Conclusions
Tire grip is arguably the most important factor on a race car. Understanding how tires make grip is therefore one of the most important things a racing driver needs to know. Aerodynamic downforce can greatly influence the balance and grip of the tires at different speeds, and can be used for tuning the car’s handling and ultimately make the car turn faster lap times, and/or stay on track for a longer duration.