This website is full of data that supports why cars (Miatas) should have aero. Nevertheless, I meet people all the time that say they don’t want to use aero. Fine, don’t. But don’t justify that with bullshit excuses or claims you can’t back up with data. That just gets you a dick punch for being a moron.
What are the most common excuses I hear for not using aero?
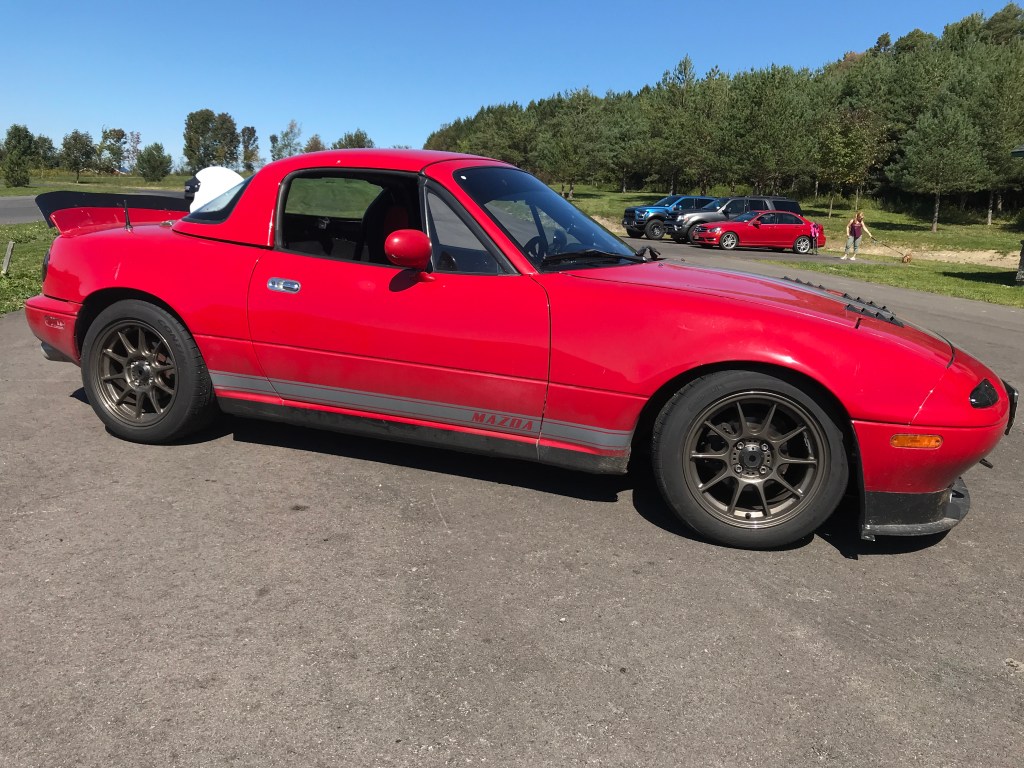
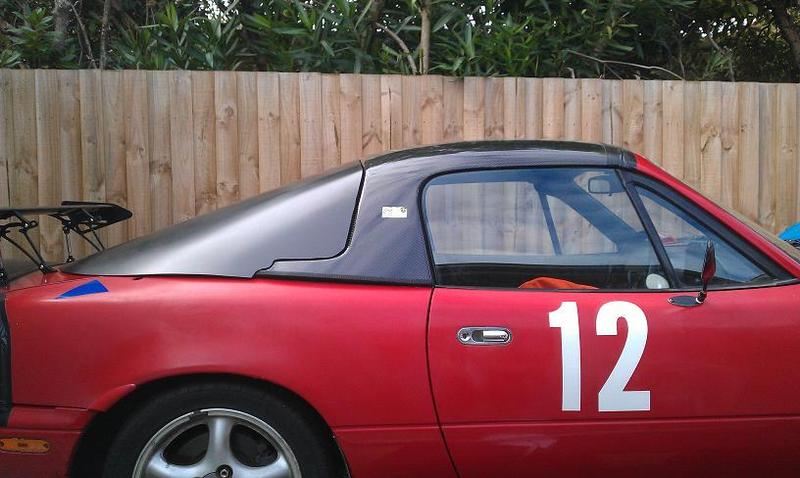
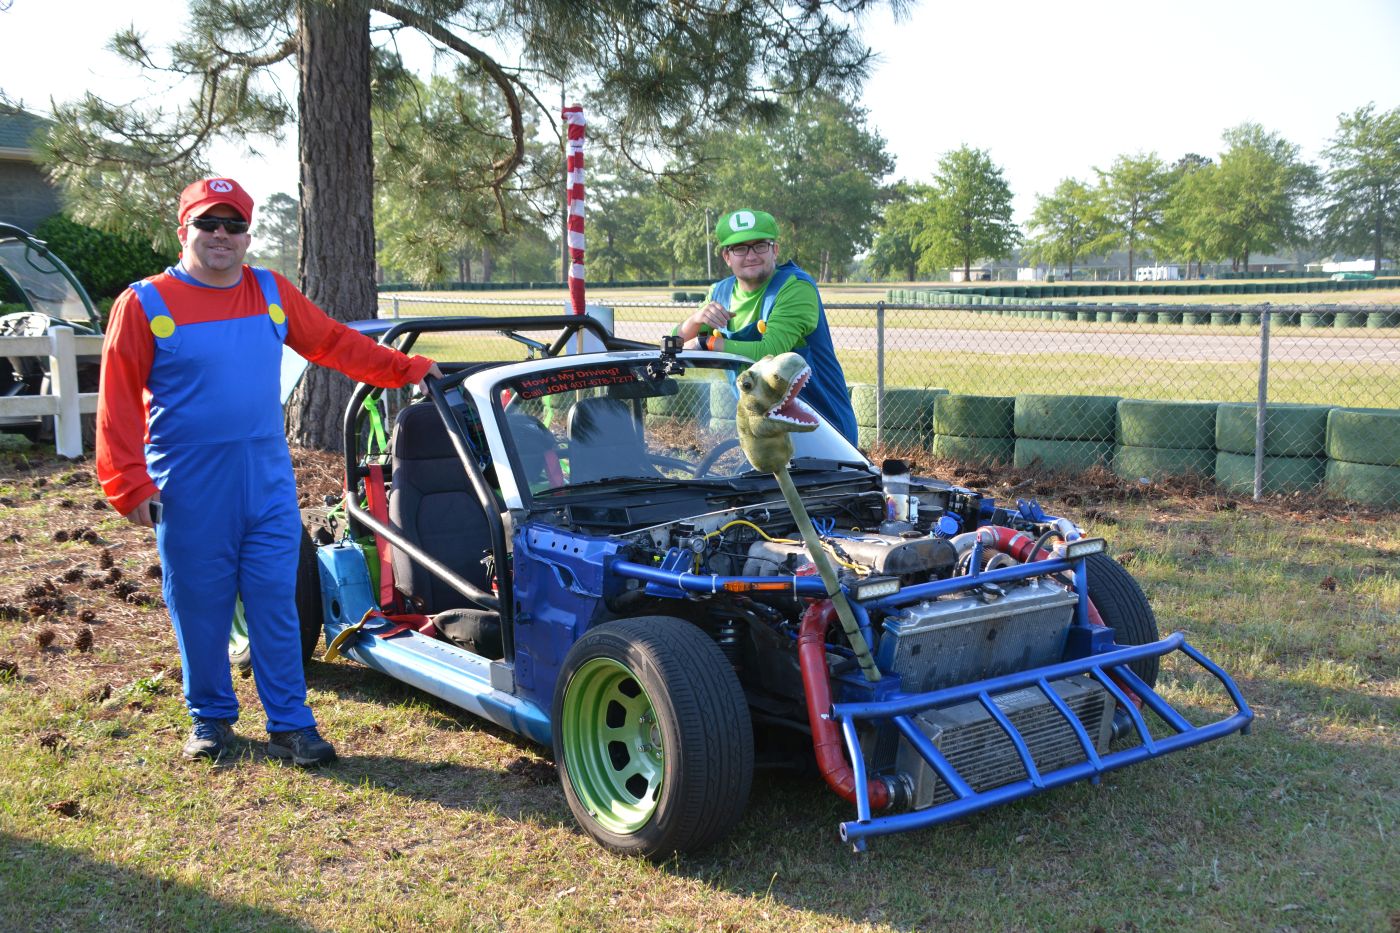
Alyssa’s car has evolving aero, built to a budget.
“My car doesn’t make enough power to use aero”
This is the dumbest one. I wrote about this previously, and it’s just plain wrong. Miatas have terrible aero, and the normal aero things one does to a Miata reduce drag (freeing up power) and add downforce (increasing grip). There’s simply no downside to using aero on a Miata.
Drag reduction – Airdam, splitter, flat bottom, low spoiler: all of these reduce drag. Explain to me how the fuck it takes more power to use aero?
Wing drag – A single-element wing has about as much drag as your side mirrors. Move the mirrors inboard and shut up. Or just ignore the mirror drag and stand agape as you gain 2-3 seconds per lap.
“I’m not a good enough driver to use aero”
This is my second favorite saying. As if the self-admitted “not-good enough driver” has aerodynamic knowledge, but not driving skill? The fact is, adding grip and stability is not going to make you a worse driver, it’s going to make you a safer and better driver.
Understeer is safe – A wing will generate more and more downforce at speed, shifting the balance of the car to the rear, causing the car to understeer the faster you go. This is especially good for people who claim they aren’t good drivers.
Easy to tune – Not everyone is schooled in setting up suspension. Conversely, changing the angle of your wing is child’s play.
Braking – If you look at data, you’ll see that aero helps braking more than it does for cornering. Drivers who identify as “not good” will benefit greatly from better braking.
Stability is good – A stable car is easier to drive at high speed. Cars without aero suffer from aerodynamic lift, which makes the car unstable at high speed. Downforce makes a car easier to drive, and better for noobs. Lack of aero, and instability, require a better driver. Not the other way around.
Obviously a pro driver will get more out of a car that has a lot of downforce, but a rookie driver will also benefit greatly from aero. Saying that there’s some skill level requirement to a car that has less drag and lift is fucking asinine.
“I don’t like the way aero looks”
If you’re choosing your performance based on looks then you’re not serious about performance and shouldn’t be reading my website. For a street car, you have a leg to stand on, but for a race car, notsomuch.
My brother is one of these “I don’t like the way aero looks” people. It’s infuriating because he races a Yaris. Somehow he thinks a splitter and wing are going to ruin its wonderful lines?!? Dude, this is not a Giugiaro masterpiece! Aero all the things, brother.
I finally got Ian to throw a $50 wing on the Yaris and he was able to flat-foot Thunderhill Turn 1 for the first time ever. So at least he’s been partially converted. I’d like to see it with a splitter, flat bottom, barge boards, and diffuser, but I’ll take this small victory for now.
“Aero costs too much”
OK, I don’t really hear people say this one so much as see it. People will dump money into every aspect of performance except aero. They’ll run A052s and change them every 5 hours. Or they’ll do an engine swap or turbo. All the grip and power things cost money, and then keep costing money. On the other hand, once you do aero, you’re done. Aero is way cheaper for the same performance.
Tires – Teams that run Super 200s for endurance racing are spending 3x more on tires. Sure, they are getting a second or two a lap, but also paying for tires (and mounting) 3-4 times more often.
Power – Everyone wants more power, but for Miatas without fuel cells, you’re limited by the fuel you can carry. Some motor swaps, like Ecotecs, are pretty frugal on fuel, but more power means more gas. Gas costs money, pit stops cost time, do the math.
Aero – Do it once, forget about it. I’ve done a lot of OptimumLap simulations on different tracks, and while some tracks favor one or the other, grip, power, and aero often balance each other out. Over time, aero is simply the cheapest way to get the same lap times.
What’s your excuse for not using aero?
If your racing series doesn’t allow aero, obviously you can’t. But if you’re not using aero for some other reason, tell me why. But be careful… and cover your junk.
Some race tracks are power tracks, and some are grip tracks. At the extreme ends of the spectrum, compare a salt flat to a skid pad. On the salt flat, there’s no cornering, it’s all about power. Likewise, on a skid pad, it doesn’t matter how much power you have, it’s all about grip.
Some tracks are all about grip.
However, you also have to consider the aerodynamic factors of drag and lift. On a salt flat, drag could be a huge factor. On a large diameter skid pad, aerodynamic lift (downforce), could also weigh heavily (pun intended).
Most race tracks are neither salt flats nor skid pads, but somewhere in between. Some favor grip, some power, and some aero. I thought it would be interesting to run a bunch of simulations in OptimumLap to find out which tracks favor power, grip, or aero.
For the simulator car I used a Miata (surprise!) with 100 hp, 2400 lbs, tires at 1.0g grip, andvCd 0.5, Cl 0.5. These are very low, round numbers, meant only to illustrate the differences. Moreover, the low power and grip values create larger gaps in the data, which makes it more obvious which tracks favor which attributes.
I ran this base car on 12 different race tracks that range from an autocross course to the fastest closed-course race tracks in the USA. There’s a good mix of tracks in OptimumLap, but I also added the map my brother made of New York Safety Track, because it’s local and awesome.
New York Safety Track (NYST). Dumb name, great track.
After the initial base simulation run, I then added 10% grip and re-ran the group. The lap times dropped across the board (especially at the autocross course), and I logged the data.
I then removed the additional grip and added 10% more power. So at this point, we’re back to the base car, this time with 110 hp instead of 100. Lap times fell again, but not always in the same order.
Finally, I removed the extra power and changed the coefficient of lift from -0.5 to +0.1. This is not a drastic change, one could easily get this from an airdam and small spoiler. I left the drag (Cd) the same, as it probably wouldn’t change much (it would actually have less drag, but I chose to concentrate only on downforce).
The table below shows the base lap time, and then what happens when I added more power, more grip, and minor aero. I ordered the table by tracks that favor power at the top, in the middle are tracks that favor aero, and at the bottom of the table are the tracks that favor grip.
Track
Base
Grip
Power
Aero
Favors
VIR
154.73
152.7
151.85
153.10
Power
Mid-Ohio
112.57
111.26
110.99
111.06
Power
Watkins Glen
157.30
155.33
154.97
154.97
Power and Aero
Summit Pt
93.93
92.76
92.69
92.35
Aero
NYST
112.71
111.70
111.68
111.02
Aero
Big Willow
109.46
107.98
108.18
107.11
Aero
Lime Rock
71.06
70.01
70.22
69.60
Aero
Thunderhill
142.71
140.60
140.74
140.59
Aero and Grip
Gingerman
118.76
116.82
117.26
117.34
Grip
Thunderbolt
107.01
104.91
105.87
105.21
Grip
Waterford
87.32
85.49
86.67
86.08
Grip
Autocross
68.11
66.83
67.85
67.49
Grip
Start by looking at the Base column, which is the lap time before I modified any values, and then look across for the time in bold, which is the fastest lap.
Race tracks with long straights favor power, and so it’s not surprising to see VIR and Mid-Ohio at the top of the list. Likewise, an autocross course, or a smaller technical track like Waterford, are grip tracks. Finally, some tracks are fast and flowing, and suit aero.
Not every track was definitively a power, grip, or aero track; some tracks are a mix of two. Watkins Glen favors both power and aero, while Thunderhill (3 mile) favors grip and aero.
I then re-ran the simulations using a Miata in a higher state of tune. I left the weight the same, but gave it 120 whp and 1.2g grip, to see if the relationships would change at all. Nope, they stayed the same. Astute readers will cite that a high-power car like a Corvette rarely benefits from more power at any track. But this isn’t a site about Corvettes….
Note: As I stated earlier, the coefficient of lift value (Cl) for the aero car is 0.1, which is pretty low. A Miata with an airdam, splitter, and wing has a Cl of 1.0, which is way better. If I re-ran all the simulations using that value, then it would show that every track is an aero track, and that wouldn’t tell me much about the nature of the track. So I purposely chose a low Cl value that would illustrate which tracks are more favorable to power and grip, and put the aero into equal perspective.
I’ve been de-aeroing my street car this year. What?
Last year I was experimenting with aero and I made an airdam and splitter on my 1993 street car. The airdam was a vertical 3″ extension under the stock lip, and the splitter was simply the forward part of the undertray. I built an adjustable spoiler to balance it out.
September 2019. Small airdam, splitter, adjustable spoiler (the black plastic part can be moved up or down into three different heights).
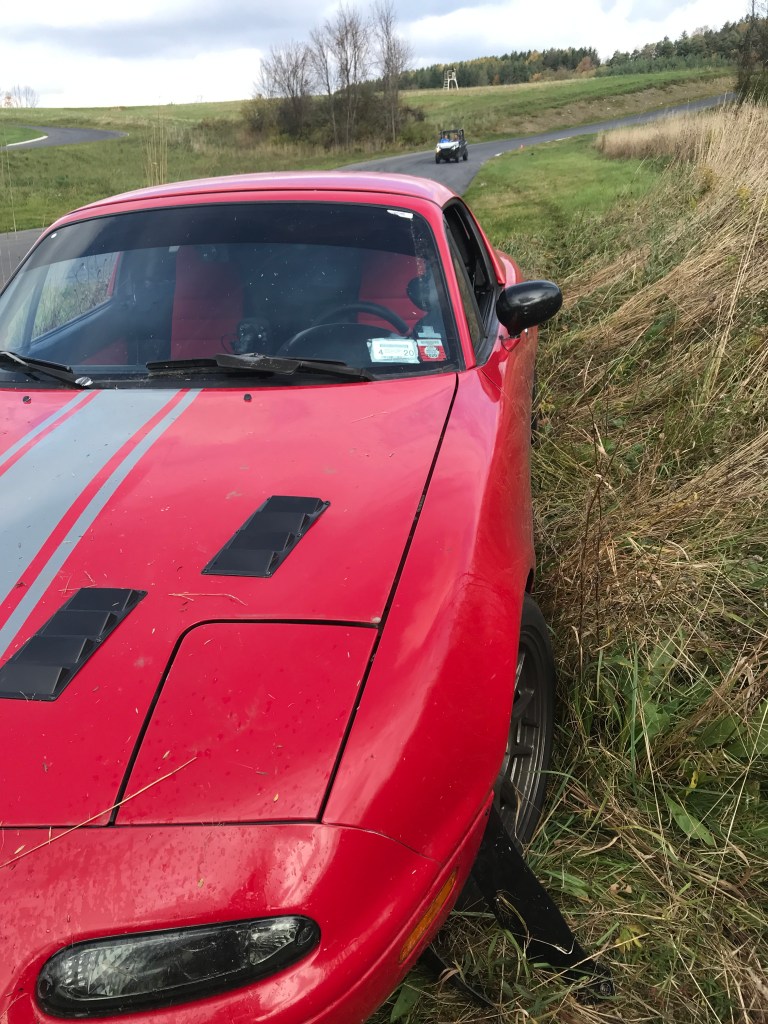
It went pretty well until I stuffed it into the weeds. The splitter dug in hard, bending the mounting brackets, the undertray got shoved underneath the car, and I sheared some bolts and plastic. It wasn’t pretty.
Oops. Shoved the splitter/undertray back and broke my side spats.
So like I said, I’m de-aeroing my car. My hope is, that if I go off track into the weeds again, the car just glides over them, rather than the splitter ruining my day.
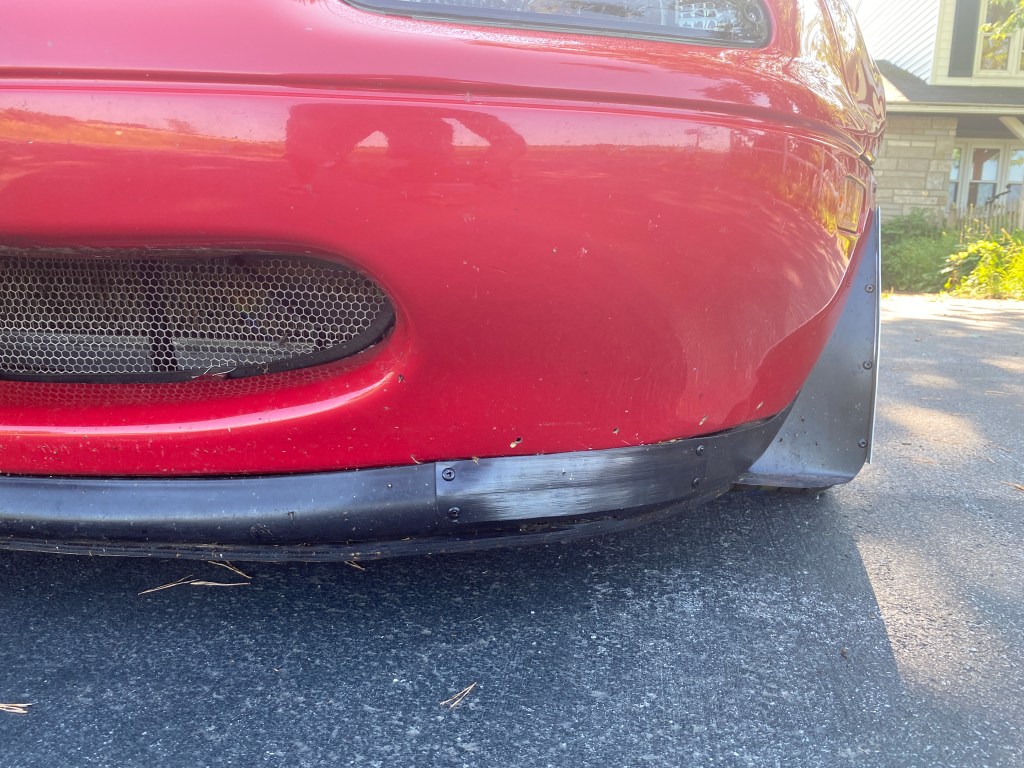
The front end is now the popular R-package front lip. The brake ducts aren’t really functional, so I covered them up. Underneath, I still use a full undertray so I can duct the radiator and whatnot, but the front edge terminates right at the R-package lip.
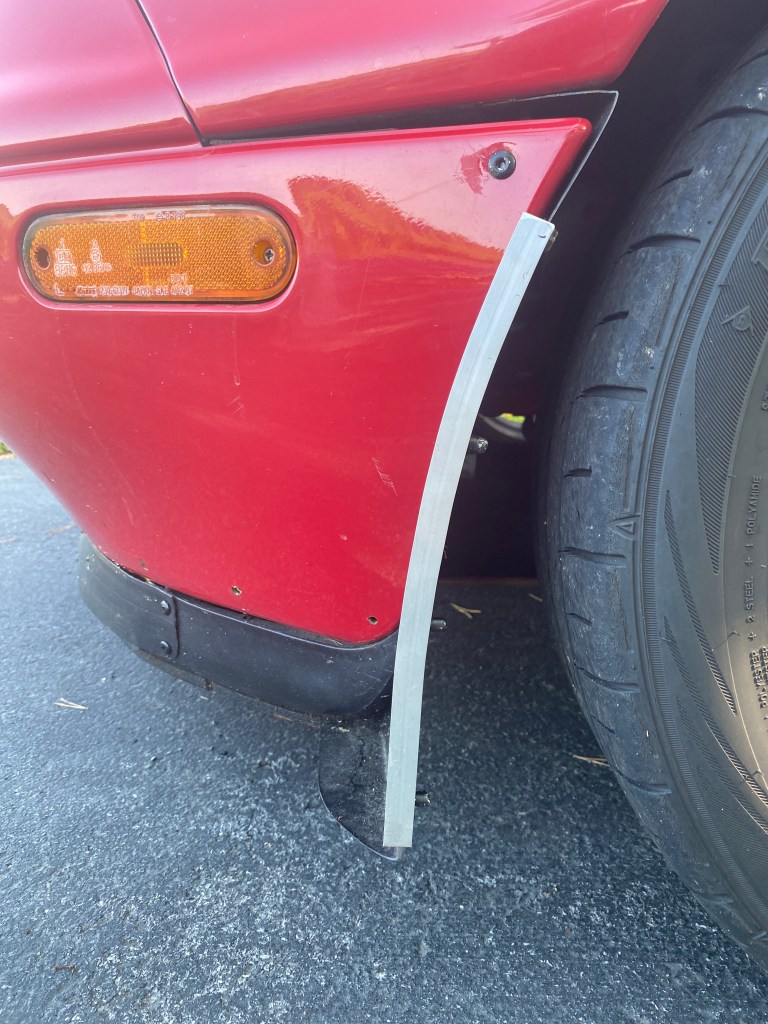
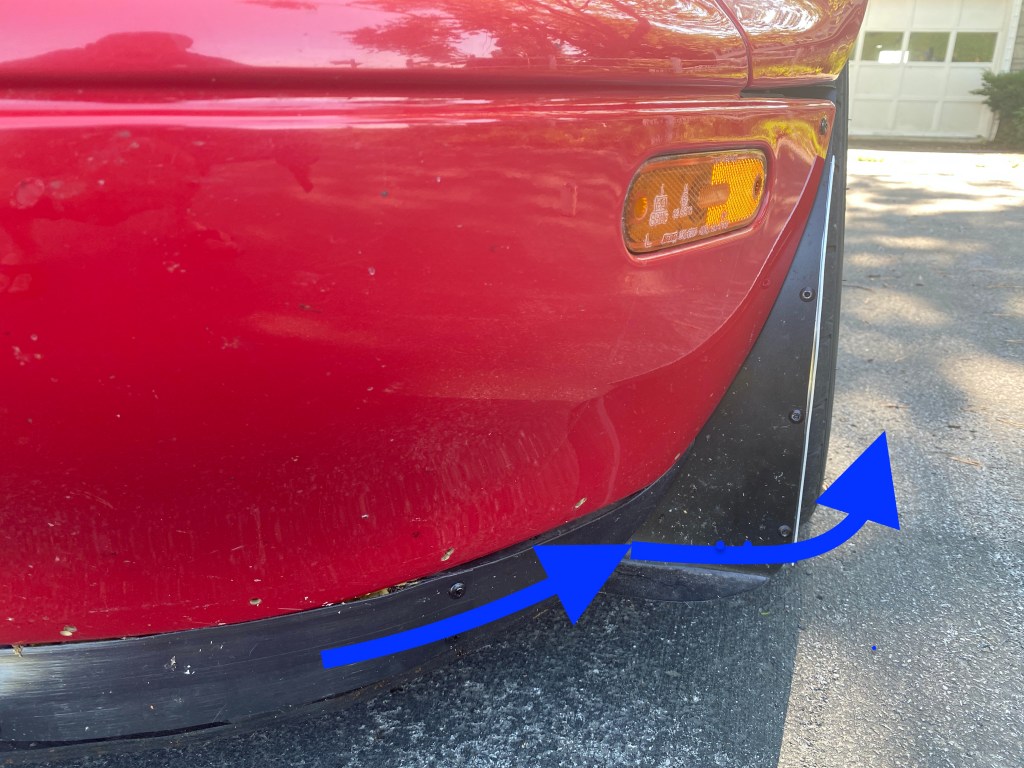
One of the things I don’t like about the NA front end is that it doesn’t have enough tire coverage, and so I built some front spats to deflect air away from the tires.
R-package front lip with plywood undertray and covered brake duct. From this angle, it looks like the wheel spats cover the whole tire, but they don’t.
Last time I made spats out of extra HDPE plastic I had lying around from making the airdam. This time I decided to use metal, so I could pre-form the shape. It was pretty easy to mock up in cardboard, then bend it over and get the shape right.
I fastened the bottom of the spats to the undertray, sandwiching them between the undertray and the front lip. At the top I folder over the extra material, drilled a hole, and used the standard fender mounting bolt.
Angle aluminum wickers on each side.
Finally I added some 1/4″ angle aluminum to the edge of the spats. These required a bit of effort to form. I had to clamp it in a vise as I bent the arc slowly. If I hadn’t clamped it down, the whole piece of aluminum would have come out bent in more than one dimension.
The purpose of the angle aluminum is to act as a wicker (Gurney flap), and fool the air into thinking the spats are wider than they are. As air moves around the front end, it encounters this raised edge which deflects air around it, effectively making the spats wider.
Wicker helps deflect air around the tire.
I suppose the angle aluminum also makes the outer edge stiffer, but I’m not sure if that was an issue, these are pretty strong and very light. I don’t know if they can handle any serious grass cutting, but at least it’ll just be the spats I lose next time, and not the whole shebang.
Wind Tunnel Testing
Back when I wrote this article, I hadn’t done any wind tunnel testing. Since that time, I’ve tested tire spats as well as spoilers, and I was on the right track back then. For all the details, purchase my Miata Wind Tunnel Report and you’ll receive a download link.
The wind tunnel report has a lot more than just spoilers and tire spats, it also covers the following.
Splitter diffusers and spill boards.
Canards in various locations and combinations.
Closed windows versus open, plus modifications to reduce drag and turbulence from the open windows, including wickers, mirrors, and venting the rear window in two different locations.
Singular hood vents fender vents.
Brake ducts, NACA ducts.
OEM hardtop with and without a rear window spoiler, versus a CCP fastback.
Blackbird Fabworx spoiler at different angles/heights.
Wings from 9 Lives Racing, Wing Logic, and a couple prototypes.
At our last race we had two different fuel jugs, VP and Hunsaker. Both jugs hold about 5.5 gallons. The Hunsakers have unleaded fuel nozzles and pour a lot slower, but they have a convenient venting system that keeps you from getting gasoline on your race shoes.
I was curious how fast each can could dump its contents, so I filled them up with about 5 gallons of water and did a little test. But first, let’s see the contenders and how I modified them.
Hunsaker
My Hunsaker jugs have the small diameter nozzles that fit a standard unleaded restrictor plate. This has been useful for the Lemons team I race with, since their car (minivan), is street legal. The small nozzle’s .59” inside diameter (ID) restricts the amount of fuel that can flow, and makes fueling take a lot longer.
Unleaded nozzle on the left, DIY on the right
But my race car doesn’t have the unleaded restrictor plate, and so it’s kind of silly to use the Hunsaker cans as is. However, if I remove the nozzles, the large diameter tubing on the Hunsaker is too large to fit in my filler tank neck. So I made new nozzles that were as large as I could fit inside the clear tubing. I bought 1.25” aluminum tubing which has a 1.12” ID.
VP Jugs
We typically use the VP jugs for fueling because the hose is a larger diameter and they dump faster. The VP caps have a screw-in plug, and if you remove it, you can thread in a brass adapter that fits a 1” tube. Add a piece of tubing and a hose clamp and you’re done. The inside diameter of the brass adapter is 3/4”.
At the last Lemons race, my teammate Dieter modified one of my VP jugs with a Hunskaker-like air vent. This seemed to work pretty well, as no fuel escaped the vent or got on our shoes. I bored out the vent tube a bit to give it freer breathing, it looks like this:
Poor-man’s Hunskaer
Speed test
First up is the standard Hunsaker with unleaded nozzle: 44.4 seconds. That’s with the small air valve popped open. My teammate Pat always removes the entire vent cap from the Hunsaker jugs, instead of just opening the vent. I always thought that was silly, but I wanted to see what the difference was in dump time: 38 seconds. Huh, he wasn’t wrong about that.
Next up is the standard VP jug with homemade nozzle: 25.4 seconds. Having seen the benefit of a larger vent hole, I opened up the vent on the VP can. This can also has the “poor-man’s” Hunsaker vent, which is basically a long piece of tubing on the vent hole so you can invert the can and no gas drips out. This one dumps at 22.5 seconds, better still!
Finally, I tested the Hunsaker fuel jug with an aluminum 1-1/4” tube in place of the unleaded nozzle. Having already seen the benefit of the unscrewing the vent cap, I did that: 10 seconds. Woot!
Fuel Can Configuration
ID
Seconds
Hunsaker, unleaded nozzle, small vent
.59″
44.4
Hunsaker, unleaded nozzle, unscrew cap
.59″
38.0
VP with standard air vent
.75″
25.4
VP with larger vent and tubing
.75″
22.5
Hunsaker with 1-1/4″ aluminum nozzle
1.12″
10
Final results
I was actually unprepared for how fast the last configuration dumped the fuel, and could be off by a second when I fumbled to time it. It doesn’t really matter anyway, the point is to use the largest diameter nozzle you can, and don’t neglect the size of the air vent.
I previously blogged about all the reasons I wasn’t going to swap a 1.8 engine into my 1.6 Miata. I’ll sum it up with the phrase “I’m not building a better car, I’m building a better Miata.” The goal is to accentuate everything that made the 1.6 different, and more Miata, than the later 1.8s. Part 2 of this blog is my progress report. Where am I at?
Higher compression ratio – Done. I bought a spare head on eBay so I could do all the work on the bench. I got the head decked .035″ for $50, and the engine should have about 10.3:1 compression now. I also put in Supertech +1mm oversize intake valves. I didn’t do the exhaust valves because I was trying to save a bit of money, and my understanding is the intake-to-exhaust valve diameter ratio is still good. I went with OEM valve guide seals after reading multiple cases of how much the Supertech valve seals leak. I did a simple DIY porting job, mostly just knocking down casting flash and blending. My teammate Alyssa Merrill’s landlord is a retired machinist and does heads in his spare time. He does top-notch work at a very reasonable price.
Hotter cams – Done. Kelford 203-B cam, 264/264 degree camshafts with 9mm lift. This is a medium cam with a lumpy, but streetable idle. I’m still using stock valve springs and retainers, nothing radical. Note that there is a normally-aspirated version of this cam, which has a bit less duration on the exhaust cam. I got the forced-induction cam with an eye on the future.
Higher redline – Done. The 1.6 has a shorter stroke, and so it’s safe to rev it a little faster. 7000 RPM on a 1.8 is the same piston speed as 7125 RPM on a 1.6. It’s easy to set it anywhere I want with the Megasquirt PNP2. I have it set to retard the timing at 7200 rpm, which is stock, and cut fuel at 7500. Also worth noting, I got a Speedy EFI variable TPS sensor.
Lighter flywheel and clutch – Done. Fidanza 7-lb flywheel and Exedy stage 1 clutch. The flywheel feels great when rev matching, but I’m having a bit of buyer’s remorse on the clutch. It works great, I’m just thinking I should have gone for a heavier clutch in case I go forced induction in the future. This clutch is good for 145 ft-lbs, which is fine for anything normally aspirated.
Less weight – Done. I removed the A/C (needed to be recharged and messed with my idle), and added lightness here and there. My already svelte car is down to 2100 lbs, and that’s with an OEM hard top, Hard Dog roll bar, full carpet and interior, tow hitch, and half tank of gas.
Shorter final drive – Punt…. After a lot of number crunching and simulations, I decided to go with a 4.1. It’s an hour drive to Pineview Run, and some of it is on the interstate, and I just didn’t want the engine buzz. As a side benefit, the speedometer is now accurate. However, if I was hardcore about sticking to my principles, I would have shortened the gear ratio. If a 4.625 or 4.778 comes up at the right price, I still might do it. (Edit – I now have the 4.625 in my car thanks to Torb!)
Another place I punted on the 1.6 theme was retaining the 6-inch ring gear. These are known to fail under stock power, and only people hamstrung by STS rules actually wants one. So I swapped in a 7″ ring gear and Torsen from a later model, which required new axles and drive shaft.
I took the car to Rick Gifford for tuning. He sees a lot of Miatas and Megasquirts and has been known to work a bit of magic. He has a Land and Sea dyno (DYNOmite) mounted flush with the floor, it’s a neat drive-up experience. The dyno measures low numbers, like a Mustang in terms of power readings. I multiply by 112% to get a Dynojet number.
On Rick’s dyno, I got 129.7 hp. Power maxes out at 6800 RPM, which is only 300 RPM more than stock, so the cam didn’t make it a peaky powerband at all. The engine made 109 ft-lbs of torque at 5300 rpm, without any big dips, and a fairly flat curve. Check it out.
Apples to Apples to Oranges
Let’s compare my 1.6 build to other Miatas and engine swaps. A stock 1.6 engine would put out about out about 83 hp at the wheels on Rick’s dyno. My 130 hp is 156% more power. This is about 145 hp and 122 torque if measured on a Dynojet. Woot!
On the same day we dynoed Clayton’s NB1 with a gutted cat, Cobalt exhaust, and cold-air intake. It made 117 hp and 108 torque. That’s about 131 hp, 121 torque on a Dynojet. Of course it could be further improved with a header and standalone ECU, but even using the stock ECU, this is good power, and that’s why people swap 1.8s instead of tuning 1.6s.
But if you’re going to do a 1.8 swap, may as well use the later VVT engine for a bit more grunt. Coincidentally, right around the time I was getting my engine work done, Napp Motorsports was filming a multi-part YouTube series with their two Miatas: the first a VVT swap and the second, a K-swap. Stefan Napp also takes their cars to Rick Gifford for tuning, so this gives me a chance to do an apples-to-apples comparison.
Some background on the Napp cars. Dylan’s car started as a NA6, and, not satisfied, he did a NA8 swap with an exhintake cam. It dynoed 102 hp on Rick’s dyno, and in Dynojet terms that’s more like 114 hp. That’s not a very strong NA8, but it was choked by a 1.6 wiring harness including the AFM flapper valve. In the end, Dylan decided a VVT swap would be better.
But Stefan Napp didn’t just swap Dylan’s motor, he decked the head .040″, did some port polishing, and got a good valve job. The engine now has 11:1 compression, and exhales through a custom fabricated exhaust system. It has a standalone ECU, and on 93 pump gas it put out 135 hp and 126 ft-lbs of torque. In Dynojet numbers that’s a strong 151 hp and 141 torque. (Side note, it only made +5 hp on E98. Booo, corn.)
When you compare my 1.6 to the 1.8 VVT, the bigger motor makes 5 more hp and 17 ft-lbs more torque. The 1.6 has always been gutless in terms of torque, and right there you see it.
Stefan’s personal Miata has a K24Z3 swap, which is a 2354cc 4-cylinder used in an Acura TSX and other cars. This is the easiest way to get a Honda engine in a Miata. It initially made 175 hp on the dyno, but after further tuning, Rick managed 197 hp, and 150 torque. Wow.
Engine
Hp / Tq
Dynojet
Hp/ Liter
1.6 – Stock
83 / 66
93 / 74
58.2
1.6 – Mine, with cams, etc.
130 / 109
145 / 122
90.7
Dylan’s NA8
102
114
62.1
NB1 – Clayton
117 / 108
131 / 1221
71.2
NB2 – Dylan
135 / 126
151 / 141
82.1
K24Z3 – Stefan
197 / 150
220 / 168
93.4
Hp/Tq is from Rick’s dyno. I multiplied by 112% to get Dynojet-like numbers. The Hp/Liter values are based on the Dynojet number.
In terms of efficiency (hp/liter), my little 1.6 kicks ass on the VVT motor, but gets beat by the Honda engine. Not that Hp/Liter is important, but it’s a good measure of the state of tune. Dylan is planning future mods to hit the elusive 100 hp/liter, so his 1.8 may yet surpass my 1.6.
Where’s the power come from? What did it cost?
I have a spreadsheet where I’ve entered data from various dyno charts I’ve found on the web. By looking at the parts that were used and the total output, I can make a fair guess at which parts produce how much power. Based on that data, this is what made what, and how much it costs.
Mod
Power
Total
Cost
DIY cowl intake
5%
105%
$40
ECU, tuning
15%
120%
$1400
Cams, cam gears
15%
135%
$700
+1 mm intake valves + seals, valve job
4%
139%
$500
DIY port and polish
2%
141%
$0
.035″ head shave
6%
147%
$50
Raceland header
4%
151%
$170
Hi-flow cat
1%
152%
$90
Cat-back exhaust
4%
156%
$350
$3300
My best guess as to where the power came from, and what it cost me.
By running a standalone ECU (MS PNP2), I was able to get rid of the restrictive flapper valve (AFM). This is really the first thing anyone should do to a 1.6, and it makes all the other mods tunable. But it’s not cheap, and when you add in $600 for dyno tuning, this comes to nearly $100 per 1% power. That’s my ceiling for my “worth it” calculation, and I like to be closer to $50 per 1% (or $50 per hp, if you think that way). But the ECU makes all the other things better, so you have to start there.
The cams added about the same amount of power as the ECU, and were a big bang for the buck. I probably didn’t need the adjustable cam gears, but I decked the head and thought it was a good idea to get the cam timing back to stock. I still haven’t played with the cam timing, so there’s probably a bit more power there.
Keep in mind that these individual power gains are all guesstimates, I certainly wasn’t going to dyno and tune each part as I put it on. In all I spent roughly $3300 to get 56% more power. That’s $63-70 per hp, depending on the dyno.
As you can see, modifying a 1.6 engine isn’t the best use of money, but almost nothing car related is. Common wisdom is to just drop in a VVT and be done with it. I can’t argue with that, especially after driving Dylan’s car (future blog post). But if you have a low-milage 1.6 and feel like it’s dumb to swap a perfectly good motor, or if you just want to buck the motor-swap trend, then tuning a 1.6 can be pretty rewarding.
I feel like the project has been a total success. I’ve improved everything that made the early cars better Miatas. In terms of power to weight ratio, the car is about 16.1 lbs/hp, with me in it. That’s about the same as a new ND2 Miata, and in that light, a downright bargain.
But it’s no rocket ship. When I hit a long straightaway, I’m still patting the center console giving her the giddy-up: “C’mon baby, let’s GO!” An underpowered is still part of the Miata charm, after all.
I got to track test both of the Napp Motorsports Miatas back to back to back with my NA6. I’ll report on that after their video comes out.
There’s a nerdy site and forum called Ecomodder. Most of the site is focused on fuel economy, but some of it can be applied more appropriately to racing. In this post I’ll see how we can apply Ecomodder’s aerodynamic template tool to a Miata.
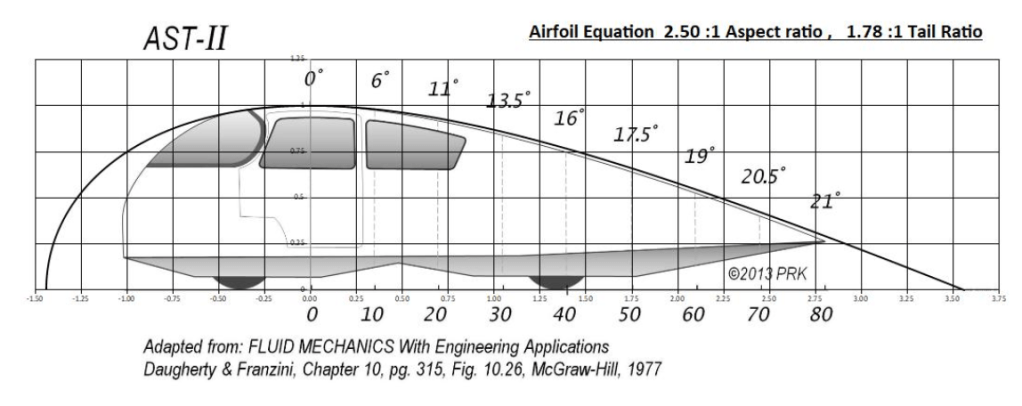
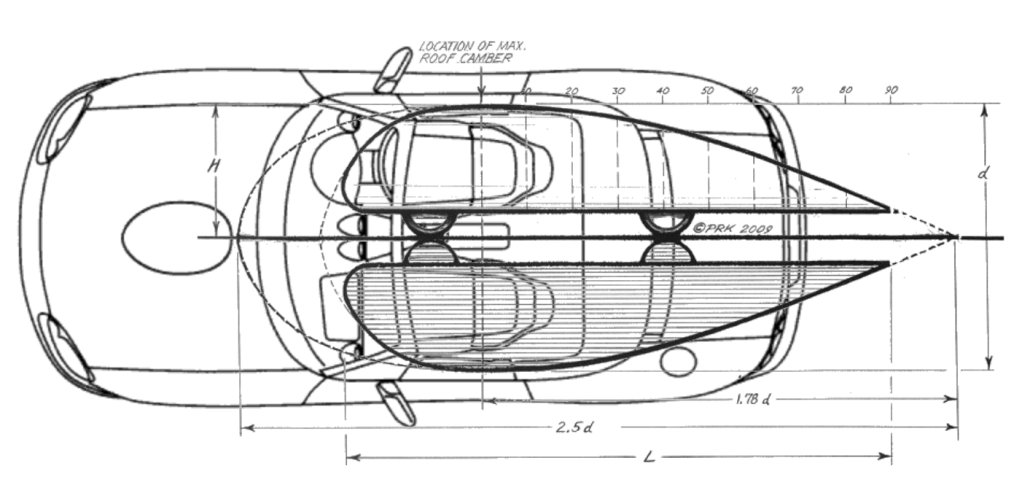
Aerodynamic template
The aerodynamic template refers to the shape of a car that has the lowest possible drag. It’s basically a tear-drop shape on wheels and looks like this.
Aerodynamic template of the ideal low-drag shape.
The Ecomodder site has an online tool that allows you to superimpose the aerodynamic template over a picture of your car. I’ll do this with a NB Miata using a simple line drawing I found on Google images.
NB line drawing is easy to work with.
I’ll superimpose the aerodynamic template over the car, resizing one or the other so that they fit. The zero mark on the template should line up with the highest part of the roof, which I’m putting in the middle of the door handle.
Aerodynamic template superimposed.
While this is the ideal shape for lowest drag, it doesn’t mean that air will become detached if you don’t follow the shape! Sub-ideal shapes will result in a thicker boundary layer, or maybe even some turbulence, but lots of shapes will work just fine without separation.
Likewise, it isn’t necessary to extend the tail to a point. Wunibald Kamm found that cutting off the tail resulted in minimal increase in drag, because the wake region converges to mimic the effect of a fully tapered tail. The so-called Kammback shape is quite efficient at 50% of the cross sectional area, which in this case is the second vertical line past the rear bumper in the picture above. That’s way the heck back there!
A more realistic stopping point is at the end of the trunk, which has the roof at an angle of about 14 degrees. At that length, the roof is still quite flat, and has a shape like a Honda CR-X, CR-Z, or a Hyundai Veloster. And like a lot of SUVs, damnit.
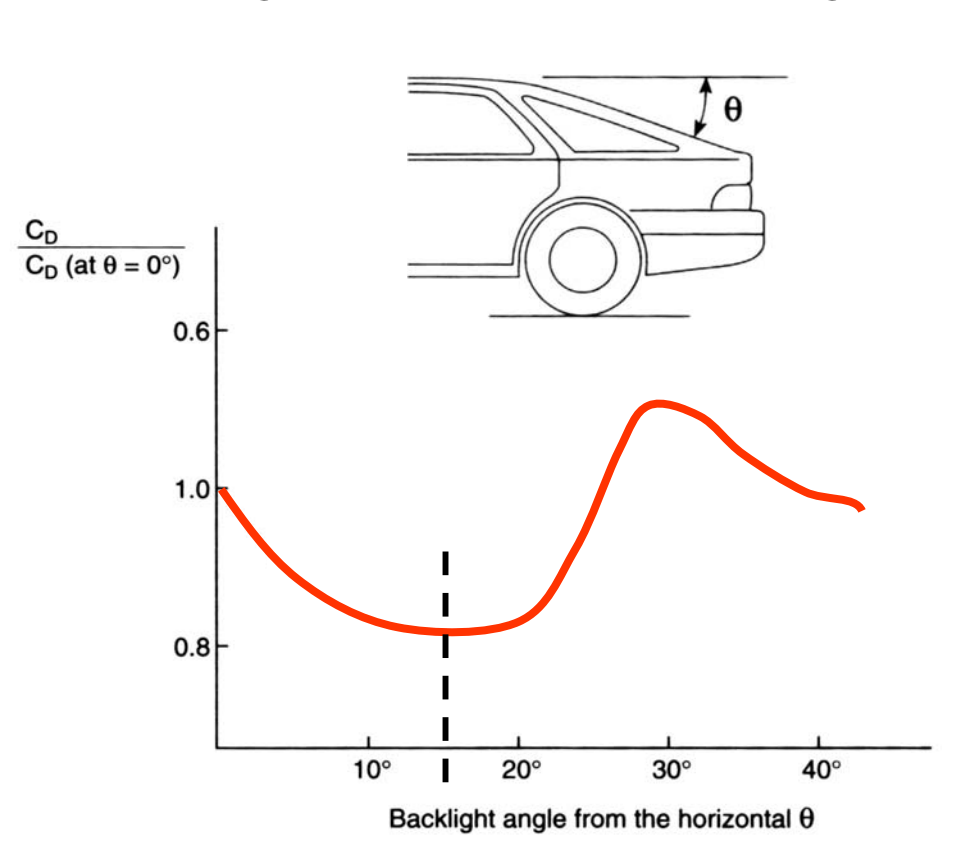
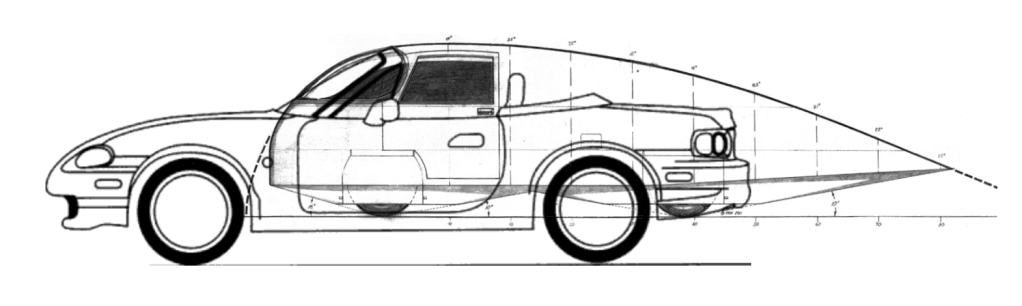
Backlight angle
Most cars these days have rooflines that slope gradually, just like the aerodynamic template, but if you look at older cars, the roofs are often flat, and the rear window comes back at a fixed angle. The backlight angle refers to the slop of the rear canopy, which is often the rear window. The ideal angle is around 15 degrees. It’s not intuitive, but the worst angle is 25-35 degrees. Guess what a Miata’s backlight angle is?
Drag vs backlight angle, 25-35 degrees is the worst.
If you extended the rear window of a Miata to the trunk lid, this would make about a 20-degree angle. This isn’t ideal, but still a lot better than an OEM hard top. Adding a spoiler would be an easy way effectively achieve a better backlight angle.
A pragmatic way to make a fastback
Boat tailing the sides
So far I’ve only been considering the two-dimensional side view, but the aerodynamic template is a 3D shape that tapers on the sides as well. The side taper is referred to as “boat tailing”.
Miata rear end tapers nicely.
You can see that the Miata rear end fits pretty closely to the aero template. Extending the length of the rear quarter panels to the full length of the car (even with the rear bumper) would reduce drag. Although it wouldn’t be necessary to go any further than that. (Note that the end of the bumper is right at the 50% line.)
Streamlining the canopy
The Miata canopy is wide and short, and to reduce drag you need to make it longer. In other words, a fastback. If you’re thinking about building one, bring the sides of the fastback all the way to the end of the trunk lid and you’re at about the right angle. You’d have to figure out a way to relocate the fuel filler, as the fastback goes right over the top of it. But you would save some weight by getting rid of the trunk lid.
Boat-tailing the canopy into a fastback.
My fastback is considerably narrower in the hips, and this allows a more efficient rear taper. This wouldn’t work well on a street car (it creates big gaps behind the windows where water would get in), but a fastback built like this would have less drag, and uses the existing gas cap location.
Diffuser
The final piece of the puzzle is the air going underneath the car. You’ll see the aero template shows a 10-degree diffuser. I’m not sure why this is a fixed angle, I’d imagine a continuous curve would be better.
I had to shrink the aero template to fit the diffuser under the rear bumper, and so this is no longer the ideal shape for the roofline, as it’s too short and the angles are thus too steep.
10-degree diffuser
Ecomod all the things
I also race 24 Hours of Lemons with The Awkward Corner, in a Honda Odyssey minivan. It’s had a few different themes, but if it were my car, the next theme would be a gigantic Honda CRX, following the lines of the aero template.
You can reverse the template and outline color.
I race my brother Ian’s Yaris from time to time. I drew a version of his car with a really long tail that was inspired by the aero template and Porsche 930.
Yaris long-tail
Ian also used to track a BMW E30, which is now with WinSome Racing. I’ve cropped the template to show what it would look like as a shooting brake.
My wife’s parents live in Florida, and we visit them every winter. She has two sets of parents, so we usually stay a couple weeks. I go a little stir crazy with all the down time, and so that’s why this blog post is unusually long. Two weeks away from home also leaves me searching for things to do.
Last year I chartered a boat and went spearfishing. Freediving alone in the ocean is both calming and thrilling. Calming because of the motion of the ocean, the silence, and deep breathing. It’s a kind of mediation I suppose. It’s also thrilling because sharks, big fish, low visibility, and the combination of the them. I had a few opportunities, but I was diving like shit and didn’t spear any fish.
I also went on a wild boar hunt. I put an arrow into a decent hog, but it escaped into the palmettos. In the end I had to enlist the help of a dog, and finish the pig with a knife. Good eating, and a fine winter break.
This year I looked around for something else to do and saw there was a Champcar race at Sebring the weekend after Xmas. My Florida geography isn’t great, so I had to look up Sebring. Oh damn, it’s only 53 miles away from Winter Haven, perfect!
I put a post on the Champcar forum page and got a couple interesting offers from professionally run organizations with arrive-and-drive pricing around $2500. This includes registration, all consumables, and catering. Well shit, at that price, it had better. But I figured this was a rare opportunity to race a bucket-list track, so I should do it.
The first team to contact me runs an E36, and that’s certainly appealing. Rear-wheel drive and a stick shift are table stakes in my game, and BMW handling certainly sweetens the pot. It was a strong possibility.
The second team, RYSA Racing, has a Miata with no windshield. Hurm…. I had previously corresponded with them about aerodynamics on their car, and they seemed like great guys. But the no-windshield thing was a bit concerning. Anyway, I liked ’em, and I know the platform, and I had another idea that would make it even more interesting.
I said that I could bring my wing and other aero parts with me. And then we could do a really neat article on before and after. Meaning, we’d run the car as it normally is on Saturday, and then overnight attach a splitter and wing for Sunday. That would be a cool back-to-back test, and even if not 100% scientific, it would make a great article. They agreed. Cool!
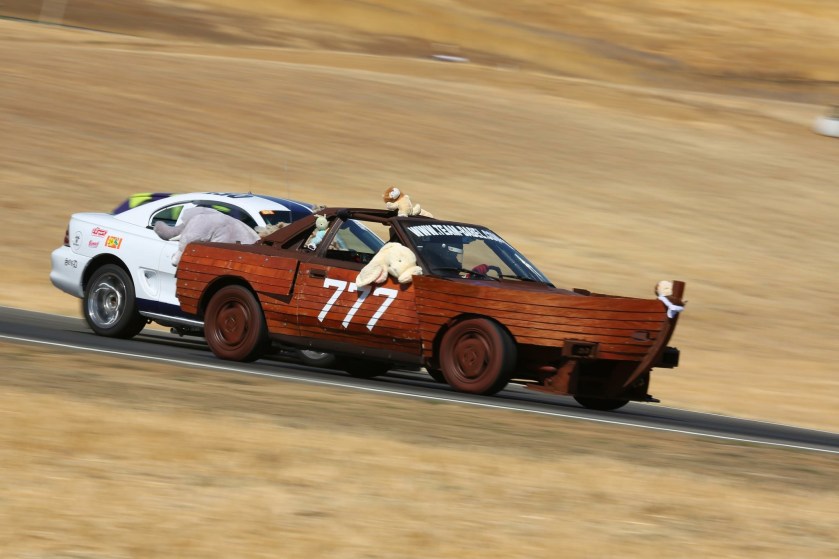
But then I got an offer to drive a first generation MR2. Fawk. My first race car was a MR2 Mk1, or AW11 to the enthusiast. We built a boat around ours, got a Lemons trophy for it, and later a neat writeup.
The M-Ark-2
We swapped in a Silvertop from Japan trying to go faster and cure engine problems, which it did and didn’t. We made it into a Lamborarri and got on a Car and Driver “Best Of” list.
Same MR2, Silvertop, new theme
I wanted to race the RYSA Miata, and write a blog post on comparative aerodynamics, Also I instantly liked the team owner Rudy, and I know we could be fast friends. I felt like a total dick letting him down.
Because when it comes to AW11s, I have a nostalgic streak as wide as Sebring’s front straight. My rose-tinted glasses are at 5%. As such I’m blind to all the troubles that led us to giving the car away rather than race it again.
So as much as I would like to end 2019 writing an article on Miata aerodynamics, I’m going to be completely selfish and drive Team Carma’s MR2. And here’s the other thing, the whole weekend for $500.
Sebring International Raceway
Sebring is a bucket-list track for a lot of people. Not only because of its storied history, but because it’s challenging. The pavement is bumpy, changes regularly between concrete and asphalt, and the track is long and fast. There isn’t any elevation to speak of, but it doesn’t need any more character than it has.
I wasn’t going to just show up and drive, I did my homework. I read every online track guide I could find, watched youtube videos, and most importantly, watched the Speed Secrets “Virtual Track Walk”. The track walk is over three hours of content and worth the price. I was an idiot and didn’t get this until two days before the event, and I really should have done this first, it would have helped me on the simulator.
That was the other vital piece of homework I did, sim racing in Assetto Corsa. My brother Ian hooked me up with a sweet computer, wheel and pedals. The rest of my “sim rig” is decidedly get-tow, with a tiny monitor and a bean-bag chair stuffed under a basement staircase. It’s a lot like Harry Potter’s bedroom without a door or heat.
At first I used a stock Miata on Street 90s tires and my best time was 2:59. I’m not bragging, I’m saying that I suck at sim racing. I can’t drive this car at the limit, and I spin out all the time. I then tried the ND Miata, and I could at least drive that one without spinning, and did like a 2:42. And then I tried the ND Cup car and I recall doing 2:35 or maybe even a 2:32. You guys are like, I can do a 2:27 in that car! Yeah, I’m not a sim racer. Yet.
Here’s what I learned. Turn 1 is probably my biggest problem, and that’s true at most tracks. It’s got to be psychological. I can’t tell where to turn in, or how much speed to carry, and I often wind up mowing grass.
Otherwise I’m generally pretty good in the tight esses and 90-degree bends, so the rest of the track flows alright for me. But Turn 16 is another one where I either overcook it, or leave too much on the exit. And the final corner is a mystery of braking and turn-in points, but it seems you can make some adjustments mid-corner. But this area is riddled with bumps, and the reality may be something else altogether.
Team Carma
It’s a good team name if you have an MR2. What goes around comes around. As in the back end coming around! And the fact that team owner Kevin swapped in a heavier and more powerful 3-liter engine… swapping ends is more likely.
Kevin raced SCCA many years ago, and pressed pause to raise a family. The past five years he’s been racing with Champcar. Over that time, his car has evolved. Like us, he got tired of being abused by the 4AGE, but rather than give his car away, he swapped in a V6 engine from a Camry. These typically put out 190-ish hp, but Kevin says this one has 220 hp. He had to cut up the engine compartment to make it fit, but it’s in there.
A 60-degree V6 will fit with some cutting.
At first Kevin used a stock transmission, but only two bolts on the bell housing lined up, and this required some custom fitting and didn’t last long. This will be the first race on a new manual transmission from a ES300, which are as rare as hen’s teeth. The new tranny required custom axles. If you know MR2s, then you know the axles are one of the weak points. Now imagine putting double the horsepower through them. But I’m getting ahead of myself.
Besides me and Kevin, there are two other drivers, Neil and Kevin #2. Neither has any experience at Sebring. Neil has a lot of short track experience, meaning a 1/2-mile oval. So he’s never raced on a track that has both left and right turns. Sebring has a lot of right turns.
Kevin #2 has no wheel-to-wheel experience, but he did the Lemons Rally to Key West in a Miata kart. He even dressed up as Super Mario. No shit, he’s that guy.
Teammates with this guy. Cool!
Friday
I arrived on Friday evening and looked over the car. Let’s start with the aero, of course.
The aero package starts with a short airdam and splitter made out of aluminum. It extends to the front axle underneath, but the business end is only a couple inches long. The ends turn up and aim at the exposed tires, which is not so good. In all, the splitter probably helps, but these cars typically need more downforce at the rear than the front anyway.
Airdam and splitter. Love the tow chain, I’ll use it.
The rear aero is the stock spoiler moved back a few inches, the Plumley mod, as it’s called. In addition, Kevin made the entire trunk adjustable, so he can increase the height and angle to four positions. It’s a simple DIY solution and I love it.
Simple adjustable spoiler. Notice license plate, this is street legal!
Before I move onto the rest of the car, I’ll note that I saw more cars without rear windows than with. This is an aerodynamic challenge for anyone using a wing, but the Champcar rules specify no rear glass. So for teams that don’t want to shell out for Lexan windows and the required aluminum supports, they just remove all the rear glass.
Back to the MR2. I noticed the tires were staggered, with 205/40-17 on the front and 225/17 on the rear. The rear tires are the largest diameter that will fit, which Kevin chose for taller gearing. I would have fit 15″ wheels, but it’s not up to me. The tires are Falken Azenis 615k+, which I’m familiar with. Kevin starts these at 30 psi, but doesn’t really adjust them. Which is a no-nonsense approach, but I’m seeing the start of a pattern.
I asked about the brake pads, and Kevin said he didn’t know. Are they race pads? No. Hmmm. I’ve never raced on “I don’t know” pads, so this should be interesting. The shocks also feel a bit soft, and I confirm they are simply cut springs. There are a lot of small details like that, which add up to a car that is, let’s say, not exactly race spec. But it is what it is, and it looks fun.
Ok then. The team owner has some interesting ideas on car setup. The other drivers are inexperienced, and both of them are scheduled to drive before I do. The forecast is for rain, and this is a treacherous track in the rain. At this point I’m certain the car wont last the weekend, and the over-under on me driving at all is about 50/50. Just the same, I’m feeling right at home with this car and these guys. Fuckin bring it.
Saturday
The race started with a bang. Or rather, two bangs. There are two pairs of black rubber stripes on the front straight, which is where the drag racers launch. This area has been treated with some kind of chemical for increased traction, which works in the dry, but has the exact opposite effect in the wet. In addition, the paint on the start/finish line is icy when wet. And it’s pouring. If you accelerate or change direction over these two areas, the car slides.
Green flag. Bang! Two cars hit the side walls before start/finish of the first lap. A few laps later another car would join them. And then another. And then another. The Champcar staff had to call an emergency driver’s meeting and tell all of us what we already knew: don’t accelerate or change direction on the black stripes or the start/finish line.
To Sebring: Clean that drag-racing shit off your front straight, it’s downright dangerous. Or better yet, don’t treat the track! Drag racing is about comparative times, it doesn’t matter what the surface is. Yes, we were told about this hazard in the driver’s meeting, but it’s within your power to make your track safer, and you made the track more dangerous. Even your safety car had problems staying on track!
We didn’t hit any walls, but this is a rookie team, and we made other rookie mistakes. Some examples of this:
Kevin #2 had the least experience, so he went first. We were gridded in 7th place, but because of an ill-fitting Hans anchor, he left in last place.
The radios gave us fits, caused an unscheduled pit stop, and never worked well.
The shifter cables got disconnected by getting caught on the driver’s sleeve. This resulted in another pit stop.
At the end of Neil’s stint, Kevin sent him out for three more laps. He interpreted this literally, and so when the entire track went full-course yellow on his out lap, he stayed out there during the entire FCY laps rather than use this for the pit window.
You only break parts you don’t bring. But I’m jumping ahead.
Despite these things, I was really proud of Kevin #2 and Neil. They’d never been to the Sebring before, were racing wheel-to-wheel in dangerous conditions, and brought the car back in one piece. They had their moments and saved them, and set some decent lap times in the process. Nice job.
I got in the car around 12:30, in some of the better weather we’d seen. I even turned off the windshield wipers for a couple laps. Despite the dry-ish track, I never got any heat into the tires because I couldn’t push the car. It just didn’t handle. At least not how I remember my MR2 handling.
I’d turn the steering wheel, the front tires would kind of take a set, and then the back end would come around, like there was a hinge in the middle that had to catch up with the front. The brakes didn’t inspire confidence, but at least they were water cooled. The suspension was way too soft, even in the rain. After a couple missed attempts at 2nd gear, I didn’t go below 3rd.
The engine, tho. The engine. More weight over the rear wheels, more power to them, and you can accelerate like crazy. The engine signs off at 5500 rpm, but so what. Short shift and pin it. I passed people on power, which never happens in a Miata.
It took a while to get accustomed to the point-and-shoot nature of the car, but I was getting there. And then on the entry to T5 I heard a clunk from what felt like the right rear wheel, and the car stepped out a bit more than usual, as if it had a second hinge. I backed off until I’d exited T6, gassed it, and then right in the middle of the back straight, suddenly the car popped out of gear and I had no power. I rolled to the inside of T7 and waited for a tow.
Back in the pits we found the problem, a broken RR CV joint. The axles on this car are custom made for the transmission, and Kevin didn’t have any spares on hand. We went to a local parts shop and got a standard MR2 axle, but we couldn’t fit it and our weekend was over.
The bearings are somewhere between T6 and T7.
Further inspection of the car showed a RF wheel bearing with a lot of play, and the entire wheel was moving 1/2″. I was on my way to a parts store 90 minutes away when they discovered that it was simply the nut backing off. Also the front sway bar was disconnected. Sebring’s bumpy surface will rattle apart anything that isn’t loctited or wired down, and these problems were probably victims of the track.
These two problems help explain the funky handling, and why I can put on my rose-tinted glasses back on and still call the AW11 the best handling car I’ve driven. Just not this one.
Sour grapes
This wasn’t my worst racing weekend. One time I flew out to California and the car broke on the first stint, and I never got to drive it. Another time I came together with an E30 at Watkins Glen and ruined both our weekends. Measured against these, this weekend wasn’t so bad.
I paid $500 for 12.5 laps. This works out to about $40 per lap, or $720 per hour. However, I got to race wheel-to-wheel at high speed, on an iconic track, in a nostalgic car. If I do the math, that’s less expensive than autocross, and a hell of a lot more fun than dodging cones in a parking lot. When things go badly, it feels better to point the finger at other people. So there I go bashing autocross again. I still don’t fucking get it.
Every year my sister Mia gives me Swedish Fish in my Christmas stocking. This year I’m in Florida (I’ll be racing Sebring next week), and I won’t get any candy. Instead of getting something Swedish, I’ll give something.
The other day, Torbjörn Linderson (I’ll call him Torb hereafter), from Sweden, asked a question on the Miata Race Prep group about aero modifications vs weight and should he do them. The question started vague, and with limited information I said do the wing, based on the fact that in every racing simulation I’ve run, a car with a wing beats a car without a wing. Another person with more knowledge and less science said that a low-drag wing (like my 9LR) doesn’t do anything until 80-90 mph, and that he wouldn’t use one.
That’s an interesting statement, and it begs the question, at what speed does aero start working? To see if aero helps at a lower speeds, I’ll do a quick simulation in OptimumLap. Using a stock Miata (with windows open) and some round numbers: .50 Cd, -.50 Cl, 2450 lbs, 1.1g static grip. I’ll run this car through a low-speed corner (T1 Pineview) and it goes 66.25 mph. Now I’ll use a Miata with airdam (no splitter) and 9LR wing for .05 Cd and +0.68 Cl (OptimumLap reverses the lift number). Now the car goes through the corner at 66.80 mph, a difference of .55 mph.
You might be thinking that half of a mile-per-hour is nothing, but it works out to 104.58% more grip, which is not nothing. But I’m citing a car modified with airdam and wing, not just simply the addition of a wing and no front aero. But at least we answered the question of, is aero useful at less than 80 mph, and the answer is yes.
Torb gave us more details on his car and the rules he races under, and that made things even more interesting. Blog post interesting.
The rules and the car
Torb races under the Roadsport C rules, which are a bit like NASA ST/TT rules, using kgs/hp with allowances for minor tuning. Without getting too deep in the details, his car would be at the class limit with 147 hp and 2367 lbs. That’s a pretty decent Miata, right between NASA TT5 and TT6.
The rules allow aero mods that don’t protrude from the body as seen from above. This is a lot of leeway, and would allow him to use an airdam, or an OEM-style front end with a splitter, as long as the splitter doesn’t protrude beyond the front bumper. He can also use a spoiler and flat bottom for free. So right away I’m thinking this: build a Supermiata with a flat floor! I’m a big fan of spoilers myself, and that may yet be the conclusion, but let’s move on.
The rules don’t allow him to change the roofline shape, and so a chop top or fastback are not allowed. But he could remove the rear window from a OEM hardtop and get the slightly better lift value of the chop top.
But Torb is interested in a wing. The wing needs to be mounted within the shape of the body as seen from the top, which is about 60″ (same as my wing). The wing needs to be 2″ below the roofline, and I can’t simulate that and will just use the roofline. The end plates can measure up to 10×10 square, which is within an inch of mine. The major problem with a wing is that it incurs a a 5% weight penalty.
As the car sits, Torb can just squeeze below min weight limit. However, it would be really easy to add weight. Starting with a 40-lb lead-acid battery instead of the 2-lb race battery he has now. The wing and stanchions are about 20 lbs, and a flat floor made out of metal could easily bring the weight up, and ballast would do the rest.
Front end options
Torb needs to keep the front-end aero within the lines of the stock bodywork, when viewed from above. In addition, if he adds rear downforce, he needs to balance that in front. The two obvious front-end options are a vertical airdam, and an OEM bumper with a splitter that extends only to the front bumper.
That’s exactly how my car is currently set up, see the pic below. In addition, I have a splitter extension I can add to this, it bolts on underneath. This can be easily adjusted so that the length is flush with the front bumper, when viewed from above, or to any length I want.
OEM front end with undertray acting as a short splitter. Splitter extension not shown.
Such a front end would have more drag, but also more downforce, than an airdam. I haven’t tested this myself, but CFD from Hancha/Velox came to this conclusion. Compared to the airdam, they said it would have .01 more drag and .07 more downforce. These seem like reasonable numbers, I’l use them.
Swedish tracks
Torb sent me details on the three tracks he races on. If you follow the links below, you’ll see different cars with lap times which lists the power/weight ratio of the car, and what kind of tires the car is using. Hallelujah for good data!
Kinnekulle Ring is a short 1.28 miles, lots of flowing corners, very little braking. The best Miata lap on slicks is just under a minute. At the other end of the spectrum, a 1990 Miata with 19 lbs/hp lapped at 1:06.17, which is another useful data point. So far this is looking a bit like Lime Rock, which is slightly longer (1.47 miles) and faster.
Mantorp Park is 1.93 miles, with a long uphill straight. Watch a Civic K20 do this in 1:26.55. It’s a bit like Thunderbolt without the chicanes, but the speeds look more like Summit Point.
Gelleråsen Arena is 1.57 miles and Torb does around a 1:17 lap. The track has three 2nd-gear corners where aero wouldn’t do much, but it starts end ends with a complex of of 3rd gear corners where aero would help. Waterford Hills is 1.4 miles and tighter, but this is probably the closest approximation.
Car builds and simulations
There are four configurations worth testing here. I’ll name them so it’s easy to follow.
OEM – Open windows destroy a Miata’s drag and lift numbers. I’ll be kind and call this Cd .50 and Cl -.50, 147 hp, 2367 lbs.
SuperM – I don’t have real numbers for the Supermiata formula of an airdam and spoiler. I do have comparative data from my car, plus drag and lift numbers from cars that have similar aero. I’ll call this Cd .50, Cl .40. 147 hp, 2367 lbs.
Sp-SM – As above, but with an OEM front end and splitter (not the airdam). Cd .51, Cl .47. 147 hp, 2367 lbs.
Ad-Wing – This version uses an airdam (no splitter) and wing. This is actual data from my car with OEM hard top. Cd .49, Cl .68, 147 hp, 2485 lbs. This version should also use a flat floor, since Torb needs to add weight anyway, but I don’t know what that would do for drag and lift, so I won’t factor that in.
Sp-Wing – As above, but swap the airdam for an OEM front end with a splitter. Cd .50, Cl .75. 147 hp, 2485 lbs.
In all cases I’ll use 1.3g grip. Torb sees spikes higher than that, and the class limit is 1.4g, but in steady cornering 1.3g seems a good value.
At Lime Rock (which I’m using to simulate Kinnekulle), the average speed is around 90 mph, and you can see that the airdam-wing setup is almost a half second faster than the airdam-spoiler version. In addition, the OEM front end with a splitter is another .1 seconds faster.
It’s not really worth mentioning stock aero, because it sucks. All of the aero options beat the OEM bodywork by over two seconds.
OEM
SuperM
Sp-SM
AD-Wing
Sp-Wing
62.39
60.20
60.08
59.74
59.64
Kinnekulle (Lime Rock)
At a lower speed track, like Waterford (which I’m using to represent Gelleråsen) average speeds are around 70 mph. But it’s pretty much the same relationship with the wing coming out on top, despite the extra weight. The gap isn’t as great, however.
OEM
SuperM
Sp-SM
AD-Wing
Sp-Wing
76.75
74.90
74.78
74.61
74.50
Gelleråsen (Waterford)
Another thing worth noting is that on the cars with a spoiler, the OEM front with the non-protruding splitter is .12 seconds faster than the one with the airdam. It’s weird that it’s the same time difference at both tracks, but the airdam is always slower. I’m not sure this would bear out in the real world, though.
Screen shot of some of the data.
Oh shit, OL has Swedish tracks
I went looking for more track maps and OptimumLap has seven Swedish tracks! Among them is Torb’s home track, Linköping, and his favorite track, Kinnekulle Ring. I re-ran the simulations again, and while the results were the same for Kinnekulle Ring, at Linköping the wing versions did not win!
OEM
SuperM
Sp-SM
AD-Wing
Sp-Wing
65.13
64.11
64.06
64.17
64.12
A spoiler and less weight beats a wing by .06 at Linköping.
Conclusions
In all but one of the scenarios, the wing wins. But that’s making the assumption that the wing is not affected by mounting it 2″ below the roofline, and it might be. And even though this is a simulation based on scientifically acquired data, it is a simulation. YMMV.
If this was my car, I might choose an adjustable spoiler, primarily because I’m lazy. The car is already at the class limit, and a spoiler is less work. The wing is more expensive, and would require modifying the car. Although that would provide an opportunity to use a flat floor, and add ballast where I wanted it. If Torb adds a flat floor to the spoiler version, he needs to remove weight to offset that. If that proves difficult, the wing is the obvious choice.
Torb had also asked about using a hardtop without a rear window, and if you’ve read my results on that, the answer is yes if you’re not using a wing, and no if you are using a wing. I don’t know what the answer is with a spoiler, but it would be fun to A/B test it.
Regardless of what happens at the back, I would use an OEM front end with an adjustable splitter and vertical end plates, rather than an airdam. While the airdam has slightly less drag, the adjustability and extra downforce could be more useful. It’s also easier to load on a trailer with less overhang. And let’s face it, everyone can use .12 seconds.
Last year’s Pineview Challenge Cup had a unique (and flawed) set of rules, using only tire treadwear to class cars. The “Race” class was any tire under 200 UTQG, the “Track” class was for any 200, and the “Street” class was for 300+. On the plus side, we had no rules lawyering or protests throughout the season, and it was easy to manage three classes. On the downside, the rules didn’t take into account power, weight, tire width, or the fact that there’s a great deal of variation within each tire class. In the end, the racing wasn’t always close.
We need a better set of rules for 2020, and so I took it upon myself to do some research. First, I put all of the lap times from the Pineview races into a spreadsheet, and noticed they fell into four groups. I figured that whatever rules we come up with, they should place people into four groups.
Under 1:14 – Just three people were in this group.
1:14-1:17.2 – Fast cars and fast drivers, but only five people in this group.
1:17.8-1:19.7 – Fourteen people, diverse cars and drivers, close racing.
1:20.1+ Six people, some newcomers, a wider spread of times.
I then ran hundreds of simulations in OptimumLap at Pineview Run, using different cars, power/weight ratios, tire grip, and aero. I put all of them into a spreadsheet, and analyzed the data. Let’s take a look at what I did for a Miata with various power and grip values.
Miata
HP (lbs/hp)
1.0g
1.1g
1.2g
1.3g
1.4g
Stock NA8
100 (24.5)
82.34
79.13
76.37
73.88
71.65
Spec Miata
125 (19.6)
81.25
77.98
75.14
72.64
70.46
K-swap
200 (12.5)
79.60
76.14
73.20
70.64
68.42
Turbo, Rotrex
265 (9.2)
79.39
75.69
72.51
69.77
67.42
You can see that tire grip is the most important factor. For example, a Spec Miata on 1.3g tires will beat a K-swapped Miata on 1.2g tires. The lbs/hp ratio is also very important, especially as you add more grip. But on shitty 1.0g tires, power gives diminishing returns, and cars with better than a 12:1 ratio are pretty evenly matched.
Existing time trial rules
With this data on hand, I then reviewed the rules of nine time trial series to see if we could leverage them, and learn how others are doing it. Here’s a quick synopsis.
NASA PT/TT – The old NASA rules listed and ranked every car and trim level, and everything you might do to it. It seemed like a fair system, especially how they ranked tire compounds and width. But they abandoned it for a reason.
NASA ST/TT – The newer NASA TT rules are much easier, and seem very fair, based mostly on lbs/hp. My main gripes are 1) everyone needs to dyno their car on a Dynjojet. 2) Many common modifications are not allowed. Why not just make them a point value instead of making them illegal? 3) The new tire system favors race tires, not tire choice.
SCCA Autocross – 36 classes and a 387-page rule book?! I didn’t wade into this tome; this is the exact opposite of what I want to do.
SCCA Time Trials – I’ve got some issues with how cars are classed. In the “Sport” category, all Miatas from 1990-2015 are in the same class. If you know Miatas, you know how stupid that is. If you’re going to do that, you may as well put the BRZ/FRS in the same category as a 1990 Miata. Which they fucking did. I should have stopped there, but kept reading and found that in the “Tuner” category, they put E30s in with S2000s and ND2 Miatas. Ha ha ha ha. Anyway, there are five main categories with subdivisions that make 20 classes. The stock-ish categories are based on a car list, while in the modified categories, cars are classed by displacement divided by weight (as if displacement is a good indicator of power). These are new rules and maybe they need a few seasons to refine them, but the rules look unbalanced and unfinished.
EMRA – Kudos to them for making a 12-page rulebook! As such, it’s sparse and open to interpretation. There are ten classes based on a car list. You bump up a category based on modifications, but there’s not a lot of balance to the mods. The only thing they say about tires is that they must be DOT. There’s a world of difference in there, I guess everyone shows up on A7s?
Porsche – PCA has a great system of ranking their cars and various points for modifications. It looks very fair and complete. But they have only one brand of car, and they split them into different 28 classes. We can’t afford to give out that many trophies or manage that many classes. BTW, if you ever wondered about the comparative performance of different Porsches, look at the point values, it’s great data.
Speed SF – The classing system is calculated from a relatively simple worksheet that puts you into one of six classes based on a list of cars and modifications. The classing rules are simple, and because of that, there are going to be inequalities within the classes. Tires are easy: everyone is assumed to be on 100 TW or higher, and you take a slight penalty for using race tires. I like this system for a lot of reasons.
COM – Corvette Owners of Massachusetts have the best rules I’ve seen. It’s a bit like the old NASA system, and takes into account tire compound, width, and really anything you want to do to your car. This puts you into one of ten classes. The 98-page rulebook is a tad long, but they have a great spreadsheet calculator that makes classing easy.
After all that research, I’ve come to the following conclusions.
Creating a fair classing system is difficult, and nobody does it the same.
One starting point is to list and rank every car .
Another starting point is pounds per horsepower.
Tires are a very important factor.
Many rules evaluate each tire individually.
Tire width is a factor, and often relates to weight.
It would be easy to use another club’s rules, but impossible to manage them. Our time trials are run over 2 hours, and we simply can’t have more than 4 classes.
I poke fun at some of the rules above, but I applaud any effort to make racing fair and fun. Every system is full of good ideas, this is just a really difficult problem to solve.
Creating new classing rules
So with all of that knowledge, I went about creating new rules. My guiding principles were:
I need to end up with only four main classes. Ideally these should correlate roughly to the lap time groupings observed in the 2019 season.
The classing rules must be fair, and allow people to run what they brung. It should be easy for people racing in other series to cross over.
The rule book should be short and simple.
Pounds per horsepower
I started with pounds per horsepower, because that’s easier than ranking every car in existence. For people who dyno and weigh their car, getting lbs/hp is easy, but most people won’t do that, so the rules allows using factory values.
Of course people modify their cars for less weight and more power. So they must declare, on their honor, what their modified weight and power are. This is obviously a place someone can cheat. However, I would make the class worksheets public, so anyone obviously cheating would be publicly shamed, a-la Game of Thrones.
For people racing in the NASA TT series, which is based on lbs/hp, they can use their class minimums. Meaning TT6 is calculated at 18:1, TT5 at 14:1, TT3 12:1, and the faster classes at a 10:1 cap.
For other racing series that don’t use lbs/hp, I’m experimenting with some crossover rules. These would let people bring their race car on their spec tire, and fit into a class. But more on that some other time.
Tire grip factor
I used the tire point values from the old NASA series and COM, and then cross listed with recent tire tests, forums, and various web pages to come up with a hierarchical list of tires sorted by grip value.
Pts
UTQG
Type
Examples
2
400+
All season
Any all-season 400+
3
300-390
Summer -older
Yok S.Drive, DZ102, G-force Comp2
4
240-380
Summer – better
Continental ECS, Michelin PS4S, Bridgestone Potenza S001, Champiro SX2 (260), Toyo T1R, any 240+ not listed
BFG R1S, Goodyear Eagle RS AC, Hankook Z214 C91, Hoosier A7, any 40 TW or less, not listed
I then assigned a point value to each tire, so that I could try out different formulas that would make lbs/hp and tire grip meaningful. I tried a few different ways to balance lbs/hp with different tire grip values, and make that correspond to real and simulated lap times, and simultaneously group people into four classes.
In the end, classing is based on a simple formula: FLOOR(Lbs/Hp/Tire). Or in plain english, the weight of the car with driver, divided by the wheel horsepower, divided by tire points, rounded down to a whole number. This usually results in a number 1 through 4. That’s your class.
Low-powered cars on hard tires may evaluate to more than 4, but they still must run in Class 4. We aren’t making a 5th class, there’s just no way to run that many groups in a two-hour session. For the same reason, there’s no Class Zero. So that makes Class 1 basically a no-limits class. Whatever car, on whatever tire, bring it.
Examples
To see how this works, let’s take a look at a Honda S2000. Weighs 2850 lbs with driver, dynoed at 200 hp = 14.3 lbs/hp. Different tires would put this car in a different class.
R7: 14.3 / 8 = 1.83, round down. Class 1
RE71R: 14.3 / 6 = 2.38, round down. Class 2
ECS: 14.3 / 4 = 3.75, round down. Class 3
S.Drive: 14.3 / 3 = 4.76, round down. Class 4
Let’s take a look at a Spec Miata, which would be at the 20:1 lbs/hp cap.
Hoosier A7: 20/10 = 2.0. Class 2
Toyo RA1: 20/6 = 3.33, round down. Class 3
Dunlop Z3, 20/5 = 4.0. Class 4
Or using a car crossing over from NASA TT4, which has a 12 lbs/hp minimum.
Hoosier A7: 12/10 = 1.2, round down Class 1.
Toyo RA1: 12/6 = 2, Class 2.
Michelin PS4S: 12/4 = 3, Class 3.
BFG SC2: 12/3 = 4, Class 4.
So that’s how it works, pretty simple. But is it fair? I ran a bunch of simulations using four different cars that I have data for, and the lap times come out pretty close to how I had them grouped.
One thing I found out was that this formula works best for cars in the middle range. Cars with high lbs/hp ratios, like Miatas were going too fast on sticky tires, and so I put a cap on all cars at 20 lbs hp. If your car is slower than that, you still have to use that value. Likewise, high-power cars at the other end of the spectrum were treated unfairly by the classing formula, and so I put a 10 lbs/hp cap on that. So if your car is 6 lbs/hp, it’s classed at 10. With these mins and maxes set, the simulated laps fall very close to reality.
Caveats and final thoughts
The rules are based on real laps and simulated laps at Pineview Run; I don’t know if this system would be fair at any other track, that was never my intention.
I was trying to place people into four groups, and the rules work out for that. If I doubled the number of classes, there would be more equality between cars in the same run group. But it isn’t logistically possible to manage that many classes in a 2-hour evening session.
Here are some final thoughts, in no particular order:
This is the first year we’ll try these rules, and we might need a mid-season addendum. This should be pretty easy by changing tire point values, or adding a tire width factor.
To keep things simple, I didn’t take tire width into account. But an easy calculation is to take the average tire width, and divide by 245, and multiply that by tire points. This means that every tire under 245 width would get some advantage, and a width over 245 would get some penalty. As an example, a 195 RE71R would be evaluated the same as a 225 RS4. The average tire width could be anything, I’m speculating on 245 because it seems right. This could also go by class, so that Class 4 has a 205 width average, Class 3 has 225, Class 2 has 255, and Class 1 is 275.
I’m not stuck on tire point values, or integers. For example, we might find that Z3s and R1Rs should be evaluated at 5.5 points instead of 5. Or that RC1s are really a 7-point tire, not 6. We need real-world data before making any adjustments, tho.
I didn’t take into account modifications to suspension, brakes, aero, or really anything else you might do to a car. All of these are important, but not as significant as lbs/hp and tire grip. Not at Pineview, anyway.
We are still working on the final rule set, which includes things like points per race, and how the season points add up to who gets to put their name on the Pineview Challenge Cup. But I thought people would like to see the classing system ahead of time. The first race isn’t until Saturday May 2nd, so there’s plenty of time to break out your calculator and figure out the optimal tire for the class you want to run in. Or if you’re doing it the other way around, figure out how many pounds to remove or horsepower to add, so you can use your favorite tire.
I’ve been thinking about what to build and test in 2020. It’s a long winter here in upstate NY, and I’ll have some time on my hands. I just got my barn floor poured with concrete, and now I have 950 square feet to let my imagination run. Here’s a list of what’s on my mind. Leave a comment if there’s something in particular you’re interested in.
Underbody aero – Is it worth doing on a Miata?
Flat bottom – I’m very curious about this one, not sure if I’ll do this on my race car, street car, or both. I installed a canon subframe brace in my 1.6 specifically so I could hang the flat bottom off it. So… it’s fairly likely this will happen at some point.
Side skirts – The race car lost one side skirt spinning out at Mid Ohio. I’ll make new side skirts, which will be wider, and fit next to the pinch welds, reinforcing the jacking points along the entire car.
Diffuser – I made a diffuser out of aluminum street signs (I must have been in a Lemons frame of mind), but I haven’t mounted it yet.
Misc aero projects – Some projects are partially done, some are just drawings and ideas.
DIY fastback kit – I’ve been thinking about building a fastback kit for a Miata. This would be for race cars only. It would be a bunch of parts that can ship flat, and then you assemble it at home, fiberglass the seams, and paint it. My main problem with creating a product is I don’t want to support pain-in-the-ass customers.
3D wing visualizer – This is a series of pivoting airfoils that I can mount on any car, just like a wing. It shows the shape and angle of air where a wing would be mounted. This would be great for setting wing height and angle, and also figuring out what’s the ideal shape of a 3D wing for just about any car. For science!
eBay wing 2.0 – Continue modifications to my cheap eBay wing to reduce drag and increase downforce. I’ve already started on this project because it’s a total fucking waste of time and that’s how I prioritize things.
End-plate mounted 9LR wing – This would require building new wing stanchions that mount to the rear quarter panels and come up vertically. Think Ferrari F40.
Shooting brake – I didn’t finish the shooting brake top I started earlier this year. Theoretically, it could have less drag than my fastback, and better visibility. And it’s unique looking.
NASA TTop – The TT6 rules allow convertibles to change the roofline shape, but the roofline must terminate at the front edge of the trunk. I have some ideas on how to build a roof with those limitations, but they are all sort of weird looking, like a Lotus Europa or Porsche 914. But they would have less drag and would work well in conjunction with a rear wing. From a practical standpoint, the trunk would still be functional.
Mazda RX500 top – This would be a custom top for 24 hours of Lemons. It’s almost like a station wagon, and would be simple to build.
Shark finsoup – Make a LeMans prototype-style top, complete with shark fin. If it works, race it in AER. If it doesn’t, race it in Lemons.
Aero+ tests – To do these properly I need to hire Jeremiah again. Without him, it’ll be just Aim Solo data which is a lot less accurate.
Underbody aero – Test different combinations of flat bottom, side skirts, and diffuser.
Front end aero – I didn’t get to test a stock front end vs R-package lip vs airdam. I have all the parts. I think we all know which is best, but how much better?
Low-speed aero – It’s easy for me to test low speed aero at my country club, Pineview Run. I just need to get my shit together, bring all the parts, and do it.
Spoilers by the inch – There’s a neat website called Ballistics by the Inch, where they start with a long gun barrel and progressively cut it shorter and record the resulting velocity. My test would be like that, but progressively a taller spoiler and record lap time. What’s the optimum spoiler height?
Tires – Pineview is a great place to test tires. I have some ideas in mind, like using one tire, and trying different widths, to see how much just tire width changes things. For example, I could test RS4s in 195, 225, and 245, on 7.5, 8.5 and 9″ wheels, respectively. I’m not sure how useful that is, but I’ve always been curious about this.