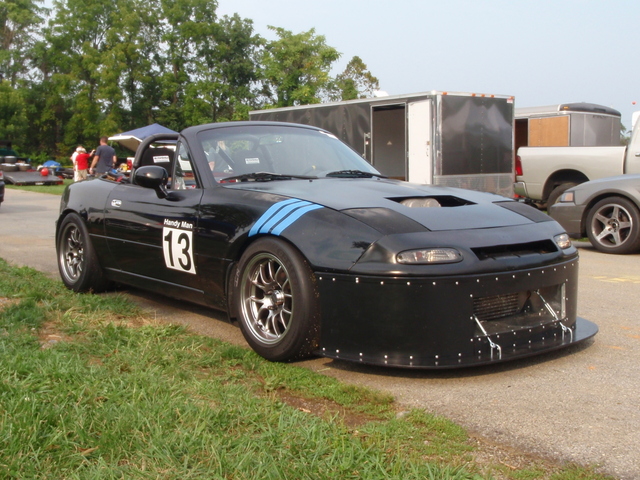
Look at an NA Miata front end and you’ll notice that you can see the front tires exposed to airflow. Rotating wheels are terrible for aero, and this is made worse by the shape of the nose, which forces more air at the exposed tires and also under the car. Under the car, the spinning wheels put the airflow in yaw, making things even worse. For drag and lift reduction, the Miata’s front end is the clearly place to start. Each generation of Miata has gotten progressively better in this regard, and so you can see Mazda agrees.
Bad nose shape and exposed tires.
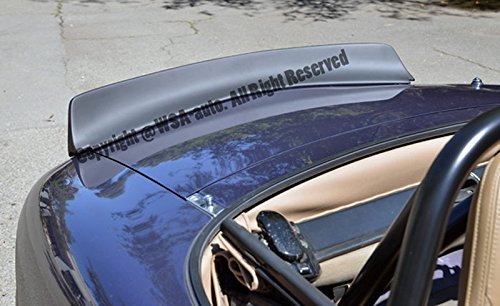
Mazda’s partial solution to this was the R-package front lip, which reduces the amount of air going under the car, and directs some towards the brakes. But the tires are still very exposed.
R-package front lip.
The are a number of aftermarket companies making Miata front ends, and many address this problem. The DIY solution is a vertical sheet of plastic, which you can buy at Speedway Motors for $20. I’ll always refer to this as the Supermiata Airdam, because Supermiata did a lot to popularize this style. 9 Lives Racing sells a pre-cut piece that will save you some headaches.
To mount the airdam you should use a sturdy undertray. Some racing rules limit the rearward length of the undertray, and so most of them start at about the front axle. If the rules permit it, most people simply extend the undertray in front of the airdam making it into a splitter. Trackspeed engineering makes an undertray/splitter bracket, which greatly simplifies building one.
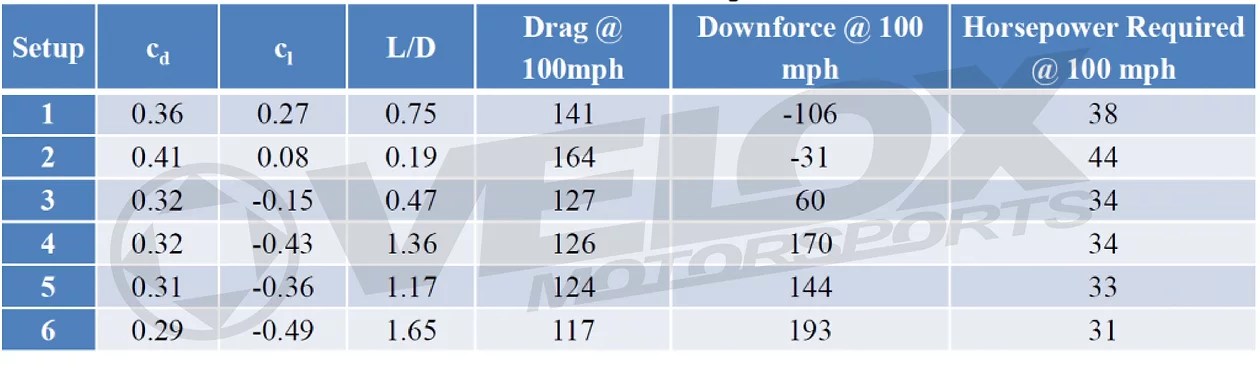
Let’s take those drag and lift values, put them in OptimumLap, and see the results at my local race tracks. I’ll use a Miata with 100hp, 2400 lbs, and tires that grip at 1g.
Setup
Pineview
NYST
Watkins Glen
1
84.40
111.27
153.52
2
84.24
111.01
153.58
3
83.96
110.09
151.30
4
83.68
109.43
150.42
5
83.74
109.55
150.44
6
83.60
109.16
149.70
Setup #1 is stock. Setup #2 is lowered to 4″, and this causes more drag, but also less lift, and that’s why it’s faster than #1. The exception is at Watkins Glen, where drag is more important. (Yes, lowering a car has other benefits, but I can’t simulate that in OptimumLap.)
Setup #3 is significantly faster. I don’t know if Hancha used the R-package front lip for the CFD, or if they calculated a chin-style airdam that completely covers the front wheels. Setup #4 adds a splitter to the chin airdam, and you can see it makes more downforce, without adding drag.
Setup #5 is a Supermiata style airdam, and it’s just a bit slower than #4. Add a splitter and you get Setup #6. Adding the splitter to the airdam reduced drag by 6.5%, and increased downforce by 34%. At a short and slow track like Pineview, this is only worth .6 seconds compared to a lowered Miata. At a track like WGI, it’s 3.8 seconds. Astonishing!
But probably not accurate in the real world. Add over 200 lbs of downforce to the front of the car and it’ll oversteer. So a real-world figure would be less. But then of course you’d balance that with a spoiler or wing, and go even faster, right?
Wind tunnel testing
Back when I wrote this article, all we had to go on was some CFD. Since then, there’s been more CFD from 9 Lives Racing, and also some actual wind tunnel testing by your’s truly.
You can purchase the wind tunnel report using the link below, but note that I wasn’t able to test the car without the splitter and just the airdam. The reason for that is I was trying to exactly match the CFD published by 9 Lives Racing, and their undertray and splitter are all one piece: you can’t just remove the splitter and test an airdam with an undertray.
In any case, if you’d like hard facts rather than CFD simulations, you can purchase my wind tunnel report for $35. Click the link and you’ll get a download link. In the report, I also go over a whole bunch of aero options, including the following:
Splitter diffusers, spill boards, and tire spats.
Canards in various locations and combinations.
Closed windows versus open, plus modifications to reduce drag and turbulence from the open windows, including wickers, mirrors, and venting the rear window in two different locations.
Singular hood vents fender vents.
Brake ducts, NACA ducts.
OEM hardtop with and without a rear window spoiler, versus a CCP fastback.
Blackbird Fabworx spoiler at different angles/heights.
Wings from 9 Lives Racing, Wing Logic, and a couple prototypes.
If you’re serious about downforce, use a wing; it can generate more downforce, and is more efficient than a spoiler. It begs the question, why would anyone want a spoiler?
Spoilers are usually cheaper than wings.
Some racing rules don’t allow wings, but allow spoilers.
A small spoiler can reduce both drag and lift.
Wings are often gaudy on a street car, but spoilers almost always make a car look cool. Not only my opinion, but NASCAR fans as well.
I tested a Blackbird spoiler in the wind tunnel, and it performed much better than I expected, and in some ways, better than a wing. You can read about that in my Miata Wind Tunnel Report. I finally had an opportunity to test my large-chord, small wingspan S1223 wing in a wind tunnel, as both a single wing and as a dual wing. The results were not what I expected. I go over all of the details in my Miata Wind Tunnel Report, which is available for $35.
I didn’t just test spoilers, I also tested several wings, splitter diffusers, spill boards, tire spats, canards, hood and fender vents, NACA ducts, brake ducts, and even a fastback, which has a built-in spoiler. You can read about all that in the report, but let’s get back to the topic on hand, which is Miata spoilers.
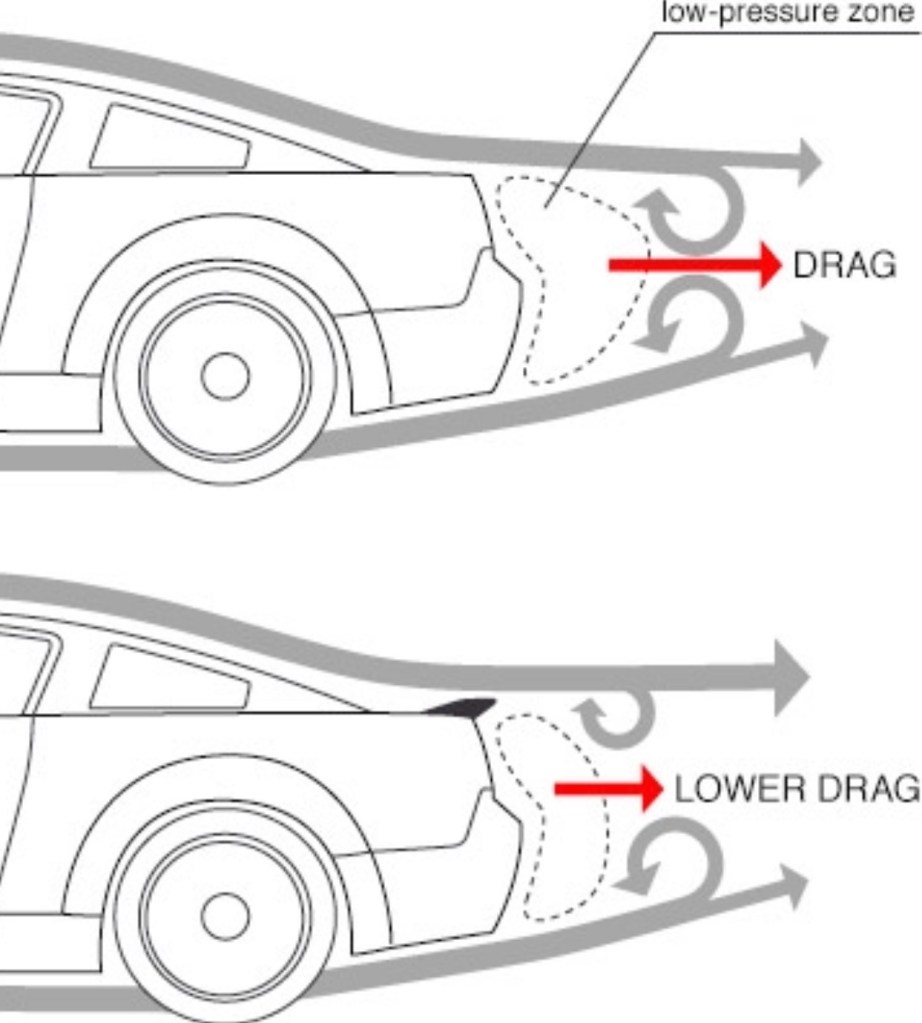
How a spoiler works
Cars are basically shaped like airfoils, and as air moves over them, it creates lift. The faster the car goes, the more lift and instability is generated. A spoiler, as the name implies, “spoils” the airflow coming over the top of the car, fooling the air into behaving as if the car has a different profile. This cancels some lift, and often reduces drag as well.
A spoiler also concentrates high pressure air on the rear deck lid. Pressure is akin to weight, and so this adds downforce to the rear of the car.
A spoiler also moves the center of pressure rearwards, and like a streamer on a kite, this promotes stability.
Spoiler height
How high should a spoiler be? Let’s take a look at what the pundits say. In Race Car Aerodynamics, Katz shows two different graphs for spoilers. The first is based on spoiler height alone, at a fixed angle of 20 degrees from vertical, or what I’d call 70 degrees.
I’ve put some pencil marks on the graph and drawn some conclusions.
A low spoiler about 1″ tall reduces drag the most. It also adds a bit of downforce. From a drag and downforce perspective, it’s a win-win!
A 3″ spoiler doesn’t add drag (compared to no spoiler), but doubles the downforce of the low spoiler. In other words, you get something for nothing!
A taller spoiler adds downforce and drag, but downforce increases more rapidly than drag. The gift that keeps on giving!
So no matter what height spoiler you chose, it has a benefit. Based on theory alone, we should all have low spoilers on our street cars, and taller spoilers on our race cars (rules permitting).
Note that the previous image shows a loss of front downforce at all spoiler heights, but in my testing, spoilers have increased front downforce by a very small amount.
Spoiler angle
Katz includes another graph on spoiler angle, this time using a fixed-height spoiler. Confusingly, this time the angle is measured from horizontal, not vertical, and the 70-degree angle from the previous graph isn’t included.
Some observations of this data:
Drag increases fairly linearly with angle (meaning height).
Lift-drag ratio seems best at a very shallow angle, but this may simply be the low overall height of the spoiler. Also note that L/D ratio is at best 3:1, whereas in my testing I’ve seen 11.5:1 L/D ratio using a 5” spoiler on a Miata.
Increasing spoiler angle to 60-degrees or more increases downforce, but at a diminishing return.
Spoiler height and angle combined
Next I’ll look at my other favorite reference, Competition Car Aerodynamics. McBeath cites CFD work done on NASCAR spoilers, in which they changed both the spoiler height and angle. Now we’re getting somewhere.
I’ll use the above results to compare spoilers of different lengths and angles that result in a similar total height above the deck. Which in turn allows me to figure out the most efficient spoiler angle.
160mm spoiler, 20 degree angle, 54.7mm total height
80mm spoiler, 40 degree angle, 51.4mm total height
60mm spoiler, 60 degree angle, 52mm total height
It’s a bit difficult to see in this graph, but a 60mm spoiler set at 60-degrees is slightly better than a 160mm spoiler set at 20 degrees, even though the longer spoiler is a little bit taller. In other words, a higher angle works better. But it’s only by a small amount.
Based on Katz and McBeath, here is my simplified conclusion: The total height of the spoiler is the most important factor, and the more vertical, the better.
NASCAR spoilers
NASCAR used rear wings for a short period of time and then switched back to spoilers. Not because they could get better performance from a spoiler, but because the series is always looking for ways to make racing both closer and safer, and the wing did neither. In addition, the fans didn’t like the look of a wing. To be fair, the CoT wing was hideous, see for yourself.
Yuck.
So we can’t look to NASCAR for the most effective spoiler design, because we know their priorities lie in close racing rather than outright speed. But it’s worth noting a few things about NASCAR spoilers.
NASCAR probably knows more about spoiler design than any other race series, and they still don’t settle on one design. In fact, the regulations change almost yearly. Looking only at the height, in 2016 it was 3.5″, in 2017 2.375″, and in 2019 8″.
Some years the spoilers were adjustable for angle, some years they were fixed, and there have been different heights, widths, and shapes throughout the years.
NASCAR uses the spoiler to balance not only the overall aero package, but as a way to balance the performance between different cars, and at different tracks.
When NASCAR reverted from rear wings to spoilers, they set the spoiler angle at 70 degrees. In 2019 the fixed angle remains 70 degrees. Interesting.
The 2019 spoiler is flat across the top, but different shapes have come and gone.
Curvy, almost bat-wing style.Convex top edge.
The size and shape of Miata spoilers
So now that we’ve looked at spoiler theories and real-world examples from NASCAR, let’s get down to what matters: Miata spoilers.
Miatas have a roofline that is peaked in the middle, and you might imagine that the ideal spoiler shape has a matching convex arc to it. Although like all things aerodynamic, this could be totally false, and maybe the sides should be taller.
The rear edge of the trunk is curved and so a curved spoiler would look more natural, and could be an easier DIY project as well. Also, a curved spoiler would be more rigid than flat. However, some race series say that the spoiler must be flat, with no curvature. Booo!
There’s no reason to “spoil” the air coming along the sides of the car, and so a spoiler much wider than the rear canopy seems like a waste. Although the exposed spoiler ends are probably adding downforce. Albeit not very efficiently, and at probably a different angle than is ideal for spoiling the roofline shape.
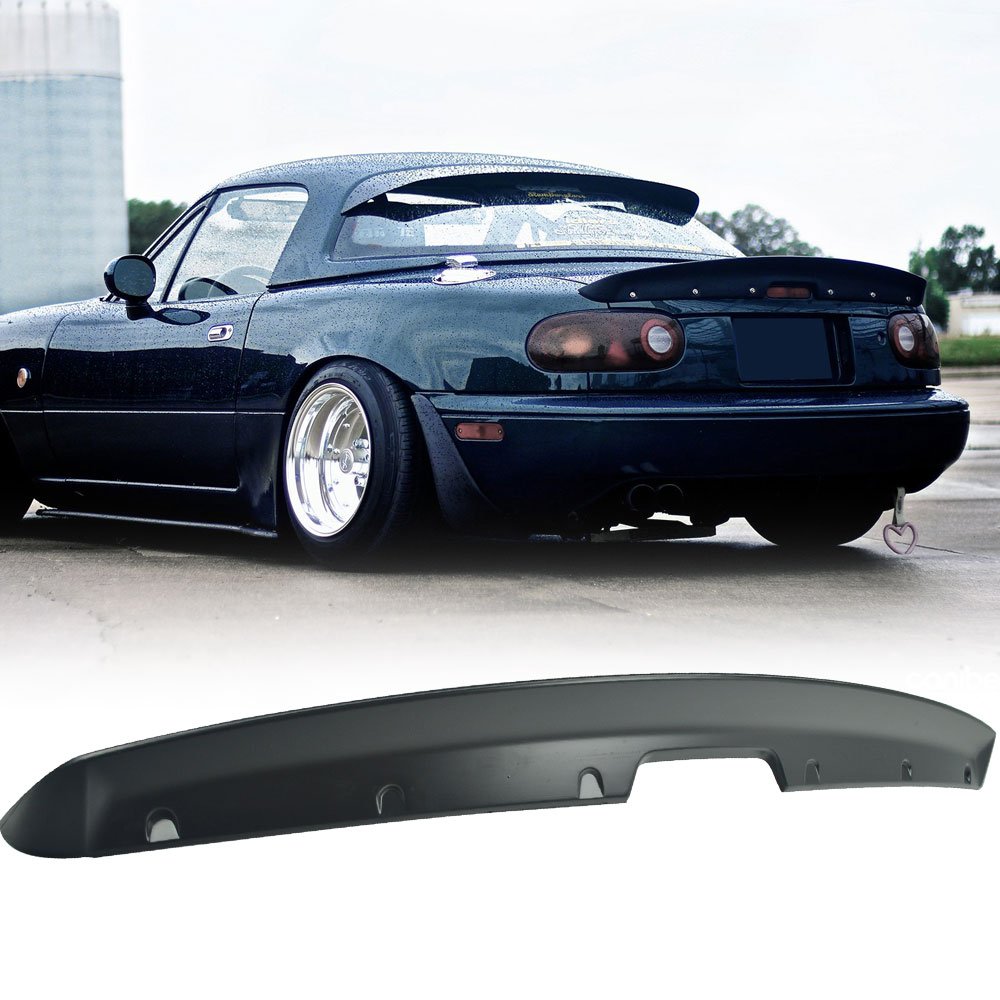
Miata products
This IKON spoiler is an attractive design, with a convex top edge and curved profile. It would be neat to see something like this with a flat extension that’s adjustable for height.
The Rocket Bunny spoiler is flatter across the top, taller, and with a steeper angle. I’d guess it’s slightly more effective than the Icon, but it has a tacked-on look that doesn’t really appeal to me.
And then there’s this JSP spoiler that looks like a wing, but isn’t (air isn’t going to flow under it, hence not a wing). The shape follows the curvature of the sides and roof, and this may be an efficient design. But meh to the looks.
Of course all of these spoilers have a fixed height and angle, so there’s no way to adjust the aerodynamic balance. On the other hand, the Blackbird Fabworx spoiler is large and adjustable for angle. I’m also not a huge fan of the way this one looks, but the beauty lies in the function.
Spoiler done right.
DIY spoiler, testing height
I made my own spoiler, it’s about 3.5″ tall and has some curvature to it that follows the trunk shape. It’s made of plywood and fiberglass, and there are 6mm T-nuts so I can add an extension.
With the low spoiler (without any extension), I ran very consistent 1:22s at Pineview Run. And by consistent, I mean 1:22.03, 1:22.05, 1:22.07, and in my second run, 1:21.99, 1:21.99 and 1:21.93. This was a hot day, and if I compare the times to previous ones, the track was definitely slower than normal.
With a 3.5″ extension (total 7″ height), my lap times were less consistent, most of them around 1:21.5, but my fast lap was a 1:21.03, almost a full second faster. But that one was an outlier, and if I average the five fastest laps, the taller spoiler was about .55 seconds faster than the lower spoiler.
The following table is an average of four back-t0-back runs, two with the spoiler extension, and two without. I’ve averaged the top six fastest laps.
Configuration
Avg Lap
Simulated
HP
Lbs
Cg
Cd
Cl
Low Spoiler
1:22.0
1:21.11
112
2400
1.00g
.44
-0.25
Tall Spoiler
1:21.45
1:20.63
112
2400
1.00g
.45
+0.20
I added .01 to the Cd as a guess, but drag isn’t that consequential anyway. I came about the Cl figure by changing that value in OptimumLap until I got the .55 delta in lap time. It seems absurd to think a spoiler can make a .45 swing in Cl, but that’s what the simulation says. Interestingly, this is also the value cited for a 8″ tall spoiler in MacBeath’s Competition Car Downforce.
In Race Car Aerodynamics, Katz cites several examples of spoilers, but none that go as high as 7″. In his examples, the relationship between height and coefficient of lift is nearly linear, and from 0″ to 4″ there’s a change of about .4 in Cl. So if I extrapolate those values from a 3.5″ spoiler to 7″, I’d only expect to see a change of .4 Cl, which is again pretty close to the test result.
Whatever the case, a 7″ tall spoiler works on a Miata. Now I have to make a taller one and test that.
I have two Miatas, and even my faster one is slow. Adding an airdam, splitter, side skirts, wing, and all the other aero bits add weight, and some of them increase drag as well. The last thing you want to do to an underpowered car is add more weight and drag, right? Maybe.
Drag reduction matters most when accelerating on a straight, but pretty much everywhere else downforce is preferable to drag reduction. Even still, there are times when drag reduction is more important, such as in an endurance racing strategy where you want to do one less pit stop. It also seems logical that at a high-speed track you’d want to skew your aero package towards top speed and reduced drag, especially in an underpowered car.
Or so you’d think. But like most things aerodynamic, what seems obvious could be completely wrong. So let’s examine downforce vs drag on a very fast racetrack that is dominated by long straights and top speed.
I did a motorcycle track day at Portland International Raceway, and I’ll describe it like this: it has a really long and boring front straight, a couple corners, another long and slightly less boring back straight, and a couple corners. If ever there was a track where you’d want to reduce downforce and optimize for less drag, this is probably it.
In Race Car Aerodynamics, the author Joseph Katz calculated lap times for a generic prototype race car at Portland International Raceway factoring in grip and drag. Take a look at the track layout in the chart inset, it’s like I said. The full results are in SAE Paper 920349, but this is what I make of it.
At this track, you might think that you should set your aero for the least possible drag, thereby attaining the highest top speed. But that actually sets the worst lap time, some 6 seconds off the pace. Or you might think to optimize for the highest L/D ratio, and with that you’d at least be within the same second as the fastest cars.
But somewhere in the neighborhood of maximum downforce, that’s where the fastest lap time was. On any other track I’d guess that maximizing downforce is the right thing to do, but I’ve raced down the front straight on this track (which is nearly a mile long), and the results are surprising.
This is a calculation, albeit a very sophisticated one, and it’s based on a race car with a lot of power that can overcome drag. Still, it makes me wonder if we should chase all the downforce we can and not worry about drag reduction at all. Miatas are all about cornering anyway, and we’re used to getting passed on the straights!
In 1993, the Mazda Miata had a coefficient of drag of .38, and the RX-7 had a Cd of .29. Same manufacturer, same year, both two-door sports cars, and yet the RX-7’s had 20% less drag.
There’s nothing magical about the RX-7 shape, and if you compare its Cd to new cars, it’s only so-so. In The Most Aerodynamic Cars You Can Buy Right Now there are many cars with Cds from .27 down to .22, and a unicorn at .189. (Follow along in this Aero Timeline and see how Mercedes has incrementally improved their aero from high .4s down to .24 complete with wind-tunnel smoke trails.)
But let’s stick with the same year and manufacturer, and see what would happen if you could magically put a RX-7 body on a Miata, and what that would do for performance and fuel economy.
Calculating top speed
To calculate top speed, I’ll use the RSR Bonneville Aero-Horsepower & Drag Loss Calculator. I’ll enter data for a 1993 Miata, with frontal area of 18 sq feet and a Cd of .38. Miatas of that vintage had about 116 crank hp, and if I multiply by .82 to simulate driveline losses, that’s about 95 hp at the rear wheels. (You can argue driveline losses, I’m using figures from Competition Car Aerodynamics.)
First I want to calculate top speed, so I’ll throw some numbers into the calculator until the Horsepower Needed field reads 95. Turns out that 116 mph is the top speed.
Now I’ll drop a RX-7 body on the Miata, and drop the Cd to .29. The top speed goes up by 10 mph to 126 mph. Wow!
However, top speed is rarely important, so I’ll plug in some more common values. I’ll use 60 mph to represent the exit of a corner, and 90 mph to represent a faster section of track. How much power is required to go that fast, and how much power remains?
Cd
HP to go 60 MPH
HP Remains
HP to go 90 MPH
HP Remains
.38
16.5
78.5
46.8
48.2
.29
13.8
81.2
37.8
57.2
At 60 mph, the low-drag RX-7 body has an additional 2.7 hp available over the standard bodywork. Meh. At 90 mph, there’s an additional 9 hp available from the sleek RX-7 body. Wow! Obviously, the faster you go, the more important drag becomes.
Simulating lap time
Drag is obviously important, but more important is lift (downforce). We need the numbers for both drag and lift in order to calculate a lap. I don’t have any published numbers for lift on a Miata, but the Hancha group did CFD testing and I’ll use their lift value of 0.27. In Race Car Aerodynamics (p. 19) Katz lists the RX7 at .24 lift, and AutoSpeeds article on Aero Testing even breaks that down into front lift vs rear. Let’s plug these values into OptimumLap and simulate lap times at my local track, Watkins Glen International.
Miata
RX7 Miata
Delta
Drag
.38
.29
.09
Lift
.27
.24
.03
Lap
2:34.93
2:33.38
1.55
1.5 seconds!
So a Miata with a RX-7 body would go over 1.5 seconds faster than a stock Miata. Some people would give their left nut for a second-and-a-half per lap. I’m betting that with windows open, which is how I’ve always raced, the RX-7 advantage would be even higher. This because the Miata hardtop is quite wide, and acts as a parachute, especially when in yaw.
Fuel economy and race strategy
In sprint racing, fuel economy is meaningless, but in endurance racing, it can be important. Especially if longer stints will allow you to do one fewer pit stop during the race, or if your car is right on the cusp of doing the maximum allowed stint. OptimumLap shows a 2.5% decrease in fuel economy using the RX7 body. That doesn’t seem like much, but it can be a big difference.
Let’s use my race Miata as an example. It burns about 7 gallons per hour, and with its 12.7-gallon gas tank, it can go about 1:50 before the tank runs out. This is not a problem in AER where stints are 90-minutes long. But in Champcar or Lucky Dog, stints are two hours long, and I end up doing an extra stop each day. In cases like this, 2.5% fuel economy can be a huge deal.
So not only is the RX7-bodied Miata going 1.5 seconds faster per lap, it’s doing that while burning 2.5% less fuel. If I calculate the total number of laps per stint, the driver in the stock Miata can do 42.6 laps per stint. The driver in the RX-7-bodied Miata can do 44.1 laps.
Imagine if Mazda made a RX-7-bodied Miata, without the design compromises of a convertible top. It would be sleeker, lighter, more rigid… and probably fall flat in sales. Ah well, it would have been great on track!